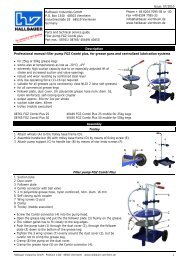
Air-operated grease gun DFP 1000 - Hallbauer Viernheim
Air-operated grease gun DFP 1000 - Hallbauer Viernheim
Air-operated grease gun DFP 1000 - Hallbauer Viernheim

You also want an ePaper? Increase the reach of your titles
YUMPU automatically turns print PDFs into web optimized ePapers that Google loves.
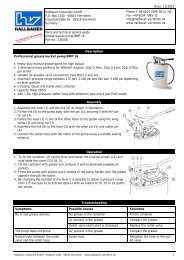
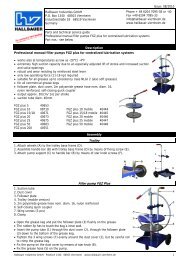
<strong>Air</strong> -<strong>operated</strong> <strong>grease</strong> <strong>gun</strong> „<strong>DFP</strong> <strong>1000</strong>” Part nos.: 10210/ 10211<br />
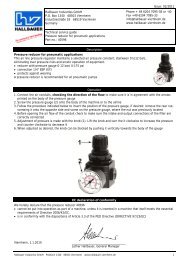
Technical safety information<br />
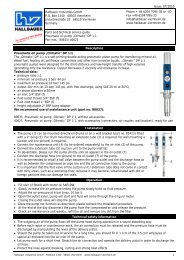
Trouble shooting<br />
Symptoms Possible reason Solutions<br />
Issue: 11/2010<br />
�� The pressure may not exceed 7 bar in the air admission.<br />
�� Before each repair or maintenance work, the air connection must be disconnected and the pressure relased by<br />
pulling the trigger.<br />
�� Never point greasing pistol at people or animals. Danger of injury!<br />
�� Use only security tested parts as accessory.<br />
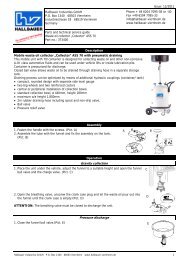
No <strong>grease</strong> delivery when the trigger No <strong>grease</strong> in the container. Fill the container.<br />
is pulled.<br />
<strong>Air</strong> pockets in the <strong>gun</strong> or container. Compact the <strong>grease</strong> in the container.<br />
Release the air with the relief valve.<br />
Grease outlet obstructed. Disassemble and clean the outlet<br />
valve. Remove the screw and clean<br />
the conduit between the container<br />
and the outlet.<br />
Grease comes out without pulling the Dirt in the outlet valve. Disassemble and clean the outlet<br />
trigger.<br />
valve, replace in case of damage.<br />
<strong>Air</strong> leaks from the air valve needle. Damaged air valve O ring. Replace the O ring.<br />
The air motor does not function Damaged air valve. Replace the air valve.<br />
when the trigger is pulled.<br />
Damaged piston plate or air piston. Replace the damaged part.<br />
Damaged air motor O ring. Replace the O ring.<br />
Accumulation of <strong>grease</strong> in the bottom<br />
of the container.<br />
Worn out <strong>grease</strong> plunger. Replace the container assembly.<br />
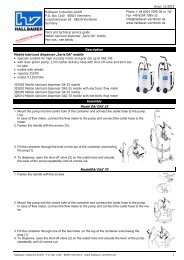
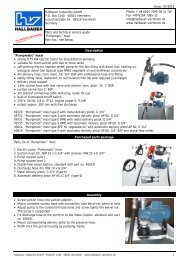
Repair and cleaning precedures<br />
ATTENTION: Before starting any kind of maintenance or repairing, disconnect the compressed air supply and pull<br />
the trigger to release the <strong>grease</strong> pressure.<br />
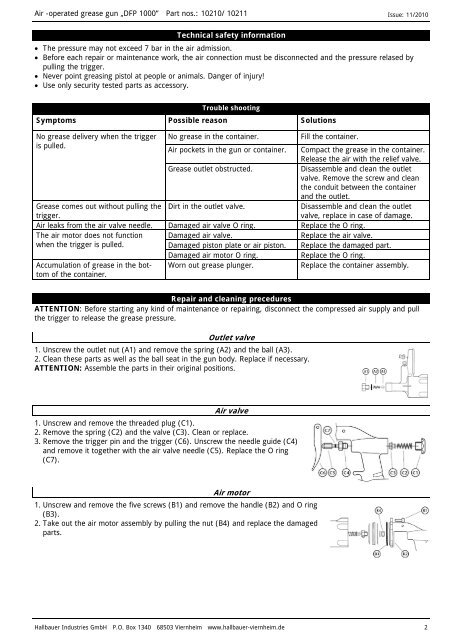
Outlet valve<br />
1. Unscrew the outlet nut (A1) and remove the spring (A2) and the ball (A3).<br />
2. Clean these parts as well as the ball seat in the <strong>gun</strong> body. Replace if necessary.<br />
ATTENTION: Assemble the parts in their original positions.<br />
<strong>Air</strong> valve<br />
1. Unscrew and remove the threaded plug (C1).<br />
2. Remove the spring (C2) and the valve (C3). Clean or replace.<br />
3. Remove the trigger pin and the trigger (C6). Unscrew the needle guide (C4)<br />
and remove it together with the air valve needle (C5). Replace the O ring<br />
(C7).<br />
<strong>Air</strong> motor<br />
1. Unscrew and remove the five screws (B1) and remove the handle (B2) and O ring<br />
(B3).<br />
2. Take out the air motor assembly by pulling the nut (B4) and replace the damaged<br />
parts.<br />
<strong>Hallbauer</strong> Industries GmbH P.O. Box 1340 68503 <strong>Viernheim</strong> www.hallbauer-viernheim.de 2