Toon Boom Animate Pro 2 Animation Charts pack 2
Toon Boom Animate Pro 2 Animation Charts pack 2
Toon Boom Animate Pro 2 Animation Charts pack 2

You also want an ePaper? Increase the reach of your titles
YUMPU automatically turns print PDFs into web optimized ePapers that Google loves.
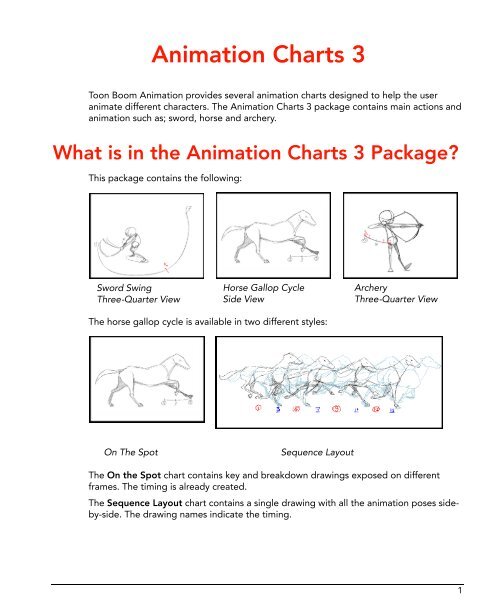
<strong>Animation</strong> <strong>Charts</strong> 3<br />
<strong>Toon</strong> <strong>Boom</strong> <strong>Animation</strong> provides several animation charts designed to help the user<br />
animate different characters. The <strong>Animation</strong> <strong>Charts</strong> 3 <strong>pack</strong>age contains main actions and<br />
animation such as; sword, horse and archery.<br />
What is in the <strong>Animation</strong> <strong>Charts</strong> 3 Package?<br />
This <strong>pack</strong>age contains the following:<br />
Sword Swing<br />
Three-Quarter View<br />
Horse Gallop Cycle<br />
Side View<br />
Archery<br />
Three-Quarter View<br />
The horse gallop cycle is available in two different styles:<br />
On The Spot<br />
Sequence Layout<br />
The On the Spot chart contains key and breakdown drawings exposed on different<br />
frames. The timing is already created.<br />
The Sequence Layout chart contains a single drawing with all the animation poses sideby-side.<br />
The drawing names indicate the timing.<br />
1
<strong>Animation</strong> <strong>Charts</strong> 3<br />
How to Install the <strong>Animation</strong> <strong>Charts</strong><br />
Once you have downloaded the <strong>Animation</strong> <strong>Charts</strong> 3 <strong>pack</strong>age, you are ready to install<br />
them.<br />
To install the <strong>Animation</strong> <strong>Charts</strong> 3 <strong>pack</strong>age:<br />
1. Double-click on the <strong>Animation</strong> <strong>Charts</strong> 3 <strong>pack</strong>age.<br />
2. Follow the Install window instructions.<br />
3. After the installation is complete, you will find the chart templates inside the Library<br />
view:<br />
Templates > <strong>Animation</strong>_<strong>Charts</strong><br />
How to use the <strong>Animation</strong> <strong>Charts</strong><br />
Before you can use the animation charts, you must first create and open an <strong>Animate</strong> <strong>Pro</strong><br />
scene.<br />
Select and Import the <strong>Animation</strong> Chart<br />
Once your scene is opened, you must choose the animation chart template which you<br />
want to use and import it into your scene.<br />
To select and import the animation chart template:<br />
1. In the Library view’s folder list, select Templates > <strong>Animation</strong>_<strong>Charts</strong>.<br />
2. In the Library’s right window, right-click (Windows) or [Ctrl]+click (Mac) and select<br />
View > Thumbnails.<br />
3. Select the animation chart template you want to use. You can double-click on the<br />
template to play it back in the Preview window.<br />
4. In the Timeline View, extend the scene’s timing to 50 frames.<br />
5. In the Library, select the template and drag and drop it into the Timeline View’s left<br />
side or the Network View.<br />
The animation chart should now appear in your Camera View and is ready to use.<br />
2
Use the Chart to Help you <strong>Animate</strong><br />
How to use the <strong>Animation</strong> <strong>Charts</strong><br />
Now that you have imported the animation chart into your scene, you are ready to<br />
animate. These charts can be used to animate in Paperless or Cut-out <strong>Animation</strong>.<br />
The animation charts contain the Key and Breakdown poses. Follow the chart to create the<br />
keys and breakdowns. Then add the missing in-betweens.<br />
Key Poses<br />
A key is one of the main poses in an action or movement. For example, if a sitting character<br />
is falling on his back, the sitting position would be the first key pose and the final position<br />
where the character is on his back would be the second key pose.<br />
Breakdown Poses<br />
A breakdown is a pose between two keys. These are important because they describe<br />
rotation trajectories, timing eases, elbow bending, etc.<br />
In-between Poses<br />
The in-betweens are the poses used to fill-in between the key poses and breakdown<br />
poses. These are the extra drawings used to make the animation smooth.<br />
3
<strong>Animation</strong> <strong>Charts</strong> 3<br />
Keys, Breakdowns and In-Betweens Markers<br />
In the <strong>Animation</strong> <strong>Charts</strong>, the keys, breakdowns and in-betweens are indicated in several<br />
ways.<br />
• Key drawings are:<br />
Indicated as a circled number on the Guide Layer<br />
Indicated as a circled number on the actual drawings.<br />
Marked with a red “K” in the Xsheet column.<br />
• The breakdown drawings are:<br />
Indicated as a underlined number on the Guide Layer<br />
Indicated as a underlined number on the actual drawings.<br />
Marked with a blue “B” in the Xsheet column.<br />
• There are no in-between drawings in the animation chart. The user must create<br />
them.<br />
The Guide Layer contains red numbers indicating the in-betweens to be<br />
created.<br />
Note<br />
You do not need to add in-betweens to the horse gallop cycle unless you want it to be slower.<br />
The Guide Layer<br />
Each animation chart contains a Guide Layer indicating the motion curve and the timing.<br />
There are two types of Guide Layer:<br />
• <strong>Animation</strong> Style<br />
• Numbered Sequence<br />
<strong>Animation</strong> Style<br />
In this example, you can see the action line with the Keys, Breakdowns and In-betweens.<br />
The in-betweens are marked in red to indicate to the user where he needs to add poses.<br />
You can also see the existing keys and breakdowns.<br />
Notice that the in-betweens 9 and 10 are placed very close to the number 7. This is<br />
because the character poses on 9 and 10 have to be similar to pose number 7. The key<br />
number 7 is the name of the drawing but also the frame where it is positioned. This means<br />
that in-betweens 9 and 10 have to be placed on frame 9 and 10. The fact that the poses<br />
4
How to use the <strong>Animation</strong> <strong>Charts</strong><br />
are similar to pose 7 creates an easing motion and make the animation appear less<br />
mechanical. This also gives the spring to the jump action.<br />
Numbered Sequence<br />
In this example, you can see the action line with the Keys, Breakdowns and In-betweens.<br />
The in-betweens are marked in red to indicate to the user where he needs to add poses.<br />
You can also see the existing keys and breakdowns.<br />
5
<strong>Animation</strong> <strong>Charts</strong> 3<br />
Animating<br />
Once you understand the purpose of the guide layer included in the selected animation<br />
chart, you can begin animating. You can follow the pose using either your own cut-out or<br />
paperless character, or you can use the sample templates included in the Library if you<br />
simply intend to practice.<br />
Paperless <strong>Animation</strong><br />
To do paperless animation, also known as tradigital animation, you simply need to add a<br />
new layer on top of the animation chart and start creating your poses following the chart.<br />
You can also load the ballerina character: Chapter04_Designing_a_Character_Example.tpl<br />
provided in the sample material, which you can download from:<br />
• http://www.toonboom.com/products/animatepro/eLearning/<br />
If you are animating in the Drawing View, you will need to enable the Light Table in order<br />
to see the guide and animation chart.<br />
If you are working in the Camera View and you want to hide the guide and animation chart,<br />
simply disable the layers in the Timeline View or the modules in the Network view.<br />
Cut-out <strong>Animation</strong><br />
To do cut-out animation, simply import your cut-out character template on top of the<br />
animation chart and start creating your poses following the chart.<br />
You can also load the character sample template: Ballerina_MASTER.tpl.<br />
If you are working in the Camera View and you want to hide the guide and animation chart,<br />
simply disable the layers in the Timeline view and modules in the Network view.<br />
You are now ready to animate!<br />
6