instruction manual residential electric 2.5 Gallon 120 volt water heater
instruction manual residential electric 2.5 Gallon 120 volt water heater
instruction manual residential electric 2.5 Gallon 120 volt water heater

You also want an ePaper? Increase the reach of your titles
YUMPU automatically turns print PDFs into web optimized ePapers that Google loves.
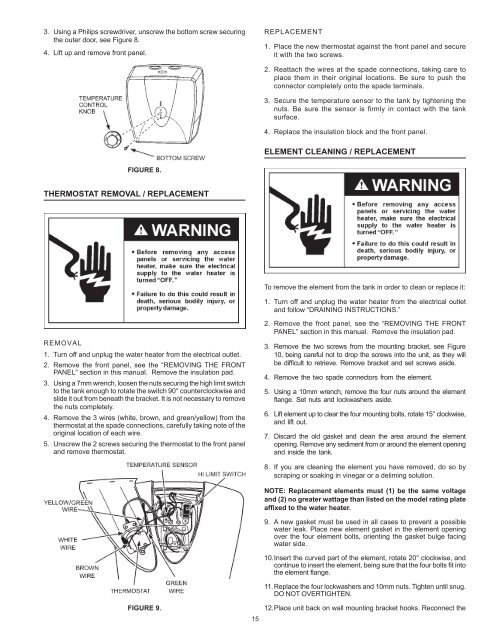
3. Using a Philips screwdriver, unscrew the bottom screw securing<br />
the outer door, see Figure 8.<br />
4. Lift up and remove front panel.<br />
REPLACEMENT<br />
1. Place the new thermostat against the front panel and secure<br />
it with the two screws.<br />
2. Reattach the wires at the spade connections, taking care to<br />
place them in their original locations. Be sure to push the<br />
connector completely onto the spade terminals.<br />
3. Secure the temperature sensor to the tank by tightening the<br />
nuts. Be sure the sensor is firmly in contact with the tank<br />
surface.<br />
4. Replace the insulation block and the front panel.<br />
ELEMENT CLEANING / REPLACEMENT<br />
FIGURE 8.<br />
Thermostat REMOVAL / REPLACEMENT<br />
To remove the element from the tank in order to clean or replace it:<br />
1. Turn off and unplug the <strong>water</strong> <strong>heater</strong> from the <strong>electric</strong>al outlet<br />
and follow “DRAINING INSTRUCTIONS.”<br />
REMOVAL<br />
1. Turn off and unplug the <strong>water</strong> <strong>heater</strong> from the <strong>electric</strong>al outlet.<br />
2. Remove the front panel, see the “REMOVING THE FRONT<br />
PANEL” section in this <strong>manual</strong>. Remove the insulation pad.<br />
3. Using a 7mm wrench, loosen the nuts securing the high limit switch<br />
to the tank enough to rotate the switch 90° counterclockwise and<br />
slide it out from beneath the bracket. It is not necessary to remove<br />
the nuts completely.<br />
4. Remove the 3 wires (white, brown, and green/yellow) from the<br />
thermostat at the spade connections, carefully taking note of the<br />
original location of each wire.<br />
5. Unscrew the 2 screws securing the thermostat to the front panel<br />
and remove thermostat.<br />
2. Remove the front panel, see the “REMOVING THE FRONT<br />
PANEL” section in this <strong>manual</strong>. Remove the insulation pad.<br />
3. Remove the two screws from the mounting bracket, see Figure<br />
10, being careful not to drop the screws into the unit, as they will<br />
be difficult to retrieve. Remove bracket and set screws aside.<br />
4. Remove the two spade connectors from the element.<br />
5. Using a 10mm wrench, remove the four nuts around the element<br />
flange. Set nuts and lockwashers aside.<br />
6. Lift element up to clear the four mounting bolts, rotate 15° clockwise,<br />
and lift out.<br />
7. Discard the old gasket and clean the area around the element<br />
opening. Remove any sediment from or around the element opening<br />
and inside the tank.<br />
8. If you are cleaning the element you have removed, do so by<br />
scraping or soaking in vinegar or a deliming solution.<br />
NOTE: Replacement elements must (1) be the same <strong>volt</strong>age<br />
and (2) no greater wattage than listed on the model rating plate<br />
affixed to the <strong>water</strong> <strong>heater</strong>.<br />
9. A new gasket must be used in all cases to prevent a possible<br />
<strong>water</strong> leak. Place new element gasket in the element opening<br />
over the four element bolts, orienting the gasket bulge facing<br />
<strong>water</strong> side.<br />
10. Insert the curved part of the element, rotate 20° clockwise, and<br />
continue to insert the element, being sure that the four bolts fit into<br />
the element flange.<br />
11. Replace the four lockwashers and 10mm nuts. Tighten until snug.<br />
DO NOT OVERTIGHTEN.<br />
FIGURE 9.<br />
15<br />
12. Place unit back on wall mounting bracket hooks. Reconnect the