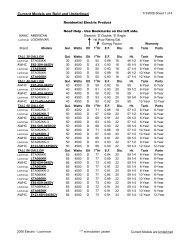
instruction manual residential electric 2.5 Gallon 120 volt water heater
instruction manual residential electric 2.5 Gallon 120 volt water heater
instruction manual residential electric 2.5 Gallon 120 volt water heater

You also want an ePaper? Increase the reach of your titles
YUMPU automatically turns print PDFs into web optimized ePapers that Google loves.
<strong>water</strong> inlet and outlet, open the nearest hot <strong>water</strong> tap and follow<br />
filling <strong>instruction</strong>s.<br />
5. Follow <strong>instruction</strong>s for replacing the element in “ELEMENT<br />
CLEANING/REPLACEMENT.”<br />
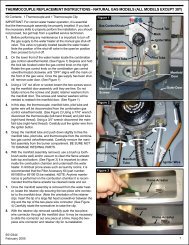
High Limit Switch Removal and replacement<br />
1. Turn off and unplug the <strong>heater</strong> from the <strong>electric</strong>al outlet.<br />
2. Remove the front panel, see the “REMOVING THE FRONT<br />
PANEL” section in this <strong>manual</strong>. Remove the insulation pad.<br />
Remove personnel barrier.<br />
Never use this <strong>water</strong> <strong>heater</strong> unless it is completely full of <strong>water</strong>. To<br />
prevent damage to the tank and heating element, the tank must be<br />
filled with <strong>water</strong>. Water must flow from the hot <strong>water</strong> faucet before<br />
turning “ON” power. The manufacturer will not warrant any elements<br />
damaged by failure to follow <strong>instruction</strong>s.<br />
15. Check element for <strong>water</strong> leaks. If leakage occurs, tighten element.<br />
If necessary drain tank before repeating Steps 7 and 8, remove<br />
element and reposition gasket. Then repeat Steps 10 through 15.<br />
16. Replace the two spade connectors on element into their original<br />
positions.<br />
3. Remove the four wires connected to the switch, taking care<br />
to note the original placement of each wire.<br />
4. Using a 7mm wrench, remove the nuts securing the high<br />
limit switch to the tank enough to rotate the switch 90°<br />
counterclockwise and slide it out from beneath the bracket.<br />
It is not necessary to remove the nuts completely.<br />
5. Place the new switch beneath the bracket and rotate it 90°<br />
clockwise.<br />
note: The taller spade terminal will be on the right side.<br />
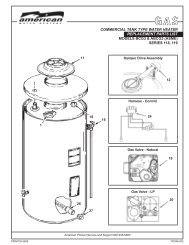
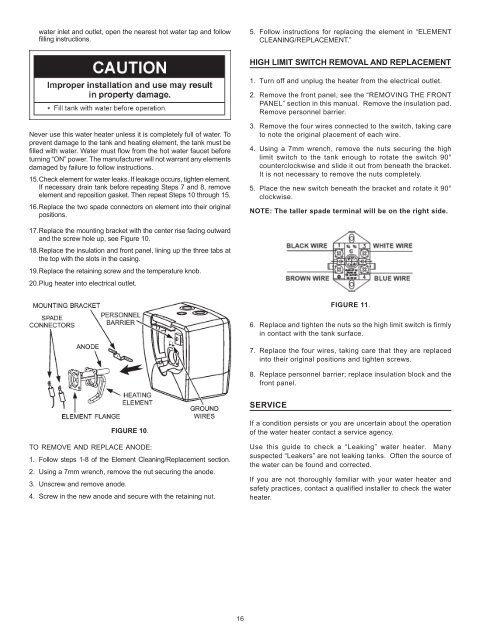
17. Replace the mounting bracket with the center rise facing outward<br />
and the screw hole up, see Figure 10.<br />
18. Replace the insulation and front panel, lining up the three tabs at<br />
the top with the slots in the casing.<br />
19. Replace the retaining screw and the temperature knob.<br />
20. Plug <strong>heater</strong> into <strong>electric</strong>al outlet.<br />
figure 11.<br />
6. Replace and tighten the nuts so the high limit switch is firmly<br />
in contact with the tank surface.<br />
7. Replace the four wires, taking care that they are replaced<br />
into their original positions and tighten screws.<br />
8. Replace personnel barrier; replace insulation block and the<br />
front panel.<br />
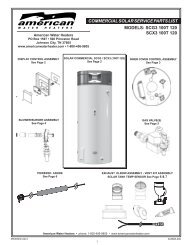
Service<br />
FIGURE 10.<br />
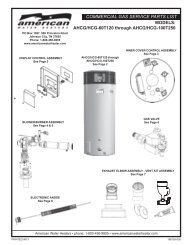
TO REMOVE AND REPLACE ANODE:<br />
1. Follow steps 1-8 of the Element Cleaning/Replacement section.<br />
2. Using a 7mm wrench, remove the nut securing the anode.<br />
3. Unscrew and remove anode.<br />
4. Screw in the new anode and secure with the retaining nut.<br />
If a condition persists or you are uncertain about the operation<br />
of the <strong>water</strong> <strong>heater</strong> contact a service agency.<br />
Use this guide to check a “Leaking” <strong>water</strong> <strong>heater</strong>. Many<br />
suspected “Leakers” are not leaking tanks. Often the source of<br />
the <strong>water</strong> can be found and corrected.<br />
If you are not thoroughly familiar with your <strong>water</strong> <strong>heater</strong> and<br />
safety practices, contact a qualified installer to check the <strong>water</strong><br />
<strong>heater</strong>.<br />
16