instruction manual residential electric 2.5 Gallon 120 volt water heater
instruction manual residential electric 2.5 Gallon 120 volt water heater
instruction manual residential electric 2.5 Gallon 120 volt water heater

You also want an ePaper? Increase the reach of your titles
YUMPU automatically turns print PDFs into web optimized ePapers that Google loves.
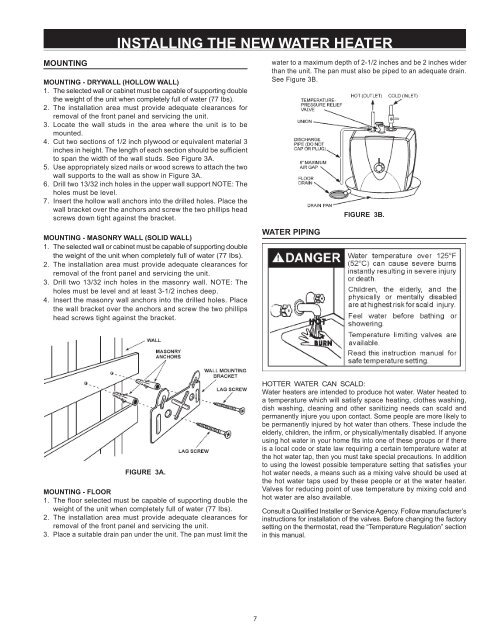
INSTALLING THE NEW WATER HEATER<br />
MOUNTING<br />
MOUNTING - DRYWALL (HOLLOW WALL)<br />
1. The selected wall or cabinet must be capable of supporting double<br />
the weight of the unit when completely full of <strong>water</strong> (77 Ibs).<br />
2. The installation area must provide adequate clearances for<br />
removal of the front panel and servicing the unit.<br />
3. Locate the wall studs in the area where the unit is to be<br />
mounted.<br />
4. Cut two sections of 1/2 inch plywood or equivalent material 3<br />
inches in height. The length of each section should be sufficient<br />
to span the width of the wall studs. See Figure 3A.<br />
5. Use appropriately sized nails or wood screws to attach the two<br />
wall supports to the wall as show in Figure 3A.<br />
6. Drill two 13/32 inch holes in the upper wall support NOTE: The<br />
holes must be level.<br />
7. Insert the hollow wall anchors into the drilled holes. Place the<br />
wall bracket over the anchors and screw the two phillips head<br />
screws down tight against the bracket.<br />
MOUNTING - MASONRY WALL (SOLID WALL)<br />
1. The selected wall or cabinet must be capable of supporting double<br />
the weight of the unit when completely full of <strong>water</strong> (77 Ibs).<br />
2. The installation area must provide adequate clearances for<br />
removal of the front panel and servicing the unit.<br />
3. Drill two 13/32 inch holes in the masonry wall. NOTE: The<br />
holes must be level and at least 3-1/2 inches deep.<br />
4. Insert the masonry wall anchors into the drilled holes. Place<br />
the wall bracket over the anchors and screw the two phillips<br />
head screws tight against the bracket.<br />
<strong>water</strong> to a maximum depth of 2-1/2 inches and be 2 inches wider<br />
than the unit. The pan must also be piped to an adequate drain.<br />
See Figure 3B.<br />
Water Piping<br />
FIGURE 3B.<br />
FIGURE 3A.<br />
MOUNTING - FLOOR<br />
1. The floor selected must be capable of supporting double the<br />
weight of the unit when completely full of <strong>water</strong> (77 Ibs).<br />
2. The installation area must provide adequate clearances for<br />
removal of the front panel and servicing the unit.<br />
3. Place a suitable drain pan under the unit. The pan must limit the<br />
HOTTER WATER CAN SCALD:<br />
Water <strong>heater</strong>s are intended to produce hot <strong>water</strong>. Water heated to<br />
a temperature which will satisfy space heating, clothes washing,<br />
dish washing, cleaning and other sanitizing needs can scald and<br />
permanently injure you upon contact. Some people are more likely to<br />
be permanently injured by hot <strong>water</strong> than others. These include the<br />
elderly, children, the infirm, or physically/mentally disabled. If anyone<br />
using hot <strong>water</strong> in your home fits into one of these groups or if there<br />
is a local code or state law requiring a certain temperature <strong>water</strong> at<br />
the hot <strong>water</strong> tap, then you must take special precautions. In addition<br />
to using the lowest possible temperature setting that satisfies your<br />
hot <strong>water</strong> needs, a means such as a mixing valve should be used at<br />
the hot <strong>water</strong> taps used by these people or at the <strong>water</strong> <strong>heater</strong>.<br />
Valves for reducing point of use temperature by mixing cold and<br />
hot <strong>water</strong> are also available.<br />
Consult a Qualified Installer or Service Agency. Follow manufacturer’s<br />
<strong>instruction</strong>s for installation of the valves. Before changing the factory<br />
setting on the thermostat, read the “Temperature Regulation” section<br />
in this <strong>manual</strong>.