Nexsys Modules - Crest Audio
Nexsys Modules - Crest Audio
Nexsys Modules - Crest Audio

You also want an ePaper? Increase the reach of your titles
YUMPU automatically turns print PDFs into web optimized ePapers that Google loves.
Module Operation<br />
The following pages contain information on how to operate the NxEthernet<br />
and NxCobraNet modules. The NexSys functions that can be controlled<br />
from the amplifier’s rear panel will be explained. After working through this<br />
section, you should have an understanding of the network modules’ operation<br />
through hardware. For more on software control of the modules’ features,<br />
see the NexSys Manual.<br />
The instructions in this chapter assume that a module has been mounted in<br />
the CKi amplifier and the user has a working knowledge of the module’s<br />
control panel layout.<br />
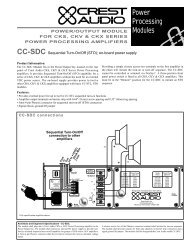
Making Network Connections<br />
The Network modules are connected to the network via standard<br />
CAT-5 Ethernet cabling using and RJ-45 connector. For a more robust<br />
connection, use a Neutrik ® EtherCon ® connector. All CKi network<br />
modules are equipped to accommodate this more robust solution.<br />
When the cable has been physically connected to the module and to<br />
an active network device, the “Link” LED will illuminate.<br />
Setting IP Addresses<br />
Press the Function button until the LED next to I.P.Address illuminates.<br />
Once the function has been chosen, depressing the Select button will<br />
scroll through the four octets of the I.P. Address.The position of the<br />
decimal point in the numeric display designates which octet has been<br />
selected. If the decimal point is to the left of all three digits, then the<br />
first octet is being displayed. If the decimal is between the first and<br />
second digit, the second octet is being displayed and so on.<br />
Once the appropriate octet has been selected, press the Edit button.<br />
The octet value will begin flashing.Press the increment and decrement<br />
buttons to change the octet value.There are 256 possible values for<br />
each octet, ranging from 0 to 255. Once the correct value has been<br />
reached, press the Edit button again to register the value and exit edit<br />
mode. If another octet value must be changed, select it using the<br />
Select button and repeat the editing procedure.<br />
Setting the I.P.Address to 000.000.000.000 will enable DHCP for this<br />
amplifier. Under this setting a connected DHCP server will dymanically<br />
assign an I.P.Address to the amplifier.<br />
Setting Amplifier ID<br />
Use the Function button to choose Amp ID. Each Amp ID is composed<br />
of two, two-digit hexadecimal values (see Appendix C for more information<br />
on Hex Numbering).The upper two digits (the High Value) and<br />
the lower two digits (the Low Value) can be independently adjusted.<br />
For this function, the Select button toggles between these two values.<br />
Select a value for adjustment, and press Edit.The selected portion of<br />
the ID will flash, and the increment and decrement keys can now be<br />
used to adjust the value.<br />
An amplifier’s I.P.Address can be used to designate an amp in a network,<br />
however Amp ID is more useful for designation, particularly<br />
when DHCP is being used.<br />
NexSys <strong>Modules</strong> 7<br />
��������<br />
For instructions on<br />
I.P.Addresses, designing<br />
and setting up a<br />
complete network,<br />
please see Appendix C:<br />
Network Examples<br />
�����������<br />
���� ������ ��������<br />
����<br />
����<br />
������������<br />
������<br />
����<br />
�����������<br />
����������<br />
+<br />
p.29