SDS9800-Satellite-receiver-manual-220613.pdf (2.17MB) - Satmax
SDS9800-Satellite-receiver-manual-220613.pdf (2.17MB) - Satmax
SDS9800-Satellite-receiver-manual-220613.pdf (2.17MB) - Satmax

Create successful ePaper yourself
Turn your PDF publications into a flip-book with our unique Google optimized e-Paper software.
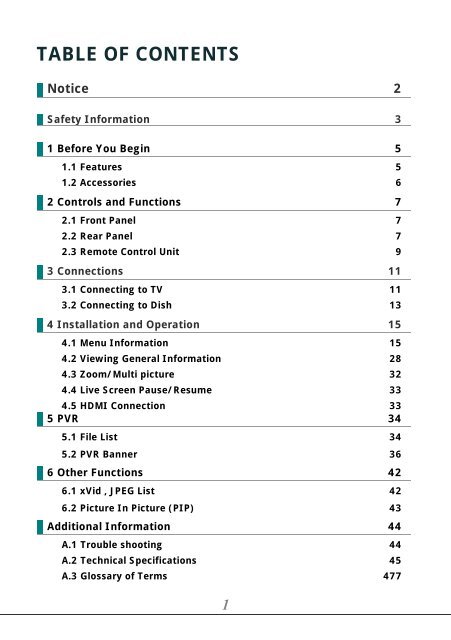
TABLE OF CONTENTS<br />
Notice 2<br />
Safety Information 3<br />
1 Before You Begin 5<br />
1.1 Features 5<br />
1.2 Accessories 6<br />
2 Controls and Functions 7<br />
2.1 Front Panel 7<br />
2.2 Rear Panel 7<br />
2.3 Remote Control Unit 9<br />
3 Connections 11<br />
3.1 Connecting to TV 11<br />
3.2 Connecting to Dish 13<br />
4 Installation and Operation 15<br />
4.1 Menu Information 15<br />
4.2 Viewing General Information 28<br />
4.3 Zoom/Multi picture 32<br />
4.4 Live Screen Pause/Resume 33<br />
4.5 HDMI Connection 33<br />
5 PVR 34<br />
5.1 File List 34<br />
5.2 PVR Banner 36<br />
6 Other Functions 42<br />
6.1 xVid , JPEG List 42<br />
6.2 Picture In Picture (PIP) 43<br />
Additional Information 44<br />
A.1 Trouble shooting 44<br />
A.2 Technical Specifications 45<br />
A.3 Glossary of Terms 477<br />
1
Notice<br />
Read this <strong>manual</strong> carefully and make sure you understand the provided instructions. For<br />
your safety, check what the result each action will be.<br />
Warnings, Cautions and Notes<br />
Throughout the whole <strong>manual</strong>, pay special attention to the following marks that indicate<br />
hazardous situations.<br />
Caution<br />
Indicates a situation which, if not avoided, could<br />
damage the equipment or apparatus.<br />
Warnings<br />
Indicates a hazardous situation which, if not avoided,<br />
could result in serious injury.<br />
Note<br />
Indicates additional information to the user to make the user<br />
aware of possible problems and information of any importance<br />
to help the user to understand, to use and to maintain the<br />
installation.<br />
2
Safety Information<br />
This digital satellite <strong>receiver</strong> has been manufactured to comply with international<br />
safety standards. Please read the following safety precautions carefully.<br />
Safety Instructions and Precautions<br />
Avoid placing heavy things and blocking ventilation<br />
passage. (Passage blocking can cause fire)<br />
Avoid scrubbing the surface with Benzene or Volatile<br />
gasoline. Color can be damaged.<br />
Do not leave your <strong>receiver</strong> in standby mode for a long<br />
time (e.g., when you leave home for a holiday), unplug<br />
the <strong>receiver</strong> from the main power source.<br />
Avoid dropping and damaging Remote Control Unit.<br />
Remove the batteries and store them in a cool dry place,<br />
if you won’t be using the remote controller for a<br />
longtime. Never expose the remote controller’s batteries<br />
to excessive heat to avoid an explosion or a fire.<br />
In case of overheating, smoking, burning smell or any<br />
other damage, unplug the <strong>receiver</strong> from main power<br />
source.<br />
Avoid place the set on slippery and slant surface.<br />
3
The <strong>receiver</strong>'s main powered equipment must not be<br />
exposed by dripping or splashing water or any liquid<br />
materials that can cause electric shock, fire and other<br />
hazardous damage of the receicer.<br />
Clear off the dust. Dust or Metallic particles inside the set<br />
can cause fire and electric shock.<br />
Avoid dissembling and assembling. Do not open the set.<br />
Do not snatch the cable to plug out.<br />
Do not move the set while power cord is plugged in.<br />
Keep the distance from Magnetic items and Audio<br />
Speaker.<br />
Place the set with the good ventilation and away from<br />
the direct sunlight and humidity.<br />
Avoid the temperature of over 30C and below 5C.<br />
4
1 Before You Begin<br />
1.1 Features<br />
• Brilliant On Screen Graphic<br />
• MPEG-2 & Fully DVB Compliant<br />
• MPEG-2 Video (MP@ML), MPEG-1 Audio Layer1,Layer2<br />
• LNB Controlling Logic<br />
• SCPC/MCPC Receivable from C / Ku-Band <strong>Satellite</strong>s<br />
• Digital Tuner with Loop-through<br />
• Wide Symbol Rate 1~45Mbps & Frequency Input 950 ~ 2150MHz<br />
• DiSEqC 1.2 Supported<br />
• User friendly OSD Menu with Full Function<br />
• 256 Color Graphic User Interface<br />
• Multi-language menu<br />
• 4-digit 7-segment LED Display<br />
• Variable Aspect Ratio (4:3, 16:9) with Pan Vector or Letter Box<br />
• EPG(Electronic Program Guide) for On-screen Channel Information<br />
• Small Screen Picture on EPG<br />
• Teletext and Subtitle Supported (VBI & OSD)<br />
• Capacity for Storing Multi Channel (6000 Channels, 1000 Transponders)<br />
• Favorite Channel and Parental Lock Function<br />
• Live Screen Pause and Resume<br />
• Zoom and Multi Picture Supported<br />
• Blind Scan Supported<br />
• RS232C Port for Additional Information Service and Upgrading System<br />
Software<br />
• One channel recording and one channel watching<br />
• TimeShift Supported<br />
• Jpeg Viewer and xVid Player Supported<br />
• PIP(Picture In Picture) Supported<br />
• HDMI Supported(480i,480p,576i,576p)<br />
5
1.2 Accessories<br />
• User Manual<br />
• Remote Control<br />
• AAA dry cell batteries x 2<br />
6
2 Controls and Functions<br />
2.1 Front Panel<br />
Item<br />
Description<br />
1. Power Button Turns the <strong>receiver</strong> On/Off.<br />
2. CH Up/Down Buttons<br />
(▲/▼)<br />
3. Volume Up/Down<br />
Buttons (◀/▶)<br />
4. Display<br />
(4-digit 7-segment)<br />
Changes channels in viewing mode and moves the cursor<br />
up/down in menu mode.<br />
Increases/ decreases the volume levels in viewing mode and<br />
changes settings in menu mode.<br />
The 4-digit displays channel information.<br />
In STAND BY mode, the 7-segment displays local time.<br />
The red LED is STAND BY indicator.<br />
2.2 Rear Panel<br />
7
Item<br />
1. DISH IN 13/18(14/19)V<br />
500mA Max<br />
Connect the satellite dish.<br />
Description<br />
2. LOOP OUT Loop Out is a output port of the DISH IN signal.<br />
3. RS-232C Connect a Set-top box or a serial port of PC.<br />
4. AUDIO, VIDEO Connect the AUDIO/VIDEO of TV to AUDIO/VIDEO.<br />
Connect Red and White connector to Audio L/R, and Yellow<br />
into Video port respectively.<br />
5. COAXIAL Connect the COAXIAL to a Dolby Digital decoder for AC3<br />
audio.<br />
6. Electric Inlet Lead 100~240V AC(Auto-selectable),50/60Hz. Make sure to<br />
check the power specification.<br />
7. Power Cord Connect the Power outlet.<br />
8. HDMI Connect HDMI input of TV<br />
8
2.3 Remote Control Unit<br />
All <strong>receiver</strong> features can be controlled with the remote controller.<br />
Button<br />
Description<br />
1. POWER Turns the <strong>receiver</strong> On/Off.<br />
MUTE<br />
Freeze<br />
FUNC<br />
TV/STB<br />
TV/Rad<br />
A/V+<br />
Turns the sound on/off.<br />
Changes Live Screen Pause/Resume.<br />
Zoom, Multi Picture.<br />
The TV/STB button is used to switch between TV and STB mode.<br />
Switches between TV and Radio.<br />
Select video mode(4:3, 4:3 Letter Box, 16:9) and audio mode(Left,<br />
Option Select the option such as Audio Language, Teletext Language and S<br />
Video Format<br />
Sleep<br />
2. NUMERIC Buttons<br />
(0~9)<br />
Recall<br />
FAV/SAT<br />
Change the video format.<br />
(HDMI model only)<br />
You can turn the STB off after minutes set.<br />
Select channels or can use as a alphabetic search key in the sorted<br />
Move to the previous channel and<br />
Shows a channel list of 10 channels watched previously when you p<br />
Selects the group of satellite or favorite.<br />
3. OK Confirms the choices and/or selections the highlighted menu<br />
item. While watching TV or listening to Radio, press the OK<br />
button and the channel list will appear.<br />
◀/▶ ( / ) Moves left/right or change settings in menu mode.<br />
Changes channels in viewing mode.<br />
▲/▼ ( / ) Moves up/down in menu mode.<br />
MENU<br />
A to Z<br />
EXIT<br />
EPG<br />
Shows the Main menu in viewing mode and the TV/Radio<br />
program screen in menu mode.<br />
Sorts the channels automatically in alphabetical order.<br />
Exit from the present menu and moves to the previous menu.<br />
Shows the TV/Radio Channel guide.<br />
9
Button<br />
Description<br />
4 .VOL+/- Changes the volume level in viewing mode.<br />
CH+/-<br />
INFO<br />
RED<br />
GREEN<br />
YELLOW<br />
BLUE<br />
Changes channels in viewing mode.<br />
Shows the information of the Banner and EPG.<br />
For Teletext.or Move PIP Screen on PIP mode<br />
For Teletext.or Draws PIP Channel list<br />
For Teletext or commands various functions in each MENU<br />
There are ‘HELP’ in each MENU for color key use.<br />
5. REC(Record) Record the channel.<br />
PLAY / PAUSE<br />
T.Shift<br />
PVR Info<br />
REW<br />
STOP<br />
FF<br />
PVR LIST<br />
PIP<br />
SLOW<br />
◀ JUMP<br />
JUMP▶<br />
MEDIA<br />
A-B<br />
MARK<br />
JUMP<br />
Playback the recorded files/ Pause playing mode.<br />
Set TimeShift Mode, Auto/Manual<br />
Display playback status bar<br />
Rewind playback.<br />
Stop playing mode.<br />
Fast forward playback.<br />
Display the file list.<br />
Watch the two channel at the same time.<br />
Playback in slow mode..<br />
Rewind Jump, PlayBack and TimeShift<br />
Forward Jump, PlayBack and TimeShift<br />
Display the MEDIA list.<br />
Set the block to repeat, copy and cut.<br />
Or exchange main-picture with sub-picture on PIP mode.<br />
Set the bookmark.<br />
Jump to bookmarked point.<br />
10
3 Connections<br />
Install the <strong>receiver</strong> in a horizontal position.<br />
Do not place any heavy object - such as a TV set - on the <strong>receiver</strong>.<br />
Do not install the <strong>receiver</strong> in following environments: vibration, direct sunrays,<br />
excessive<br />
humidity, extreme high or low temperatures, no ventilation, etc.<br />
3.1 Connecting to TV<br />
<br />
1. Connect the Video and Audio of TV to the Video and Audio.<br />
Connect Red and White connector to Audio R and Audio L, and Yellow into<br />
Video port respectively.<br />
2. Go to section 3.2, Connecting to Dish, then connect your dish.<br />
11
1. Connect STB’s HDMI OUT to HDMI IN of monitor or TV.<br />
2. Set STB’s video output mode to 480p /480i / 576p / 576i using V.F key of<br />
remote controller.<br />
12
3.2 Connecting to Dish<br />
<br />
Connect the satellite antenna cable to DISH IN.<br />
<br />
Connect the output of DiSEqC 1.0/1.1 to DISH IN of the <strong>receiver</strong>.<br />
13
Connect the output of DiSEqC 1.2 to DISH IN of the <strong>receiver</strong>.<br />
14
4. Installation and Operation<br />
4.1 Menu Information<br />
<br />
During the installation, short information is displayed at the bottom of the menu<br />
screen. After you finish the setup procedure, you can start watching TV or listening to<br />
Radio<br />
1.Turn on your TV and <strong>receiver</strong>.<br />
2.The pop-up menu for language selection will<br />
appears. Select one language and press the<br />
OK button to proceed.<br />
3.Press the MENU button to display the main<br />
menu. And menu is a field of text shown on the<br />
TV screen, the selected line generally become<br />
blue. Most of menus show a short information<br />
at the bottom of screen<br />
- Used the ▲/▼ button you can move, upwards and downwards in the menu.<br />
- When you have reached the required subject menu, Press the OK button<br />
to confirm your selection.<br />
- When you want to return to the previous mode, Press the EXIT button.<br />
4.Press the OK button on the Installation<br />
The password window appears.<br />
Enter the password with the numeric key<br />
(default password is "0000")<br />
15
1 Antenna Setup<br />
1. Press the OK button Antenna Setting<br />
The following window will appears.<br />
2.The right screen shows the pre-programmed<br />
32 satellite list of selected satellite. If you want<br />
to change satellite, select the satellite on the<br />
right screen Press the OK button in the right<br />
screen. Dish number will change.<br />
3. The column on the right screen will show the<br />
pre-programmed satellite list of the selected<br />
satellite. If you want to change satellite, select<br />
the satellite on the right. Press the OK button<br />
on the right<br />
16
4. The column on the right will show the<br />
transponder list of the selected satellite. If you<br />
select one of the alternative satellite names,<br />
then transponder is changed automatically<br />
according to the satellite name.<br />
5. The column on the right screen will show the<br />
LNB Power. Select one of the LNB Power and<br />
LNB Local frequency of your antenna.<br />
6. If your antenna has connected to the DiSEqC<br />
1.0/1.1, Select the Switch type of DiSEqC<br />
1.0/1.1 Option is specify DiSEqC input. Select<br />
one of the DiSEqC 1.0/1.1 input<br />
7. If you connect a DiSEqC1.2 antenna to the<br />
<strong>receiver</strong>, Select the Switch type to Motor.<br />
The Motor means DiSEqC1.2 you can change<br />
position of your Motor through the Option.<br />
- Done : Press OK button on the right screen , position of cursor will be changed to<br />
left. In this mode Done is equals EXIT<br />
- Move West-East : Press the OK button to move the motor.<br />
- Store Position : Press the OK button to save the current position.<br />
- Go to Position : Press the OK button to move the motor to the stored position.<br />
- Go to Reference : Press the OK button to move the motor to the 0 position.<br />
- Set West Limit : Press the OK button to fix West limit.<br />
- Set East Limit : Press the OK button to fix East limit.<br />
- Enable / Disable Limit : Press the OK button to change the limit status.<br />
(Set West Limit & Set East Limit can be available with Disable Limit status)<br />
17
8. When return to previous menu or exit the<br />
Dish Setup, press the EXIT button. If you<br />
changed the data in Dish Set up, the<br />
confirmation window will appears. If you<br />
want to save the changes, select the YES,<br />
If you don’t want to save the changes,<br />
Select<br />
the No or press the EXIT button again<br />
※USALS<br />
(UNIVERSAL SATELLITE AUTOMATIC LOCATION SYSTEM )<br />
On USALS set up of Installation, First you get values of Longitude and Latitude for<br />
your dish location.<br />
Then you select USALS on the Switch type of Dish Setup menu.<br />
Then Automatically the values of USALS are shown.<br />
And the Set top box is basically entered for the value of Longitude :<br />
11.9˚E and Latitude : 44.9˚N of “STAB”installation site(Italy)<br />
Execute “Go to Positioner” of “Option”Menu.<br />
Then, It moves to the location automatically, the other functions are the same as<br />
DiSEqC1.2<br />
- Done : Press OK button on the right screen , position of cursor will be changed to<br />
left. In this mode Done is equals EXIT<br />
- Set location: Press the OK button. Set My Longitude and Latitude.<br />
- Move West-East : Press the OK button to move the motor<br />
- Go to Position : Press the OK button to move the motor to the stored position.<br />
- Go to Reference : Press the OK button to move the motor to the 0 position.<br />
- Set West Limit : Press the OK button to fix West limit.<br />
- Set East Limit : Press the OK button to fix East limit.<br />
- Enable / Disable Limit : Press the OK button to change the limit status.<br />
(Set West Limit & Set East Limit can be available with Disable Limit status)<br />
18
2 Automatic <strong>Satellite</strong> Search<br />
1.You can search the channel offered by the satellite for which your antenna has been<br />
configured. Press the OK button on the Scan <strong>Satellite</strong> of the Installation. The Scan<br />
<strong>Satellite</strong> window will appears. If you select the satellite for scanning and Press the<br />
OK button, TV & Radio channel search will start.<br />
Scan All Channel:Searches all Channel<br />
(FTA+Scrambled)<br />
Scan Free Channel :<br />
Searches Free to Air Channels<br />
2.The Progressing scan window will appear, The column on the left window shows TV<br />
channel and the column on the right screen will shows Radio channels.<br />
3. When pressing the EXIT button during searching channels or after searching<br />
channels, the confirmation window will appear. If you want to save the updated<br />
channels, Select YES.<br />
19
3 Manual TP Search<br />
1.Press the OK button on the scan Transponder in the Installation Menu. You can<br />
search the transponder offered by the satellite for which your antenna has been<br />
configured. Select the satellite name, LNB frequency, symbol rate, code rate polarity,<br />
code rate, scan mode, and network search. You can also set the User PID, If you<br />
set the network search to Enable and select Yes, you can find more transponders<br />
through the home work. If you input the transponder frequency, the <strong>receiver</strong><br />
searches other transponder besides the existing transponder.<br />
▶<strong>Satellite</strong> name<br />
▶Frequency<br />
▶Symbol rate<br />
▶Polarization(Horizontal/Vertical)<br />
▶FEC code rate : 1/2, 2/3, 3/4, 5/6, 7/8,Auto<br />
▶Scan mode: Free channel, All channel<br />
▶Network search : Enable, Disable<br />
▶PID: Auto PID, Manual Dec, Manual Hex<br />
Press the Right ▶ button to change<br />
the transponder<br />
Press the left◀ button to input<br />
the transponder <strong>manual</strong>ly<br />
If you select the values and press the OK button, the transponder search will start.<br />
- Press the ◀/▶ button to select proper data.<br />
- Press the EXIT button to quit the current menu.<br />
2.The progress scan window will appear. When finish<br />
the channel search, TV & Radio channel that you<br />
found will be shown in two columns on both screens.<br />
20
4 Transfer Data<br />
Press the OK button on the Transfer Data in the Installation.<br />
You can upgrade the channel information and system software from<br />
another new programmed set top box. And you can transfer data through USB device.<br />
1.If you want to transfer the data to other <strong>receiver</strong> or PC through RS232 cable than<br />
Select the No.1~3 and Press the OK button.<br />
2.You should turn the AC power of the target set to box, and then turn it on.<br />
3.The following window will appear on the TV<br />
screen connected to target set top box<br />
4. If you want to download from USB device than Select the No.4 and Press the OK<br />
button.<br />
21
5. If you want to upload to USB device than Select the No.5 and Press the OK button.<br />
6. Select the data type you want to transfer to USB device.<br />
5 Reset Factory Defaults<br />
Press the OK button on the Reset factory Defaults of the<br />
Installation. In this menu you can choose the reset types,<br />
All, Channel List. When you select the All, your<br />
previous setting will be erased, parental code and favorite<br />
channel etc.<br />
<br />
1. Channel Properties<br />
1.You can make the Favorite channel grouping<br />
and Adult channel function in this menu. When<br />
you want to watch the locked TV channels, you<br />
need to enter the password. To easy operation,<br />
use the FUNC key to sort the channel list in<br />
alphabetical order.<br />
2 Edit channels<br />
1.This menu can support you to delete, move and<br />
rename the channel of normal channel. Select<br />
one of the functions in the left screen, Delete,<br />
Group Move or Rename Then move to the<br />
channel list in right screen to select and deselect<br />
the channel.<br />
- Press OK key to delete the channel<br />
- Press OK and Red button to insert the channels,<br />
(You can select only up to 100 channels at once for group moving.)<br />
22
- Press OK key to rename the channel,total 16 letters can be available for new<br />
channel name.<br />
3 Remove <strong>Satellite</strong><br />
1. Press the OK button on the Remove <strong>Satellite</strong>. You can remove the satellite for<br />
which your antenna has been configured.<br />
2. Press the OK button in the left screen to delete the satellite and all channels in the<br />
selected satellite<br />
3. Press the EXIT after select the satellite, the confirmation window will appear.If you<br />
select YES, the satellite and all channels of the selected satellite will be removed.<br />
4 Channel Sort<br />
In this menu, you can choose the channel<br />
array type such as Transponder, Network<br />
and CAS<br />
When you select Network, service provider<br />
order will be sorted. Also you select CAS,<br />
Scramble channels and Fee channels order can<br />
be divided.<br />
By default, Transponder is selected.<br />
23
5 Edit Transponder List<br />
In this menu, you can see all satellite information and can make DELETE, EDIT and<br />
ADD the satellite and transponder.<br />
To DELETE, EDIT and ADD the satellite select the satellite name in the left screen,<br />
and to DELETE, EDIT and ADD the transponder select the transponder in the right<br />
screen. Press OK Button and Select one of DELETE, EDIT and ADD in the pop up<br />
menu to make it. (The last one satellite and transponder cannot deleted)<br />
<br />
1. EPG<br />
2. Channel List<br />
3. Channel Properties<br />
4. Edit Channels<br />
5.<br />
<br />
1. Output Setting<br />
- You can select TV type, Video output, and<br />
screenmode. The letter box format display<br />
broadcasting on TV in its original 16:9 wide<br />
screen form.<br />
24
2 Parental Lock<br />
- Password<br />
You can change the password and memorize<br />
new password.<br />
- Option<br />
You can change the password option to<br />
unlock or lock some menu entry<br />
- Rating<br />
No Rating : All channel will display.<br />
7 : Channel is blocked for person under a age of 7 years.<br />
12 : Channel is blocked for person under a age of 12 years.<br />
15 : Channel is blocked for person under a age of 15 years.<br />
18 : Channel is blocked for person under a age of 18 years.<br />
When yo select one chhannel that is block by this function, you need to give the<br />
Password for open it.<br />
3 Language Setting<br />
You can select the display language, audio<br />
language, Subtitle Lang.If no language is<br />
provided, then the default language of<br />
current service will automatically selected.<br />
4 Other Setting<br />
- Select th Teletext OSD transparent type, Low,<br />
Middle, High<br />
- Select the OSD transparent type, Low, Middle,<br />
High<br />
- Select the Screensaver starting time<br />
- Anti-flicker,Brightness,Contrast,Color Setting<br />
5 Clock Set<br />
- In this menu, you can setting current Time,<br />
1. Setting current time using the ▲/▼/◀/▶<br />
button.<br />
2. If you press the ok button, current changing<br />
state will be saved and exit.<br />
25
When users reserve the channel to be recorded, it can be abnormally recoreded in TDT<br />
mode. Thus it is strongly recommended that users set the Time Mode to USER mode.<br />
<br />
- TDT : Receive the time from satellite.<br />
USER : Set the time directly by user.<br />
- Offset : Set the Time difference between GMT and the local time.<br />
- Day light saving : Day light Saving will work only in case of ‘Enable’ mode.<br />
- Start day : Day light saving start day.<br />
- End day : Day light saving end day.<br />
<br />
You can see the system information such as Model<br />
ID, hardware version, and software version.<br />
Press the OK button on the system information.<br />
<br />
You can reserve a channel recording at your desired<br />
time. In this mode, you can reserve channels up to<br />
8.<br />
- Prees the YELLOW button to edit the reserved<br />
channel. And then use the ▲/▼/◀/▶ button to<br />
the detail setting for your reservation.<br />
- To add more, press the RED button. Press the<br />
GREEN button to delete the reservation.<br />
- After all settings are done, press the ok button to<br />
save and exit.<br />
26
If it is duplicated with the time zone that was<br />
already registered at a reservation list, the<br />
alarm message appears which it is not able to<br />
register.<br />
In this case, you must register a reservation<br />
for other time zone.<br />
<br />
1. PVR Setting<br />
In This Menu, you can change Record Setting. You<br />
can set Time Shift function as Auto or Manual and<br />
set TimeShift size and set default Record Time. If<br />
Time Shift is Auto, whenever user change the<br />
channel, time shift is activated automatically. If<br />
Manual, time shift function doesn’t work.<br />
To force Time Shift in PVR info, you should press<br />
T.Shift key.<br />
2. HDD Information<br />
To see the capacity of HDD in PVR, press the OK<br />
button.<br />
You can see information about HDD such as Total<br />
size, Free size.<br />
3. Format HDD<br />
To format the HDD in PVR, press OK button.<br />
If you want to delete all the files in HD permanently,<br />
select the Yes.<br />
27
4.2 Viewing General Information<br />
This section explains the general information while watching TV or<br />
listening to Radio<br />
1 Program Information<br />
Whenever you press the i button, the program<br />
information window will appear for a few seconds.<br />
If you press the INFO button again on the<br />
information mode, the detail EPG window will<br />
appear.<br />
28
2 TV or Radio Channel List<br />
While watching TV or listening to Radio you can get the channel list by pressing the OK<br />
button on the remote controller. Press the ▲/▼ button to move the cursor If you press<br />
the OK button on the desired channel, you can watch the channel screen. And if you<br />
want to hide the channel list, press the Exit button.<br />
When you want to change the TV/Radio mode, press the TV/Rad button<br />
When you want to sort the channels, press the AtoZ button<br />
3 Favorite Channel Lists<br />
3.1 <strong>Satellite</strong><br />
1.Select the '<strong>Satellite</strong>' using the ◀/▶button.<br />
2.Press the ▲/▼ button to select a atellite.<br />
3.Press the OK button, then you can watch<br />
the channel list of selected <strong>Satellite</strong><br />
3.2 Favorite<br />
1.Select the 'Favorite' using the ◀/▶button.<br />
2.Press the ▲/▼ button to select a group.<br />
3.Press the OK button, then you can watch<br />
the channel list of selected group.<br />
29
4 Option<br />
While watching TV or listening to Radio, press the Option button. You can watch small<br />
pop-up window. You can select a option.(Audio Language, Teletext Language, Subtitle<br />
Language) If you want to change the option mode, press the ◀/▶ button<br />
4.1 Audio Language<br />
1.Select the 'Audio' using the ◀/▶ button.<br />
2.Press the ▲/▼ button to select a desired<br />
audio language.<br />
3.Press the OK button to change the audio<br />
language.<br />
4.2 Teletext Language<br />
1.Select the 'Teletext' using the ◀/▶button.<br />
2.Press the ▲/▼ button to select a language.<br />
3.Press the OK button.<br />
4.You can watch the Teletext contents in<br />
the language if it is available.<br />
4.3 Subtitle Language<br />
1.Select the 'Subtitle' using the ◀/▶ button.<br />
2.Press the ▲/▼ button to select a language.<br />
3.Press the OK button.<br />
4.If the selected language is different from what<br />
is available, you can't watch the subtitle.<br />
30
5 A/V +<br />
While watching TV or listening to Radio, press the A/V+ button. You can watch small<br />
pop-up window. You can select a option.(Audio Mode, Video Mode) If you want to<br />
change the option mode, press the ◀/▶ button.<br />
5.1 Audio Mode<br />
1.Select the 'Audio Mode' using the ◀/▶ button.<br />
2.Press the ▲/▼ button to set the output<br />
direction for speakers.<br />
(STEREO, LEFT, RIGHT, JOINT)<br />
3.Press the OK button to save and exit.<br />
5.2 Video Mode<br />
1.Select the 'Video Mode' using the ◀/▶<br />
button.<br />
2.Press the ▲/▼ button to set screen<br />
format of your TV.<br />
3.Press the OK button to save and exit<br />
6 Program Guide<br />
Press the EPG button on the remote controller, you can get the electronic prgram<br />
Guide if applicable. Press the ◀/▶ button to see the guide about the program, and<br />
then press the i button, the detail EPG window will appear.<br />
- Press the ▲/▼ button to move to other channel.<br />
- Press the ◀/▶ button to see the guide about the program.<br />
31
- Press the Note button to change the TV/ Radio mode.<br />
- Press the EXIT button to quit the current menu.<br />
<br />
If you press the sleep button on the remote controller, the follows window will<br />
appear. The sleep timer automatically switches the <strong>receiver</strong> to standby after the preset<br />
time elapses.<br />
1.Press the sleep button once. The remaining sleep time will appear on the screen .<br />
2.Press the sleep button repeatedly until the display sleep *** appears,<br />
and thenthe sleep timer will be released.<br />
3.When you turn the <strong>receiver</strong> off, the <strong>receiver</strong> releases the preset sleep time.<br />
4.3 Zoom/Multi Picture<br />
- Press the Function FUNC button on TV mode.<br />
- Default focus will be Zoom mode.<br />
- You can select each mode using the ▲/▼ button<br />
on the function bar.<br />
- And then press the OK button<br />
1 Zoom mode<br />
1.Press the OK button to enlarge the screen.<br />
2.You can move the focus using the ▲/▼◀/▶<br />
button.<br />
3.Press the EXIT button to exit this mode.<br />
Zoom mode supports the function of enlarging<br />
screen(x2, x3, x4, x5, x6)<br />
32
2 Multi Picture<br />
1.Select the Multi Picture mode on the function<br />
bar.<br />
2.You can select the desired channel using<br />
▲/▼/◀/▶ button<br />
3.Press the EXIT button to watch the channel<br />
with full size.<br />
Multi Picture : supports 4,9,10,13,16 partition.<br />
4.4 Live Screen Pause/Resume<br />
1. Press Freeze button on TV mode.<br />
2. Live Screen will be stopped<br />
3. If you press this button again you can<br />
see current live screen.<br />
4.5 HDMI Connection<br />
- You can change STB’s HDMI output resolution only when HDMI cable is<br />
connected between TV and STB. When 480p or 576p resolution is selected,<br />
audio & video outputs will be available with only HDMI cable connection.<br />
- When the HDMI cable is disconnected from TV or STB in 480p or 576p<br />
resolution mode, STB will automatically restore audio & video outputs for the<br />
other connections(e.g. CVBS or SCART connection)<br />
33
5. PVR<br />
5.1 File List<br />
AV file format of<br />
recorded channels.<br />
Date<br />
File size<br />
HDD Information<br />
5.1.1 Playback mode<br />
1. Select the recorded file using the ▲/▼<br />
button<br />
2. Press the OK button and then the file will be<br />
played.<br />
3. Press the EXIT button to close the file list.<br />
5.1.2 Delete mode<br />
1. select the file you want to delete using<br />
the ▲/▼ button.<br />
2. If you decide to delete the file,<br />
Press 'Yes' on the pop-up window. ]<br />
Press the EXIT button to exit.<br />
34
5.1.3 Rename mode<br />
1. Select the file to rename and press the button<br />
And then a small editing name window will be<br />
displayed<br />
2. You can write each letter of the file name using<br />
the ▲/▼/◀/▶/numeric button and the<br />
button.<br />
3. After renaming are done, select 'Done' tab and<br />
then press the button.<br />
4. Press the EXIT button to exit.<br />
5.1.4 Lock Mode<br />
1. Press the OK button. And then the<br />
following message window will appear<br />
2. Input your password and then the<br />
highlighted file will be locked<br />
3. If you want to lock another file, select<br />
the file using the ▲/▼ button. And press<br />
the button<br />
4. Press the Exit button to exit.<br />
If you record locked cannel, the file is locked automatically.<br />
35
5.2 PVR Banner<br />
To access the PVR Banner, press PVR Info.<br />
Current channel name<br />
Current position<br />
Record time<br />
Time gap<br />
Control position<br />
Progress Bar<br />
PVR Status<br />
The description of icons<br />
: Time Shift status<br />
: Recording status<br />
: Time Shift and record status<br />
: Playback and trick status<br />
: Time Shift playback and trick status<br />
: Recording, playback and trick status<br />
5.2.1 Time Shift<br />
Time Shift function automatically records the current playing program temporarily,<br />
in case you might have missed a scene or like to see a scene again, you don't need to<br />
record it <strong>manual</strong>ly<br />
1. If Time Shift function is set to Auto in the<br />
PVR menu, Time Shift is always working on<br />
air and changing the channel. You can not<br />
stop Time Shift function in Auto mode except<br />
the case you choose to record the channel.<br />
36
2 . If Time Shift function is set to Manual in the<br />
PVR menu, Time Shift will work only when<br />
you press the T.Shift button<br />
5.2.2 Record<br />
1. Press the Record( ● ) button to record<br />
the channel you're watching.<br />
2. Record mode can't be canceled by any<br />
control such as changing channel, etc.<br />
except pressing the STOP( ■ ) button.<br />
Max duration time for recording is set to the default record time which set in Menu.<br />
If you want to change the duration, press the ◀/▶ button<br />
(Minimum: 5Minutes, Maximum: 10Hours)<br />
5.2.2.1 One recording and playback the same<br />
channel simultaneously<br />
1. Press the Record( ● ) button on the<br />
desired channel<br />
2. Press the REW(N) button and use the<br />
REW(◀◀) button and use the ▶▶/<br />
◀◀/◀/▶ button to find position you want<br />
to watch<br />
37
3. Press the PLAY/Pause( ▶II) button when<br />
found the desired posilon.<br />
4. The recorded content will be played from<br />
that position until the current recorded part<br />
5.2.2.2 One recording and playback other file<br />
simultaneously<br />
1. Press the REC( ● ) button on the desired<br />
channel<br />
2. Press the PVR List button to open the file list.<br />
3. Select the desired file using the ▲/▼ button<br />
4. Press the OK or PLAY/Pause( ▶II) button to<br />
playback the file.<br />
5. Press the STOP( ■ ) button to stop<br />
watching the file and then recording channel<br />
will be shown<br />
5.2.2.3 One recording and view live channel<br />
simultaneously<br />
You can watch another channel while recording, in the same TP.<br />
1 Press the REC( ● ) button on the desired<br />
channel.<br />
2. Press the OK button to view the channel list<br />
3. Select the channel you want to watch using the<br />
▲/▼ button<br />
<br />
Several channels are restricted because of transponder of the recorded channel.<br />
38
5.2.3 Playback<br />
1. Press the PVR List button to open the file<br />
list.<br />
2. Select the file you want to watch using<br />
the ▲/▼ button<br />
3. Press the OK or PLAY/Pause( ▶II) button<br />
4. Press the Exit or PVR List button to exit from<br />
the file list<br />
5. Press the ◀/▶ button or trick button such as<br />
REW, FF, etc., if you want to check the status<br />
of playing<br />
6. Press the numeric button(0-9) in<br />
Playback mode<br />
7. Each number means the ratio of the number to<br />
ten If you press number 3, control position will<br />
be located 30% progressed position<br />
39
5.2.3.1 Jump in playback mode<br />
1. You can locate the control position to the<br />
desired position using the ◀/▶ button<br />
2. By releasing the ◀/▶ button, playback<br />
continues from this position<br />
5.2.3.2 Bookmark<br />
For your convenience, the bookmark function enables you to set bookmarks within the<br />
media file to continue or target a special position In media file.<br />
1. Play the file you want to watch<br />
2. Move the control position to the favored<br />
position using the◀/▶ button. Then<br />
press the MARK button and the white<br />
small bar will be placed at that position<br />
3. To delete the Bookmark, move the<br />
control position using the◀/▶ button to<br />
the desired Bookmark and then the color<br />
of the control position turns black<br />
Just that time, press the MARK button<br />
4. Press the JUMP button and the control<br />
position will lump to the next bookmarked position<br />
and playback starts from this point<br />
Current position JUMP position<br />
The maximum number of the Bookmark is twenty in a file.<br />
The first Bookmark exists at the starting position of the file<br />
40
5.2.4 FF/REW/SLOW mode<br />
These functions are available In Playback mode and Time Shift mode.<br />
<br />
1. Press the FF(▶▶) button<br />
2. If you press the FF(▶▶) button<br />
continuously, speed will be increased up<br />
to 4 times<br />
: Fast forward icon on Playback mode<br />
: Fast forward icon on Playback mode<br />
< Rewind / Speed , x2, x3, x4 ><br />
1. Press the REW(◀◀ ) button<br />
2. If you press the REW(◀◀ ) button<br />
continuously, speed will be increased up<br />
to 4 times.<br />
< Slow><br />
1. Press the SLOW(I▶) button<br />
2. If you press the SLOW(I▶) button<br />
continuously, speed will be decreased up<br />
to 1/4 times.<br />
5.2.5 Set repeat<br />
You can set the block to repeat on the PVR Banner.<br />
1. Play the recorded file.<br />
2. Locate the control position to the favored<br />
starting position using the ◀/▶ button.<br />
3. Press the A-B button to set the starting point<br />
and then move the ending point using<br />
the ◀/▶ button.<br />
4.Press the A-B button again on the ending point.<br />
5. Press the A-B button to cancel setting block.<br />
41
6. Other Functions<br />
6.1 xVid and Image LIST<br />
6.1.1 xVid List<br />
The XVID Player can be open by press the button MEDIA PLAY.<br />
- Size<br />
- Video and Audio Format<br />
- Duration<br />
1. Select xVid file by using the ▲/▼/◀/▶ buttons<br />
and press the OK button.<br />
2. Press the RED button to display Image LIST.<br />
6.1.2 Image List<br />
1. Select JPEG file by using the ▲/▼/◀/▶ buttons<br />
and press the OK button.<br />
2. Press the RED button to start slide show of JPEG<br />
images in current folder. And press the RED button to<br />
stop slide show and the BLUE button to Zoom mode.<br />
42
6.2 Picture In Picture (PIP)<br />
1. Press the PIP button to display PIP. Press the PIP button repeatedly to change the<br />
size of sub-picture or to remove the sub-picture.<br />
※ PIP function will be activated only when the channels are on the same TP.<br />
2. At PIP screen, press the A-B button to exchange main-picture with sub-picture.<br />
3. Press the Red button to move the position of sub-picture.<br />
4. To display the service list of main-picture, press the OK button. To display the<br />
service list of sub-picture, press the Green button.<br />
43
Additional Information<br />
A.1 Trouble shooting<br />
There may be various reasons behind <strong>receiver</strong> problems. Check the <strong>receiver</strong> according<br />
to the procedures described below. If you can’t solve your problem even after<br />
following the troubleshooting procedures, please contact the dealer. Do not open the<br />
<strong>receiver</strong> cover. It may cause a dangerous situation.<br />
The front panel doesn’t<br />
display any message.<br />
No picture or sound.<br />
No picture.<br />
No or bad signal.<br />
The remote controller does<br />
not operate.<br />
The power cord is not<br />
plugged in.<br />
Wrong connection of the<br />
Audio/Video output of the<br />
<strong>receiver</strong> to TV.<br />
Wrong connection of the<br />
antenna.<br />
No or Bad signal message<br />
appears.<br />
Audio muting<br />
TV Power<br />
The <strong>receiver</strong> can’t receive<br />
the signal.<br />
Incorrect values of some<br />
tuner parameters.<br />
The UHF Antenna is not<br />
Pointing.<br />
Signal too strong.<br />
Antenna is too small.<br />
The batteries of the remote<br />
controller are not inserted<br />
or exhausted.<br />
44<br />
Check that the power cable is<br />
plugged in to the wall outlet.<br />
Connect the Audio/Video<br />
output of the <strong>receiver</strong> to TV<br />
correctly.<br />
Connect the antennal cable<br />
correctly.<br />
Check other device<br />
connected between Antenna<br />
and the <strong>receiver</strong>, or adjust<br />
the antenna position.<br />
Press the MUTE button<br />
Turn TV on.<br />
Check the antenna cable,<br />
replace the cable, or connect<br />
the cable to the <strong>receiver</strong><br />
tightly.<br />
Set the values of tuner<br />
parameters correctly. Refer to<br />
the Installation menu.<br />
Adjust the antenna.<br />
Connect the signal attenuator<br />
to the signal input.<br />
Change to a larger antenna.<br />
Check whether the batteries<br />
are inserted correctly in your<br />
remote controller.<br />
Check and replace the<br />
batteries of the remote<br />
controller.<br />
Poor picture quality. Signal loss cable. Change the antenna power in<br />
Less channels in scanning.<br />
Antenna menu.
A.2 Technical Specifications<br />
1. Tuner & Demodulator<br />
Parameter<br />
Input Frequency Range<br />
RF Input Signal Level<br />
RF Impedance<br />
IF Bandwidth<br />
LNB Power<br />
LNB Tone Switch<br />
DiSEqC Control<br />
Demodulation<br />
Symbol Rate<br />
Specifications<br />
950MHz to 2150 Mhz<br />
-25 to -65dBm<br />
75Ω<br />
55MHz/8MHz(Under 5Msps)<br />
13/18DC, 14/19V +/-5%, 0.5Amax, 0.8Apeak overload protected<br />
22kHz +/-2kHz, 0.6Vpp +/-0.2V<br />
Version 1.2, Tone burst A/B<br />
QPSK<br />
1~45Msps/SCPC, MCPC<br />
2. MPEG<br />
Parameter<br />
Specifications<br />
Transport Stream<br />
MPEG-2 ISO/IEC 13818 Transport Stream Specification<br />
Input Rate<br />
Max.15Mbit/s<br />
Video<br />
MPEG-2 MP@ML, MPEG-4 xVid<br />
Audio MPEG-1/2 Audio Layer 1,2<br />
Aspect Ratio 4:3, 16:9<br />
Video Resolution<br />
720x576(PAL), 720x480(NTSC)<br />
Audio Mode<br />
Stereo, Dual channel, Joint stereo, Mono<br />
Audio Sampling Frequency 24/32/44.1/48khz<br />
3. Connector<br />
Port<br />
LNB IF input<br />
LNB IF Loop-through Output<br />
Serial Port<br />
Specifications<br />
F type, IEC 169-24 Female<br />
F type, IEC 169-24 Female<br />
RS232C D-sub male type<br />
45
4. Power Supply<br />
Parameter<br />
Input Voltage<br />
Power Consumption<br />
Weight<br />
Operating Temperature<br />
Storage Temperature<br />
USB Port<br />
Specifications<br />
100~240VAC(SMPS)<br />
Max. 28W<br />
Appr.2KG<br />
0'C~40'C<br />
-40'C~65'C<br />
USB 2.0(Rated current: Min 700mA)<br />
46
A.3 Glossary of Terms<br />
DiSEqC<br />
Digital <strong>Satellite</strong> Equipment Control.<br />
EPG<br />
Electronic Program Guide. Software that enables viewers to navigate easily among the<br />
large selection of channels provided by the digital technology and choose the service<br />
they desire.<br />
FEC<br />
Forward Error Correction. Correction of faulty bits in the received signal.<br />
LNB(Low-Noise Block converter)<br />
The LNB is an electronic unit mounted on the satellite dish. It receives the signals<br />
reflected by the dish and converts them to signals that can be used by <strong>Satellite</strong><br />
<strong>receiver</strong>.<br />
Parental control<br />
A feature that allows parents to lock programs that they consider unsuitable for their<br />
children. A locked channel or program can only be unlocked with the password.<br />
PIN code<br />
Personal Identification Number. A four-digit code that is used for locking/unlocking<br />
channels and programs, as in the parental control feature.<br />
Polarization<br />
Polarization allows several programmes to be fitted into the same frequency band.<br />
The signals from a satellite are transmitted either with linear (vertical or horizontal)<br />
polarization or circular (right or left) polarization.<br />
RS 232<br />
Serial communication standard data port.<br />
47
<strong>Satellite</strong> dish<br />
A dish-shaped antenna to receive signals from a satellite. The dish focuses the signals<br />
into the LNB.<br />
Scrambled satellite TV programme<br />
Some satellite TV programmes are transmitted in scrambled form. A smartcard, and<br />
possibly a CA module is needed to view such programmes.<br />
Symbol rate<br />
Size of the digital package transmission.<br />
48