
You also want an ePaper? Increase the reach of your titles
YUMPU automatically turns print PDFs into web optimized ePapers that Google loves.
INSTRUCTION MANUAL<br />
for<br />
<strong>Executive</strong> <strong>Cigar</strong> <strong>Humidor</strong> <strong>Kit</strong><br />
#127570<br />
77B43<br />
10/07/97<br />
<strong>Woodcraft</strong>, 210 Wood County Industrial Park, P.O. Box 1686, Parkersburg, WV 26102-1686<br />
© 1999 <strong>Woodcraft</strong> Supply Corp. “Helping You Make Wood Work” is a trademark of <strong>Woodcraft</strong> Supply Corp.<br />
1
Before You Begin<br />
Before beginning the assembly of your <strong>Woodcraft</strong> precut kit, read these instructions and become familiar with the parts list, drawings and<br />
photos which illustrate the text. We also recommend a dry assembly “practice run” on all parts prior to actual gluing. Instructions or<br />
information in bold print are critical for proper assembly and for avoiding irreversible assembly mistakes.<br />
About <strong>Humidor</strong>s<br />
The lining of our <strong>Humidor</strong> <strong>Kit</strong> is Spanish Cedar. This unique wood has a very low sap content and a faint spicy aroma (very unlike domestic<br />
aromatic, white, or red cedar). The lining should be sanded but not finished. The outside of the humidor can be finished with your favorite<br />
oil, urethane or varnish sealer.<br />
When you close your humidor it should create an airtight seal. The unique overlapping wedge joint of the liner in this kit will give you good<br />
results. An airtight seal allows you to control the humidity inside the humidor and keep the tobacco from drying out. A relative humidity of<br />
60% to 80% should be maintained inside your humidor. You can create these humid conditions with the supplied humistat and monitor its<br />
performance with the hygrometer.<br />
After you have installed the humistat it will take about four weeks for the humidity to stabilize inside the box. The wood liner will be absorbing<br />
much of the initial moisture you put into the humidor. Be patient.<br />
Important Notes About Solid Wood<br />
One of the unique characteristics of solid hardwood is the varying hues and patterns within a single piece of lumber. Since no two trees are<br />
identical, no two pieces of wood can be exactly alike either. Each has its own characteristics created by nature, not by man. Unlike plastics<br />
and some veneers in which the grain pattern is symmetrical, solid hardwood has irregular and asymmetrical graining, which adds to the<br />
overall beauty. In the same manner, the various shadings and colors within solid hardwood are part of its beauty.<br />
Clamping<br />
Clamping is necessary to insure a tight accurate fit of glued joints. Conventional pipe or bar clamps can be used as well as band clamps.<br />
When dry fitting make sure you have sufficient clamps for equal pressure over all the joints before actually applying glue to the parts.<br />
Glue<br />
We recommend Titebond II, water resistant, yellow aliphatic resin glue used according to the manufacturer’s instructions because the<br />
<strong>Humidor</strong> is exposed to moisture by way of the internal humidifier. Use a glue brush or cotton swab to spread the glue. A thin even spread on<br />
both parts is best. Clean up excess glue by scraping it off with a knife blade or scraper. Do not wipe glue off with a damp cloth as the<br />
moisture of the cloth will thin the glue and allow it to soak deeply into the wood. This will show in the final finish of your project.<br />
Definitions<br />
Rabbet<br />
Tools Needed<br />
•square •pipe/bar/band clamps • yellow, water-resistant, woodworking glue<br />
•small screw driver •Phillips screwdriver •scratch awl<br />
•chisel •X-Acto knife •mallet<br />
•scrap wood block •CA Glue •glue brushes<br />
2 <strong>Woodcraft</strong>, 210 Wood County Industrial Park, P.O. Box 1686, Parkersburg, WV 26102-1686<br />
© 1999 <strong>Woodcraft</strong> Supply Corp. “Helping You Make Wood Work” is a trademark of <strong>Woodcraft</strong> Supply Corp.
11<br />
24<br />
20 21<br />
12<br />
23<br />
22<br />
1<br />
2<br />
13<br />
4<br />
3<br />
25<br />
10<br />
9<br />
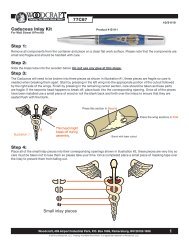
<strong>Cigar</strong> <strong>Humidor</strong> Parts List<br />
14<br />
5 6<br />
15 16 17<br />
19<br />
7 8<br />
18<br />
Part Qty.<br />
Description<br />
Material Dimension T" x W" x L"<br />
1 ......... 1 .................... Base Side, Right, w/pre-cut mortise.................................................. Alder ................................................. 5 /8" x 4 3 /4" x 10 1 /4"<br />
2 ......... 1 .................... Base Side, Left .................................................................................... Alder ................................................. 5 /8" x 4 3 /4" x 10 1 /4"<br />
3 ......... 1 .................... Base Front ........................................................................................... Alder ..................................................... 5 /8" x 4 3 /4" x 14"<br />
4 ......... 1 .................... Base Back, w/pre-bored holes ........................................................... Alder ..................................................... 5 /8" x 4 3 /4" x 14"<br />
5 ......... 1 .................... Top Side, Right, w/pre-drilled hole .................................................... Alder ................................................. 5 /8" x 1 1 /4" x 10 1 /4"<br />
6 ......... 1 .................... Top Side, Left ....................................................................................... Alder ................................................. 5 /8" x 1 1 /4" x 10 1 /4"<br />
7 ......... 1 .................... Top Front .............................................................................................. Alder ..................................................... 5 /8" x 1 1 /4" x 14"<br />
8 ......... 1 .................... Top Back, w/pre-bored holes ............................................................. Alder ..................................................... 5 /8" x 1 1 /4" x 14"<br />
9 ......... 1 .................... Mitered Frame Top-Pre Assembled ................................................... Alder ................................................... 3 /4" x 10 5 /8" x 14"<br />
10....... 1 .................... Bottom .......................................................................................... Spanish Cedar ....................................... 1 /4" x 13 5 /8" x 10 1 /4"<br />
11 ....... 2 .................... Liner, Bottom Sides..................................................................... Spanish Cedar ........................................ 1 /4" x 4 3 /4" x 8 15 /16"<br />
12 ....... 2 .................... Liner, Bottom Front/Back ........................................................... Spanish Cedar ..................................... 1 /4" x 4 3 /4" x 12 13 /16"<br />
13 ....... 2 .................... Tray Supports .............................................................................. Spanish Cedar ............................................... 1 /4" x 2" x 8 3 /4"<br />
14 ....... 1 .................... Slotted Tray Bottom, Base Side ................................................. Spanish Cedar ......................................... 3 /8" x 8 1 /2" x 11 3 /4"<br />
15 ....... 2 .................... Tray Sides .................................................................................... Spanish Cedar ............................................ 3 /8" x 2" x 8-1/2"<br />
16 ....... 2 .................... Tray Front/Back ........................................................................... Spanish Cedar ............................................. 3 /8" x 2" x 12 1 /8"<br />
17 ....... 2 .................... Liner Top Sides ............................................................................ Spanish Cedar .................................... 1 /4" x 11 3 /16" x 8 15 /16"<br />
18 ....... 2 .................... Liner Top Front/Back .................................................................. Spanish Cedar ................................... 1 /4" x 1 13 /16" x 12 13 /16"<br />
19 ....... 1 .................... Center Divider .............................................................................. Spanish Cedar ........................................... 3 /8" x 1 5 /8" x 8 1 /8"<br />
Hardware<br />
20 ...... 1 .................... 55mm Surface Mount <strong>Humidor</strong> Hygrometer (127571)<br />
21 ....... 2 .................... <strong>Cigar</strong> Keepers - Slim with Mounting Clip and Screw (127457)<br />
22....... 2 .................... 10 MM Cylinder Hinges (27C11)<br />
23....... 1 .................... Mortised Box Lid Support (16B34)<br />
24 ...... 3’ ................... Grooved Type Keeper Strip Clear<br />
25 ...... 1 .................... Bevelled Glass<br />
<strong>Woodcraft</strong>, 210 Wood County Industrial Park, P.O. Box 1686, Parkersburg, WV 26102-1686<br />
© 1999 <strong>Woodcraft</strong> Supply Corp. “Helping You Make Wood Work” is a trademark of <strong>Woodcraft</strong> Supply Corp.<br />
3
Surface Preparation<br />
<strong>Humidor</strong> parts are factory sanded, but final finish sanding may be<br />
required according to personal preferences. If additional sanding is<br />
required, sand all parts prior to assembly.<br />
Sanding should be accomplished in a series of steps. Begin with a<br />
180 medium grit paper and remove any scratches or blemishes.<br />
Final sanding should be accomplished with a 320 or 400 grit paper,<br />
removing the scratches left by previous coarser paper. Always sand<br />
with the grain of the wood. When you have finished sanding all<br />
parts, clean them of all dust by vacuuming or using a tack cloth.<br />
Take care not to deform crisp edges or profile lines if additional<br />
sanding is performed on this kit.<br />
Case Assembly Instructions<br />
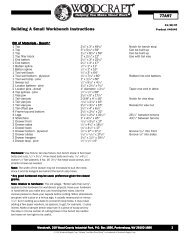
1. Assemble the humidor on a flat level surface. In a dry run, place<br />
the base sides (#1 and #2), front (#3) and back (#4) on edge, rabbet<br />
side down, and fit the machined joints together. Clamp this assembly<br />
together applying a medium amount of pressure, making sure<br />
that the end joints are fully seated and the edges are flush (Photo<br />
1). When clamping be sure to put scrap blocks of wood between<br />
your clamp heads and the finished surface of the box, this will allow<br />
you to avoid marring the surface with the clamps. Check that the box<br />
is square by placing a try square in an inside corner of the box<br />
(Photo 2). When comfortable with the dry run procedure, glue the<br />
box base together in the order described below.<br />
2. Spread a thin layer of glue on the machined joints of all pieces.<br />
Clamp pieces together with a medium amount of pressure. Check<br />
for square with your try square. If the base is not square, loosen<br />
clamps and re-adjust. Set aside to dry. It is critical that the base of<br />
the box is square.<br />
3. Repeat step 1 of the base dry assembly process using the top<br />
sides (#5 and #6), front (#7) and back (#8) (Photo 3). Clamp. Check<br />
for square. Proceed to next step.<br />
4. Spread a thin layer of glue on the machined joints of all pieces.<br />
Clamp pieces together with a medium amount of pressure. Check<br />
for square with your try square. If the top is not square, loosen<br />
clamps and re-adjust. Set aside to dry. It is critical that the top of the<br />
box is square.<br />
5. After the top assembly has dried, remove clamps and place on a<br />
flat level surface. Apply a thin film of glue on the top edges of the<br />
assembly (edges without hinge holes). Place the pre-assembled<br />
miter frame top (#9), with the routed profile up, on the assembly and<br />
position it so that all of the edges are flush. Apply clamps with a<br />
medium amount of pressure and let dry (Photo 4).<br />
1<br />
2<br />
3<br />
4<br />
4 <strong>Woodcraft</strong>, 210 Wood County Industrial Park, P.O. Box 1686, Parkersburg, WV 26102-1686<br />
© 1999 <strong>Woodcraft</strong> Supply Corp. “Helping You Make Wood Work” is a trademark of <strong>Woodcraft</strong> Supply Corp.
6. Dry fit the bottom (#10) in the rabbetted edges of the base<br />
“frame”. It’s all right if the bottom is slightly loose in the rabbet.<br />
Remove box bottom and place a thin film of glue on the inside of the<br />
rabbet. Place the box bottom in the rabbet edge and clamp with a<br />
medium amount of pressure (Photo 5). It is not critical that the<br />
bottom be square in the recess.<br />
Finishing<br />
Only the exterior of the box and the inside surface where the box top<br />
and bottom meet needs to be finished. The Spanish Cedar lining will<br />
cover the remaining interior of the box. Lightly sand the exterior of<br />
the box in preparation for finishing. Use a sanding block and be<br />
careful not to round off corners.<br />
1. Remove any dust, which may have accumulated during the<br />
building process and final sanding by vacuuming or using a tack rag.<br />
2. The wood may be stained or left natural. It should be sealed with<br />
a topcoat such as varnish, lacquer, polyurethane, or oil finish. If this<br />
is one of your first finishing projects and you are unsure how to<br />
proceed to get the effect you want, we suggest you obtain a copy of<br />
a good general book on wood finishing. Do not rush the finishing of<br />
your kit. Take your time, be very careful, experiment on scrap wood,<br />
and you will be rewarded with a truly handsome project.<br />
Assembling the <strong>Cigar</strong> Trays, <strong>Cigar</strong> Tray<br />
Supports and Liner<br />
1. Place a thin film of glue on the rabbetted surfaces of the tray<br />
front and back (#16) and the tray sides (#15) and position them on<br />
the slotted tray bottom (#14). Apply clamps, apply a medium amount<br />
of pressure and let dry. Spot glue the center divider (#19) in the<br />
center of the cigar tray (Photo 6).<br />
2. After the box is finished and thoroughly dried, you can insert the<br />
Spanish Cedar lining (parts # 11-12, 17-18). Dry fit the pieces in the<br />
top and base of the box (Photo 7). Do not force the liner pieces into<br />
place. If the pieces fit too tightly, lightly sand the ends until they fit<br />
snugly in place.<br />
3. Once satisfied with the dry fit, remove the pieces and place a<br />
small drop or two of yellow glue on the backs of each piece and<br />
return them to their position in the box top and bottom. By spot<br />
gluing the cedar in the box, you will be able to replace the cedar<br />
lining as it ages and looses its aroma.<br />
4. Spot glue the cigar tray supports (#13) on the interior sides of the<br />
base (photo #8).<br />
5<br />
6<br />
7<br />
8<br />
<strong>Woodcraft</strong>, 210 Wood County Industrial Park, P.O. Box 1686, Parkersburg, WV 26102-1686<br />
© 1999 <strong>Woodcraft</strong> Supply Corp. “Helping You Make Wood Work” is a trademark of <strong>Woodcraft</strong> Supply Corp.<br />
5
Installing the Beveled Glass<br />
1. Because the glass keeper strip (#23) is flexible we found that<br />
inserting the strip in the frame and then cutting the strip to fit, as it<br />
is installed, is more accurate than measuring the interior of the<br />
frame and cutting pieces prior to insertion. Carefully place the<br />
beveled glass into the rabbetted frame. Start by cutting a 45° cut on<br />
one end of the keeper strip (Photo #9). With the glass in the<br />
rabbetted frame, insert the serrated edge of the keeper strip into<br />
the slot. Gently push the keeper strip in until it seats flush. Mark the<br />
proper length of the strip, remove from the groove and cut 45° at<br />
your mark. Continue this process around the frame. Using the<br />
flexible keeper strip makes it easy to remove the beveled glass for<br />
cleaning.<br />
Mounting the Hardware<br />
1. Place the two 10mm hinges (#21) in the holes at the back of the<br />
box taking care to position the leaves of the hinges perpendicular to<br />
the back of the box and the top of the barrels flush with the wood<br />
surface. This will ensure that the hinges open and close easily and<br />
do not bind (Photo #10). Using a very small screwdriver, tighten the<br />
screws of the hinges. By tightening the screws you will be expanding<br />
the barrel slightly so the hinge will be secured within the hole. No<br />
glue is needed to keep the hinges in place.<br />
2. Place the lid support (#22) into the mortise on the right side of<br />
the box base (Photo #11). Use a scratch awl to make starter holes<br />
through the support and into the side of the box. Secure in place<br />
with the provided mounting screws. Put a small drop of CA glue on<br />
and around the cylindrical stem of the stay and place it into the<br />
mating hole in the top of the lid. Let dry.<br />
3. Place the hygrometer (#19) in the cigar tray in a convenient<br />
location so that you can read the dial through the beveled glass<br />
when the humidor is closed.<br />
4. Fill the Slim <strong>Cigar</strong> Keeper humidifiers (#20) according to the<br />
manufacture’s instructions. Place one in the base of the humidor<br />
and the other in the cigar tray.<br />
9<br />
10<br />
11<br />
6 <strong>Woodcraft</strong>, 210 Wood County Industrial Park, P.O. Box 1686, Parkersburg, WV 26102-1686<br />
© 1999 <strong>Woodcraft</strong> Supply Corp. “Helping You Make Wood Work” is a trademark of <strong>Woodcraft</strong> Supply Corp.