CN1303-4 Gas Predator Manual 2nd Edition
CN1303-4 Gas Predator Manual 2nd Edition
CN1303-4 Gas Predator Manual 2nd Edition

You also want an ePaper? Increase the reach of your titles
YUMPU automatically turns print PDFs into web optimized ePapers that Google loves.
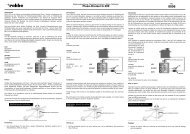
Step 17 Engine Cooling Fan<br />
Slide the cooling fan assembly onto the engine.<br />
Locate the M6x15 socket cap screw and M6x13<br />
flat washer and thoroughly clean these parts to<br />
remove any oil residue. Install the fan assembly<br />
onto the crankshaft. Slide the washer onto the<br />
M6x15 socket cap screw install through the center<br />
of the fan hub. Using a strap-wrench wrapped<br />
around the outside of the cooling fan, tighten the<br />
M6x15 socket cap screw until hand tight and check<br />
the runout of the fan assembly. Acceptable runout<br />
is 0.002”, if more, remove the fan assembly and<br />
install again. Once satisfied, remove the M6x15<br />
socket cap screw, apply L242 Blue thread lock and<br />
secure in place.<br />
M6x15 Socket Cap<br />
Bolt & M6x13 Flat<br />
Washer<br />
#HI6009A<br />
Cooling Fan<br />
#HW6012A<br />
Fan Hub<br />
5.0mm Hex<br />
Key required<br />
#HI6020A<br />
Fiberglass<br />
Cooling<br />
Shroud<br />
M2.5x8 Socket<br />
Cap Screws x 3<br />
Step 18 Cooling Fan Shroud<br />
Slide the fan shroud over the cooling fan and<br />
secure using three M2.5x8 socket cap screws using<br />
L242 Blue threadlock. Tighten these until they stop<br />
and that’s it, do not torque these bolts!<br />
If you plan to install a governor, it is best to fabricate<br />
the mount for the sensor at this time, get it<br />
fitted and set the sensor gap before the fan shroud<br />
is installed.<br />
#HW6011A<br />
Clutch Shoe<br />
M3x6<br />
Button Head<br />
Screws x 4<br />
Step 19 Clutch Assembly<br />
Apply light oil to the Torrington bearing in the center of the clutch shoe. Be<br />
sure that no grease contacts the edge of the clutch or it could get transfered to<br />
the clutchbell. Slide the clutch shoe onto the fan hub, press down and install<br />
four M3x6 button head screws using L242 Blue threadlock.<br />
Apply a few drops<br />
of light oil on the<br />
Torrington bearing.<br />
10<br />
Take the time now to make sure that the clutch shoe is<br />
properly seated on the fan assembly by looking at it from the<br />
side and making sure there is no vertical movement as you<br />
slowly turn over the engine. Experience modelers can dial<br />
indicate the clutch, the acceptable amount of runout is 0.002”