PatternMaker Garment Collection - PatternMaker Software
PatternMaker Garment Collection - PatternMaker Software
PatternMaker Garment Collection - PatternMaker Software

You also want an ePaper? Increase the reach of your titles
YUMPU automatically turns print PDFs into web optimized ePapers that Google loves.
Men/Young Men’s <strong>Collection</strong><br />
stitching line. Place two strips on the rectangular “box,” with the folded edges meeting over the<br />
pocket cutting line, and machine basting over the stitch lines of the “box.” Zigzag the folded<br />
edges together to hold them in place until the pocket is completed, then remove the zigzag.<br />
Stitch rectangle again from wrong side.<br />
c) Welt Cut welt piece with a length two seam allowances<br />
longer than the stitched rectangle. Welt piece height is<br />
twice the stitched box height, plus two seam allowances.<br />
Normal height of finished welt piece is ½” (1-2 cm).<br />
Interface welt, overlock raw edges and fold lengthwise<br />
wrong sides together.<br />
Place welt on the stitched rectangle with the welt seam<br />
line along lower stitching line of “box.” Folded edge faces<br />
down, and raw edge is turned upward toward the “box”<br />
center. From wrong side, stitch around “box” rectangle<br />
again.<br />
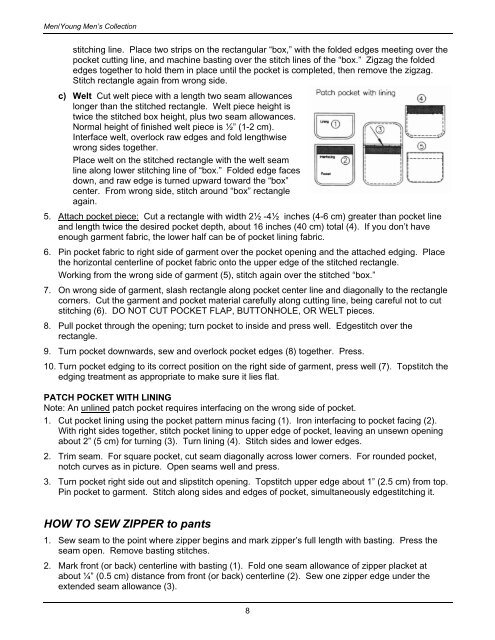
5. Attach pocket piece: Cut a rectangle with width 2½ -4½ inches (4-6 cm) greater than pocket line<br />
and length twice the desired pocket depth, about 16 inches (40 cm) total (4). If you don’t have<br />
enough garment fabric, the lower half can be of pocket lining fabric.<br />
6. Pin pocket fabric to right side of garment over the pocket opening and the attached edging. Place<br />
the horizontal centerline of pocket fabric onto the upper edge of the stitched rectangle.<br />
Working from the wrong side of garment (5), stitch again over the stitched “box.”<br />
7. On wrong side of garment, slash rectangle along pocket center line and diagonally to the rectangle<br />
corners. Cut the garment and pocket material carefully along cutting line, being careful not to cut<br />
stitching (6). DO NOT CUT POCKET FLAP, BUTTONHOLE, OR WELT pieces.<br />
8. Pull pocket through the opening; turn pocket to inside and press well. Edgestitch over the<br />
rectangle.<br />
9. Turn pocket downwards, sew and overlock pocket edges (8) together. Press.<br />
10. Turn pocket edging to its correct position on the right side of garment, press well (7). Topstitch the<br />
edging treatment as appropriate to make sure it lies flat.<br />
PATCH POCKET WITH LINING<br />
Note: An unlined patch pocket requires interfacing on the wrong side of pocket.<br />
1. Cut pocket lining using the pocket pattern minus facing (1). Iron interfacing to pocket facing (2).<br />
With right sides together, stitch pocket lining to upper edge of pocket, leaving an unsewn opening<br />
about 2” (5 cm) for turning (3). Turn lining (4). Stitch sides and lower edges.<br />
2. Trim seam. For square pocket, cut seam diagonally across lower corners. For rounded pocket,<br />
notch curves as in picture. Open seams well and press.<br />
3. Turn pocket right side out and slipstitch opening. Topstitch upper edge about 1” (2.5 cm) from top.<br />
Pin pocket to garment. Stitch along sides and edges of pocket, simultaneously edgestitching it.<br />
HOW TO SEW ZIPPER to pants<br />
1. Sew seam to the point where zipper begins and mark zipper’s full length with basting. Press the<br />
seam open. Remove basting stitches.<br />
2. Mark front (or back) centerline with basting (1). Fold one seam allowance of zipper placket at<br />
about ¼” (0.5 cm) distance from front (or back) centerline (2). Sew one zipper edge under the<br />
extended seam allowance (3).<br />
8