

Gaymar FW600 Operator's Manual
Gaymar FW600 Operator's Manual
Gaymar FW600 Operator's Manual

Create successful ePaper yourself
Turn your PDF publications into a flip-book with our unique Google optimized e-Paper software.
ENGLISH<br />
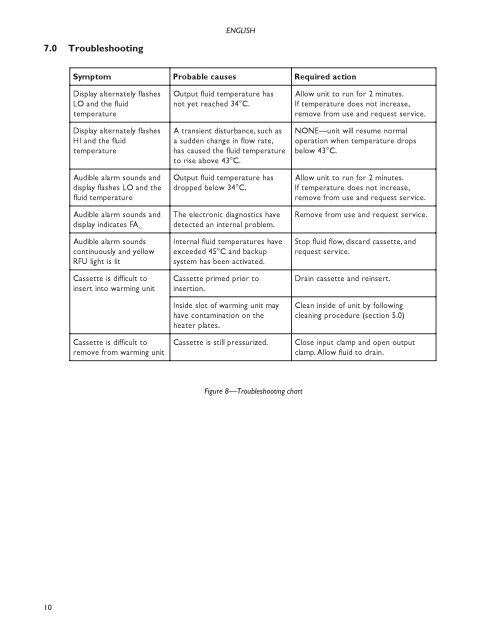
7.0 Troubleshooting<br />
Symptom<br />
Display alternately flashes<br />
LO and the fluid<br />
temperature<br />
Display alternately flashes<br />
HI and the fluid<br />
temperature<br />
Audible alarm sounds and<br />
display flashes LO and the<br />
fluid temperature<br />
Audible alarm sounds and<br />
display indicates FA_<br />
Audible alarm sounds<br />
continuously and yellow<br />
RFU light is lit<br />
Cassette is difficult to<br />
insert into warming unit<br />
Cassette is difficult to<br />
remove from warming unit<br />
Probable<br />
causes<br />
Output fluid temperature has<br />
not yet reached 34°C.<br />
A transient disturbance, such as<br />
a sudden change in flow rate,<br />
has caused the fluid temperature<br />
to rise above 43°C.<br />
Output fluid temperature has<br />
dropped below 34°C.<br />
The electronic diagnostics have<br />
detected an internal problem.<br />
Internal fluid temperatures have<br />
exceeded 45°C and backup<br />
system has been activated.<br />
Cassette primed prior to<br />
insertion.<br />
Inside slot of warming unit may<br />
have contamination on the<br />
heater plates.<br />
Cassette<br />
is still pressurized.<br />
Required action<br />
Allow unit to run for 2 minutes.<br />
If temperature does not increase,<br />
remove from use and request service.<br />
NONE—unit will resume normal<br />
operation when temperature drops<br />
below 43°C.<br />
Allow unit to run for 2 minutes.<br />
If temperature does not increase,<br />
remove from use and request service.<br />
Remove from use and request service.<br />
Stop fluid flow, discard<br />
request service.<br />
Drain cassette and reinsert.<br />
cassette, and<br />
Clean inside of unit by following<br />
cleaning procedure (section 5.0)<br />
Close input clamp and open<br />
clamp. Allow fluid to drain.<br />
output<br />
Figure 8—Troubleshooting chart<br />
10


