MAXPower eSATA 6G PCIe 2.0 Controller Card - Newer Technology
MAXPower eSATA 6G PCIe 2.0 Controller Card - Newer Technology
MAXPower eSATA 6G PCIe 2.0 Controller Card - Newer Technology

You also want an ePaper? Increase the reach of your titles
YUMPU automatically turns print PDFs into web optimized ePapers that Google loves.
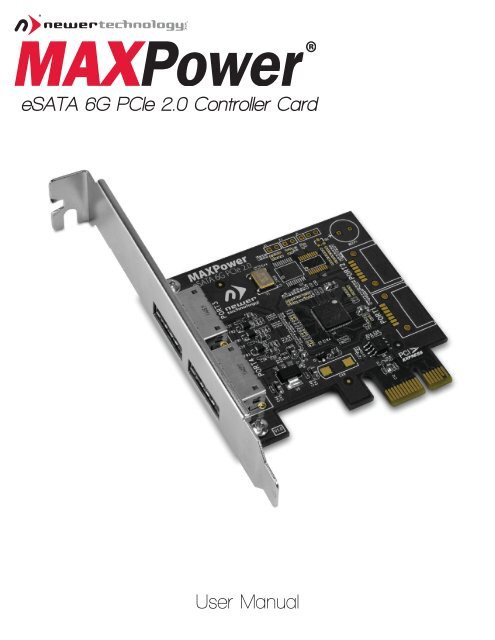
<strong>eSATA</strong> <strong>6G</strong> <strong>PCIe</strong> <strong>2.0</strong> <strong>Controller</strong> <strong>Card</strong><br />
User Manual
Table of Contents<br />
<strong>Newer</strong><strong>Technology</strong> <strong>MAXPower</strong> <strong>eSATA</strong> <strong>6G</strong> <strong>PCIe</strong> <strong>2.0</strong><br />
Part 1: Introduction Page 3<br />
a. What is <strong>eSATA</strong> <strong>6G</strong>b/s? Page 3<br />
b. <strong>MAXPower</strong> <strong>eSATA</strong> <strong>6G</strong> <strong>PCIe</strong> <strong>2.0</strong> <strong>Controller</strong> <strong>Card</strong> Page 3<br />
c. <strong>MAXPower</strong> <strong>eSATA</strong> <strong>6G</strong> Features Page 3<br />
d. Maximum Interface Speed Comparison Page 3<br />
Part 2: System Requirements & Installation Pages 4-6<br />
a. System Requirements Page 4<br />
b. Hardware Installation Page 4<br />
c. Verifying Installation on AHCI Systems Page 5<br />
d. Installation on Non-AHCI Systems Page 6<br />
Part 3: Troubleshooting & FAQ Page 7<br />
Part 4: Contact Information Page 7<br />
Package Contents<br />
• <strong>MAXPower</strong> <strong>eSATA</strong> <strong>6G</strong> <strong>PCIe</strong> <strong>2.0</strong> <strong>Controller</strong> <strong>Card</strong><br />
• User Manual<br />
• Driver Installation Disc for Windows 2000/XP/2003<br />
• Low Profile Bracket<br />
Images and descriptions may vary slightly between this manual and the unit shipped.<br />
Please visit the product webpage for the most recent specifications.<br />
Page 2
<strong>Newer</strong><strong>Technology</strong> <strong>MAXPower</strong> <strong>eSATA</strong> <strong>6G</strong> <strong>PCIe</strong> <strong>2.0</strong><br />
Part 1: Introduction<br />
What is <strong>eSATA</strong> <strong>6G</strong>b/s?<br />
<strong>eSATA</strong> stands for External Serial Advanced <strong>Technology</strong> Attachment. <strong>eSATA</strong> <strong>6G</strong>b/s (revision 3.0) is the latest<br />
SATA standard and provides data transfer rates up to <strong>6G</strong>b/s (600MB/s) for external storage devices.<br />
<strong>MAXPower</strong> <strong>eSATA</strong> <strong>6G</strong> <strong>PCIe</strong> <strong>2.0</strong> <strong>Controller</strong> <strong>Card</strong><br />
Utilizing the latest <strong>eSATA</strong> <strong>6G</strong>b/s technology and true Plug-n-Play driverless install, the <strong>MAXPower</strong> <strong>eSATA</strong> <strong>6G</strong><br />
card is the ideal choice for high speed, efficient, low cost connectivity for the Mac or PC.<br />
<strong>MAXPower</strong> <strong>eSATA</strong> <strong>6G</strong> Features:<br />
• <strong>PCIe</strong> <strong>2.0</strong> x1 (500MB/s bandwidth)<br />
• Compatible with <strong>PCIe</strong> 1.0 (250MB/s bandwidth)<br />
• Two <strong>eSATA</strong> <strong>6G</strong>b/s ports (600MB/s per port*)<br />
• <strong>eSATA</strong> Hot Plug Support<br />
• Plug-n-Play Ready Industry Standard AHCI Compliance<br />
• Out-of-the-Box Ready Driverless Install for:<br />
• Mac OS X 10.5 & 10.6<br />
• Windows Vista & Windows 7<br />
• Any Linux versions with built-in AHCI support<br />
(Windows 2000/XP/2003 requires driver install)<br />
• Compatible with SATA based hard disk drives and solid state drives<br />
• 3 year warranty<br />
Maximum Interface Transfer Speeds<br />
*SATA <strong>6G</strong>b/s speeds (600MB/s) will be limited by the <strong>PCIe</strong> x1 bandwidth (500MB/s total for x1 <strong>PCIe</strong> <strong>2.0</strong> or 250MB/s total for x1 <strong>PCIe</strong> 1.0)<br />
Page 3
Part 2: System Requirements & Installation<br />
System Requirements<br />
Mac<br />
Hardware: Intel-based Mac with available <strong>PCIe</strong> <strong>2.0</strong> or 1.0 slot<br />
Operating System: Mac OS X 10.5 and later<br />
PC<br />
Hardware: Any computer with available <strong>PCIe</strong> <strong>2.0</strong> or 1.0 slot<br />
Operating System: Windows 2000/XP/2003 and later<br />
Hardware Installation<br />
<strong>Newer</strong><strong>Technology</strong> <strong>MAXPower</strong> <strong>eSATA</strong> <strong>6G</strong> <strong>PCIe</strong> <strong>2.0</strong><br />
Before Installing the <strong>MAXPower</strong> <strong>eSATA</strong> <strong>6G</strong> card...<br />
• Make sure computer is turned off and unplugged from its power source<br />
• Take appropriate electrostatic discharge precautions:<br />
Your computer is a static-sensitive device. It is susceptible to invisible damage<br />
if not protected during installation.<br />
We recommend proper grounding by using a grounding strap. Make sure to<br />
work in a clean and static-free area, and avoid wearing clothing that retains<br />
static charges.<br />
For more information, please visit:<br />
http://www.newertech.com/static<br />
Step 1 Open the computer systems chassis and locate an unused <strong>PCIe</strong> <strong>2.0</strong> or 1.0 slot (x1, x4,<br />
x8, or x16).<br />
Step 2<br />
Step 3<br />
Step 4<br />
Step 5<br />
(Windows 2000/<br />
XP/2003 only)<br />
Remove the PCI slot cover.<br />
Gently insert the <strong>MAXPower</strong> card into the <strong>PCIe</strong> slot and secure the bracket to the<br />
computer chassis.<br />
After installing the <strong>MAXPower</strong> card attach any <strong>eSATA</strong> storage devices to the card and<br />
start your computer.<br />
Windows 2000/XP/2003 versions do not have built-in AHCI support and therefore require<br />
driver installation* for the <strong>MAXPower</strong> <strong>eSATA</strong> <strong>6G</strong> card to function. Use Windows’<br />
New Hardware Install Wizard to install the drivers located on the included Driver<br />
Installation CD.<br />
*See the “Installation on Non-AHCI Systems” section for more details.<br />
Page 4
<strong>Newer</strong><strong>Technology</strong> <strong>MAXPower</strong> <strong>eSATA</strong> <strong>6G</strong> <strong>PCIe</strong> <strong>2.0</strong><br />
Verifying Installation on AHCI Systems<br />
The <strong>MAXPower</strong> <strong>eSATA</strong> <strong>6G</strong> card has built-in AHCI support on the following Operating Systems:<br />
• Max OS X 10.5.x<br />
• Mac OS X 10.6.x<br />
• Windows Vista<br />
• Windows 7<br />
• Any Linux based OS with built-in AHCI support<br />
After installation, the <strong>MAXPower</strong> <strong>eSATA</strong> <strong>6G</strong> card will be visible in Apple System Profiler in<br />
the “PCI <strong>Card</strong>s” section as an “AHCI <strong>Controller</strong>” with drivers installed.<br />
Mac<br />
Upon computer startup, the <strong>MAXPower</strong> <strong>eSATA</strong> <strong>6G</strong> card will be recognized by the BIOS as<br />
a “Marvell 88SE91xx Adapter” which is the chip utilized for the <strong>eSATA</strong> <strong>6G</strong> technology and<br />
control.<br />
PC<br />
In Windows Device Manager, the <strong>MAXPower</strong> <strong>eSATA</strong> <strong>6G</strong> card will be recognized as a<br />
Standard AHCI 1.0 Serial ATA <strong>Controller</strong> card.<br />
Page 5
<strong>Newer</strong><strong>Technology</strong> <strong>MAXPower</strong> <strong>eSATA</strong> <strong>6G</strong> <strong>PCIe</strong> <strong>2.0</strong><br />
Installation on Non-AHCI Systems<br />
The following Operating Systems do not have AHCI support and require a two-part driver install:<br />
• Windows 2000<br />
• Windows XP<br />
• Windows 2003<br />
Use the Windows Found New Hardware Install<br />
Wizard to install the drivers located on the included<br />
Driver Installation CD. Make sure the CD is inserted<br />
into your computer before beginning.<br />
Windows will locate the drivers on the Driver<br />
Installation CD at which point click on “Next” to<br />
continue installation.<br />
Windows will present a dialog box stating<br />
information about the Windows Logo program.<br />
Click on “Continue Anyway” to continue the<br />
installation.<br />
Upon successful installation, click “Finish” to<br />
complete the first driver installation. Repeat the<br />
same steps for the second part of driver installation.<br />
After completion, restart your computer.<br />
Page 6
Part 3: Troubleshooting & FAQ<br />
Troubleshooting Tips<br />
If a connected storage device is not recognized after connecting it:<br />
First try unplugging the <strong>eSATA</strong> cable from the <strong>MAXPower</strong> <strong>eSATA</strong> <strong>6G</strong> card and then plugging it back in. If the<br />
device is still not recognized, keep the storage device turned on and connected via <strong>eSATA</strong> to the <strong>MAXPower</strong><br />
<strong>eSATA</strong> <strong>6G</strong> card and restart your machine. Please contact Technical Support for further assistance.<br />
If the <strong>MAXPower</strong> e SATA <strong>6G</strong> card is not being recognized by the computer:<br />
First make sure the card is seated completely in the <strong>PCIe</strong> slot by reviewing the Hardware Installation steps.<br />
If the card is still not recognized, try installing the card into a different <strong>PCIe</strong> slot. If the card is still not<br />
recognized, please contact Technical Support for assistance.<br />
FAQ<br />
Does the <strong>MAXPower</strong> <strong>eSATA</strong> <strong>6G</strong> card support port multiplier enclosures?<br />
The <strong>MAXPower</strong> <strong>eSATA</strong> <strong>6G</strong> does not have support for port multiplier enclosures.<br />
Does the <strong>MAXPower</strong> <strong>eSATA</strong> <strong>6G</strong> card support booting?<br />
Booting from the <strong>MAXPower</strong> <strong>eSATA</strong> <strong>6G</strong> card is not currently supported for Mac. On PC’s running Windows 7<br />
or Vista, boot support can be enabled by enabling AHCI mode in the BIOS.<br />
Part 4: Contact Information<br />
Telephone<br />
(815) 308-7001<br />
8AM - 10PM CT Monday - Friday<br />
9AM - 4PM CT Saturday<br />
<strong>Newer</strong><strong>Technology</strong> <strong>MAXPower</strong> <strong>eSATA</strong> <strong>6G</strong> <strong>PCIe</strong> <strong>2.0</strong><br />
Live Chat<br />
Available 24 hours a day, 7 days a week through <strong>Newer</strong>Tech’s distributor, OWC.<br />
For more information, visit:<br />
http://www.newertech.com/support<br />
Email<br />
Submit your email at:<br />
http://www.newertech.com/support<br />
Page 7
<strong>Newer</strong><strong>Technology</strong> <strong>MAXPower</strong> <strong>eSATA</strong> <strong>6G</strong> <strong>PCIe</strong> <strong>2.0</strong><br />
FCC Certification Information<br />
FCC Part 15 Class B Radio Frequency Interference Statement<br />
This equipment has been tested and found to comply with the limits for a Class B digital device, pursuant<br />
to part 15 of the FCC Rules. These limits are designed to provide reasonable protection against harmful<br />
interference in a residential installation. This equipment generates, uses and can radiate radio frequency<br />
energy and, if not installed and used in accordance with the instructions, may cause harmful interference<br />
to radio communications. However, there is no guarantee that interference will not occur in a particular<br />
installation. If this equipment does cause harmful interference to radio or television reception, which can be<br />
determined by turning the equipment off and on, the user is encouraged to try to correct the interference<br />
by one or more of the following measures:<br />
• Reorient or relocate the receiving antenna<br />
• Increase the separation between the equipment and receiver<br />
• Connect the equipment into an outlet on a circuit different from that to which the receiver is<br />
connected.<br />
• Consult the dealer or an experienced radio/TV technician for help.<br />
Modifications not expressly approved by the manufacturer could void the user’s authority to operate the<br />
equipment under FCC rules.<br />
This device complies with part 15 of the FCC Rules. Operation is subject to the following two conditions:<br />
(1) this device may not cause harmful interference, and<br />
(2) this device must accept any interference received, including interference that may cause undesired<br />
operation.<br />
European Union Compliance Statement This Information Technologies Equipment has been tested and<br />
found to comply with the following European directives:<br />
• European Standard EN55022 (1998) Class B<br />
• European Standard EN55024 (1998)<br />
Page 8<br />
Revision 3 - 3/29/10 CH