Viessmann Anleitung 5134 - Seilzug - Reynaulds
Viessmann Anleitung 5134 - Seilzug - Reynaulds
Viessmann Anleitung 5134 - Seilzug - Reynaulds

Create successful ePaper yourself
Turn your PDF publications into a flip-book with our unique Google optimized e-Paper software.
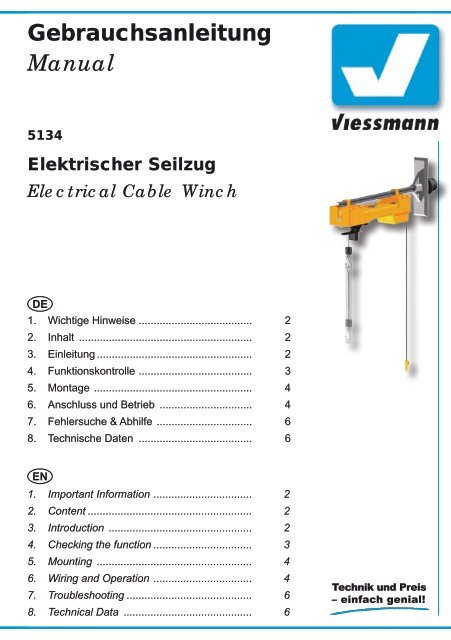
Gebrauchsanleitung<br />
Manual<br />
<strong>5134</strong><br />
Elektrischer <strong>Seilzug</strong><br />
Electrical Cable Winch<br />
DE<br />
1. Wichtige Hinweise ...................................... 2<br />
2. Inhalt .......................................................... 2<br />
3. Einleitung .................................................... 2<br />
4. Funktionskontrolle ...................................... 3<br />
5. Montage ..................................................... 4<br />
6. Anschluss und Betrieb ............................... 4<br />
7. Fehlersuche & Abhilfe ................................ 6<br />
8. Technische Daten ...................................... 6<br />
EN<br />
1. Important Information ................................. 2<br />
2. Content ....................................................... 2<br />
3. Introduction ................................................ 2<br />
4. Checking the function ................................. 3<br />
5. Mounting .................................................... 4<br />
6. Wiring and Operation ................................. 4<br />
7. Troubleshooting .......................................... 6<br />
8. Technical Data ........................................... 6
2<br />
DE<br />
1. Wichtige Hinweise<br />
Lesen Sie vor der ersten Benutzung des Produktes<br />
bzw. dessen Einbau diese <strong>Anleitung</strong> komplett<br />
und aufmerksam durch. Bewahren Sie diese<br />
<strong>Anleitung</strong> auf. Sie ist Teil des Produktes.<br />
Das Produkt richtig verwenden<br />
Das Produkt darf ausschließlich dieser <strong>Anleitung</strong><br />
gemäß verwendet werden. Dieser Elektrische<br />
<strong>Seilzug</strong> ist bestimmt<br />
• zum Einbau in eine Modelleisenbahnanlage<br />
oder ein Diorama<br />
• zum Anschluss an das mitgelieferte Schaltmodul<br />
und darüber an einen zugelassenen<br />
Modellbahntransformator bzw. an einer damit<br />
versorgten elektrischen Steuerung<br />
• zum Betrieb in trockenen Räumen.<br />
Jeder darüber hinausgehende Gebrauch gilt als<br />
nicht bestimmungsgemäß. Für daraus resultierende<br />
Schäden haftet der Hersteller nicht.<br />
2. Inhalt<br />
Beachten Sie:<br />
Das Modell des <strong>Seilzug</strong>s besteht aus filigranen<br />
Kunststoffteilen und einer empfindlichen<br />
Antriebsmechanik. Daher sollten Sie<br />
den <strong>Seilzug</strong> nie am Ausleger selbst, sondern<br />
nur an der Montageplatte oder dem<br />
Befestigungsstift hinten anfassen.<br />
Packungsinhalt überprüfen<br />
Kontrollieren Sie nach dem Auspacken den Lieferumfang<br />
auf Vollständigkeit:<br />
► <strong>Seilzug</strong> mit integrierter Antriebseinheit,<br />
► Schaltmodul für den elektrischen Anschluss,<br />
► diese <strong>Anleitung</strong>.<br />
3. Einleitung<br />
Die bewegten Modelle der Serie eMotion sorgen<br />
für Leben auf der Modelleisenbahn.<br />
Der speziell entwickelte Antrieb ist mit einer elektronischen<br />
Steuerung ausgerüstet, die realistische<br />
Bewegungsabläufe erzeugt. Der Antrieb ist fest<br />
mit dem Modell verbunden.<br />
Die elektronische Steuerung des <strong>Seilzug</strong>s ist im<br />
mitgelieferten Schaltmodul untergebracht. Mit Hilfe<br />
des Schaltmoduls wird der Wickelmotor des<br />
<strong>Seilzug</strong>s gesteuert und die Abschaltung des Motors<br />
bei Erreichen der jeweiligen Endpositionen<br />
sichergestellt.<br />
EN<br />
1. Important Information<br />
Please read this manual prior to first use of the<br />
product resp. its installation! Keep this manual. It<br />
is part of the product.<br />
Using the product for its correct<br />
purpose<br />
This product must only be used as required in<br />
this manual. This model is intended<br />
• for installation in model railroad layouts and<br />
dioramas<br />
• for connection to the enclosed electronic box<br />
„Schaltmodul“ and via that ot an authorized<br />
model railroad transformer or an electrical<br />
control system connected to one<br />
• for operation in a dry area.<br />
Using the product for any other purpose is not<br />
approved and is considered incorrect. The<br />
manufacturer cannot be held responsible for<br />
any damage resulting from the improper use of<br />
this product.<br />
2. Content<br />
Caution:<br />
The model of the electrical cable winch is<br />
made of very small and detailed plastic<br />
parts and a sensitive drive unit.<br />
So if you mount or unmount the model,<br />
don’t pull the winch itself. Take carefully the<br />
mounting plate instead.<br />
Checking the package contents<br />
Check the contents of the package for completeness<br />
after unpacking:<br />
► Electrical cable winch with drive unit,<br />
► switching module for the electrical connections,<br />
► this manual.<br />
3. Introduction<br />
The <strong>Viessmann</strong> moving models bring life to your<br />
model train layout.<br />
The especially developed drive unit contains a<br />
controller, which generates realistic movements.<br />
The drive unit is fixed to the model.<br />
The controller of the electrical cable winch is integrated<br />
in the enclosed switching module “<strong>Seilzug</strong>”.<br />
By the switching module, the rotation of the<br />
winch motor and the stop at the end positions is<br />
controlled.
Die Einsatzmöglichkeiten eines elektrischen <strong>Seilzug</strong>es<br />
sind fast unendlich. Vom kleinen Kran in<br />
Werkstätten über Holzverladeeinrichtungen in Sägewerken<br />
oder Hebeeinrichtungen in Maschinenhallen<br />
bis hin zu mittleren und großen Baustellen<br />
reicht das Einsatzgebiet elektrischer Winden.<br />
Der Fantasie und dem Spielspaß sind mit dem<br />
elektrischen <strong>Seilzug</strong> von <strong>Viessmann</strong> keine Grenzen<br />
gesetzt.<br />
Die Hubhöhe des <strong>Seilzug</strong>es lässt sich elektronisch<br />
einstellen, so dass der <strong>Seilzug</strong> für verschiedene<br />
Einsatzgebiete optimal eingerichtet werden kann.<br />
Mit dem <strong>Viessmann</strong> <strong>Seilzug</strong> können Sie das Beund<br />
Entladen von Zügen oder LKW an Güterverkehrsstellen<br />
nun auch im Modell nachbilden und<br />
mit viel Spielspaß richtig Betrieb machen.<br />
4. Funktionskontrolle<br />
Nehmen Sie den <strong>Seilzug</strong> vorsichtig aus der Verpackung.<br />
Führen Sie vor der Montage eine Funktionskontrolle<br />
durch.<br />
► Montieren Sie den <strong>Seilzug</strong> testweise an<br />
geeigneter Stelle.<br />
► Schließen Sie den <strong>Seilzug</strong> gemäß Abbildung 3<br />
an das Schaltmodul an.<br />
► Verbinden Sie den Stromanschluss (beschriftet<br />
mit „16 V=/~“) des Schaltmoduls mit einem geeigneten<br />
Modellbahntransformator (z. B. <strong>Viessmann</strong><br />
5200 oder 5201)<br />
► Verbinden Sie das braune Kabel des Trafos<br />
kurz zusätzlich mit dem markierten Eingang<br />
des Schaltmoduls (Vergleiche Abb. 3).<br />
Der <strong>Seilzug</strong> spult das Seil ab und stoppt in seiner<br />
Endlage. Ein erneuter Kontakt der braunen Leitung<br />
startet das Aufspulen des Seils.<br />
The possibilities to use the electrical cable winch<br />
are nearly infinitely. From a small crane in workshops<br />
to hoisting cranes in factories and freight<br />
stations, everywhere you can use winches.<br />
The <strong>Viessmann</strong> electrical cable winch offers you<br />
so much possibilities to play without limits.<br />
The length of the rope and therefore the height<br />
you can lift goods is adjustable by a learning function<br />
in the control module.<br />
The <strong>Viessmann</strong> cable winch allows to load and<br />
unload goods from freight trucks or trains!<br />
4. Checking the function<br />
Remove the winch from the box carefully. Check<br />
all functions prior to installation.<br />
► Mount the winch for testing at a usefull position.<br />
► Connect the winch to the switching module as<br />
shown in figure 3.<br />
► Connect the power input of the switching<br />
module (labeled with “16 V=/~”) to a 16 V transformer<br />
for model railways (e. g. <strong>Viessmann</strong><br />
5200 or 5201).<br />
► Then make a short contact between the brown<br />
output of the transformer and the control input<br />
of the switching module (see fig. 3).<br />
When you connect the input with the transformer,<br />
the winch rolls out or in the rope and stops in the<br />
respective end position.<br />
Abb. 1 Fig. 1 Abb. 2<br />
Fig. 2<br />
4 mm<br />
Klebstoff<br />
Glue<br />
3
5. Montage<br />
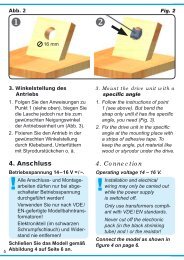
1. Bohren Sie an der Montagestelle ein Loch mit<br />
einem Durchmesser von 4 mm (Abb. 1).<br />
2. Führen Sie die Anschlusskabel zuerst durch<br />
das Montageloch und stecken Sie dann den<br />
<strong>Seilzug</strong> mit dem Befestigungsstift voran hinein.<br />
3. Befestigen Sie die Montageplatte des <strong>Seilzug</strong>es<br />
ggf. mit einem Tropfen Klebstoff am<br />
Montageort.<br />
4. Schrauben Sie das Schaltmodul nahe beim Antrieb<br />
unterflur an einen geeigneten Träger (z. B.<br />
Anlagengrundplatte oder Spanten). Die Kabel<br />
des <strong>Seilzug</strong>s müssen ohne mechanische Spannung<br />
bis zum Schaltmodul reichen.<br />
6. Anschluss und Betrieb<br />
Alle Anschluss- und Montagearbeiten dürfen<br />
nur bei abgeschalteter Betriebsspannung<br />
durchgeführt werden!<br />
Verwenden Sie nur nach VDE /EN-gefertigte<br />
Modellbahntransformatoren!<br />
Sichern Sie die Stromquellen unbedingt so<br />
ab, dass es bei einem Kurzschluss nicht<br />
zum Kabelbrand kommen kann.<br />
Die Betriebsspannung beträgt 16 V = / ~.<br />
Schließen Sie den <strong>Seilzug</strong> und das Schaltmodul<br />
gemäß den Abbildungen 3 oder 4 an.<br />
Gleichstrombetrieb: Schließen Sie das gelbe<br />
Kabel an den Minuspol des Trafos an.<br />
Analoge Ansteuerung<br />
Abbildung 3 zeigt, wie Sie den <strong>Seilzug</strong> mit Hilfe<br />
des <strong>Viessmann</strong> Tastenstellpultes 5547 anschließen<br />
können. Taster anderer Hersteller können Sie<br />
natürlich auch nutzen.<br />
Digitale Ansteuerung<br />
Der <strong>Viessmann</strong>-<strong>Seilzug</strong> kann auch von einem Digitalsystem<br />
angesteuert werden (Abb. 4). Beim<br />
Anschluss z. B. an den <strong>Viessmann</strong>-Magnetartikeldecoder<br />
5212 müssen Sie darauf achten, dass<br />
der rote und grüne Anschluss zur Steuerung gemeinsam<br />
beschaltet werden, damit jeder Tastendruck<br />
die Funktion des <strong>Seilzug</strong>es auslöst. Zum digitalen<br />
Schalten des <strong>Seilzug</strong>es benötigen Sie eine<br />
Ausgangsgruppe eines Magnetartikeldecoders.<br />
Der Magnetartikeldecoder 5212 (4-fach) ist kompatibel<br />
zu Märklin-Motorola und DCC. Damit lässt<br />
er sich mit den meisten am Markt vorhandenen<br />
Digitalzentralen wie z. B. <strong>Viessmann</strong> Commander,<br />
Digital plus (Lenz), Roco Digital, Fleischmann<br />
Twin Center, Digitrax, Uhlenbrock Intellibox, Tillig<br />
Digital, Märklin CS2 usw. steuern.<br />
5. Mounting<br />
1. Check that the electrical cable winch works<br />
properly as per the instructions above before<br />
you start installing it on the layout.<br />
2. Drill a hole of 4 mm diameter at the mounting<br />
place (Fig. 1).<br />
3. Insert the connection wires into the hole first.<br />
Then put the winch with the mounting foot<br />
into the hole.<br />
4. If needed, stick the mounting plate with a<br />
little bit of glue to the wall.<br />
5. Fix the switching module with screws near to<br />
the electrical cable winch on a suitable support<br />
(e. g. the ground plate of your model railway).<br />
The cables of the winch unit have to reach<br />
the switching module.<br />
6. Connections & Wiring<br />
The operation voltage is 16 V AC or DC.<br />
Installation and electrical wiring may only<br />
be carried out while the power supply is<br />
switched off.<br />
Only use transfor mers compliant with<br />
VDE / EN standards.<br />
The power sources must be protected to<br />
prevent the risk of burning wires.<br />
Now make the electrical connection as per<br />
figures 3 or 4.<br />
Direct current: Connect the yellow cable to the<br />
negative pole of the power supply.<br />
Analogue Wiring<br />
The conventional wiring is shown in figure 3. It<br />
shows how you can connect the electrical winch<br />
to a push-button panel (e. g. 5547).<br />
Digital Control<br />
The <strong>Viessmann</strong> electrical cable winch can also<br />
be operated with a digital system. Refer to figure<br />
4 (see below) for the correct wiring.<br />
Simply connect the wires to a digital solenoid<br />
drive decoder (e.g. <strong>Viessmann</strong> 5212 for Mot.<br />
and DCC).<br />
Remind, that the control cable (green) is connected<br />
to the red and green output of the digital<br />
solenoid drive decoder.<br />
The digital decoder 5212 (4 outputs) is compatible<br />
to Märklin-Motorola and DCC. Therefore<br />
it is compatible with many digital command<br />
stations: <strong>Viessmann</strong> Commander, Digital plus<br />
(Lenz), Roco Digital, Fleischmann Twin Center,<br />
4
Lernfunktion: Einstellen der Hubhöhe<br />
Die Hubhöhe des <strong>Seilzug</strong>s ist zwischen 5 und 80<br />
mm frei einstellbar. In der Werkseinstellung ist die<br />
Hubhöhe auf 80 mm (Vollauszug) eingestellt.<br />
Sie können die Hubhöhe jederzeit neu einstellen:<br />
1. Schließen Sie den <strong>Seilzug</strong> gemäß Abb. 3 oder<br />
4 an und schalten Sie die Stromversorgung ein.<br />
2. Halten Sie den Taster mindestens 2 Sekunden<br />
gedrückt und lassen ihn dann los. Der <strong>Seilzug</strong>haken<br />
fährt in die obere Endposition und dann<br />
dreimal kurz herauf und herunter.<br />
3. Der <strong>Seilzug</strong> fährt anschließend herunter, bis<br />
Sie den Taster kurz erneut drücken (siehe<br />
Punkt 4) oder er die maximale Länge erreicht.<br />
Digitrax, Uhlenbrock Intellibox, Tillig Digital, Märklin<br />
CS2 etc.<br />
Learning function: Setup of rope length<br />
The length of the rope is free adjustable from 5 to<br />
80 mm by a learning function. The default setting<br />
is 80 mm (maximum length).<br />
You can easily setup this value at any time:<br />
1. Connect the winch as shown in fig. 3 or 4 and<br />
switch on the power supply.<br />
2. Keep the pushbutton pushed for min. 2 seconds<br />
and then release the button. The winch<br />
goes into the upper position and then the hook<br />
goes shortly three times down and up.<br />
Abb. 4<br />
Fig. 4<br />
<strong>5134</strong><br />
rot<br />
red<br />
braun<br />
brown<br />
Digital (MM / DCC)<br />
z. B. Commander<br />
e. g. Commander<br />
Abb. 3<br />
Fig. 3<br />
or ws sw bl rt<br />
<strong>5134</strong> viessmann<br />
Elektr. <strong>Seilzug</strong><br />
16 V=/~<br />
- +<br />
ge<br />
bn<br />
M<br />
<strong>5134</strong><br />
grün<br />
green<br />
J K rt 1 gn rt 2 gn<br />
– + – +<br />
Adresse<br />
<strong>Viessmann</strong><br />
DCC-<br />
5212<br />
Magnetartikeldecoder<br />
~<br />
~<br />
E<br />
+ – + –<br />
gn 4 rt gn 3 rt<br />
gelb<br />
yellow<br />
z. B. 5212<br />
e. g. 5212<br />
16 V ~ / =<br />
braun / brown<br />
or ws sw bl rt<br />
viessmann<br />
Elektr. <strong>Seilzug</strong><br />
M<br />
<strong>5134</strong><br />
grün / green<br />
orange<br />
orange<br />
white<br />
weiß<br />
black<br />
schwarz<br />
blue<br />
blau<br />
red<br />
rot<br />
gelb<br />
yellow<br />
16 V=/~<br />
- +<br />
ge<br />
bn<br />
Universal Tasten - Stellpult<br />
or ws sw bl rt<br />
viessmann<br />
Elektr. <strong>Seilzug</strong><br />
M<br />
<strong>5134</strong><br />
5<br />
16 V ~ / =<br />
braun / brown<br />
<strong>Viessmann</strong><br />
z. B. 5547<br />
5547<br />
e. g. 5547<br />
16 V=/~<br />
- +<br />
ge bn
4. Sobald der <strong>Seilzug</strong> die gewünschte Länge erreicht<br />
hat, drücken Sie den Taster kurz erneut.<br />
Damit ist die Hubhöhe eingestellt. Kurzes Drücken<br />
des Tasters fährt den Haken nun jeweils in die<br />
obere bzw. untere Endlage.<br />
Sie können diesen Einstellvorgang (Punkte 1<br />
bis 4) jederzeit wiederholen. Die Einstellung der<br />
Hubhöhe bleibt auch nach dem Ausschalten bzw.<br />
Trennen der Stromversorgung gespeichert.<br />
Hinweis: Lernfunktion mit Digitalzentralen<br />
Auch mit Digitalzentralen wie dem <strong>Viessmann</strong><br />
Commander können Sie die Lernfunktion nutzen.<br />
Stellen Sie dazu die Impulsdauer in der Zentrale<br />
auf „Länge des Tastendrucks“ ein, damit sie den<br />
Lernmodus des <strong>Seilzug</strong>es aktivieren können.<br />
7. Fehlersuche & Abhilfe<br />
Jedes <strong>Viessmann</strong>-Produkt wird unter hohen Qualitätsstandards<br />
gefertigt und vor seiner Auslieferung<br />
geprüft. Sollte es dennoch zu einer Störung kommen,<br />
können Sie anhand der folgenden Punkte<br />
eine erste Überprüfung vornehmen. Testen Sie jedoch<br />
zuvor die Stromzuführungen.<br />
1. Der <strong>Seilzug</strong> spult das Seil nicht bis zur<br />
Maximallänge von ca. 80 mm ab:<br />
Vermutlich wurde über die Lernfunktion eine<br />
andere Hubhöhe eingestellt. Stellen Sie mit der<br />
Lernfunktion die gewünschte Hubhöhe neu ein.<br />
Sollte das Produkt beschädigt sein, geben Sie es<br />
in der zugehörigen Verpackung zu Ihrem Fachhändler<br />
oder senden Sie es direkt an den<br />
<strong>Viessmann</strong>-Service (Adresse siehe unten).<br />
8. Technische Daten<br />
Betriebsspannung 16 Volt =/~<br />
Stromaufnahme<br />
ca. 30 mA<br />
Umgebungstemperatur (Betrieb) 0 - + 60 °C<br />
Zulässige relative Luftfeuchtigkeit max. 85 %<br />
Maximale Hubhöhe<br />
ca. 80 mm<br />
Maximale Last am Haken<br />
25 g<br />
3. Then winch brings the hook down, until you<br />
push the button again (see next paragraph) or<br />
until it reaches the max. length.<br />
4. If the winch reaches the desired length, press<br />
the pushbutton again shortly.<br />
After that procedure, the length is set up. Short<br />
pressing of the pushbutton lets the winch go into<br />
the upper or lower endposition.<br />
You can repeat the setup procedure (points 1 to 4)<br />
at anytime. The adjusted length of the rope stays<br />
saved, even if you disconnect the power supply.<br />
Notice: Learning function with digital systems<br />
You can use the learning function with digital command<br />
stations as the <strong>Viessmann</strong> Commander too.<br />
Set the duration of the switch pulse to “key push”,<br />
so that you are able to activate the learning mode.<br />
7. Troubleshooting<br />
Every <strong>Viessmann</strong> product is manufactured under<br />
high quality standards and is tested before delivery.<br />
If there is a fault nevertheless, you can do a<br />
first check. At first check the power supply.<br />
1. The electrical cable winch doesn’t unwind<br />
the rope to the maximum length (80 mm):<br />
Probably the length of the rope is adjusted to<br />
another value by the learning function.<br />
Set up a new value by using the learning function<br />
as described above.<br />
If the product is damaged, send it in the original<br />
package directly for repair to your local dealer or<br />
to the <strong>Viessmann</strong> company (see below for address).<br />
8. Technical Data<br />
Operating voltage:<br />
16 V AC / DC<br />
Current consumption<br />
approx. 30 mA<br />
Ambient temperature in use 0 - +60 °C<br />
Comparative humidity allowed max. 85 %<br />
Maximum length of rope approx. 80 mm<br />
Maximum weight<br />
25 g<br />
Dieses Produkt ist kein Spielzeug. Nicht geeignet für<br />
Kinder unter 14 Jahren! <strong>Anleitung</strong> aufbewahren!<br />
This product is not a toy. Not suitable for children<br />
under 14 years! Keep these instructions!<br />
Ce produit n’est pas un jouet. Ne convient pas aux<br />
enfants de moins de 14 ans ! Conservez ce mode<br />
d’emploi !<br />
Dit produkt is geen speelgoed. Niet geschikt voor kinderen<br />
onder 14 jaar! Gebruiksaanwijzing bewaren!<br />
Questo prodotto non è un giocattolo. Non adatto a<br />
bambini al di sotto dei 14 anni! Conservare instruzioni<br />
per l’uso!<br />
Esto no es un juguete. No recomendado para menores<br />
de 14 años! Conserva las instrucciones de servicio!<br />
Modellspielwaren GmbH<br />
4/2010 Ko<br />
Stand 01<br />
Sach-Nr. 86983<br />
Made in Europe<br />
6