DA 1855A - Operator's Manual - Teledyne LeCroy
DA 1855A - Operator's Manual - Teledyne LeCroy
DA 1855A - Operator's Manual - Teledyne LeCroy

You also want an ePaper? Increase the reach of your titles
YUMPU automatically turns print PDFs into web optimized ePapers that Google loves.
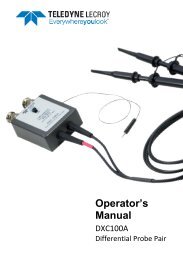
Operator’s <strong>Manual</strong><br />
Figure 2, Block Diagram V DIFF Mode.<br />
Setting Up the Oscilloscope with ProBus Interface<br />
Connect the RJ-45 type connector of the ProBus interface cable to the REMOTE connector and one<br />
end of the BNC cable to the AMPLIFIER OUTPUT on the rear panel of the <strong>DA</strong><strong>1855A</strong> and the other<br />
end of the BNC cable to the ProBus connector. Connect the ProBus connector to any vertical<br />
channel and, if necessary, press the Front Panel channel button to turn on the channel.<br />
Switch the power switch located on the <strong>DA</strong><strong>1855A</strong>’s rear panel to ON and observe the front panel<br />
indicators. Initially, each indicator light will be ON and the red OVERLOAD indicator will be ON as<br />
well. All segments in the Precision Voltage Generator display will be ON. The +INPUT and –INPUT<br />
Coupling Indicators will switch to OFF while the amplifier performs the Auto Zero function and back<br />
to the original setting. After approximately 3 seconds from turn on, the <strong>DA</strong><strong>1855A</strong> will return to the<br />
settings in effect when the power was last turned off. The oscilloscope’s input impedance has been<br />
set to 50 Ω automatically through the ProBus interface, the trace has been centered and all<br />
<strong>DA</strong><strong>1855A</strong> front panel controls are locked out.<br />
922258-00 Rev A 25