Manual - Cool Italia GmbH
Manual - Cool Italia GmbH
Manual - Cool Italia GmbH

You also want an ePaper? Increase the reach of your titles
YUMPU automatically turns print PDFs into web optimized ePapers that Google loves.
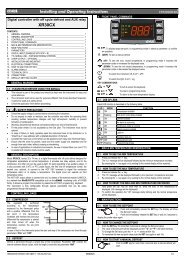
IC100CX<br />
dIXEL<br />
iCHiLL 100CX<br />
Quick reference guide<br />
1592022550 Quick reference guide IC100CX GB rel.1.0 03/03/2008 Page 1 di 39
IC100CX<br />
INDEX<br />
1. General Advices _________________________ 2<br />
2. User Interface ___________________________ 3<br />
3. Remote Keyboard VICX610 ________________ 4<br />
4. Display visualization______________________ 5<br />
5. Silencing the Buzzer______________________ 5<br />
6. First Installing ___________________________ 5<br />
7. How to Set the Clock RTC _________________ 5<br />
8. “ Hot Key” Programming __________________ 5<br />
9. Parameters Programming _________________ 6<br />
10. How to Change the Password ______________ 6<br />
11. Start / Stop Chiller or Heat Pump____________ 6<br />
12. Stand- By Function_______________________ 7<br />
13. “menu” Function ________________________ 7<br />
14. Keyboard Functions ______________________ 8<br />
15. Black Out_______________________________ 8<br />
16. Installing and Mounting ___________________ 9<br />
17. Electrical Wiring ________________________ 11<br />
18. Alarm Code and Events __________________ 12<br />
19. Connecting Diagram_____________________ 19<br />
20. Parameter Table ________________________ 22<br />
21. Technical Data _________________________ 39<br />
• Fit the probe where it is not accessible by the End User. The<br />
instrument must not be opened.<br />
• In case of failure or faulty operation send the instrument<br />
back to the distributor or to “Dixell s.r.l.” (see address) with a<br />
detailed description of the fault.<br />
• Consider the maximum current which can be applied to each<br />
relay (see Technical Data).<br />
• Ensure that the wires for probes, loads and the power supply<br />
are separated and far enough from each other, without<br />
crossing or intertwining.<br />
• In case of applications in industrial environments, the use of<br />
mains filters (our mod. FT1) in parallel with inductive loads<br />
could be useful.<br />
1.2 full <strong>Manual</strong><br />
Dixell S.p.A. reserves the right to modify or improve this<br />
manual without prior notice.<br />
The complete manual can be requested at the following<br />
email address.<br />
dixell@dixell.com<br />
1. GENERAL ADVICES<br />
• Please read this manual before using<br />
• This manual is part of the product and should be kept near the<br />
instrument for easy and quick reference.<br />
• The instrument shall not be used for purposes different from<br />
those described hereunder. It cannot be used as a safety<br />
device.<br />
• Check the application limits before proceeding.<br />
1.1 Safety Precaution<br />
• Check the supply voltage is correct before connecting the<br />
instrument.<br />
• Do not expose to water or moisture: use the controller only<br />
within the operating limits avoiding sudden temperature<br />
changes with high atmospheric humidity to prevent<br />
formation of condensation<br />
• Warning: disconnect all electrical connections before any<br />
kind of maintenance.<br />
1592022550 Quick reference guide IC100CX GB rel.1.0 03/03/2008 Page 2 di 39
IC100CX<br />
2. USER INTERFACE<br />
On if heaters are activated (antifreeze<br />
heaters or/and boiler)<br />
On flashing during defrost delay time.<br />
On during defrost<br />
On flashing if water flow switch is activated.<br />
When the pump is OFF, the led is on flashing<br />
to indicate the correct status of the digital<br />
input<br />
On if at least one water pump is on<br />
2.1 Display<br />
Upper digits (red color): configurable, see parameter<br />
CF36 (PB1, PB2, PB4, Set-point (parameter value)*,<br />
working set-point (real set-point modified from dinamic setpoint,<br />
Energy saving or function for units without water<br />
storage tank), Hysteresis, Machine status **))<br />
Lower digits (yellow color): configurable, see parameter<br />
CF43 (PB1, PB2, PB3, PB4, Set-point (parameter value)*,<br />
working set-point (real set-point modified from dinamic setpoint,<br />
Energy saving or function for units without water<br />
storage tank), Hysteresis, RTC, Machine status **)).<br />
*the display visualizes chiller set point when the unit is on<br />
and in chiller mode, heating set point when the unit is on<br />
and in heat pump mode, and OFF when the unit is in<br />
standby.<br />
**the display visualizes OnC when the unit is on and in<br />
chiller mode, OnH when the unit is on and in heat pump<br />
mode, and OFF when the unit is in standby.<br />
2.2 Icons of the Display<br />
Icon<br />
°C -°F<br />
bar-PSI<br />
Meaning<br />
ON when the display visualizes a temperature<br />
or a pressure<br />
On when the display visualizes the RTC,<br />
working hours, etc.<br />
On flashing in case of alarm<br />
On if the Energy Saving, dynamic set-point<br />
or function for units without water storage<br />
tank are active.<br />
OFF if a function above is enabled but not<br />
active.<br />
On during menù visualization<br />
2.3 Keys<br />
On if evaporator fans are activated<br />
On if a compressor is on.<br />
On flashing during the delay time for<br />
compressor activation.<br />
On if open collector output is active<br />
On if the controller is on in Heat or <strong>Cool</strong><br />
mode<br />
On in case of Low pressure alarm or High<br />
pressure alarm<br />
1. Push to enter in the Menu<br />
2. Push and hold (about 3 seconds)<br />
to set the clock<br />
1. Push to visualize the set point.<br />
2. Push and release 2 times: 1 st<br />
time is visualized the setpoint (the<br />
value of the parameter), 2 nd time<br />
is visualized the real setpoint<br />
(when Energy saving, Dynamic<br />
setpoint or function for units<br />
without water storage tank are<br />
enebled)<br />
3. Push and hold to modify the<br />
setpoint<br />
4. Push during parameter<br />
programming:<br />
- to enter in parameter<br />
modification<br />
- to confirm the changes of the<br />
parameter<br />
5. Menù AlrM: push to reset<br />
the alarms<br />
1592022550 Quick reference guide IC100CX GB rel.1.0 03/03/2008 Page 3 di 39
IC100CX<br />
1. Push and release to visualize all<br />
the probes configured<br />
2. In programming mode it scrolls<br />
the parameter list<br />
3. In programming mode increases<br />
the value of the parameters.<br />
3. REMOTE KEYBOARD VICX610<br />
1. Push and release to visualize all<br />
the probes configured<br />
2. In programming mode it scrolls<br />
the parameter list<br />
3. In programming mode decreases<br />
the value of the parameters<br />
1. Push and hold to switch on/off the<br />
machine (chiller or heat pump<br />
depending from CF31 parameter)<br />
2.4 Key Combination<br />
+<br />
+<br />
1. Push and old to switch on/off the<br />
machine (chiller or heat pump<br />
depending from CF31 parameter)<br />
Push and hold to enter on the<br />
parameters programming<br />
1. Push to exit to the<br />
programming<br />
parameters<br />
2. Push and hold to<br />
activate manual<br />
defrost<br />
Upper digits (red color): configurable by parameter CF44<br />
(PB1, PB2, PB4, Set-point (parameter value)*, working setpoint<br />
(real set-point modified from dinamic set-point,<br />
Energy saving or function for units without water storage<br />
tank), Hysteresis, Machine status **))<br />
Lower digits (yellow color): configurable by parameter<br />
CF45 (PB1, PB2, PB3, PB4, Set-point (parameter value)*,<br />
working set-point (real set-point modified from dinamic setpoint,<br />
Energy saving or function for units without water<br />
storage tank), Hysteresis, RTC, Machine status **)).<br />
*the display visualizes chiller set point when the unit is on<br />
and in chiller mode, heating set point when the unit is on<br />
and in heat pump mode, and OFF when the unit is in<br />
standby.<br />
**the display visualizes OnC when the unit is on and in<br />
chiller mode, OnH when the unit is on and in heat pump<br />
mode, and OFF when the unit is in standby.<br />
3.1 Key Function<br />
Concerning the meaning of the keys, refer to paragraph<br />
2.3.<br />
Air/Air unit: using the remote keyboard with NTC sensor<br />
on board (VICX610S model and parameter CF35 = 2), the<br />
read-out and the regulation are controlled by the NTC<br />
sensor mounted on the remote keyboard.<br />
1592022550 Quick reference guide IC100CX GB rel.1.0 03/03/2008 Page 4 di 39
IC100CX<br />
When there is not communication between the keyboard<br />
and the instrument the display visualizes ”noL” (no link<br />
message).<br />
4. DISPLAY VISUALIZATION<br />
Upper digits (red color): configurable by parameter CF36<br />
(PB1, PB2, PB4, Set-point (parameter value)*, working setpoint<br />
(real set-point modified from dinamic set-point,<br />
Energy saving or function for units without water storage<br />
tank), Hysteresis, Machine status **)<br />
Lower digits (yellow color): configurable by parameter<br />
CF43 (PB1, PB2, PB3, PB4, Set-point (parameter value)*,<br />
working set-point (real set-point modified from dinamic setpoint,<br />
Energy saving or function for units without water<br />
storage tank), Hysteresis, RTC, Machine status **).<br />
*the display visualizes chiller set point when the unit is on<br />
and in chiller mode, heating set point when the unit is on<br />
and in heat pump mode, and OFF when the unit is in<br />
standby.<br />
**the display visualizes OnC when the unit is on and in<br />
chiller mode, OnH when the unit is on and in heat pump<br />
mode, and OFF when the unit is in standby.<br />
4.1 Alarm visualization<br />
When the instrument detects an alarm, the lower display<br />
shows the alarm code alternated to probe value. The alarm<br />
icon ( ) is on flashing.<br />
In case of HIGH PRESSURE alarm (HP), LOW<br />
PRESSURE alarm (LP) or WATER FLOW SWITCH<br />
(Flow!), dedicated icons are on.<br />
5. SILENCING THE BUZZER<br />
Automatically: just after the alarm condition is recovered.<br />
<strong>Manual</strong>ly: push and release one of the keys; the buzzer is<br />
stopped even if the alarm is still active.<br />
6. FIRST INSTALLING<br />
After giving power supply to the instrument, the lower<br />
display can show “rtC” alternated to the probe value: it is<br />
necessary to set the clock time.<br />
If the probes are not connected, or they are faulty, the<br />
display shows the corresponding alarm code.<br />
In any case it is possible to proceed with clock setting.<br />
7. HOW TO SET THE CLOCK RTC<br />
1. Push “menu” key for some seconds and wait until<br />
“Hour” label appears.<br />
2. Push “SET”: the hour value starts flashing.<br />
3. Push n or o to change the value. Confirm by<br />
pushing “SET”; after some seconds the controller will<br />
show “Min”.<br />
4. Repeat points 2 and 3 to set other parameters:<br />
Min: minutes (0÷60)<br />
UdAy: day of the week (Sun = Sunday, Mon = Monday,<br />
tuE = Tuesday, UEd = Wednesday, tHu = Thursday, Fri<br />
= Friday, SAt = Saturday).<br />
dAy: day of the month(0÷31)<br />
MntH: Month (1÷12)<br />
yEAr: Year (00÷99)<br />
8. “ HOT KEY” PROGRAMMING<br />
8.1 Download from the Hot Key (previously<br />
programmed) to the Instrument Memory<br />
• The controller has to be not connected to the power<br />
supply<br />
• Insert the Hot Key into dedicated connector<br />
• Connect the controller to the power supply<br />
• The download starts and lasts some seconds.<br />
During this phase the whole regulation is locked and the<br />
“dOL” message is flashing.<br />
“End “ message will appear if the programming result is<br />
good, after 15 sec. the regulation automatically restarts<br />
If “Err” message appears the operation has given bad<br />
result. Turn the controller off and then on again to repeat<br />
the operation or restart the normal regulation.<br />
8.2 Upload the Parameter from the Controller to<br />
the Hot Key<br />
The instrument has to be connected to the power supply:<br />
1. Insert the Hot Key<br />
2. Push “menu”<br />
1592022550 Quick reference guide IC100CX GB rel.1.0 03/03/2008 Page 5 di 39
IC100CX<br />
3. Select “UPL” function with the arrow keys<br />
4. Push “SET” key. The Upload starts immediately.<br />
During this phase the whole regulation is locked and the<br />
“UPL” message is flashing.<br />
“End “ message will appear if the programming result is<br />
good, after 15s the regulation automatically restarts.<br />
If “Err” message appears the operation has given bad<br />
result. Repeat the points 1-4 for a new Upload.<br />
9. PARAMETERS PROGRAMMING<br />
9.1 “Pr1” Programming Level (User Level)<br />
How to access the “Pr1” User Level:<br />
1) Push “SET” + n key for some seconds; the upper<br />
display shows “ALL” (first family of parameters).<br />
and icons are flashing.<br />
2) Using o and n arrows scroll the other family labels.<br />
3) Push “SET” to enter and see all the parameter<br />
belonging to that family. The display shows the first<br />
parameter label and its value.<br />
Scroll the parameter list with o and n arrows or modify<br />
the value as described in 9.4.<br />
9.2 “Pr2” Programming Level (Factory Level)<br />
“Pr2” parameters level is accessible through password:<br />
1. Enter the “Pr1” level as described in 9.1.<br />
2. Search parameter “Pr2”; “PAS” label appears on<br />
the upper side.<br />
3. Push “SET”: the lower display shows “Pas” and the<br />
upper display shows “0” flashing.<br />
4. Set the password using o and n keys.<br />
5. Push SET key to confirm the value.<br />
9.3 How to Move a Parameter from “Pr2” Level<br />
to “Pr1” Level<br />
Enter the “Pr2” level and select the parameter to move;<br />
keeping pressed “SET” key, push and immediately release<br />
the n key.<br />
The led in lower display will light to indicate the presence of<br />
the parameter in “Pr1”. Then release also SET key.<br />
To move the parameter in “Pr2” again: keep pressed SET<br />
key and immediately release the n key. The led turns off<br />
so as the parameter is not more visible in “Pr1” but just in<br />
“Pr2”.<br />
9.4 Changing a Parameter Value<br />
1. Access to programming mode Pr1 or Pr2<br />
2. Select the parameter to modify<br />
3. Push “SET”<br />
4. Modify the value with o and n keys<br />
5. Push SET key again to confirm the new value; after<br />
some seconds next parameter will be displayed<br />
6. Exit the programming mode: push “SET” and o<br />
when a parameter label is displayed, or wait 15s<br />
(time-out) without pushing any keys.<br />
NOTE: The new parameter value is also confirmed if, after<br />
changing it, no SET key is pressed for the time-out to exit.<br />
ATTENTION:<br />
CF parameters (Configuration parameters) can be modified<br />
only if the controller is in OFF (digital input) or STD-BY.<br />
10. HOW TO CHANGE THE PASSWORD<br />
To change the password you must know the previous<br />
value. This operation is possible only starting from Pr2<br />
level.<br />
1) Enter the Pr1 level<br />
2) Select a family of parameters (ST, or CF, or SD,…)<br />
and push “SET” key<br />
3) Using o and n keys select the parameter “Pr2”,<br />
then push “SET” key. The lower display shows<br />
“PAS” and the upper display shows 0 flashing<br />
4) Use n and o keys to input the active<br />
PASSWORD; push “SET” to confirm the value and<br />
enter to Pr2 level<br />
5) Search “Pr2” parameter with n and o keys<br />
6) Push “SET” key to enter the new value (flashing)<br />
7) Insert the new password with o and n keys.<br />
8) Push “SET” key to confirm it.<br />
9) The upper display will flash for few seconds then,<br />
next parameter will be showed.<br />
10) Exit the programming by pushing “SET” and o<br />
together or wait the time-out.<br />
11. START / STOP CHILLER OR HEAT PUMP<br />
Press key for 3 seconds:<br />
• the unit starts or stops the Chiller cycle if the parameter<br />
CF31 =0<br />
• the unit starts or stops the Heat Pump cycle if the<br />
parameter CF31 =1<br />
The icon flashes for 3 seconds when the controller is<br />
waiting to turn on/off.<br />
To move from Chiller mode to Heat Pump mode or vice<br />
versa, it is necessary to stop the current cycle and then<br />
restart the new (Chiller STD-BY Heat Pump) .<br />
Press key for 3 seconds:<br />
• the unit starts or stops the Heat Pump cycle if parameter<br />
CF31 =0<br />
• the unit starts or stops the Chiller cycle if parameter<br />
CF31 =1<br />
1592022550 Quick reference guide IC100CX GB rel.1.0 03/03/2008 Page 6 di 39
IC100CX<br />
The icon flashes for 3 seconds when the controller is<br />
waiting to turn on/off.<br />
To move from Chiller mode to Heat Pump mode or vice<br />
versa, it is necessary to stop the current cycle and then<br />
restart the new (Chiller STD-BY Heat Pump) .<br />
12. STAND- BY FUNCTION<br />
When the controller is working, it is possible to switch it in<br />
std-by mode pushing or key.<br />
In stand-by is possible:<br />
• Display probes value using arrow keys.<br />
• Display and modify the set-point.<br />
• Enter the “menu” function<br />
13. “MENU” FUNCTION<br />
Access the “menù” to perform the following operations:<br />
1. Display and reset the active alarms.<br />
2. Display and reset working hours of compressors and<br />
water pumps<br />
3. Display delay time between two defrost cycles<br />
4. Upload the parameters map from the controller to the<br />
Hot Key (see 8.2).<br />
5. Display/reset the alarm log.<br />
During the Menu operations the “menu” icon is on.<br />
13.1 Access to the “menu”<br />
Push and release the “menu” key. The ” menu” icon is on.<br />
13.2 Exit from the “menu”<br />
Push and release the “menu” key or wait the time out.<br />
The “menu” icon disappears.<br />
13.3 How to Display the Alarm Events<br />
Enter the “menu”:<br />
1. Use o or n keys to find “ALrM” label.<br />
2. Push and release the “SET” key.<br />
3. Use o or n keys to scroll the alarm list.<br />
To exit the function “menu” push and release the “menu”<br />
key or wait the time-out. The “menu” icon disappears.<br />
13.4 How to Reset an Alarm Event<br />
1) Enter the function “menu”.<br />
2) Use o or n keys to find the “ALrM” label.<br />
3) Push and release the “SET” key the lower display<br />
shows the alarm code.<br />
4) Lower display shows the alarm code.<br />
Upper display shows “rSt” label if the alarm can be<br />
reset, “NO” label if it is not possible.<br />
Use o or n keys to scroll the alarm list.<br />
5) Push “SET” key when “rSt” is lighted to reset the<br />
alarm; after a while the read-out move to next alarm.<br />
6) To exit the function menu push and release the<br />
“menu” key or wait the time-out.<br />
The “menu” icon disappears.<br />
13.5 Compressors And Pumps Working hours<br />
Enter the function “menu”.<br />
Use o or n keys to find on the lower display:<br />
• C1Hr (Compressor n°1 working hours),<br />
• C2Hr (Compressor n°2 working hours),<br />
• PFHr (Evaporator Water pump or supply fan working<br />
hours),<br />
• PCHr (Condenser water pump working hours).<br />
The clock icon is lighted.<br />
13.6 Reset Working Hours<br />
1. Enter the function “menu”.<br />
2. Use o or n keys to find on the lower display the<br />
C1Hr, C2Hr, PFHr or PCHr.<br />
3. Push “SET” key for 3 seconds: the upper display<br />
shows “0” indicating the reset.<br />
4. To exit the function menu push and release the<br />
“menu” key or wait the time-out.<br />
The “menu” icon disappears.<br />
13.7 How to Display the Delay Time Between<br />
Two Defrost<br />
1. Enter the function “menu”.<br />
2. Use o or n keys to find on the upper display the<br />
“dEF” label; the lower display shows delay time<br />
between two defrost (minutes and seconds).<br />
3. The icon is flashing.<br />
4. To exit the function “menu” push and release the<br />
“menu” key or wait the time-out.<br />
The “menu” icon disappears.<br />
13.8 How to See the Alarm Log<br />
1. Enter the function “menu”.<br />
2. Use o or n keys to find “ALOG” label.<br />
3. Push “SET” key: the lower display shows the alarm<br />
code, the upper display shows “n°” followed by the<br />
progressive number.<br />
4. With o or n scroll the alarm list.<br />
5. To exit from ALOG function push “menu” key or wait<br />
the time-out delay is expired.<br />
Memory capacity is 50 alarm structured in a FIFO list (first<br />
in first out). Each new alarm will take the place of the oldest<br />
alarm contained in the list ( the read-out is ordered from the<br />
oldest to the newest).<br />
1592022550 Quick reference guide IC100CX GB rel.1.0 03/03/2008 Page 7 di 39
IC100CX<br />
13.9 How to Reset the Alarm Log<br />
1) Enter the function “menu”.<br />
2) Use o or n keys to find “ALOG” label.<br />
3) Push “SET” key.<br />
4) Use o or n keys to find “ArSt” (Alarm reset) label<br />
on the lower display; the upper display shows “PAS”.<br />
5) Push “SET” key and then enter the password value<br />
using o or n keys; confirm the value pushing<br />
“SET” key.<br />
6) The ArSt label starts flashing for 5s, to confirm the<br />
alarm logging data is reset.<br />
14. KEYBOARD FUNCTIONS<br />
15. BLACK OUT<br />
- when two function above are both enabled,<br />
the lower display shows “Setr” (real set point)<br />
and upper display shows its value.<br />
After a black-out:<br />
1. the controller restarts from the pervious status.<br />
2. The defrost cycle is stopped.<br />
3. All the working time delay will be reloaded.<br />
14.1 How to See the Set Point Value<br />
Push and release the “SET” key.<br />
Lower display shows:<br />
“SetC” set point chiller;<br />
“SetH” set point heat pump.<br />
The upper display shows the value.<br />
Note:<br />
SetH is available only if configured for Heat Pump.<br />
14.2 How to Change the Set Point Value<br />
1) Push and hold “SET” key (for about 3<br />
seconds).<br />
2) The setpoint value is flashing.<br />
3) Use o and n to increase or decrease the<br />
new value.<br />
4) Push and release “SET” key or wait the timeout<br />
to exit the programming.<br />
14.3 How to See the real Set Point<br />
When Energy Saving, Dynamic Set Point or Function For<br />
Units Without Water Storage Tank are enabled is possible<br />
to see the real set point.<br />
When the machine is running:<br />
• push “SET” key once: lower display shows “SetC”<br />
(setpoint chiller) or “SetH” (setpoint heat pump) and<br />
upper display shows the value.<br />
• push “SET” key again:<br />
- when “Energy Saving” is enabled the lower<br />
display shows “SEtS” (Energy saving setpoint)<br />
and upper display shows the value.<br />
- when “Dynamic Set” is enabled, the lower<br />
display shows “SEtd” (dynamic set point) and<br />
upper display shows the value.<br />
- when the function for units without water<br />
storage tank is enabled the lower display<br />
shows “Setr” (real set point) and upper display<br />
shows its value.<br />
1592022550 Quick reference guide IC100CX GB rel.1.0 03/03/2008 Page 8 di 39
IC100CX<br />
16. INSTALLING AND MOUNTING<br />
16.1 “C” Format (32*74mm)<br />
The instrument shall be mounted on panel, in a 29x71 mm hole, and fixed using the special bracket supplied.<br />
1592022550 Quick reference guide IC100CX GB rel.1.0 03/03/2008 Page 9 di 39
IC100CX<br />
16.2 Remote keyboard<br />
Remote terminal “Vertical” shape<br />
Mounted on a panel with 72x56 mm cut-out, fixed with screw.<br />
To obtain the IP65 protection, even for the panel, use the rubber gasket RGW-V (optional). For wall mounting use the V-KIT plastic<br />
adapter as illustrated in figure 2.<br />
Fig. 2<br />
The temperature range allowed for correct operation is --10÷60°C. Avoid places subject to strong vibrations, corrosive gases,<br />
excessive dirt or humidity. The same recommendations apply to probes. Let air circulate by the cooling holes.<br />
1592022550 Quick reference guide IC100CX GB rel.1.0 03/03/2008 Page 10 di 39
IC100CX<br />
17. ELECTRICAL WIRING<br />
The controller is provided with removable terminal blocks for wires having section not bigger than 1.0 mm 2 :<br />
14 ways for supplay, analogue inputs and digital inputs,<br />
12 ways or 6 ways for relays (depending on model)<br />
Note:<br />
• terminals 17-19 are connected inside the controller (common for the “relay n°1” (terminal 15) and “relay n°2” (terminal 16))<br />
• terminals 21-22 are connected inside the controller (common for the “relay n°3 ” (terminal 18) and “relay n°4” (terminal 20))<br />
A 5-ways connector is dedicated to the TTL / RS485 interface.<br />
The controller has 4 connectors (depending on model) for remote keyboard, open collector outputs, Pb4 probe, 4..20mA / 0..10Vcc<br />
analogue output; the connectors have 2 ways (0.2 mm 2 wires).<br />
Remote keyboard is provided with 2-ways screw terminal block for wires not bigger than 2.5 mm 2 .<br />
Check power supply data before connection wires.<br />
Keep the probe and the digital input wires separate from the power cable.<br />
Do not exceed the maximum rating current for each relay, check technical data and if the load is bigger, use filtered contactors.<br />
1592022550 Quick reference guide IC100CX GB rel.1.0 03/03/2008 Page 11 di 39
IC100CX<br />
18. ALARM CODE AND EVENTS<br />
Cod Meaning Cause / Origin Instrument behaviour Reset<br />
P1 Pb1 probe Probe Pb1 faulty or disconnected<br />
alarm<br />
P2 Pb2 probe<br />
alarm<br />
P3 Pb3 probe<br />
alarm<br />
P4 Pb4 probe<br />
alarm<br />
A01<br />
A02<br />
High pressure<br />
switch alarm<br />
Low pressure<br />
switch alarm<br />
Probe Pb2 faulty or disconnected<br />
Probe Pb3 faulty or disconnected<br />
Probe Pb4 faulty or disconnected<br />
Digital input for high pressure activated<br />
Digital input for low pressure activated<br />
Open collector / alarm<br />
relay ON.<br />
Buzzer ON.<br />
General alarm icon<br />
lighted.<br />
Alarm code on display.<br />
Open collector / alarm<br />
relay ON.<br />
Buzzer ON.<br />
General alarm icon<br />
lighted.<br />
Alarm code on display.<br />
Open collector / alarm<br />
relay ON.<br />
Buzzer ON.<br />
General alarm icon<br />
lighted.<br />
Alarm code on display.<br />
Open collector / alarm<br />
relay ON.<br />
Buzzer ON.<br />
General alarm icon<br />
lighted.<br />
Alarm code on display.<br />
Open collector / alarm<br />
relay ON.<br />
Buzzer ON.<br />
General alarm icon<br />
lighted.<br />
High pressure icon<br />
lighted.<br />
Alarm code on display.<br />
Open collector / alarm<br />
relay ON.<br />
Buzzer ON.<br />
General alarm icon<br />
lighted.<br />
Low pressure icon<br />
lighted.<br />
Alarm code on display.<br />
Automatic<br />
if the probe value<br />
recovers<br />
Automatic<br />
if the probe value<br />
recover<br />
Automatic<br />
if the probe value<br />
recovers<br />
Automatic<br />
if the probe value<br />
recovers<br />
Automatic<br />
It turns to manual after<br />
AL10 intervention<br />
<strong>Manual</strong>:<br />
after the alarm event<br />
expires, proceed with<br />
manual reset.<br />
Automatic.<br />
It turns to manual after<br />
AL02 events in 1 hour.<br />
<strong>Manual</strong>:<br />
after the alarm event<br />
expires, proceed with<br />
manual reset.<br />
1592022550 Quick reference guide IC100CX GB rel.1.0 03/03/2008 Page 12 di 39
IC100CX<br />
A03<br />
A04<br />
A05<br />
A06<br />
Low<br />
temperature<br />
alarm of the<br />
supplied<br />
temperature<br />
Low<br />
temperature<br />
alarm of the<br />
outlet air from<br />
evaporator.<br />
High<br />
temperature<br />
High pressure<br />
Low<br />
temperature<br />
Low pressure<br />
If CF01=0,1 and Pb1< AR03 for AR05<br />
seconds.<br />
If CF01=0,1 and Pb2< AR03 for AR05<br />
seconds<br />
Pb3 o Pb4 > AL11<br />
Pb3 o Pb4 < AL14<br />
Open collector / alarm<br />
relay ON.<br />
Buzzer ON.<br />
General alarm icon<br />
lighted.<br />
Alarm code on display.<br />
Open collector / alarm<br />
relay ON.<br />
Buzzer ON.<br />
General alarm icon<br />
lighted.<br />
Alarm code on display.<br />
Open collector / alarm<br />
relay ON.<br />
Buzzer ON.<br />
High alarm icon<br />
lighted.<br />
Alarm code on display.<br />
Open collector / alarm<br />
relay ON.<br />
Buzzer ON.<br />
General alarm icon<br />
lighted.<br />
Low alarm icon lighted.<br />
Alarm code on display.<br />
Automatic:<br />
when Pb1 value<br />
increases over<br />
AR03+AR04 value.<br />
Automatic.<br />
It turns to manual after<br />
Ar06 events in 1 hour.<br />
<strong>Manual</strong>:<br />
the event expires if<br />
Pb2 > (AR03+ AR04),<br />
then proceed with<br />
manual reset.<br />
Automatic.<br />
It turns to manual after<br />
AL10 events in 1 hour.<br />
<strong>Manual</strong>:<br />
the event expires if<br />
Pb3 or Pb4 < (AL11-<br />
AL12), then proceed<br />
with manual reset.<br />
Automatic.<br />
It turns to manual after<br />
AL06 events in 1 hour.<br />
<strong>Manual</strong>:<br />
the event expires if<br />
Pb3 or Pb4 ><br />
(AL14+AL15), then<br />
proceed with manual<br />
reset.<br />
A07 Anti freeze<br />
alarm<br />
A07 Anti freeze<br />
alarm<br />
motocondensi<br />
ng unit<br />
Digital input active;<br />
Anti freeze probe Pbr < AR03 in chiller mode<br />
for minimum AR05 seconds<br />
Pbr < AR27 in heat pump mode for minimum<br />
AR05 seconds<br />
Digital input active<br />
CF01=6,7 and CF05=2<br />
Open collector / alarm<br />
relay ON.<br />
Buzzer ON.<br />
General alarm icon<br />
lighted.<br />
Alarm code on display.<br />
Open collector / alarm<br />
relay ON.<br />
Buzzer ON.<br />
General alarm icon<br />
lighted.<br />
Alarm code on display.<br />
Automatic.<br />
It turns to manual after<br />
Ar06 events in 1 hour.<br />
<strong>Manual</strong>:<br />
the event expires if<br />
Pbr > (AR03+AR04)<br />
or Pbr ><br />
(AR27+AR28), or the<br />
event expires (digital<br />
input) then proceed<br />
with manual reset.<br />
Automatic.<br />
It turns to manual<br />
Ar06 events in 1 hour.<br />
<strong>Manual</strong>:<br />
the event expires,<br />
then proceed with<br />
manual reset.<br />
1592022550 Quick reference guide IC100CX GB rel.1.0 03/03/2008 Page 13 di 39
IC100CX<br />
A08<br />
Evaporator<br />
water flow<br />
alarm<br />
(air/water or<br />
water/water<br />
units)<br />
If CO11≠0:<br />
digital input active for AL06;<br />
the alarm signal is disabled for AL04 starting<br />
from the start-up of the evaporator pump.<br />
If CO11=0:<br />
digital input active for AL06.<br />
• If CO11=0<br />
Alarm relay/ open<br />
collector ON.<br />
Buzzer ON.<br />
General alarm icon<br />
lighted.<br />
Flashing “Flow!”<br />
icon.<br />
Code on display.<br />
If the unit is in stdby<br />
or OFF the icon<br />
is on to indicate the<br />
the real state of the<br />
pump and the flow<br />
switch.<br />
• If CO11≠0<br />
Alarm relay/ open<br />
collector ON.<br />
Buzzer ON.<br />
General alarm icon<br />
lighted.<br />
Flashing “Flow!”<br />
icon.<br />
Code on display.<br />
Automatic.<br />
Digital input not active<br />
for AL07.<br />
It turns to manual if<br />
the digital inpuct is<br />
active for AL05.<br />
<strong>Manual</strong>:<br />
Digital input not active<br />
for AL07, then<br />
proceed with manual<br />
reset.<br />
A09 Compressor 1<br />
thermal<br />
protection<br />
alarm<br />
A10 Compressor 2<br />
thermal<br />
protection<br />
alarm<br />
A11<br />
A12<br />
Condenser<br />
fan thermal<br />
protection<br />
alarm<br />
Defrost error<br />
alarm<br />
Digital input active; bypassed for AL08 upon<br />
start-up of compressor<br />
Digital input active<br />
Digital input active<br />
Defrost ended for maximum time dF07 with<br />
dF02=1<br />
Open collector / alarm<br />
relay ON.<br />
Buzzer ON.<br />
General alarm icon<br />
lighted.<br />
Alarm code on display.<br />
Open collector / alarm<br />
relay ON.<br />
Buzzer ON.<br />
General alarm icon<br />
lighted.<br />
Alarm code on display.<br />
Open collector / alarm<br />
relay ON.<br />
Buzzer ON.<br />
General alarm icon<br />
lighted.<br />
Alarm code on display<br />
General alarm icon<br />
lighted.<br />
Only alarm code on<br />
display.<br />
<strong>Manual</strong>:<br />
the event expires,<br />
then proceed with<br />
manual reset.<br />
<strong>Manual</strong>:<br />
the event expires,<br />
then proceed with<br />
manual reset.<br />
<strong>Manual</strong>:<br />
the event expires,<br />
then proceed with<br />
manual reset.<br />
Automatic:<br />
with next proper<br />
defrost cycle.<br />
Proceed with manual<br />
reset.<br />
1592022550 Quick reference guide IC100CX GB rel.1.0 03/03/2008 Page 14 di 39
IC100CX<br />
A13 Compressor 1<br />
maintenance<br />
warning<br />
A14 Compressor 2<br />
maintenance<br />
warning<br />
A15 Water pump<br />
or supply air<br />
fan (air/air)<br />
maintenance<br />
warning<br />
A16<br />
A17<br />
High<br />
temperature<br />
evaporator<br />
inlet water<br />
Thermal<br />
protection<br />
alarm for<br />
evaporator<br />
water pump /<br />
supply fan<br />
Running hour > CO14<br />
Running hour > CO15<br />
Running hour > CO16<br />
Activation from analogue input (in following<br />
priority: PB3 -> PB4 -> PB1->PB2), if probe<br />
value > AL24.<br />
The alarm is disabled for AL26 starting from<br />
ON compressor.<br />
Digital input activation<br />
Open collector / alarm<br />
relay ON.<br />
Buzzer ON.<br />
General alarm icon<br />
lighted.<br />
Alarm code on display.<br />
Open collector / alarm<br />
relay ON.<br />
Buzzer ON.<br />
General alarm icon<br />
lighted.<br />
Alarm code on display.<br />
Open collector / alarm<br />
relay ON.<br />
Buzzer ON.<br />
General alarm icon<br />
lighted.<br />
Alarm code on display.<br />
Alarm relay/ open<br />
collector ON.<br />
Buzzer ON.<br />
General alarm icon<br />
lighted .<br />
Code on display<br />
Alarm relay/ open<br />
collector ON.<br />
Buzzer ON.<br />
General alarm icon<br />
lighted .<br />
Code on display<br />
<strong>Manual</strong>:<br />
Proceed with the hour<br />
reset procedure 13.6<br />
<strong>Manual</strong>:<br />
Proceed with the hour<br />
reset procedure 13.6<br />
<strong>Manual</strong>:<br />
Proceed with the hour<br />
reset procedure 13.6<br />
Automatic<br />
If probe value < (AL24<br />
– AL25).<br />
With unit OFF or in<br />
std-by.<br />
Becomes manual after<br />
AL27 intervention.<br />
<strong>Manual</strong><br />
De-activation: probe<br />
value < (AL24 – AL25)<br />
and manual reset.<br />
<strong>Manual</strong><br />
the event expires,<br />
then proceed with<br />
manual reset<br />
A18<br />
Thermal<br />
protection<br />
alarm for<br />
condenser<br />
water pump<br />
Digital input activation<br />
• If CO11≠0<br />
Activates alarm relay/<br />
open collector output.<br />
Activates buzzer.<br />
General alarm icon<br />
lighted .<br />
Flashing flow regulator<br />
alarm icon.<br />
Code on display<br />
<strong>Manual</strong><br />
the event expires,<br />
then proceed with<br />
manual reset<br />
1592022550 Quick reference guide IC100CX GB rel.1.0 03/03/2008 Page 15 di 39
IC100CX<br />
A19<br />
Condenser<br />
water flow<br />
alarm<br />
Enabled if AL32≠0.<br />
If CO26≠0:<br />
digital input active for AL30;<br />
the alarm is disabled for AL04 starting from<br />
the start-up of the condenser pump.<br />
If CO26=0:<br />
digital input active for AL30.<br />
Alarm relay/ open<br />
collector ON.<br />
Buzzer ON.<br />
General alarm icon<br />
lighted .<br />
Flashing “Flow!” icon.<br />
Code on display.<br />
If the unit is in std-by<br />
or OFF the icon is on<br />
to indicate the the real<br />
state of the pump and<br />
the flow switch.<br />
Automatic<br />
Digital input not active<br />
for AL31.<br />
It turns to manual if<br />
the digital inpuct is<br />
active for AL29.<br />
<strong>Manual</strong><br />
Digital input not active<br />
for AL31 and proceed<br />
with manual reset.<br />
A20<br />
Condenser<br />
water pump<br />
maintenance<br />
alarm<br />
Operating hours > CO28<br />
Alarm relay/ open<br />
collector ON.<br />
Buzzer ON.<br />
General alarm icon<br />
lighted.<br />
Code on display.<br />
<strong>Manual</strong><br />
Reset operating<br />
hours, point 13.6<br />
rtC Clock alarm Need to set the clock time Open collector / alarm<br />
relay ON<br />
Buzzer ON<br />
General alarm icon<br />
lighted<br />
Alarm code on display<br />
rtF Clock alarm Faulty clock control Open collector / alarm<br />
relay ON<br />
Buzzer ON<br />
General alarm icon<br />
lighted<br />
EE<br />
ACF1<br />
EEPROM<br />
error alarm<br />
Configuration<br />
alarm<br />
Possible data losing<br />
Heat pump configured without reversing valve<br />
Alarm code on display<br />
Open collector / alarm<br />
relay ON<br />
Buzzer ON<br />
General alarm icon<br />
lighted<br />
Alarm code on display<br />
Open collector / alarm<br />
relay ON<br />
Buzzer ON<br />
General alarm icon<br />
lighted<br />
Alarm code on display<br />
<strong>Manual</strong>:<br />
Set the clock and then<br />
proceed with manual<br />
reset.<br />
<strong>Manual</strong>:<br />
Proceed with manual<br />
reset, if nothing<br />
happens change the<br />
clock.<br />
<strong>Manual</strong>:<br />
Proceed with manual<br />
reset., if nothing<br />
happens the controller<br />
is locked, no<br />
regulation available.<br />
Automatic<br />
After parameter<br />
proper debug.<br />
1592022550 Quick reference guide IC100CX GB rel.1.0 03/03/2008 Page 16 di 39
IC100CX<br />
ACF2<br />
ACF3<br />
ACF4<br />
ACF5<br />
FErr<br />
AFr<br />
Configuration<br />
alarm<br />
Configuration<br />
alarm<br />
Configuration<br />
alarm<br />
Configuration<br />
alarm<br />
Functioning<br />
alarm<br />
Frequency<br />
alarm<br />
Air/air or H2O/air unit and:<br />
• Fa02≠0 and ventilation probe not<br />
configured<br />
• Chiller parameters configuration<br />
differents from FA13
IC100CX<br />
ALOC<br />
bLOC<br />
General alarm<br />
for machine<br />
block<br />
General<br />
alarm, signal<br />
only<br />
Digital input activated for continuous time ><br />
AL21.<br />
Alarm enabled only if AL23=1<br />
Digital input activated for continuous time ><br />
AL21.<br />
Alarm enabled only if AL23=0<br />
Alarm relay/ open<br />
collector ON.<br />
Buzzer ON<br />
Flashing flow regulator<br />
alarm icon<br />
Code on display<br />
Alarm relay/ open<br />
collector ON.<br />
Buzzer ON.<br />
Flashing flow regulator<br />
alarm icon<br />
Code on display<br />
Automatic<br />
Becomes manual after<br />
AL20 intervention<br />
<strong>Manual</strong><br />
De-activation: digital<br />
input not enabled for<br />
continuous time ><br />
AL22 and manual<br />
reset procedure.<br />
Automatic<br />
The alarm is reset<br />
automatically and<br />
does not depend on<br />
AL20<br />
1592022550 Quick reference guide IC100CX GB rel.1.0 03/03/2008 Page 18 di 39
IC100CX<br />
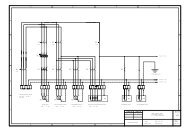
19. CONNECTING DIAGRAM<br />
19.1 Model with 5 internal relays and 1 modulating output (0..10V or 4..20mA)<br />
MF ID1, MF ID2, MF ID5 = multifunction digital inputs<br />
ID3 = high pressure digital input<br />
ID4 = low pressure digital input<br />
RL1 = compressor relay<br />
MF RL2, MF RL3, MF RL4, MF RL5 = multifunction<br />
relays<br />
MF o.c. out = multifunction open collector output (for<br />
external relay)<br />
Pb1, Pb2, Pb3, Pb4 = NTC probe or digital input<br />
Tk = output for external fan speed controller<br />
Analog output = output 0..10V / 4..20mA for external fan<br />
speed module (for condenser fan or modulating<br />
evaporator water pump)<br />
19.2 Model with triac on board and ratiometric pressure trasducer (Pb3)<br />
MF ID1, MF ID2, MF ID5 = multifunction digital inputs<br />
ID3 = high pressure digital input<br />
ID4 = low pressure digital input<br />
RL1 = compressor relay<br />
MF RL2, MF RL3, MF RL4 = multifunction relays<br />
RL5 = output for multifunction external relay<br />
Triac out fan = output for condenser fan<br />
Pb1, Pb2, Pb4 = NTC probe or digital input<br />
Pb3 = ratiometric pressure trasducer<br />
MF o.c. out = multifunction open collector output (for external<br />
relay)<br />
1592022550 Quick reference guide IC100CX GB rel.1.0 03/03/2008 Page 19 di 39
IC100CX<br />
19.3 Model with 5 internal relays and pressure trasducer (Pb3)<br />
MF ID1, MF ID2, MF ID5 = multifunction digital inputs<br />
ID3 = high pressure digital input<br />
ID4 = low pressure digital input<br />
MF RL2, MF RL3, MF RL4, MF RL5 = multifunction relays<br />
Pb1, Pb2, Pb4 = NTC probe or digital input<br />
Pb3 = pressure trasducer<br />
Tk = output for external fan speed controller<br />
MF o.c. out = multifunction open collector output (for<br />
external relay)<br />
19.4 Model with 5 internal relays and ratiometric pressure trasducer (Pb3)<br />
MF ID1, MF ID2, MF ID5 = multifunction digital inputs<br />
ID3 = high pressure digital input<br />
ID4 = low pressure digital input<br />
MF RL2, MF RL3, MF RL4, MF RL5 = multifunction relays<br />
Pb1, Pb2, Pb4 = NTC probe or digital input<br />
Pb3 = ratiometric pressure trasducer<br />
Tk = output for external fan speed controller<br />
MF o.c. out = multifunction open collector output (for external<br />
relay)<br />
1592022550 Quick reference guide IC100CX GB rel.1.0 03/03/2008 Page 20 di 39
IC100CX<br />
19.5 Accessories<br />
Serie XV: fan speed controller (0,5KW, 1KW and 2,2KW)<br />
CW15-KIT e CWC15-KIT: Ichill wiring kit for 5 realys model and 4 relays + 1 triac<br />
model<br />
XJ485CX: TTL/RS485 serial interface to connect the controller to the supervising<br />
system<br />
RT314 Kit: relay module (DIN rail mounting)<br />
Prog TOOL KIT: programming kit to manage parameters map from the<br />
Personal Computer<br />
Hot key: parameters copying key<br />
1592022550 Quick reference guide IC100CX GB rel.1.0 03/03/2008 Page 21 di 39
IC100CX<br />
20. PARAMETER TABLE<br />
SUB MENU SELECTIONS<br />
LABEL<br />
ALL<br />
ST<br />
CF<br />
SD<br />
ES<br />
CO<br />
FA<br />
Ar<br />
DF<br />
AL<br />
Meaning<br />
Shows the whole set of parameters<br />
It contains only the regulation parameters<br />
It contains only the configuration parameters<br />
It contains only the dynamic Set point parameters<br />
It contains only the Energy Saving parameters<br />
It contains only the compressor parameters<br />
It contains only the fan regulation parameters<br />
It contains only the anti freeze parameters<br />
It contains only the defrost parameters<br />
It contains only the alarm parameters<br />
Regulation Parameters<br />
Parameter Description Min Max Meas. Resolution<br />
ST01 Summer Set point ST05 ST06 °C/°F<br />
Decimal<br />
integer<br />
ST02 Summer differential<br />
0.0 25.0 °C Decimal<br />
0 45 °F integer<br />
ST03 Winter Set point ST07 ST08 °C/°F<br />
Decimal<br />
integer<br />
ST04 Winter differential<br />
0.0 25.0 °C Decimal<br />
0 45 °F integer<br />
ST05 Minimum set point limit for ST01 (summer)<br />
-50.0<br />
°C Decimal<br />
ST01<br />
-58<br />
°F integer<br />
ST06 Maximum set point limit for ST01 (summer) ST01<br />
110 °C Decimal<br />
230 °F integer<br />
ST07 Minimum set point limit for ST03 (winter)<br />
-50.0<br />
°C Decimal<br />
ST03<br />
-58<br />
°F integer<br />
ST08 Maximum set point limit for ST03 (winter) ST03<br />
110 °C Decimal<br />
230 °F integer<br />
ST09 Regulation band<br />
Function for units without water storage tank<br />
0.0 25.0 °C Decimal<br />
0 45 °F integer<br />
Parameter Description Min Max Meas. Resolution<br />
ST10 Chiller unit without water storage tank<br />
0 1<br />
0= function disabled<br />
1= function activated<br />
ST11 Minimum temperature Set point for outlet water in chiller<br />
mode (unit without water storage tank)<br />
-50.0<br />
-58<br />
110<br />
230<br />
°C<br />
°F<br />
Dec<br />
int<br />
1592022550 Quick reference guide IC100CX GB rel.1.0 03/03/2008 Page 22 di 39
IC100CX<br />
ST12 Maximum temperature Set point for outlet water in HP<br />
function (unit without water storage tank)<br />
-50.0<br />
-58<br />
110<br />
230<br />
°C<br />
°F<br />
Dec<br />
int<br />
ST13 Differential set point for chiller / heat pump function 0.0<br />
0<br />
25.0<br />
45<br />
°C<br />
°F<br />
Dec<br />
int<br />
ST14 Offset of the differential for chiller / HP function 0.0<br />
0<br />
25.0<br />
45<br />
°C<br />
°F<br />
Dec<br />
int<br />
ST15 Compressor operation time above which the delta set point 0 250 Sec 10 sec<br />
and delta differential for chiller / HP function is decreased<br />
ST16 Constant for calculationg the set point value and differential 0 250<br />
for chiller/HP function<br />
ST17 Delay for changing the operating set point 1 250 Sec 10 sec<br />
Geothermal chiller function<br />
Parameter Description Min Max Meas. Resolution<br />
ST18 Room set point in chiller function ST20 ST21 °C/°F dec/int<br />
ST19 Room differential in chiller function 0.0<br />
0<br />
25.0<br />
45<br />
°C<br />
°F<br />
Dec<br />
int<br />
ST20 Minimum value of the room set point in chiller function -50.0<br />
-58<br />
ST18 °C<br />
°F<br />
Dec<br />
int<br />
ST21 Maximum value of the room set point in chiller function<br />
110 °C Dec<br />
ST18<br />
230 °F int<br />
ST22 Room set point in heat pump function ST24 ST25 °C/°F dec/int<br />
ST23 Room differential in heat pump function 0.0<br />
0<br />
25.0<br />
45<br />
°C<br />
°F<br />
Dec<br />
int<br />
ST24 Minimum value of the room set point in heat pump function -50.0<br />
-58<br />
ST22 °C<br />
°F<br />
Dec<br />
int<br />
ST25 Maximum value of the room set point in heat pump function<br />
110 °C Dec<br />
ST22<br />
230 °F int<br />
Pr2 Password 0 999<br />
Configuration Parameters<br />
Parameter Description Min Max Meas. Resolution<br />
CF01 Unit model:<br />
0 3<br />
0= Chiller air / air<br />
1= Chiller air / water<br />
2= Chiller water / water<br />
3= Chiller water / water with reversal on water circuit<br />
CF02 Motocondensing unit<br />
0 1<br />
0= No<br />
1= Yes<br />
CF03 Regulation probe<br />
0 2<br />
0= Pb1 regulation<br />
1= Pb2 regulation<br />
2= PB2 regulation and compressors activation with user set<br />
on PB1 probe<br />
CF04 Pb1 configuration<br />
0= Probe not enabled<br />
1= NTC temperature of evaporator inlet<br />
2= Digital input for temperature regulation demand<br />
3= Digital input cooling demand<br />
0 3<br />
1592022550 Quick reference guide IC100CX GB rel.1.0 03/03/2008 Page 23 di 39
IC100CX<br />
CF05<br />
CF06<br />
CF07<br />
CF08<br />
Pb2 configuration<br />
0= Probe not enabled<br />
1= NTC temperature of evaporator outlet<br />
2= Digital Input for antifreeze alarm<br />
3= Digital input for heating demand<br />
Pb3 configuration<br />
0= Probe not enabled<br />
1= NTC temperature condensing control<br />
2= 4..20mA for condensing pressure<br />
3= 4..20ma for Dynamic Set point<br />
4= NTC temperature for anti freeze alarm (water/water)<br />
5= NTC high temperature probe of system inlet water<br />
6= 0..5V for condensing pressure<br />
Pb4 configuration<br />
0= Probe not enabled<br />
1= NTC condensing control<br />
2= Multifunction digital input<br />
3= External air temperature<br />
4= NTC temperature for anti freeze alarm (water/water)<br />
5= NTC temperature for combined defrost<br />
6= NTC temperature for logging<br />
6= NTC condenser outlet temperature (water/water units<br />
whith reversal on water circuit)<br />
7= NTC high temperature probe of system inlet water<br />
ID1 configuration<br />
0= 1 st compressor thermal protection<br />
1= Condenser fan thermal protection<br />
2= Evaporator flow switch alarm<br />
3= Remote On/off<br />
4= Remote <strong>Cool</strong>ing/Heating<br />
5= 2 nd compressor thermal protection<br />
6= 2 nd compressor or step request (Motocondensing unit)<br />
7= End defrost<br />
8= Energy Saving<br />
9= Anti Freeze alarm<br />
10= 1 st and 2 nd compressor thermal protection<br />
11= General alarm (unit shutdown)<br />
12= Evaporator water pump thermal protection alarm/<br />
supply fan thermal protection alarm<br />
13= Condenser water pump thermal protection alarm<br />
14= Condenser flow switch alarm<br />
15= not used<br />
0 3<br />
0 6<br />
0 7<br />
0 15<br />
1592022550 Quick reference guide IC100CX GB rel.1.0 03/03/2008 Page 24 di 39
IC100CX<br />
CF09<br />
CF10<br />
ID2 configuration<br />
0= 1 st compressor thermal protection<br />
1= Condenser fan thermal protection<br />
2= Evaporator flow switch alarm<br />
3= Remote On/off<br />
4= <strong>Cool</strong>ing/Heating<br />
5= 2 nd compressor thermal protection<br />
6= 2 nd compressor or step request (Motocondensing unit)<br />
7= End defrost<br />
8= Energy Saving<br />
9= Anti Freeze alarm<br />
10= 1 st and 2 nd compressor thermal protection<br />
11= General alarm for total unit shutdown<br />
12= Evaporator water pump thermal protection alarm/<br />
supply fan thermal protection alarm<br />
13= Condenser water pump thermal protection alarm<br />
14= Condenser flow switch alarm<br />
15= not used<br />
ID5 configuration<br />
0= 1 st compressor thermal protection<br />
1= Condenser fan thermal protection<br />
2= Evaporator flow switch alarm<br />
3= Remote On/off<br />
4= <strong>Cool</strong>ing/Heating<br />
5= 2 nd compressor thermal protection<br />
6= 2 nd compressor or step request (Motocondensing unit)<br />
7= End defrost<br />
8= Energy Saving<br />
9= Anti Freeze alarm<br />
10= 1 st and 2 nd compressor thermal protection<br />
11= General alarm for total unit shutdown<br />
12= Evaporator water pump thermal protection alarm/<br />
supply fan thermal protection alarm<br />
13= Condenser water pump thermal protection alarm<br />
14= Condenser flow switch alarm<br />
15= not used<br />
0 15<br />
0 15<br />
1592022550 Quick reference guide IC100CX GB rel.1.0 03/03/2008 Page 25 di 39
IC100CX<br />
CF11<br />
CF12<br />
CF13<br />
CF14<br />
CF15<br />
CF16<br />
CF17<br />
CF18<br />
CF19<br />
Pb4 configuration in digital input mode<br />
0= 1 st compressor thermal protection<br />
1= Condenser fan thermal protection<br />
2= Evaporator flow switch alarm<br />
3= Remote On/off<br />
4= <strong>Cool</strong>ing/Heating<br />
5= 2 nd compressor thermal protection<br />
6= 2 nd compressor or step request (Motocondensing unit)<br />
7= End defrost<br />
8= Energy Saving<br />
9= Anti Freeze alarm<br />
10= 1 st and 2 nd compressor thermal protection<br />
11= General alarm for total unit shutdown<br />
12= Evaporator water pump thermal protection alarm/<br />
supply fan thermal protection alarm<br />
13= Condenser water pump thermal protection alarm<br />
14= Condenser flow switch alarm<br />
15= not used<br />
ID1 input polarity<br />
0= active for closed contact<br />
1= active for open contact<br />
ID2 input polarity<br />
0= active for closed contact<br />
1= active for open contact<br />
ID3 input polarity<br />
0= active for closed contact<br />
1= active for open contact<br />
ID4 input polarity<br />
0= active for closed contact<br />
1= active for open contact<br />
ID5 input polarity<br />
0= active for closed contact<br />
1= active for open contact<br />
Pb1 input polarity<br />
0= active for closed contact<br />
1= active for open contact<br />
Pb2 input polarity<br />
0= active for closed contact<br />
1= active for open contact<br />
Pb4 input polarity<br />
0= active for closed contact<br />
1= active for open contact<br />
0 15<br />
0 1<br />
0 1<br />
0 1<br />
0 1<br />
0 1<br />
0 1<br />
0 1<br />
0 1<br />
1592022550 Quick reference guide IC100CX GB rel.1.0 03/03/2008 Page 26 di 39
IC100CX<br />
CF20 RL4 configuration of the relay 4<br />
0 10<br />
0 = Alarm relay<br />
1 = compressor 1 capacity step<br />
2 = compressor 2<br />
3 = ON/OFF ventilation<br />
4 = reversing valve<br />
5 = anti-freezer heaters / integration heater n.1<br />
6 = solenoid valve on water circuit<br />
7 = solenoid valve on water circuit only for heat pump<br />
8= anti-freezer heaters / integration heater n. 2<br />
9 = evaporator water pump / supply fan (air / air unit)<br />
10= condenser water pump<br />
CF21 RL5 configuration of the relay 5<br />
0 10<br />
0 = Alarm relay<br />
1 = compressor 1 capacity step<br />
2 = compressor 2<br />
3 = ON/OFF ventilation<br />
4 = reversing valve<br />
5 = anti-freezer heaters / integration heater n.1<br />
6 = solenoid valve on water circuit<br />
7 = solenoid valve on water circuit only for heat pump<br />
8= anti-freezer heaters / integration heater n. 2<br />
9 = evaporator water pump / supply fan (air / air unit)<br />
10= condenser water pump<br />
CF22 4mA / 0,5V corresponding to the pressure value of the<br />
transducer<br />
0.0<br />
0<br />
50.0<br />
725<br />
CF23 20mA / 5V corresponding to the pressure value of the 0.0 50.0<br />
transducer<br />
0 725<br />
CF24 Pb1 Offset -12.0 12.0<br />
-21.6 21.6<br />
CF25 Pb2 Offset -12.0 12.0<br />
-21.6<br />
CF26 Pb3 Offset -12.0<br />
-21.6<br />
-12<br />
-174<br />
21.6<br />
12.0<br />
21.6<br />
12<br />
174<br />
CF27 Pb4 Offset -12.0<br />
-21.6<br />
12.0<br />
21.6<br />
CF28 Chiller or Heat Pump configuration<br />
0 4<br />
0= chiller and heat pump selected by keyboard<br />
1= chiller and heat pump selected by digital input<br />
2= chiller and heat pump selected by probe<br />
3= only chiller unit<br />
4= only heat pump unit<br />
CF29 Automatic Changeover Setpoint -50.0<br />
-58<br />
110<br />
230<br />
CF30 Differential for functioning mode 0.0 25.0<br />
0 45<br />
CF31 Chiller or Heat pump key configuration<br />
0 1<br />
0= chiller / heat pump<br />
1= chiller / heat pump<br />
Bar<br />
Psi<br />
Bar<br />
Psi<br />
°C<br />
°F<br />
°C<br />
°F<br />
°C<br />
°F<br />
Bar<br />
Psi<br />
°C<br />
°F<br />
°C<br />
°F<br />
°C<br />
°F<br />
Decimal<br />
integer<br />
Decimal<br />
integer<br />
Decimal<br />
integer<br />
Decimal<br />
integer<br />
Decimal<br />
Integer<br />
Decimal<br />
integer<br />
Decimal<br />
integer<br />
Decimal<br />
integer<br />
Decimal<br />
integer<br />
1592022550 Quick reference guide IC100CX GB rel.1.0 03/03/2008 Page 27 di 39
IC100CX<br />
CF32 Celsius or Fahrenheit selection<br />
0 1<br />
0= °C / °BAR<br />
1= °F / °psi<br />
CF33 Power supply frequency<br />
0 2<br />
0= 50 Hz<br />
1= 60 Hz<br />
2 = DC power supply (PWM configrured as output for an<br />
external alarm relay)<br />
CF34 Serial Address for monitoring 1 247<br />
CF35 Remote terminal keyboard<br />
0 2<br />
0= Not used<br />
1= 6 keys<br />
2= 6 keys with NTC probe mounted on board<br />
CF36 Default viewing of upper display of the controller<br />
0 8<br />
0 = PB1 visualization<br />
1 = PB2 visualization<br />
2 = No visualization<br />
3 = PB4 visualization<br />
4 = Real working set point (set point modified from Energy<br />
Saving, Dynamic set point, function for units without water<br />
storage tank)<br />
5 = Unit status<br />
6 = No visualization<br />
7 = No visualization<br />
8 = Working differential<br />
9 = Unit set point (parameter value)<br />
CF37 Firmware Release<br />
CF38<br />
CF39<br />
CF40<br />
Eeprom – Parameter mapping<br />
RL2 configuration<br />
0 = Alarm relay<br />
1 = compressor 1 capacity step<br />
2 = compressor 2<br />
3 = ON/OFF ventilation<br />
4 = reversing valve<br />
5 = anti-freezer heaters / integration heater n.1<br />
6 = solenoid valve on water circuit<br />
7 = solenoid valve on water circuit only for heat pump<br />
8= anti-freezer heaters / integration heater n. 2<br />
9 = evaporator water pump / supply fan (air / air unit)<br />
10= condenser water pump<br />
RL3 configuration<br />
0 = Alarm relay<br />
1 = compressor 1 capacity step<br />
2 = compressor 2<br />
3 = ON/OFF ventilation<br />
4 = reversing valve<br />
5 = anti-freezer heaters / integration heater n.1<br />
6 = solenoid valve on water circuit<br />
7 = solenoid valve on water circuit only for heat pump<br />
8= anti-freezer heaters / integration heater n. 2<br />
9 = evaporator water pump / supply fan (air / air unit)<br />
10= condenser water pump<br />
0 10<br />
0 10<br />
1592022550 Quick reference guide IC100CX GB rel.1.0 03/03/2008 Page 28 di 39
IC100CX<br />
CF41<br />
CF42<br />
CF43<br />
CF44<br />
CF45<br />
Open collector output configuration<br />
0 = Alarm relay<br />
1 = compressor 1 capacity step<br />
2 = compressor 2<br />
3 = ON/OFF ventilation<br />
4 = reversing valve<br />
5 = anti-freezer heaters / integration heater n.1<br />
6 = solenoid valve on water circuit<br />
7 = solenoid valve on water circuit only for heat pump<br />
8= anti-freezer heaters / integration heater n. 2<br />
9 = evaporator water pump / supply fan (air / air unit)<br />
10= condenser water pump<br />
Switching time of reversing valve when the compressor is<br />
switched off<br />
Default viewing of lower display of the controller<br />
0 = PB1 visualization<br />
1 = PB2 visualization<br />
2 = PB3 visualization<br />
3 = PB4 visualization<br />
4 = Real working set point (set point modified from Energy<br />
Saving, Dynamic set point, function for units without water<br />
storage tank)<br />
5 = Unit status<br />
6 = Clock<br />
7 = No visualization<br />
8 = Woking differential<br />
9 = Unit set point (parameter value)<br />
Default viewing of upper display of the remote keyboard<br />
0 = PB1 visualization<br />
1 = PB2 visualization<br />
2 = no visualization (display off)<br />
3 = PB4 visualization<br />
4 = Real working set point (set point modified from Energy<br />
Saving, Dynamic set point, function for units without water<br />
storage tank)<br />
5 = Unit status<br />
6 = No visualization (display off)<br />
7 = No visualization (display off)<br />
8 = Woking differential<br />
9 = Unit set point (parameter value)<br />
Default viewing of lower display of the remote keyboard<br />
0 = PB1 visualization<br />
1 = PB2 visualization<br />
2 = PB3 visualization<br />
3 = PB4 visualization<br />
4 = Real working set point (set point modified from Energy<br />
Saving, Dynamic set point, function for units without water<br />
storage tank)<br />
5 = Unit status<br />
6 = Clock<br />
7 = No visualization<br />
8 = Woking differential<br />
9 = Unit set point (parameter value)<br />
0 10<br />
0 250<br />
0 8<br />
0 8<br />
0 8<br />
1592022550 Quick reference guide IC100CX GB rel.1.0 03/03/2008 Page 29 di 39
IC100CX<br />
CF46 Controller: visualization in Std-by mode<br />
0 2<br />
0 = default visualization (CF36 and CF43 parameters)<br />
1 = the display visualizes “OFF”<br />
2 = the display visualizes “StbY”<br />
CF47 Remote keyboard: visualization in Std-by mode<br />
0 2<br />
0 = default visualization (CF36 and CF43 parameters)<br />
1 = the display visualizes “OFF”<br />
2 = the display visualizes “StbY”<br />
CF48 Analog output configuration<br />
0 1<br />
0 = 4..20mA<br />
1 = 0..10V<br />
Pr2 Password value 0 999<br />
Dynamic Setpoint<br />
Parameter Description Min Max Meas Resolution<br />
Sd01 Dynamic Setpoint<br />
0 1<br />
0= Not enabled<br />
1= Enabled<br />
Sd02 Maximum summer dynamic Offset - 30<br />
-54<br />
30<br />
54<br />
°C<br />
°F<br />
Decimal<br />
integer<br />
Sd03 Maximum winter dynamic Offset - 30<br />
-54<br />
30<br />
54<br />
°C<br />
°F<br />
Decimal<br />
integer<br />
Sd04 External air d. setpoint during summer -50.0<br />
-58<br />
110<br />
230<br />
°C<br />
°F<br />
Decimal<br />
integer<br />
Sd05 External air d. setpoint during winter -50.0<br />
-58<br />
110<br />
230<br />
°C<br />
°F<br />
Decimal<br />
integer<br />
Sd06 External air differential during summer - 30<br />
-54<br />
30<br />
54<br />
°C<br />
°F<br />
Decimal<br />
integer<br />
Sd07 External air differential during winter - 30<br />
-54<br />
30<br />
54<br />
°C<br />
°F<br />
Decimal<br />
integer<br />
Pr2 Password value 0 999<br />
Energy Saving<br />
Parameter Description Min Max Meas Resolution<br />
ES01 Energy saving starting hour (0÷24) 0 23.50 Min 10 Min<br />
ES02 Energy saving ending hour (0÷24) 0 23.50 Min 10 Min<br />
ES03…ES09 Monday…Sunday<br />
0 1<br />
0 = Not enabled<br />
1= Enabled<br />
ES10 Energy saving setpoint offset in chiller -30.0<br />
-54<br />
30.0<br />
54<br />
°C<br />
°F<br />
Decimal<br />
integer<br />
ES11 Energy saving differential in chiller 0.1<br />
0<br />
25.0<br />
45<br />
°C<br />
°F<br />
Decimal<br />
integer<br />
ES12 Energy saving setpoint offset in heat pump -30.0<br />
-54<br />
30.0<br />
54<br />
°C<br />
°F<br />
Decimal<br />
integer<br />
ES13 Energy saving differential in heat pump 0.1<br />
0<br />
25.0<br />
45<br />
°C<br />
°F<br />
Decimal<br />
integer<br />
Pr2 Password value 0 999<br />
Compressor parameters<br />
Parameter Description Min Max Meas. Resolution<br />
CO01 Minimum ON time 0 250 Sec 10Sec<br />
CO02 Minimum OFF time 0 250 Sec 10Sec<br />
CO03 ON delay time between two compressors or Comp. and<br />
valve<br />
1 250 Sec<br />
1592022550 Quick reference guide IC100CX GB rel.1.0 03/03/2008 Page 30 di 39
IC100CX<br />
CO04 OFF delay time between two compressors or Comp. and 0 250 Sec<br />
valve<br />
CO05 Output time delay after power supply start-up 0 250 Sec 10Sec<br />
CO06 Compressor On delay time after Pump/”Supply fan” 1 250 Sec<br />
activation<br />
CO07 Compressor OFF delay time after Pump/”Supply fan” deactivation<br />
0 250 Sec<br />
CO08 Compressor rotating control<br />
0 1<br />
0= Enabled<br />
1= Fixed sequence<br />
CO09 Time delay for solenoid valve of water side (CF39) 0 250 Sec<br />
CO10 Stage vale polarity<br />
0 1<br />
0= Capacity stage ON<br />
1= Capacity stage OFF<br />
CO11 Water pump / Supply fan operating mode<br />
0 4<br />
0= Not used<br />
1= Always on (ON/OFF output)<br />
2= ON if the compressor is on (ON/OFF output)<br />
3= Always on (4÷20mA output)<br />
4= ON if compressor is ON (4÷20mA output)<br />
CO12 Compressor 1<br />
0 1<br />
0 = Enabled<br />
1 = OFF<br />
CO13 Compressor 2 / Stage valve.<br />
0 1<br />
0 = Enabled<br />
1= OFF<br />
CO14 Hour counter setpoint for 1 st compressor 0 999 Hr 10 Hr<br />
CO15 Hour counter setpoint for 2 nd compressor 0 999 Hr 10 Hr<br />
CO16 Hour counter setpoint for pump/”Supply fan” 0 999 Hr 10 Hr<br />
Unloading evaporator<br />
CO17 Unloading set point (evaporator side) 0<br />
32<br />
110<br />
230<br />
°C<br />
°F<br />
Dec<br />
int<br />
CO18 Unloading Differential (evaporator side) 0.1<br />
0<br />
25.0<br />
45<br />
°C<br />
°F<br />
Dec<br />
int<br />
CO19 Delay unloading function (evaporator side) 0 250 Sec 10 Sec<br />
CO20 Maximum unloading operation time in case of high 0 250 Sec 10 Sec<br />
evaporator temperature<br />
Unloading condenser<br />
CO21 Unloading pressure set point in chiller mode (condenser<br />
side)<br />
0.0<br />
0<br />
50.0<br />
725<br />
Bar<br />
Psi<br />
Dec<br />
int<br />
CO22 Unloading pressure differential in chiller mode (condenser<br />
side)<br />
0.0<br />
0<br />
12<br />
174<br />
Bar<br />
Psi<br />
Dec<br />
int<br />
CO23 Unloading pressure set point in heat pump mode<br />
(condenser side)<br />
0.0<br />
0<br />
50.0<br />
725<br />
Bar<br />
Psi<br />
Dec<br />
int<br />
CO24 Unloading pressure differential in heat pump mode<br />
(condenser side)<br />
0.0<br />
0<br />
12<br />
174<br />
Bar<br />
Psi<br />
Dec<br />
int<br />
CO25 Maximum unloading operation time in condenser side 0 250 Sec 10 Sec<br />
Water pump condenser<br />
CO26 Condenser water pump operating mode<br />
0= Not used<br />
1= Continuous opeartion<br />
2= Only for compressor demand<br />
0 2<br />
1592022550 Quick reference guide IC100CX GB rel.1.0 03/03/2008 Page 31 di 39
IC100CX<br />
CO27 Delay between condenser pump shutdown and compressor 0 250 Sec<br />
shutdown<br />
CO28 SET hour counter of water condenser pump 0 999 Hr 10 Hr<br />
Compressors in tandem mode<br />
CO29 Maximum continuous operating time of a compressor 0 250 Min<br />
CO30 Compressor start-up delay after activation of the water 0 250 sec 10 Sec<br />
solenoid valve<br />
Modulating evaporator water pump<br />
CO31 Peak time of modulating pump at maximum speed required 0 250 sec<br />
by regulation<br />
CO32 Minimum speed % of modulating pump in operation with 30 100 %<br />
enabled compressor (Chiller)<br />
CO33 Minimum speed % of modulating pump in operation with 30 100 %<br />
enabled compressor (Heat Pump)<br />
CO34 Speed % of modulating pump in operation with enabled 30 100 %<br />
compressor<br />
CO35 Set point modulating pump in chiller mode (evaporator outlet<br />
temperature)<br />
-50.0<br />
-58<br />
110<br />
230<br />
°C<br />
°F<br />
Dec<br />
int<br />
CO36 Temperature control band for the modulating pump in chiller<br />
function<br />
0.0<br />
0<br />
25.0<br />
45<br />
°C<br />
°F<br />
Dec<br />
int<br />
CO37 Delay for switching off compressor by heat regulation with 0 250 sec<br />
water pump < 100 % in chiller function<br />
CO38 Set point modulating pump in heat pump mode (evaporator<br />
outlet temperature)<br />
-50.0<br />
-58<br />
110<br />
230<br />
°C<br />
°F<br />
Dec<br />
int<br />
CO39 Temperature control band for the modulating pump in heat<br />
pump function<br />
0.0<br />
0<br />
25.0<br />
45<br />
°C<br />
°F<br />
Dec<br />
int<br />
CO40 Delay for switching off compressor by regulation with water<br />
pump < 100 % in HP function<br />
0 250 sec<br />
Pr2 Password 0 999<br />
Condenser Fan control parameter<br />
Parameter Description Min Max Meas. Resolution<br />
FA01 Fan output<br />
0 1<br />
0= Not enabled<br />
1= Enabled<br />
FA02 Fan regulation<br />
0 2<br />
0= On when compressor On<br />
1= ON / OFF<br />
2= Proportional speed control<br />
FA03 Fan related to compressor<br />
0 1<br />
0= With compressor<br />
1= Independent from compressor<br />
FA04 Maximum speed time when the fan starting 0 250 Sec<br />
FA05 Phase difference fan 0 20 Micro 250µs<br />
Sec<br />
FA06 Not used<br />
FA07 <strong>Cool</strong>ing pre-ventilation before ON compressor 0 250 Sec<br />
FA08 Minimum fan speed in summer 30 100 %<br />
FA09 Maximum fan speed in summer 30 100 %<br />
1592022550 Quick reference guide IC100CX GB rel.1.0 03/03/2008 Page 32 di 39
IC100CX<br />
FA10<br />
FA11<br />
Temperature / pressure setpoint for minimum speed in<br />
summer<br />
Temperature / pressure setpoint for maximum speed in<br />
summer<br />
-50.0<br />
-58<br />
0.0<br />
0<br />
-50.0<br />
-58<br />
0.0<br />
0<br />
FA12 Proportional band in summer 0.0<br />
0<br />
0.0<br />
0<br />
110<br />
230<br />
50<br />
725<br />
110<br />
230<br />
50<br />
725<br />
25.0<br />
45<br />
50.0<br />
725<br />
°C<br />
°F<br />
Bar<br />
Psi<br />
°C<br />
°F<br />
Bar<br />
Psi<br />
°C<br />
°F<br />
Bar<br />
Psi<br />
Decimal<br />
integer<br />
Decimal<br />
integer<br />
Decimal<br />
integer<br />
Decimal<br />
integer<br />
Decimal<br />
integer<br />
Decimal<br />
Integer<br />
FA13 CUT-OFF differential in summer 0.0<br />
0<br />
0.0<br />
0<br />
FA14 Override CUT-OFF in summer 0.0<br />
0<br />
0.0<br />
25.0<br />
45<br />
50.0<br />
725<br />
25.0<br />
45<br />
50.0<br />
°C<br />
°F<br />
Bar<br />
Psi<br />
°C<br />
°F<br />
Bar<br />
0 725 Psi<br />
FA15 Delay time for CUT-OFF 0 250 Sec<br />
FA16 Fan speed in summer night function 30 100 %<br />
FA17 Minimum fan speed in winter 30 100 %<br />
FA18 Maximum fan speed in winter 30 100 %<br />
FA19<br />
FA20<br />
Temperature / pressure setpoint for minimum speed in<br />
winter<br />
Temperature / pressure setpoint for maximum speed in<br />
winter<br />
-50.0<br />
-58<br />
0.0<br />
0<br />
-50.0<br />
-58<br />
0.0<br />
0<br />
FA21 Proportional band in winter 0.0<br />
0<br />
0.0<br />
0<br />
FA22 CUT-OFF differential in winter 0.0<br />
0<br />
0.0<br />
0<br />
FA23 Override CUT-OFF in winter 0.0<br />
0<br />
0.0<br />
0<br />
110<br />
230<br />
50<br />
725<br />
110<br />
230<br />
50<br />
725<br />
25.0<br />
45<br />
50.0<br />
725<br />
25.0<br />
45<br />
50.0<br />
725<br />
25.0<br />
45<br />
50.0<br />
725<br />
°C<br />
°F<br />
Bar<br />
Psi<br />
°C<br />
°F<br />
Bar<br />
Psi<br />
°C<br />
°F<br />
Bar<br />
Psi<br />
°C<br />
°F<br />
Bar<br />
Psi<br />
°C<br />
°F<br />
Bar<br />
Psi<br />
Decimal<br />
integer<br />
Decimal<br />
integer<br />
Decimal<br />
integer<br />
Decimal<br />
integer<br />
Decimal<br />
integer<br />
Decimal<br />
integer<br />
Decimal<br />
integer<br />
Decimal<br />
integer<br />
Decimal<br />
integer<br />
Decimal<br />
integer<br />
Decimal<br />
integer<br />
Decimal<br />
integer<br />
Decimal<br />
integer<br />
Decimal<br />
integer<br />
FA24 Fan speed in winter night function 30 100 %<br />
Hot Start Function<br />
Parameter Description Min Max Meas. Resolution<br />
1592022550 Quick reference guide IC100CX GB rel.1.0 03/03/2008 Page 33 di 39
IC100CX<br />
FA25 Hot Start Setpoint -50.0<br />
-58<br />
110<br />
230<br />
°C<br />
°F<br />
Decimal<br />
integer<br />
FA26 Hot Start differential 0.0<br />
0<br />
25.0<br />
45<br />
°C<br />
°F<br />
Decimal<br />
integer<br />
Pr2 Password 0 999<br />
Anti-freeze / Heater parameters<br />
Parameter Description Min Max Meas. Resolution<br />
Ar01 Minimum value of Anti-Freeze Setpoint -50.0<br />
°C Decimal<br />
Ar03<br />
-58<br />
°F integer<br />
Ar02 Maximum value of Anti-Freeze Setpoint<br />
110 °C Decimal<br />
Ar03<br />
230 °F integer<br />
Ar03 Anti-freeze Setpoint in chiller mode Ar01 Ar02 °C/°F Dec/int<br />
Ar04 Anti-Freeze Differential in chiller mode 0<br />
0<br />
25.0<br />
45<br />
°C<br />
°F<br />
Decimal<br />
integer<br />
Ar05 Anti-Freeze alarm delay 0 250 Sec<br />
Ar06 Maximum number of Anti-Freeze alarm events in 1 hour 0 16<br />
Ar07 Anti-Freeze alarm delay after starting in Heat Pump 0 250 Sec<br />
Ar08 Anti-Freeze Setpoint of the electrical heater in Chiller mode -50.0<br />
-58<br />
110<br />
230<br />
°C<br />
°F<br />
Ar09 Anti-Freeze Setpoint of the electrical heater in Heat Pump -50.0 110 °C<br />
mode<br />
-58 230 °F<br />
Ar10 Anti-Freeze Setpoint of external electrical heater -50.0 110 °C<br />
(water/water units)<br />
-58 230 °F<br />
Ar11 Anti-Freeze Differential in Chiller 0 25.0 °C<br />
0 45 °F<br />
Ar12 Anti-Freeze Differential in Heat Pump 0 25.0 °C<br />
0 45 °F<br />
Ar13 Anti-freeze electrical heater regulation<br />
0 1<br />
0= enabled during regulation control<br />
1= enabled active during regulation an defrost<br />
Ar14 Anti-freeze electrical heater regulation in Chiller mode 0 1<br />
0= OFF in chiller<br />
1= ON in chiller<br />
Ar15 Anti-freeze electrical heater regulation in H.P. mode<br />
0 1<br />
0= OFF in Heat Pump<br />
1= ON in Heat Pump<br />
Ar16 Anti-freeze control probe in Chiller mode<br />
0 3<br />
0= Pb1<br />
1= Pb2<br />
2= PB3 probe control<br />
3= PB4 probe control<br />
Ar17 Anti-freeze control probe in Heat Pump mode<br />
0 3<br />
0= Pb1<br />
1= Pb2<br />
2= PB3 probe control<br />
3= PB4 probe control<br />
Decimal<br />
integer<br />
Decimal<br />
integer<br />
Decimal<br />
integer<br />
Decimal<br />
integer<br />
Decimal<br />
integer<br />
1592022550 Quick reference guide IC100CX GB rel.1.0 03/03/2008 Page 34 di 39
IC100CX<br />
Ar18 “Water pump”/ “Anti-freeze electrical heater” control with unit 0 3<br />
in OFF or Stand-by<br />
0= Regulation not enabled<br />
1= Regulation enabled<br />
2= Regulation of water pump/anti-freezer on probe PB4<br />
configured as esternal temperature probe<br />
3= Regulation of water pump / anti-freezer heaters on probe<br />
PB4 and separate set points<br />
Ar19 “Water pump”/ “Anti-freeze electrical heater” control for 0 1<br />
faulty probe<br />
0= output OFF for faulty probe<br />
1= output ON for faulty probe<br />
Boiler Function<br />
Parameter Description Min Max Meas. Resolution<br />
Ar20 Boiler function<br />
0 1<br />
0= Integration control<br />
1= Heating control<br />
Ar21 External air Setpoint for Boiler heater activation -50.0<br />
-58<br />
110<br />
230<br />
°C<br />
°F<br />
Decimal<br />
integer<br />
Ar22 Boiler function differential 0<br />
0<br />
25.0<br />
45<br />
°C<br />
°F<br />
Decimal<br />
integer<br />
Ar24 Activation delay time of heater n° 2 0 250 Min<br />
Ar25 Outside air set point for disabling the compressors -50.0<br />
-58<br />
110<br />
230<br />
°C<br />
°F<br />
Dec<br />
Int<br />
Ar26 Outside air differential for enabling the compressors 0<br />
0<br />
25.0<br />
45<br />
°C<br />
°F<br />
Dec<br />
int<br />
Anti-freezer alarm in HP function<br />
Ar27 Anti-freeze alarm set point in heat pump mode Ar01 Ar02 °C /°F Dec/int<br />
Ar28 Anti-freeze alarm differential in heat pump mode 0<br />
0<br />
25.0<br />
45<br />
°C<br />
°F<br />
Dec<br />
int<br />
Evaporator water pump functioning / condenser of ambient probe<br />
Ar29 Evaporator/condenser water pump set point with external<br />
temperature regulation<br />
-50.0<br />
-58<br />
110<br />
230<br />
°C<br />
°F<br />
Dec<br />
int<br />
Ar30 Evaporator/condenser water pump differential with external<br />
temperature regulation<br />
0.1<br />
0<br />
25.0<br />
45<br />
°C<br />
°F<br />
Dec<br />
int<br />
Condenser water pump functioning<br />
Ar31 Regulation of condenser water pump/ anti-freeze heaters in 0 3<br />
OFF – standby mode.<br />
0= de-activated<br />
1= Switched on in OFF or standby mode<br />
2= Regulation of water pump/ anti-freeze heaters with probe<br />
PB4 configured as ambient probe<br />
3= Regulation of the water pump / anti-freeze heaters with<br />
probe PB4 configured as ambient probe and separate set<br />
points.<br />
Ar32 Activation of condenser water pump / anti-freeze heaters in 0 1<br />
case of probe failure.<br />
0= Off with probe fault<br />
1= On with probe fault<br />
Pr2 Password 0 999<br />
Defrost Parameters<br />
Parameter Description Min Max Meas. Resolution<br />
1592022550 Quick reference guide IC100CX GB rel.1.0 03/03/2008 Page 35 di 39
IC100CX<br />
DF01<br />
DF02<br />
DF03<br />
DF04<br />
Defrost control<br />
0= No<br />
1= Yes<br />
Defrost type<br />
0= Temperature / pressure<br />
1= Time<br />
2= External contact<br />
Temperature / pressure Setpoint for starting the defrost<br />
cycle<br />
Temperature / pressure Setpoint for stopping the defrost<br />
cycle<br />
0 1<br />
0 2<br />
-50.0<br />
-58<br />
0.0<br />
0<br />
-50.0<br />
-58<br />
0.0<br />
110<br />
230<br />
50<br />
725<br />
110<br />
230<br />
50<br />
°C<br />
°F<br />
Bar<br />
Psi<br />
°C<br />
°F<br />
Bar<br />
0 725 Psi<br />
DF05 Minimum delay time before starting a forced defrost cycle 0 250 Sec<br />
DF06 Minimum defrost duration 0 250 Sec<br />
DF07 Maximum defrost duration 0 250 Min<br />
DF08 Compressor Off time before starting a defrost cycle 0 250 Sec<br />
DF09 Compressor Off time after a defrost cycle 0 250 Sec<br />
DF10 Interval time between defrost cycles 0 99 MIN<br />
DF11 Temperature setpoint to start a combined defrost cycle after<br />
the DF10 counting time<br />
-50.0<br />
-58<br />
110<br />
230<br />
DF12 Temperature Setpoint to stop a combined defrost -50.0 110<br />
-58 230<br />
DF13 Forced activation of the 2 nd compressor in defrost<br />
0 1<br />
0= Not enabled<br />
1= Enabled<br />
DF14<br />
DF15<br />
Forced fan activation during defrost and draining times<br />
0= Not enabled<br />
1= Enabled only for defrost<br />
2= Enabled for defrost and draining time (dF09)<br />
Temperature/Pressure Setpoint to start a forced condensing<br />
fan control in defrost cycle<br />
DF16 Low alarm control during defrost<br />
0= Not enabled<br />
1= Enabled<br />
DF17 Low alarm delay time after changing the status of the 4-<br />
ways valve<br />
DF18 4-ways reversing valve<br />
0= ON in cooling<br />
1= ON in heating<br />
DF19 Temperature/pressure Setpoint to start a forced defrost<br />
cycle<br />
0 2<br />
-50.0<br />
-58<br />
0.0<br />
0<br />
110<br />
230<br />
50<br />
725<br />
0 1<br />
°C<br />
°F<br />
°C<br />
°F<br />
°C<br />
°F<br />
Bar<br />
Psi<br />
0 250 Sec<br />
0 1<br />
-50.0<br />
-58<br />
0.0<br />
0<br />
110<br />
230<br />
50<br />
725<br />
25.0<br />
DF20 Forced defrost cycle differential 0<br />
0 45<br />
Pr2 Password 0 999<br />
Alarm Parameter<br />
°C<br />
°F<br />
bar<br />
psi<br />
°C<br />
°F<br />
Decimal<br />
integer<br />
Decimal<br />
integer<br />
Decimal<br />
integer<br />
Decimal<br />
integer<br />
Decimal<br />
integer<br />
Decimal<br />
integer<br />
Decimal<br />
integer<br />
Decimal<br />
integer<br />
Decimal<br />
integer<br />
Decimal<br />
integer<br />
Decimal<br />
integer<br />
1592022550 Quick reference guide IC100CX GB rel.1.0 03/03/2008 Page 36 di 39
IC100CX<br />
Parameter Description Min Max Meas. Resolution<br />
AL01 Low pressure alarm delay time 0 250 Sec<br />
AL02 Maximum low pressure alarm events in 1 hour 0 16<br />
AL03 Low pressure alarm with off compressor<br />
0 1<br />
0= Not enabled when compressor Off<br />
1= Enabled when compressor Off<br />
AL04 “Water flow/Supply fan thermal protection” alarm delay after 0 250 Sec<br />
“water pump / supply air fan” starting.<br />
AL05 Maximum duration of the flow switch alarm before it 0 250 Sec<br />
becomes manual and blocks the water pump<br />
AL06 “Water flow/Supply fan thermal protection” input activation 0 250 Sec<br />
duration<br />
AL07 “Water flow/Supply fan thermal protection” input deactivation<br />
0 250 Sec<br />
duration<br />
AL08 Thermal protection alarm delay after starting the compressor 0 250 Sec<br />
AL09 Number of maximum thermal protection alarm events. 0 16<br />
AL10 Maximum number of high temperature / condenser pressure 0 16<br />
AL11<br />
alarm interventions per hour<br />
Condensing temperature/pressure high alarm setpoint for<br />
input probe<br />
-50.0<br />
-58<br />
0.0<br />
0<br />
AL12 Temperature/pressure high alarm differential for input probe 0<br />
0<br />
0<br />
0<br />
110<br />
230<br />
50<br />
725<br />
25.0<br />
45<br />
50.0<br />
725<br />
°C<br />
°F<br />
Bar<br />
Psi<br />
°C<br />
°F<br />
Bar<br />
Psi<br />
AL13 Low pressure alarm delay for input probe 0 250 Sec<br />
AL14 Low pressure alarm Setpoint for input probe -50.0<br />
-58<br />
0.0<br />
0<br />
110<br />
230<br />
50<br />
725<br />
°C<br />
°F<br />
Bar<br />
Psi<br />
AL15 Low pressure differential for input probe 0<br />
0<br />
0<br />
0<br />
AL16<br />
AL17<br />
AL18<br />
Maximum number of the low alarm events in 1 hour for input<br />
probe<br />
Alarm relay and buzzer activation when the unit is Off or<br />
stand-by<br />
0= Alarm relay and buzzer enabled<br />
1= Alarm relay and buzzer disabled<br />
Alarm relay output/open collector polarity<br />
0= Output without voltage in normal conditions, with voltage<br />
when there is an alarm<br />
1= Output with voltage in normal conditions, without voltage<br />
when there is an alarm<br />
25.0<br />
45<br />
50.0<br />
725<br />
0 16<br />
0 1<br />
0 1<br />
°C<br />
°F<br />
Bar<br />
Psi<br />
Decimal<br />
integer<br />
Decimal<br />
integer<br />
Decimal<br />
integer<br />
Decimal<br />
integer<br />
Decimal<br />
integer<br />
Decimal<br />
integer<br />
Decimal<br />
integer<br />
Decimal<br />
integer<br />
1592022550 Quick reference guide IC100CX GB rel.1.0 03/03/2008 Page 37 di 39
IC100CX<br />
AL19 Allows to choose the probe for the anti- freezer heater 0 4<br />
alarm.<br />
0= Relative to Ar16 parameters in chiller mode - Ar17 in hp.<br />
1= on Pb1 probe<br />
2= on Pb2 probe<br />
3= on Pb3 probe<br />
4= on Pb4 probe<br />
AL20 Maximum number of general unit block alarm interventions 0 16<br />
per hour<br />
AL21 General alarm delay starting from digital input activation 0 250 Sec<br />
AL22 Delay to reset the general alarm starting from digital input 0 250 10 sec 10 sec<br />
de-activation<br />
AL23 General alarm type:<br />
0 = signaling only does not depend on AL20 (alarm relay<br />
and buzzer enabled), always reset automatically<br />
1= the alarm blocks the unit; resetting of the alarm depends<br />
on the value of the AL20 parameter<br />
0 1<br />
AL24 System’s inlet water high temperature alarm set point -50.0<br />
-58<br />
0.0<br />
0<br />
AL25 System’s inlet water high temperature alarm differential 0<br />
0<br />
0<br />
AL26<br />
AL27<br />
Delay time for signaling the system’s inlet water high<br />
temperature alarm<br />
Maximum number of system inlet high temperature alarm<br />
interventions per hour<br />
110<br />
230<br />
50.0<br />
725<br />
°C<br />
°F<br />
Bar<br />
Psi<br />
Dec<br />
int<br />
Dec<br />
int<br />
25.0<br />
45<br />
50.0<br />
725<br />
°C<br />
°F<br />
Bar<br />
Psi<br />
Dec<br />
int<br />
Dec<br />
int<br />
0<br />
0 250 10 sec 10 sec<br />
0 16<br />
AL28 Condenser water flow alarm delay time 0 250 Sec<br />
AL29 Maximum duration of the flow switch alarm before it 0 250 Sec<br />
becomes manual and blocks the water pump<br />
AL30 Minimum activation time for water flow alarm 0 250 Sec<br />
AL31 Minimum time with inactive water flow input (after alarm 0 250 Sec<br />
event).<br />
AL32 Condenser flow switch alarm configuration<br />
0 3<br />
0= not used<br />
1= activated only in chiller mode<br />
2= activated only in h.p. mode<br />
3= activated in chiller and h.p. mode<br />
Pr2 Password 0 999<br />
1592022550 Quick reference guide IC100CX GB rel.1.0 03/03/2008 Page 38 di 39
IC100CX<br />
21. TECHNICAL DATA<br />
Housing: Self extinguishing ABS<br />
Case: Front panel 32x74 mm, depth 60mm<br />
Mounting : 29x71 mm panel cut-out<br />
Frontal protection: IP65<br />
Connections: Removable terminal block 12 and 14 ways<br />
Power supply: 12Vac/dc ± 10%, 24Vac/dc ± 10%, 50-60Hz<br />
Power absorption: 5VA max<br />
Inputs: 4 NTC probes,or 3 NTC probes and one 4..20mA / 0..10V<br />
Digital inputs: 5 free voltage<br />
Relay outputs: 4 / 5 relays (depending on the model) SPDT 5(3)A, 250Vac<br />
Open collector: 12V, 40mA<br />
Analogue output: 4..20mA / 0..10V<br />
Serial output : TTL standard<br />
Communication protocol: Modbus – RTU<br />
Data storing: on the non-volatile memory (EEPROM)<br />
Kind of action: 1B<br />
Pollution grade: normal<br />
Software class: A<br />
Operating temperature: 0÷60 °C<br />
Storage temperature: -25÷60 °C<br />
Relative humidity: 20÷85% (no condensing)<br />
Measuring range: NTC probe -40÷110°C C (- 40 ÷ 230 °F)<br />
Measuring range: pressure trasducers 0÷ 50 bar<br />
Temperature resolution: 0,1 °C or 1°C<br />
Accuracy (ambient temp. 25°C): ±0,5 °C ±1 digit<br />
Input/output<br />
Probes Pb1, Pb2 e Pb4 Configurable: NTC, Digital input<br />
Pb3<br />
Tipo<br />
Configurable: NTC, 4..20mA, 0..5V<br />
Digital inputs ID1, ID2 e ID5 Configurable; free voltage<br />
ID3<br />
ID4<br />
High pressure; free voltage<br />
Low pressure; free voltage<br />
Relays RL1 For compressor: relay SPDT 5(3) A 250Vac<br />
PWM output / open collector<br />
Open collector output<br />
4..20mA or 0..10V output<br />
Hot Key / TTL output<br />
Remote keyboard<br />
RL2, RL3, RL4 e RL5<br />
Configurable: relè SPDT 5(3) A 250Vac<br />
PWM: modulation of the evaporator fan, open collector:<br />
configurable<br />
Configurab\le; 12 Vcc 40mA max<br />
Modulation of the evaporator fan or modulation of the evaporator<br />
pump<br />
Output for Hot Key or Persional computer / supervisor systems<br />
Output for remote keyboard<br />
Dixell s.r.l. Z.I. Via dell’Industria, 27<br />
32010 Pieve d’Alpago (BL) ITALY<br />
tel. +39 - 0437 - 98 33 - fax +39 - 0437 - 98 93 13<br />
E-mail:dixell@dixell.com - http://www.dixell.com<br />
1592022550 Quick reference guide IC100CX GB rel.1.0 03/03/2008 Page 39 di 39