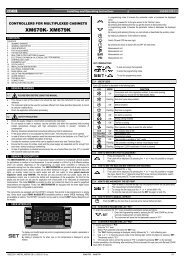
XC1008D-XC1011D - Emerson Climate Technologies
XC1008D-XC1011D - Emerson Climate Technologies
XC1008D-XC1011D - Emerson Climate Technologies
- No tags were found...

Create successful ePaper yourself
Turn your PDF publications into a flip-book with our unique Google optimized e-Paper software.
<strong>XC1008D</strong>-<strong>XC1011D</strong>-XC1015D and VGC810(rel. 1.5A)
INDEX1. GENERAL WARNING 41.1 PLEASE READ BEFORE USING THIS MANUAL 41.2 SAFETY PRECAUTIONS 42. WIRING CONNECTIONS 52.1 <strong>XC1008D</strong> 52.2 <strong>XC1011D</strong> 62.3 XC1015D 72.4 DESCRIPTIONS OF THE WIRING CONNECTIONS 73. USER INTERFACE 93.1 WHAT IS DISPLAYED WHEN THE KEYBOARD IS CONNECTED 93.2 DISPLAY VISUALIZATION 103.3 PROGRAMMING 124. SERVICE MENU 154.1 HOW TO ENTER THE SERVICE MENU 154.2 HOW TO PROGRAM AN INSTRUMENT USING A HOT KEY 164.3 HOW TO SEE THE VALUES OF ANALOG OUTPUTS 164.4 HOW TO SEE THE STATUS OF THE RELAYS 174.5 COMPRESSOR SERVICE SUB- MENU – FOR MAINTENANCE SECTIONS 174.6 HOW TO SEE THE STATUS OF DIGITAL INPUTS 194.7 HOW TO SEE THE VALUES OF THE PROBES 204.8 HOW TO SET TIME AND DATE 205. ALARMS 215.1 MENU ACTIVE ALARMS 215.2 ACTIVE ALARM LOG MENU 225.3 ACTIVE ALARM LOG MENU 236. PARAMETERS 237. REGULATION 427.1 NEUTRAL ZONE ADJUSTMENT – ONLY FOR COMPRESSORS 427.2 PROPORTIONAL BAND ADJUSTMENT – FOR COMPRESSORS AND FANS 438. SCREW COMPRESSORS 458.1 REGULATION WITH SCREW COMPRESSORS LIKE BITZER/ HANBELL/ REFCOMP ETC 458.2 REGULATION WITH SCREW COMPRESSORS LIKE FRASCOLD 459. ANALOG OUTPUTS FOR INVERTER 479.1 COMPRESSOR MANAGEMENT 471592021021 XC1008-1011-1015D GB A5 r.1.5A 12.10.2009 XC1008-1011-1015D 2/66
9.2 FANS MANAGEMENT WITH INVERTER– 1 FANS GROUP WITH INVERTER MODE, OTHERS ON INON/OFF MODE 499.3 MANAGEMENT OF ALL FANS WITH INVERTER – PROPORTIONAL INVERTER 4910. ALARM LIST 5010.1 ALARM CONDITIONS – SUMMARY TABLE 5111. CONFIGURATION ERRORS 5312. MOUNTING & INSTALLATION 5312.1 XC1000D DIMENSIONS 5412.2 VG810 DIMENSIONS AND MOUNTING 5513. ELECTRICAL CONNECTIONS 5613.1 PROBES CONNECTION 5614. RS485 SERIAL LINK 5615. TECHNICAL FEATURES 5616. DEFAULT SETTING 581592021021 XC1008-1011-1015D GB A5 r.1.5A 12.10.2009 XC1008-1011-1015D 3/66
1. GENERAL WARNING1.1 Please read before using this manualThis manual is part of the product and should be kept near the instrument for easy and quickreference.The instrument shall not be used for purposes different from those described hereunder. Itcannot be used as a safety device.Check the application limits before proceeding.1.2 Safety PrecautionsCheck the supply voltage is correct before connecting the instrument.Do not expose to water or moisture: use the controller only within the operating limits avoidingsudden temperature changes with high atmospheric humidity to prevent formation ofcondensationWarning: disconnect all electrical connections before any kind of maintenance.The instrument must not be opened.In case of failure or faulty operation send the instrument back to the distributor or to “DIXELLs.r.l.” (see address) with a detailed description of the fault.Consider the maximum current which can be applied to each relay (see Technical Data).Ensure that the wires for probes, loads and the power supply are separated and far enoughfrom each other, without crossing or intertwining.Fit the probe where it is not accessible by the end user.In case of applications in industrial environments, the use of mains filters (our mod. FT1) inparallel with inductive loads could be useful.1592021021 XC1008-1011-1015D GB A5 r.1.5A 12.10.2009 XC1008-1011-1015D 4/66
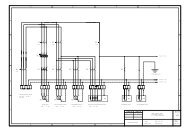
2. Wiring connections2.1 <strong>XC1008D</strong>NOTE: according to the models the digital inputs: (3-18) and (52-55) can operates at 230V/120Vor 24V. Verify on the controller which is the right voltage that can be applied.ATTENTIONConfigurable digital inputs (term. 36-43) are free voltage.1592021021 XC1008-1011-1015D GB A5 r.1.5A 12.10.2009 XC1008-1011-1015D 5/66
2.2 <strong>XC1011D</strong>NOTE: according to the models the digital inputs: (3-24) and (52-59) can operates at 230V/120Vor 24V. Verify on the controller which is the right voltage that can be applied.ATTENTIONConfigurable digital inputs (term. 36-43) are free voltage.1592021021 XC1008-1011-1015D GB A5 r.1.5A 12.10.2009 XC1008-1011-1015D 6/66
2.3 XC1015DNOTE: according to the models the digital inputs: (3-26) and (46-59) can operates at 230V/120Vor 24V. Verify on the controller which is the right voltage that can be applied.ATTENTIONConfigurable digital inputs (term. 36-43) are free voltage.2.4 Descriptions of the wiring connections1 - 2 Power supply: WARNING: THE SUPPLY IS 24Vac/dc3 –26 Digital inputs for safeties of compressors and fans – main voltage. When an d. i. isactivated, the corresponding output is switched OFF. Please note: the digital input 1 is linked tothe relay 1 (C1); d.i. 2 to relay 2 (C2), etc.30-31Analog output 4 (0-10V or 4-20mA depends on the parameter 3Q1)1592021021 XC1008-1011-1015D GB A5 r.1.5A 12.10.2009 XC1008-1011-1015D 7/66
31-32 Analog output 3 (0-10V or 4-20mA depends on the parameter 3Q1)34-35 Analog output 1 (0-10V or 4-20mA depends on the parameter 1Q1)33-34 Analog output 2 (0-10V or 4-20mA depends on the parameter 1Q1)36-37 Configurable digital input 1 (free voltage)38-39 Configurable digital input 2 (free voltage)40-41 Configurable digital input 3 (free voltage)42-43Configurable digital input 4 (free voltage)46-51 Digital inputs for safeties of compressors and fans – main voltage. When an d. i. isactivated, the corresponding output is switched OFF. Please note: the digital input 1 is linked tothe relay 1 (C1); d.i. 2 to relay 2 (C2), etc.52 - 53 Low pressure-switch input for circuit 1: input at the same voltage of loads.54 - 55 High pressure-switch input for circuit 1: input at the same voltage of loads.56 - 57 Low pressure-switch input for circuit 2: input at the same voltage of loads.58 - 59 High pressure-switch input for circuit 2: input at the same voltage of loads.60-61 RS485 output62 –(63) or (68): Suction probe input for circuit 1:with AI1 = cur or rat use 62 -68with AI1 = ntc or ptc use 62 -6364 –(63) or (68): Suction probe input for circuit 2:with AI1 = cur or rat use 64 -68with AI1 = ntc or ptc use 64 -6365 –(66) or (69): Condensing probe input for circuit 1:with AI8 = cur or rat use 65 -69with AI8 = ntc or ptc use 65 -6667 –(66) or (69): Condensing probe input for circuit 2:with AI8 = cur or rat use 67 -69with AI8 = ntc or ptc use 67 -6670-71 Auxiliary probe 171-72 Auxiliary probe 273-74 Auxiliary probe 374-75 Auxiliary probe 478- 79- 80 Keyboard81-82-83: Safety relay: XC1000D off or damaged: 81-82 closedXC1000D working: 81-83 closed84-85-86: Alarm relay:1592021021 XC1008-1011-1015D GB A5 r.1.5A 12.10.2009 XC1008-1011-1015D 8/66
88 - 103 and 106 - 119 Relay configurable outputs for compressors, fans, alarms and aux.The functioning of the relays depends on the setting of the correspondent C(i).3. User interface3.1 What is displayed when the keyboard is connectedWhere:release: Rel Firmware XC1000D / release OS Visograph / release Program VisographPush the ENTER key to enter the standard visualization1592021021 XC1008-1011-1015D GB A5 r.1.5A 12.10.2009 XC1008-1011-1015D 9/66
3.3 ProgrammingPush thekey and the programming menu is entered.Parameters are collected in two menu:Pr1: menu of parameters without password. Press the Pr1 key to enter.Pr2: menu of parameters with password. If the password is enabled, use the following procedure toput it.3.3.1 Password introduction to enter Pr2If the password is enabled, by pushing the Pr2 key the following interface is displayed:1. Push the SET key.2. Use the UP and DOWN keys to set the password3. Push the SET key to confirm it4. The following message is displayed1592021021 XC1008-1011-1015D GB A5 r.1.5A 12.10.2009 XC1008-1011-1015D 12/66
5. Push the ENTER key to enter in Pr2 menu3.3.2 Parameters groupingThe parameters are collected in sub-menu according to the following interface.The parameters sub menu are the following:Set Point (SETC1-SETF2)Compressor Rack setup (C0-C18, C34-C36)Regulation (C37-C44)Display (C45-C46)Analog Inputs of regulation (Ai1-Ai15)Analog Inputs of auxiliary (Ai16-Ai28)Safety Digital Inputs (Di2-Di13)Digital Inputs (Di14-Di27)Display (C45-C44)Compressor Action (CP1-CP8)Safety Compressors (CP9-CP18)Fan Action (F1-F8)Safety Fans (F9-F10)Energy Saving (HS1-HS14)Compressor Alarms (AC1-AC19)1592021021 XC1008-1011-1015D GB A5 r.1.5A 12.10.2009 XC1008-1011-1015D 13/66
Fan Alarms (AF1-AF17)Dynamic Setpoint Suction (o1-o8)Condenser Set point (O9-O14)Analog outputs configuration (1Q1, 3Q1)Analog Outputs 1 (1Q1-1Q26)Analog Outputs 2 (2Q1-2Q25)Analog outputs 3 (3Q2-3Q26)Analog outputs 4 (4Q1-4Q25)Auxiliary Outputs (AR1-AR12)Other (oT1-OT9)NOTE: some sub menu could be absent depending on the model.Push the SET key to enter a menu and the parameter with their value will be displayed: see belowpicture.Push theThen push thekey and use the UP and DOWN keys to modify the value.key to store the new value and move to the following parameter.NOTE: the Pr2 or Pr1 message is present only in Pr2 menu.It is possible to modify the level of each parameter changing Pr2 Pr1 or vice versa.NOTE: Pushing the EXIT button the initial screen shot is displayed.1592021021 XC1008-1011-1015D GB A5 r.1.5A 12.10.2009 XC1008-1011-1015D 14/66
4. SERVICE MENUThe service menu collect the main functions of the controller.From the Service menu is possible to:- see the values of analog outputs- see the status of compressor relay- operate a maintenance section- see the status of safety and configurable digital inputs- see the values of the probes- set the real time clock- use the HOT KEY to program the instrument or to program the HOT KEY- set the password and enable it for some menu- set the instrument language.4.1 How to enter the Service menuFrom the main display screen push the SERVICE button and the SERVICE menu is entered.See below picture:The Service sub-menu are the following:ANALOG OUTPUTSRELAY OUTPUTSCOMPRESSOR SERVICEDIGITAL INPUTSPROBESPASSWORDLANGUAGESelect one of them with the UP or DOWN keys then push the SET key to enter the sub-menu1592021021 XC1008-1011-1015D GB A5 r.1.5A 12.10.2009 XC1008-1011-1015D 15/66
4.2 How to program an instrument using a HOT KEYThe XC1000D uses a standard Dixell HOT KEY (cod. DK00000100).4.2.1 How to program the HOT KEY.1. Program one controller with the front keypad.2. When the controller is ON, insert the “Hot key”. Enter the SERVICE menu and push the UPLkey. The display will shows the message “PLEASE WAIT”.3. The instrument will shows during 10sec:“END”: the programming phase is ended successfullythe “ERROR” message is displayed for failed programming. In this case push again the UPLkey if you want to restart the upload again.4.2.2 How to program an instument using a HOT KEY1. Switch off the controller or enter the SERVICE menu.2. Insert a programmed “Hot Key” into the 5 PIN receptacle3. Turn the controller on, or push the DOL key of the SERVICE menu.4. Automatically the parameter list of the “Hot Key” is downloaded into the Controller memory,the “doL” message is blinking. The display will shows the message “PLEASE WAIT”.4. The instrument will shows during 10sec:“END”: the programming phase is ended successfully.Remove the “Hot Key”, the XC1000D will restart working with the new parameters.NOTE: until the “Hot Key” is inserted, the instrument doesn’t start the regulation.the “ERROR” message is displayed for failed programming. In this case push again the UPLkey if you want to restart the upload again.After 10 seconds the instrument will restart workingwith the new parameters.4.3 How to see the values of analog outputsProcedure:1. Enter the SERVICE menu2. Select ANALOG OUTPUTS sub-menu3. Push the SET key.The ANALOG OUTPUTS sub-menu displays the status of the analog outputs of the controller, withthe following layout:1592021021 XC1008-1011-1015D GB A5 r.1.5A 12.10.2009 XC1008-1011-1015D 16/66
This outputs can be used to drive an external inverter or to repeat a main probe, by means of asignal 4-20mA or 0-10V.4.4 How to see the status of the relaysProcedure:1. Enter the SERVICE menu2. Select LOADS STATUS3. Push the SET key.The LOADS STATUS sub-menu displays the status of the relays in the following format:With this meaning:First column: number of relay; second column: configuration; third column: status.4.5 COMPRESSOR SERVICE SUB- MENU – For maintenancesectionsThe COMPRESSOR SERVICE menu could be protected by password. See chapter 3.3.1.By means of the COMPRESSOR SERVICE sub-menu is possible to perform a maintenancesection, consisting on:- disabled an output- check and (eventually) erase the running hour of a load.4.5.1 How to enter the “COMPRESSOR SERVICE” submenu.Procedure:1. Enter the SERVICE menu2. Select COMPRESSOR SERVICE sub-menu3. Push the SET key.The COMPRESSOR SERVICE sub-menu displays the status of the relays with the followinglayout:1592021021 XC1008-1011-1015D GB A5 r.1.5A 12.10.2009 XC1008-1011-1015D 17/66
4.5.2 How to disabled/enabled an output during a maintenance section.To disabled an output during a maintenance session means to exclude the output from theregulation:To do it act as in the following1. Enter the COMPRESSOR SERVICE sub-menu, as described in the previous paragraph.2. Select the load by means of the UP and DOWN keys.3. Push the SET key, then use the UP and DOWN keys to move the status to ON to OFFand vice versa.4. Confirm the selection by means of the SET key.4.5.3 Regulation with some outputs disabled.If some outputs are disabled they don’t take part to the regulation, so the regulation goes on with theother outputs.4.5.4 How to display the running hours of a load.The controller memorises the running hours of each load.To see how long a load has been working enter the COMPRESSOR SERVICE sub-menu.The running hour are displayed with the following layout:1592021021 XC1008-1011-1015D GB A5 r.1.5A 12.10.2009 XC1008-1011-1015D 18/66
4.5.5 How to erase the running hours of a loadAfter a maintenance session usually is useful to erase the running our of a load.To do it act as in the following1. Enter the COMPRESSOR SERVICE sub-menu, as described in the paragraph. 4.5.1.2. Select the load by means of the UP and DOWN keys.3. Push the SET key, then use the DOWN key to decrease the running hour of the load..4. Confirm the setting by means of the SET key.To exit: push the EXIT key to come back to the SERVICE menu.4.6 How to see the status of digital inputsProcedure:1. Enter the SERVICE menu2. Select DIGITAL INPUTS sub-menu3. Push the SET key.The DIGITAL INPUTS sub-menu displays the status of the safety and configurable digital inputs,with the following layout:Safety digital inputs1592021021 XC1008-1011-1015D GB A5 r.1.5A 12.10.2009 XC1008-1011-1015D 19/66
HP, LP and configurable inputs4.7 How to see the values of the probesProcedure:1. Enter the SERVICE menu2. Select PROBES sub-menu3. Push the SET key.The PROBES sub-menu displays the probe values, with the following layout:To change the measurement unit for the probe PB1, PB2, PB3, PB4, push UNIT button.4.8 How to set time and dateProcedure:1. Enter the SERVICE menu2. Select REAL TIME CLOCK sub-menu3. Push the SET key.The REAL TIME CLOCK sub-menu displays time and date, with the following layout:1592021021 XC1008-1011-1015D GB A5 r.1.5A 12.10.2009 XC1008-1011-1015D 20/66
5. Set the day by means of the UP and DOWN keys.6. Push the SET key, to confirm and pass to the setting of time.7. Use the same procedure for the date.8. Then confirm the selection by means of the SET key.NOTE: to memorise the alarms and to enable the automatic energy saving cycle the realtime clock has to be set.5. AlarmsThe controller memorises the last 100 alarms happened, together with their start and finish time. Tosee the alarms follow the following procedure.5.1 Menu Active alarmsIf the alarm icon is flashing on themain display, an alarm is occurring.Push the ALARM key to enter the alarm menu.1. Push the ALARM key to enter the ALARM MENU,2. Select the alarm menu1592021021 XC1008-1011-1015D GB A5 r.1.5A 12.10.2009 XC1008-1011-1015D 21/66
Premere il tasto ENTER per entrare nel menu allarmiThe alarm menu displays the active alarm with the following layout:(1) = alarm code(2) = alarm descriptionPush the LOG button to enter the ALARM ACTIVE log, as shown in the following picture5.2 Active alarm log menuThis menu contains all the information concerning the active alarms.In the first line, it is displayed how many alarms are happening.It’s possible to move through the alarms by the UP and DOWN keys.1592021021 XC1008-1011-1015D GB A5 r.1.5A 12.10.2009 XC1008-1011-1015D 22/66
5.3 Active alarm log menuPush the LOG button to enter the ALARM LOG.This menu contains all the memorised alarms. For each alarm the starting time and date and thefinish time and date are recorded.Push the ERASE button to delete the whole archive of alarms.The following display is shown:Push the CONFIRM button to confirm the operation and delete the archive.Push the CANCEL button to cancel the operation and come back to the ALARM LOG menu.6. Parameters6.1.1 Compressor Rack setup (C0-C18, C34-C36)C0Kind of plant: it set the kind of plant.The following table shows the kind of plant can be set and which probes have to be used1592021021 XC1008-1011-1015D GB A5 r.1.5A 12.10.2009 XC1008-1011-1015D 23/66
C0 Kind of Pb1 Pb2 Pb3 Pb4plant0A1d Only condenser fan Delivery 11A0d Only compressors Suction 1 - -1A1d Compressors and Suction 1 Delivery 1fans 1 circuit0A2d Fans of circuit 1Delivery 1 Delivery 2and 22A0d Compressors of Suction 1 Suction 2circuit 1 and 22A1d Compressors of Suction 1 Suction 2 Delivery 1 -circuit 1 and 2 – 1condenser2A2d Compressors ofcircuit 1 and 2 –Fans of circuit 1and 2Suction 1 Suction 2 Delivery 1 Delivery 2C1… C15 Relay 1…15 configuration: by means of parameter C0 and C1…C15 the plant can bedimensioned according to the number and type of compressors and/or fans and the number of stepsfor each one.Each relay according to the configuration of the C(i) parameter can work asFrq1 = frequency compressor circuit 1;Frq2 = frequency compressor circuit 2;CPr1 = compressor circuit 1;CPr2 = compressor circuit 2,Screw1 = screw compressor – circuit 1Screw2 = screw compressor – circuit 2StP = step of the previous compressor,FrqF1 = inverter fan circuit 1;FrqF2 = inverter fan circuit 2;FAn1 = fan circuit 1,FAn2 = = fan circuit 2,ALr = alarm;ALr1 = alarm 1ALr2 = alarm 2AUS1 = auxiliary output 1AUS2 = auxiliary output 2,AUS3 = auxiliary output 3,AUS4 = auxiliary output 4,onF = on / off relaynu = relay not usedNOTE 1: CIRCUITS WITH INVERTER FOR COMPRESSORS OR FANSIf in one circuit there are frequency compressors (Frq1 or Frq2) inverter fans, (Frq1F orFrq2F) their relays must be the first of that circuit.ES: Plant with 1 circuit with 6 compressors (1 with inverter and 5 fans with inverter):C0 = 1A1d;C1 = Frq1;C2 = CPr1;C3 = CPr1,C4 = CPr1,C5 = CPr1;C6 = CPr1;C7 = Frq1F;1592021021 XC1008-1011-1015D GB A5 r.1.5A 12.10.2009 XC1008-1011-1015D 24/66
C8 = FAn1;C9 = FAn1;C10 = FAn1;C11 = FAn1;C12 = nuC13 = nuC14 = nuC15 = nuPLANT CONFIGURATION EXAMPLE:Plant with 1 circuit with 6 compressors e 5 fans:C0 = 1A1d;C1 = CPr1;C2 = CPr1;C3 = CPr1,C4 = CPr1,C5 = CPr1;C6 = CPr1;C7 = FAn1;C8 = FAn1;C9 = FAn1;C10 = FAn1;C11 = FAn1;C12 = nuC13 = nuC14 = nuC15 = nuPlant with 1 circuit with 3 compressors, 2 of them without valves, and 1compressor with 2 valves e 4 fans:C0 = 1A1d;C1 = CPr1;C2 = CPr1;C3 = CPr1,C4 = Stp,C5 = Stp;C6 = FAn1;C7 = FAn1;C8 = FAn1;C9 = FAn1;C10 = nuC11 = nuC12 = nuC13 = nuC14 = nuC15 = nuPlant with 2 suctions and 2 deliveries:Suction 1: 1frequency compressor, 1 compressor without valves and 1 compressors with2 valvesDelivery 1: 3 fansSuction 2: 1frequency compressor, 2 compressorsDelivery 2: 1 inverter fan, 2 fansC0 = 2A2d;1592021021 XC1008-1011-1015D GB A5 r.1.5A 12.10.2009 XC1008-1011-1015D 25/66
C16C17C18C34C35C36C1 = Frq1;C2 = CPr1;C3 = CPr1,C4 = Stp,C5 = Fan1;C6 = FAn1;C7 = FAn1;C8 = Frq2;C9 = Cpr2;C10 = Cpr2;C11 = Frq2F;C12 = Fan2;C13 = Fan2;C14 = nuC15 = nuKind of compressors: to set the kind of compressors.SPo = compressors with the same capacity.BtZ = screw compressors like Bitzer, Hanbell, Refcomp etc operation.Frtz = screw compressors like Frascold operation.Valve output polarity - circuit 1: valve polarity: polarity of the outputs for capacity valves. Itdetermines the state of the relays associated with the capacity valves:oP=valve enabled with open contact;cL= valve enabled with closed contact.Valve output polarity - circuit 2: valve polarity: polarity of the outputs for capacity valves. Itdetermines the state of the relays associated with the capacity valves:oP=valve enabled with open contact;cL= valve enabled with closed contact.Kind of gas: set the kind of freon used in the plantr22 = R22; r404= R404A ; 507= R507; 134=134; r717=r717 (ammonia); co2 = CO2; 410 = r410.Setting the kind of gas, the XC1000D can associate the pressure with the matching temperature.Activation time during the switching on of first step (valve of 25%) for Bitzer screwcompressors: (0÷255s): it sets for how long the valve is used during the startup phase.First step enabled during the regulation (switching off phase): it sets if the first step can beused also during normal regulation.NO = first step used only during the start phaseYES = first step used also during normal regulation6.1.2 Regulation (C37-C44)C37 Type of regulation for compressor circuit 1:db = neutral zone, Pb = proportional band.C38 Type of regulation for compressor circuit 2: db = neutral zone, Pb = proportional band.C41 Compressor rotation circuit 1:YES = rotation: the algorithm distributes the working time between loads to ensure even run times.no = fixed sequence: the compressors are enabled and disabled in fixed sequence: first, second etc.C42 Compressor rotation circuit 2:YES = rotation: the algorithm distributes the working time between loads to ensure even run times.no = fixed sequence: the compressors are enabled and disabled in fixed sequence: first, second etc.C43 Fan rotation circuit 1:YES = rotation: the algorithm distributes the working time between loads to ensure even run times.no = fixed sequence: the fans are enabled and disabled in fixed sequence: first, second etc.C44 Fan rotation circuit 2:YES = rotation: the algorithm distributes the working time between loads to ensure even run times.no = fixed sequence: the fans are enabled and disabled in fixed sequence: first, second etc.6.1.3 Display (C45-C46)C45Displaying measurement unit: it sets the measurement unit used for the display and forparameters that are connected to temperature/pressure. In pharentesis other measurement unit.CDEC: °C with decimal point (bar);1592021021 XC1008-1011-1015D GB A5 r.1.5A 12.10.2009 XC1008-1011-1015D 26/66
C46CINT: °C with decimal point (bar);F: °F (PSI);BAR: bar (°C);PSI: PSI (°F);KPA: KPA (°C)CKPA: °C (KPA)NOTE1: changing the measurement unit, the instrument will update parameter values that refer topressure or temperature.NOTE2: parameters with probe calibration, are reset during the measurement unit change.Pressure display: it indicates if the range of the probes are related to relative or absolute pressure.rEL = relative pressure; AbS: absolute pressureNOTE: the temperature is updated changing this value.6.1.4 Analog Inputs (Ai1-Ai15)AI1 Kind of probe of P1 & P2: it sets the kind of probes for suction sections: Cur = 4 ÷ 20 mA probe;Ptc = Ptc probe; ntc = NTC probe; rAt = rathiometric probe (0÷5V).AI2 Adjustment of read out for the probe 1 at 4mA/0V: (-1.00 ÷ AI3 bar; -15 ÷ AI3 PSI, -100 ÷ AI3KPA) ;AI3 Adjustment of read out for the probe 1 at 20mA/5V: (AI2 ÷ 100.00 bar; AI2 ÷ 750 PSI; AI2 ÷10000 KPA)AI4 Probe 1 calibration:with C45 = CDEC or CINT: -12.0 ÷ 12.0 °Cwith C45= bar: -1.20 ÷ 1.20 bar;with C45 = F or PSI: -120 ÷ 120 °F o PSIwith C45 = KPA: -1200 ÷ 1200 KPA;AI5 Adjustment of read out for the probe 2 at 4mA/0V: (-1.00 ÷ AI6bar; -15 ÷ AI6 PSI)AI6 Adjustment of read out for the probe 2 at 20mA/5V: (AI5 ÷ 51.00 bar; AI5 ÷ 750 PSI)AI7 Probe 2 calibration:with C43 = CEL_DEC or CEL_INT: -12.0 ÷ 12.0 °Cwith C43 = bar: -1.20 ÷ 1.20 bar;with C43 = FAR or PSI: -120 ÷ 120 °F or PSIAI8 Kind of probe of P3 & P4: : it sets the kind of probes for delivery sections: Cur = 4 ÷ 20 mA probe;Ptc = Ptc probe; ntc = NTC probe; rAt = rathiometric probe (0÷5V).AI9 Adjustment of read out for the probe 3 at 4mA/0V: (-1.00 ÷ AI10bar; -15 ÷ AI10 PSI; -100 ÷ AI10KPA)AI10 Adjustment of read out for the probe 3 at 20mA/5V: (AI9 ÷ 100.00 bar; AI9 ÷ 750 PSI; AI9 ÷10000 KPA)AI11 Probe 3 calibrationwith C45 = CDEC or CINT: -12.0 ÷ 12.0 °Cwith C45 = bar: -1.20 ÷ 1.20 bar;with C45 = F or PSI: -120 ÷ 120 °F o PSIwith C45 = KPA: -1200 ÷ 1200 KPA;AI12 Adjustment of read out for the probe 4 at 4mA/0V: (-1.00 ÷ AI13bar; -15 ÷ AI13 PSI; -100 ÷ AI13KPA)AI13 Adjustment of read out for the probe 4 at 20mA/5V: (AI12 ÷ 100.00 bar; AI12 ÷ 750 PSI; AI12 ÷10000 KPA)AI14 Probe 4 calibration:with C45 = CDEC or CINT: -12.0 ÷ 12.0 °Cwith C45 = bar: -1.20 ÷ 1.20 bar;with C45 = F or PSI: -120 ÷ 120 °F o PSIwith C45 = KPA: -1200 ÷ 1200 KPA;AI15 Alarm activated in case of regulation faulty probe:nu = none relay; Alr: all the C(i) outputs set as ALr; ALr1: all the C(i) outputs set as ALr1, ALr2: allthe C(i) outputs set as ALr26.1.5 Auxiliary analog inputs (Ai1-Ai15)AI16 Probe 1 AUX setting: ptc = PTC probe; ntc= NTC probeAI17 Probe 1 AUX action type: it sets the function ot the AUX1 probe (term. 70-71)1592021021 XC1008-1011-1015D GB A5 r.1.5A 12.10.2009 XC1008-1011-1015D 27/66
nu = not usedAu1 = thermostat probe for AUX1 relay;Au2 = thermostat probe for AUX2 relay;Au3 = thermostat probe for AUX3 relay;Au4 = thermostat probe for AUX4 relay;otC1 = for the optimization of the delivery pressure/temperature, circuit 1 (dynamic set of deliverycircuit 1);otC2 = for the optimization of the delivery pressure/temperature, circuit 2 (dynamic set of deliverycircuit 2);otA1 = for the optimization of the suction pressure/temperature, (dynamic set point) circuit 1(dynamicset of suction circuit 1);otA2 = for the optimization of the suction pressure/temperature, (dynamic set point) circuit 2(dynamic set of suction circuit 2)AI18 Probe 1 AUX calibration: -12.0 ÷ 12.0 °C; -120 ÷ 120 °FAI19 Probe 2 AUX setting: ptc = PTC probe; ntc= NTC probeAI20 Probe 2 AUX action type: it sets the function ot the AUX1 probe (term. 71-72)nu = not usedAu1 = thermostat probe for AUX1 relay;Au2 = thermostat probe for AUX2 relay;Au3 = thermostat probe for AUX3 relay;Au4 = thermostat probe for AUX4 relay;otC1 = for the optimization of the delivery pressure/temperature, circuit 1 (dynamic set of deliverycircuit 1);otC2 = for the optimization of the delivery pressure/temperature, circuit 2 (dynamic set of deliverycircuit 2);otA1 = for the optimization of the suction pressure/temperature, (dynamic set point) circuit 1(dynamicset of suction circuit 1);otA2 = for the optimization of the suction pressure/temperature, (dynamic set point) circuit 2(dynamic set of suction circuit 2)AI21 Probe 2 AUX calibration: -12.0 ÷ 12.0 °C; -120 ÷ 120 °FAI22 Probe 3 AUX setting: ptc = PTC probe; ntc= NTC probeAI23 Probe 3 AUX action type: it sets the function ot the AUX1 probe (term. 73-74)nu = not usedAu1 = thermostat probe for AUX1 relay;Au2 = thermostat probe for AUX2 relay;Au3 = thermostat probe for AUX3 relay;Au4 = thermostat probe for AUX4 relay;otC1 = for the optimization of the delivery pressure/temperature, circuit 1 (dynamic set of deliverycircuit 1);otC2 = for the optimization of the delivery pressure/temperature, circuit 2 (dynamic set of deliverycircuit 2);otA1 = for the optimization of the suction pressure/temperature, (dynamic set point) circuit 1(dynamic set of suction circuit 1);otA2 = for the optimization of the suction pressure/temperature, (dynamic set point) circuit 2(dynamic set of suction circuit 2)AI24 Probe 3 AUX calibration: -12.0 ÷ 12.0 °C; -120 ÷ 120 °FAI25 Probe 4 AUX setting: ptc = PTC probe; ntc= NTC probeAI26 Probe 4 AUX action type: it sets the function ot the AUX1 probe (term. 74-75)nu = not usedAu1 = thermostat probe for AUX1 relay;Au2 = thermostat probe for AUX2 relay;Au3 = thermostat probe for AUX3 relay;Au4 = thermostat probe for AUX4 relay;otC1 = for the optimization of the delivery pressure/temperature, circuit 1 (dynamic set of deliverycircuit 1);otC2 = for the optimization of the delivery pressure/temperature, circuit 2 (dynamic set of deliverycircuit 2);otA1 = for the optimization of the suction pressure/temperature, (dynamic set point) circuit 1(dynamic set of suction circuit 1);1592021021 XC1008-1011-1015D GB A5 r.1.5A 12.10.2009 XC1008-1011-1015D 28/66
otA2 = for the optimization of the suction pressure/temperature, (dynamic set point) circuit 2(dynamic set of suction circuit 2)AI27 Probe 4 AUX calibration: -12.0 ÷ 12.0 °C; -120 ÷ 120 °FAI28 Alarm relay on with auxiliary probe fault:nu = relay not present; ALr: all the C(i) outputs set as ALr; ALr1: all C(i) outputs set as ALr1, ALr2:all C(i) outputs set as ALr2.6.1.6 Safety Digital Inputs (Di2-Di13)DI2 Low pressure switch polarity (term. 52 - 53) – circuit 1:oP=LP d.i. enabled by voltage absence;cL= LP d.i. enabled by voltage presence.DI3 Low pressure switch polarity (term. 56 - 57) – circuit 2:oP=LP d.i. enabled by voltage absence;cL= LP d.i. enabled by voltage presence.DI4 High pressure switch polarity (term. 54 - 55) – circuit 1:oP=HP d.i. enabled by voltage absence;cL= HP d.i. enabled by voltage presence.DI5 High pressure switch polarity (term. 58 - 59) – circuit 2:oP=HP d.i. enabled by voltage absence;cL= HP d.i. enabled by voltage presence.DI6 Relay activated in case of pressure switch alarm:nu = no relay activation, only visual signalling; Alr: all the C(i) outputs set as ALr; ALr1: all the C(i)outputs set as ALr1, ALr2: all the C(i) outputs set as ALr2DI7 Compressor alarm inputs polarity - circuit 1oP= d.i. enabled by voltage absence;cL= d.i. enabled by voltage presence.DI8 Compressor alarm inputs polarity - circuit 2oP= d.i. enabled by voltage absence;cL= d.i. enabled by voltage presence.DI9 Fan alarm inputs polarity - circuit 1oP= d.i. enabled by voltage absence;cL= d.i. enabled by voltage presence.DI10 Fan alarm inputs polarity - circuit 2oP= d.i. enabled by voltage absence;cL= d.i. enabled by voltage presence.DI11 Manual reset of compressor alarms signalled by d.i.no = automatic recover of alarm: regulation restart when the correspondent digital input is disabledyES = manual recover for the alarms of compressorsDI12 Manual reset of fan alarms signalled by d.i.no = automatic recover of alarm: a fan restarts when the correspondent digital input is disabledyES = manual recover for the alarms of fanDI13 Relay activated in case of compressor or fan alarms:nu = no relay activation, only visual signalling; Alr: all the C(i) outputs set as ALr; ALr1: all the C(i)outputs set as ALr1, ALr2: all the C(i) outputs set as ALr26.1.7 Digital Inputs (Di14-Di27)DI14 Polarity of configurable digital input 1 (term 36-37)oP: the digital input is activated by opening the contact;CL: the digital input is activated by closing the contact.DI15 Function of configur. configurable digital input 1 (term. 36-37)ES1 = energy saving circuit 1ES2 = energy saving circuit 2OFF1 = circuit 1 stand –byOFF2 = circuit 2 stand –byLL1 = liquid level alarm for circuit 1LL2 = liquid level alarm for circuit 21592021021 XC1008-1011-1015D GB A5 r.1.5A 12.10.2009 XC1008-1011-1015D 29/66
noCRO = it disables the set point coming from the supervising system, and it restores SETC1 andSETC2 set.noSTD1 = it disables the dynamic set point on the circuit 1, and it restores SETC1 and SETF1 set.noSTD2 = it disables the dynamic set point on the circuit 2, and it restores SETC2 and SETF2 set.DI16 Delay of configurable d.i. 1 (0 ÷ 255 min)DI17 Polarity of configurable digital input 2 (term 38-39)oP: the digital input is activated by opening the contact;CL: the digital input is activated by closing the contact.DI18 Function of configur. configurable digital input 2 (term. 38-39)ES1 = energy saving circuit 1ES2 = energy saving circuit 2OFF1 = circuit 1 stand –byOFF2 = circuit 2 stand –byLL1 = liquid level alarm for circuit 1LL2 = liquid level alarm for circuit 2noCRO = it disables the set point coming from the supervising system, and it restores SETC1 andSETC2 set.noSTD1 = it disables the dynamic set point on the circuit 1, and it restores SETC1 and SETF1 set.noSTD2 = it disables the dynamic set point on the circuit 2, and it restores SETC2 and SETF2 set.DI19 Delay of configurable d.i. 2 (0 ÷ 255 min)DI20 Polarity of configurable digital input 3 (term 40-41)oP: the digital input is activated by opening the contact;CL: the digital input is activated by closing the contact.DI21 Function of configur. configurable digital input 3 (term. 40-41)ES1 = energy saving circuit 1ES2 = energy saving circuit 2OFF1 = circuit 1 stand –byOFF2 = circuit 2 stand –byLL1 = liquid level alarm for circuit 1LL2 = liquid level alarm for circuit 2noCRO = it disables the set point coming from the supervising system, and it restores SETC1 andSETC2 set.noSTD1 = it disables the dynamic set point on the circuit 1, and it restores SETC1 and SETF1 set.noSTD2 = it disables the dynamic set point on the circuit 2, and it restores SETC2 and SETF2 set.DI22 Delay of configurable d.i. 3 (0 ÷ 255 min)DI23 Polarity of configurable digital input 4 (term. 42-43)oP: the digital input is activated by opening the contact;CL: the digital input is activated by closing the contact.DI24 Function of configur. configurable digital input 4 (term. 42-43)ES1 = energy saving circuit 1ES2 = energy saving circuit 2OFF1 = circuit 1 stand –byOFF2 = circuit 2 stand –byLL1 = liquid level alarm for circuit 1LL2 = liquid level alarm for circuit 2noCRO = it disables the set point coming from the supervising system, and it restores SETC1 andSETC2 set.noSTD1 = it disables the dynamic set point on the circuit 1, and it restores SETC1 and SETF1 set.noSTD2 = it disables the dynamic set point on the circuit 2, and it restores SETC2 and SETF2 set.DI25 Delay of configurable d.i. 4 (0 ÷ 255 min)DI26 Relay activated in case of liquid level alarm – circuit 1nu = no relay activation, only visual signalling; Alr: all the C(i) outputs set as ALr; ALr1: all the C(i)outputs set as ALr1, ALr2: all the C(i) outputs set as ALr2DI27 Relay activated in case of liquid level alarm – circuit 2nu = no relay activation, only visual signalling; Alr: all the C(i) outputs set as ALr; ALr1: all the C(i)outputs set as ALr1, ALr2: all the C(i) outputs set as ALr21592021021 XC1008-1011-1015D GB A5 r.1.5A 12.10.2009 XC1008-1011-1015D 30/66
6.1.8 Compressor Action (CP1-CP8)CP1 Regulation band width for compressors- circuit 1 (0.10÷10.00 bar; 0.1÷25.0°C, 1÷80PSI,1÷50°F; 10÷1000 KPA) The band is symmetrical compared to the target set point, with extremes:SETC1+(CP1)/2 ... SETC1-(CP1)/2. The measurement unit depends on the C45 par.NOTE: If the circuit 1 has 1 relay set as a frequency compressor (Frq1), the 1Q19 parameter isused instead of the CP1 parameter: regulation band width that is added to the set point 1.CP2 Minimum compressor set point - circuit 1 (AI2 ÷ SETC1 bar, PSI or KPA; -50.0 ÷ SETC1 °C; -58.0÷ SETC1 °F). The measurement unit depends on C45 parameter. It sets the minimum value that canbe used for the compressor set point, to prevent the end user from setting incorrect values.CP3Maximum compressor set point - circuit 1 (SETC1÷AI3 bar/PSI/KPA; SETC1÷150.0°C;SETC1÷302°F)The measurement unit depends on C45 parameter. It sets the maximum acceptable value forcompressor set point.CP4 Compressor energy saving value - circuit 1 (-20.00÷20.00bar; -50.0÷50.0 °C; -300÷300 PSI; -90÷90 °F; -2000÷2000KPA) this value is add to the compressor set point when the energy saving isenabled.CP5 Regulation band width for compressors - circuit 2 (0.10÷10.00 bar; 0.1÷25.0°C, 1÷80PSI,1÷50°F; 10÷1000 KPA). The band is symmetrical compared to the target set point, with extremes:SETC2+(CP5)/2 ... SETC2-(CP1)2. The measurement unit depends on the C43 par.NOTE: If the circuit 1 has 1 relay set as a frequency compressor (Frq2), the 2Q18 parameter isused instead of the CP5 parameter: regulation band width that is added to the set point 2.CP6 Minimum compressor set point - circuit 2 (AI5 ÷ SETC2 bar or PSI o KPA; -50.0 ÷ SETC2 °C; -58.0 ÷ SETC2 °F). The measurement unit depends on C45 parameter. It sets the minimumvalue that can be used for the compressor set point, to prevent the end user from setting incorrectvalues.CP7Maximum compressor set point - circuit 2 (SETC2÷AI6 bar/PSI/KPA; SETC2÷150.0°C;SETC2÷302°F)The measurement unit depends on C45 parameter. It sets the maximum acceptable value forcompressor set point.CP8 Compressor energy saving value - circuit 2 (-20.00÷20.00bar; -50.0÷50.0 °C; -300÷300 PSI; -90÷90 °F) this value is add to the compressor set point when the energy saving is enabled.6.1.9 Safety Compressors (CP9-CP19)CP9CP10CP11CP12CP13CP14CP15CP16CP17CP18CP19Minimum time between 2 following switching ON of the same compressor (0÷255 min).Minimum time between the switching off of a compressor and the following switching on.(0÷255min).Note: usually CP9 is greater than CP10Time delay between the insertion of two different compressors (0 ÷ 99.5 min; res. 1sec)Time delay between switching off of two different compressors (0 ÷ 99.5 min; res. 1sec)Minimum time load on (0 ÷ 99.5 min; res. 1sec)Maximum time load on (0 ÷ 24 h; with 0 this function is disabled.) If a compressor keeps staying onfor the CP14 time, it’s switched off and it can restart after the CP10 standard time or after the CP15time with frequency compressor (Frq1 or Frq2).Minimum time a frequency compressor (CP1..CP15 =Frq1 or Frq2) stays off after CP14 time(0÷255 min)CP11 delay enabled also for the first call. If enabled, the triggering of the step is delayed for a“CP11” time, respect to the call.no = “CP11” not enabled;yES=”CP11” enabledCP12 delay enabled also for the first off. If enabled, the triggering of the step is delayed for a“CP12” time, respect to the call.no = “CP12” not enabled;yES=”CP12” enabledOutput delay at power on (0 ÷ 255 sec)Booster function enabled:no = compressors of 2 circuits work independentlyyES = if at least one compressor of the circuit 1 (BT) is ON, also one compressor of the circuit 2(TN) is enabled, independently from the pressure of the circuit 2. This ensures that the gas comingfrom the circuit 1 is suct by the compressors of the circuit 2.1592021021 XC1008-1011-1015D GB A5 r.1.5A 12.10.2009 XC1008-1011-1015D 31/66
6.1.10 Fan Action (F1-F8)F1 Regulation band width for fans – circuit 1 (0.10÷10.00 bar; 0.1÷30.0°C, 1÷80PSI, 1÷50°F;10÷1000 KPA) Set the C45 par. and the target set point for fans before setting this parameter.The band is symmetrical compared to the fan target set point, with extremes: SETF1-(F1)/2 ...SETF1+(F1)/2. The measurement unit depends on the C45 par.F2 Minimum fan set point – circuit 1 BAR: 2 (AI9 ÷ SETF1 bar or PSI o KPA; -50.0 ÷ SETF1 °C; -58.0 ÷ SETF1 °F). The measurement unit depends on C45 parameter. It sets the minimum value thatcan be used for the fan set point, to prevent the end user from setting incorrect values.F3Maximum fan set point - circuit 1 (SETF1÷AI10 bar/PSI/KPA; SETF1÷150.0°C; SETF1÷302°F)The measurement unit depends on C45 parameter. It sets the maximum acceptable value for fan setpoint.F4 Fan energy saving value - circuit 1 (-20.00÷20.00bar; -50.0÷50.0 °C; -300÷300 PSI; -90÷90 °F; -2000÷2000KPA) this value is add to the fan set point when the energy saving is enabled.F5 Regulation band width for fans – circuit 2 (0.10÷10.00 bar; 0.1÷30.0°C, 1÷80PSI, 1÷50°F;10÷1000 KPA)Set the C45 par. and the target set point for fans before setting this parameter.The band is symmetrical compared to the fan target set point, with extremes: SETF2-(F5)/2 ...SETF2+(F5)/2. The measurement unit depends on the C45 par.F6 Minimum fan set point – circuit 2 BAR: 2 (AI12 ÷ SETF2 bar or PSI o KPA; -50.0 ÷ SETF2 °C; -58.0 ÷ SETF2 °F). The measurement unit depends on C45 parameter. It sets the minimum value thatcan be used for the fan set point, to prevent the end user from setting incorrect values.F7Maximum fan set point - circuit 2 (SETF2÷AI13 bar/PSI/KPA; SETF2÷150.0°C; SETF2÷302°F)The measurement unit depends on C45 parameter. It sets the maximum acceptable value for fan setpoint.F8 Fan energy saving value - circuit 2 (-20.00÷20.00bar; -50.0÷50.0 °C; -300÷300 PSI; -90÷90 °F; -2000÷2000KPA) this value is add to the fan set point when the energy saving is enabled.6.1.11 Safety Fans (F9-F10)F9F10Time delay between the insertion of two different fans (1 ÷ 255 sec)Time delay between switching off of two different fans (1 ÷ 255 sec)6.1.12 Energy Saving Management (HS1-HS14)HS1 Energy Saving start time on Monday (0:0÷23.5h; nu)HS2 Monday Energy Saving duration (0:0÷23.5h)HS3 Energy Saving start time on Tuesday (0:0÷23.5h; nu)HS4 Tuesday Energy Saving duration (0:0÷23.5h)HS5 Energy Saving start time on Wednesday (0:0÷23.5h; nu)HS6 Wednesday Energy Saving duration (0:0÷23.5h)HS7 Energy Saving start time on Thursday (0:0÷23.5h; nu)HS8 Thursday Energy Saving duration (0:0÷23.5h)HS9 Energy Saving start time on Friday (0:0÷23.5h; nu)HS10 Friday Energy Saving duration (0:0÷23.5h)HS11 Energy Saving start time on Saturday (0:0÷23.5h; nu)HS12 Saturday Energy Saving duration (0:0÷23.5h)HS13 Energy Saving start time on Sunday (0:0÷23.5h; nu)HS14 Sunday Energy Saving duration (0:0÷23.5h)6.1.13 Compressor Alarms (AC1-AC19)AC1AC2Probe 1 alarm exclusion at power on (0 ÷ 255 min) it is the period starting from instrument switchon, before an alarm probe is signalled. During this time if the pressure is out of range all thecompressor are switched on.Probe 2 alarm exclusion at power on (0 ÷ 255 min) it is the period starting from instrument switchon, before an alarm probe is signalled. During this time if the pressure is out of range all thecompressor are switched on.1592021021 XC1008-1011-1015D GB A5 r.1.5A 12.10.2009 XC1008-1011-1015D 32/66
AC3 Low pressure (temperature) alarm for compressors – circuit 1: (0.10 ÷ 30.00bar; 0.0 ÷ 100.0°C;1÷430 PSI; 1÷200.0°F; 10 ÷ 3000KPA)The measurement unit depends on C45 parameter. AC3 is always subtracted to the set pointSETC1. When the value SETC1-AC3 is reached the “Low alarm - Suction 1” is enabled, (possiblyafter the AC5 delay time)AC4 High pressure (temperature) alarm for compressors – circuit 1: (0.10 ÷ 30.00bar; 0.0 ÷ 100.0°C;1 ÷ 430 PSI; 1 ÷ 200.0°F; 10 ÷ 3000KPA)The measurement unit depends on C45 parameter. AC4 is always added to the set point SETC1.When the value SETC1+AC4 is reached the “High alarm - Suction 1” is enabled, (possibly after theAC5 delay time)AC5 Low and High compressor pressure (temperature) alarms delay – circuit 1 (0÷255 min) timeinterval between the detection of a pressure (temperature) alarm condition and alarm signalling.AC6 Low pressure (temperature) alarm for compressors – circuit 2: (0.10 ÷ 30.00bar; 0.0 ÷ 100.0°C;1÷430 PSI; 1÷200.0°F)The measurement unit depends on C43 parameter. AC6 is always subtracted to the set pointSETC2. When the value SETC2-AC6 is reached the “Low alarm - Suction 2” is enabled, (possiblyafter the AC8 delay time)AC7 High pressure (temperature) alarm for compressors – circuit 2: (0.10 ÷ 30.00bar; 0.0 ÷ 100.0°C;1 ÷ 430 PSI; 1 ÷ 200.0°F; 10 ÷ 3000KPA)The measurement unit depends on C45 parameter. AC7 is always added to the set point SETC2.When the value SETC2+AC7 is reached the “High alarm - Suction 1” is enabled, (possibly after theAC8 delay time)AC8 Low and High compressor pressure (temperature) alarms delay – circuit 2 (0÷255 min) timeinterval between the detection of a pressure (temperature) alarm condition and alarm signalling.AC9 Relay activated in case of pressure (temperature) alarmnu = no relay activation, only visual signalling; Alr: all the C(i) outputs set as ALr; ALr1: all the C(i)outputs set as ALr1, ALr2: all the C(i) outputs set as ALr2AC10 Service request: (0÷25000h with 0 the function is disabled) number of running hours after thatmaintenance warning is generatedAC11 Relay activated in case of service request alarmnu = no relay activation, only visual signalling; Alr: all the C(i) outputs set as ALr; ALr1: all the C(i)outputs set as ALr1, ALr2: all the C(i) outputs set as ALr2AC12 Low pressure-switch intervention numbers – circuit 1: (0÷15). Every time the pressure-switch isactivated all the compressors of the circuit 1 are turned off. If the low pressure-switch is activatedAC12 times in the AC13 interval, the compressors of the first circuit are switched off and only themanually unlocking is possible.AC13 Pressure-switch interventions time (0÷255 min) – circuit 1 Interval, linked to the AC12 parameter,for counting interventions of the low pressure-switch.AC14 Number of steps engaged with suction probe 1 faulty (0 ÷ 15)AC15 Not usedAC16 Low pressure-switch intervention numbers – circuit 2: (0÷15). Every time the pressure-switch isactivated all the compressors of the circuit 2 are turned off. If the low pressure-switch is activatedAC16 times in the AC17 interval, the compressors of the second circuit are switched off and only themanually unlocking is possible.AC17 Pressure-switch interventions time (0÷255 min) – circuit 2 Interval, linked to the AC16 parameter,for counting interventions of the low pressure-switch.AC18 Number of steps engaged with suction probe 2 faulty (0 ÷ 15)AC19 Not used6.1.14 Fan Alarms (AF1-AF17)AF1 Low pressure (temperature) alarm for fans – circuit 1: (0.10 ÷ 30.00bar; 0.0 ÷ 100.0°C; 1÷430PSI; 1÷200.0°F; 10 ÷ 3000KPA)The measurement unit depends on C45 parameter. AF1 is always subtracted to the set pointSETF1. When the value SETF1-AF1 is reached the “Low alarm – Condenser 1” is enabled, (possiblyafter the AF3 delay time)AF2 High pressure (temperature) alarm for fans– circuit 1: (0.10 ÷ 30.00bar; 0.0 ÷ 100.0°C; 1 ÷ 430PSI; 1 ÷ 200.0°F; 10 ÷ 3000KPA)1592021021 XC1008-1011-1015D GB A5 r.1.5A 12.10.2009 XC1008-1011-1015D 33/66
AF3The measurement unit depends on C45 parameter. AF2 is always added to the set point SETF1.When the value SETF1+AF2 is reached the “High alarm – Condenser 1” is enabled, (possibly afterthe AF3 delay time)Low and High fan pressure (temperature) alarms delay – circuit 1 (0÷255 min) time intervalbetween the detection of a pressure (temperature) alarm condition and alarm signalling.AF4 Compressors off with pressure (temperature) alarm for fans– circuit 1no = compressors are not influenced by this alarmyES = compressors are turned off in case of high pressure (temperature) alarm of fansAF5 Interval between 2 compressors turning off in case of high pressure (temperature) alarm forfans – circuit 1 (0 ÷ 255 min)AF6 High pressure-switch intervention numbers – circuit 1: (0÷15). Every time the pressure-switch isactivated all the compressors of the circuit 1 are turned off and the fan turned on. If the highpressure-switch is activated AF6 times in the AF7 interval, the compressors of the first circuit areswitched off and the fans on, only the manually unlocking is possible.AF7 High pressure-switch interventions time (0÷255 min) – circuit 1 Interval, linked to the AF6parameter, for counting interventions of the high pressure-switch.AF8 Fans on with delivery probe faulty – circuit 1 (0 ÷ 15)AF9 Low pressure (temperature) alarm for fans – circuit 2: (0.10 ÷ 30.00bar; 0.0 ÷ 100.0°C; 1÷430PSI; 1÷200.0°F; 10 ÷ 3000KPA)The measurement unit depends on C45 parameter. AF9 is always subtracted to the set pointSETF2. When the value SETF2-AF9 is reached the “Low alarm – Condenser 2” is enabled, (possiblyafter the AF11 delay time)AF10 High pressure (temperature) alarm for fans– circuit 2: (0.10 ÷ 30.00bar; 0.0 ÷ 100.0°C; 1 ÷ 430PSI; 1 ÷ 200.0°F; 10 ÷ 3000KPA)The measurement unit depends on C45 parameter. AF10 is always added to the set point SETF2.When the value SETF2+AF10 is reached the “High alarm – Condenser 2” is enabled, (possibly afterAF11the AF11 delay time)Low and High fan pressure (temperature) alarms delay – circuit 2 (0÷255 min) time intervalbetween the detection of a pressure (temperature) alarm condition and alarm signalling.AF12 Compressors off with pressure (temperature) alarm for fans– circuit 2no = compressors are not influenced by this alarmyES = compressors are turned off in case of high pressure (temperature) alarm of fansAF13 Interval between 2 compressors turning off in case of high pressure (temperature) alarm forfans – circuit 2 (0 ÷ 255 min)AF14 High pressure-switch intervention numbers – circuit 2: (0÷15). Every time the pressure-switch isactivated all the compressors of the circuit 2 are turned off and the fans turned on. If the highpressure-switch is activated AF14 times in the AF15 interval, the compressors of the second circuitare switched off and the fans on, only the manually unlocking is possible.AF15 High pressure-switch interventions time (0÷255 min) – circuit 2 Interval, linked to the AF14parameter, for counting interventions of the high pressure-switch.AF16 Fans on with delivery probe faulty – circuit 2 (0 ÷ 15)AF17 Relay activated in case of pressure (temperature) alarms of fansnu = no relay activation, only visual signalling; Alr: all the C(i) outputs set as ALr; ALr1: all the C(i)outputs set as ALr1, ALr2: all the C(i) outputs set as ALr26.1.15 Dynamic Setpoint Suction (o1-o8)O1 Dynamic compressor set point function enabled - circuit 1no = standard regulationyES = the SETC1 varies according to the setting of O2, O3, O4.WARNING the dynamic set point requires a dedicated probe, so it’s necessary one of the aux probesis set for this function in other words AI17 or AI20 or AI23 or AI27 has to be set as otA1.NOTE: if more than one probe is used for the optimization of the suction set point, only the highertemperature is considered.O2 Maximum compressor set point - circuit 1 (SETC1÷CP3) It sets the maximum value ofcompressor set point used in the dynamic set point function. The measurement unit depends on C45parameter.O3 External temperature for maximum set point O2- circuit 1 (-40÷O4 °C /-40÷O4°F) It’sthe temperature detected by the external AUX probe, at which the maximum set point is reached.O4 External temperature for standard set point– circuit 1 (O3÷150°C O3÷302°F)1592021021 XC1008-1011-1015D GB A5 r.1.5A 12.10.2009 XC1008-1011-1015D 34/66
1. with AUX temper. < O3 ==> “Real SEtC1” = O22. with AUX temper. > O4 ==> “Real SEtC1” = SEtC13. with O3 < AUX temper < O4 ==> SEtC1 < “Real SEtC1” < O2Suction 1Set pointO2SEtC1O3O4AUXTemperatureO5 Dynamic compressor set point function enabled - circuit 2no = standard regulationyES = the SETC2 varies according to the setting of O6, O7, O8.WARNING the dynamic set point requires a dedicated probe, so it’s necessary one of the aux probesis set for this function in other words AI17 or AI20 or AI23 or AI27 has to be set as otA2.NOTE: if more than one probe is used for the optimization of the suction set point, only the highertemperature is considered.O6 Maximum compressor set point - circuit 2 (SETC2÷CP7) It sets the maximum value ofcompressor set point used in the dynamic set point function. The measurement unit depends on C45parameter.O7 External temperature for maximum set point O6 - circuit 1 (-40÷O8 °C /-40÷O8°F) It’sthe temperature detected by the external AUX probe, at which the maximum set point is reached.O8 External temperature for standard set point– circuit 2 (O7÷150°C O7÷302°F)1. with AUX temper. < O7 ==> “Real SEtC2” = O62. with AUX temper. > O8 ==> “Real SEtC2” = SEtC23. with O7 < AUX temper < O8 ==> SEtC2 < “Real SEtC2” < O6Suction 2Set pointO6SEtC2O7O86.1.16 Dynamic Setpoint Condenser (o9-o14)AUXTemperatureO9 Dynamic set enabled for condenser- circuit 1no = standard regulationyES = the SETF1 varies according to the setting of O10, O11.WARNING the dynamic set point requires a dedicated probe, so it’s necessary one of the aux probesis set for this function in other words AI17 or AI20 or AI23 or AI27 has to be set as otC1O10 Minimum condenser set point - circuit 1 (F2÷SETF1)O11 Differential for condenser dynamic set point –circuit 1 (-50.0÷50.0°C; -90÷90°F). The way ofworking of this algorithm is explained in the following exemplum.1592021021 XC1008-1011-1015D GB A5 r.1.5A 12.10.2009 XC1008-1011-1015D 35/66
ExampleWith the external temperature (otc1) > SETF1-O11 ==> “real SEtF1” = SETF1With the external temperature (otc1) < O10-O11 ==> “real SetF1”= O10With O10-O11 < external temperature (otc1) < SETF1-O11 ==> O10 SETF2-O14 ==> “real SetF2” = SETF2With the external temperature (otc2) < O13-O14 ==> “real SetF1”= O13With O13-O14 < external temperature (otc1) < SETF2-O14 ==> O13
Pbc1= Suction Probe, circuit 1 (term. 62-63 or 62 -68)Pbc2 = Suction Probe, circuit 2 (term. 64-63 or 64 -68)1Q4 Adjustment of read out for the analog output 1 (-1.00÷100.00 bar; -15÷750PSI; -50÷150°C; -58÷302°F; -100÷10000 KPA). It’s used only when 1Q2 = FREE1Q5 Adjustment of read out for the analog output 1 at 20mA/10V (-1.00÷100.00 bar; -15÷750PSI; -50÷150°C; -58÷302°F; -100÷10000 KPA). It’s used only when 1Q2 = FREE1Q6 Minimum value for analogue output 1 (0 ÷ 100%)1Q7 Analog output 1 value after compressor start (1Q6 ÷ 100 %) It’s the value of the analogue outputafter a compressor has started, when the pressure/temperature is above the regulation band. – Usedduring inverter regulation1Q8 Analog output 1 value after a compressor is switched off (1Q6 ÷ 100 %) It’s the value of theanalogue output when a compressor has been switched off and the the pressure/temperature isbelow the regulation band. – Used during inverter regulation1Q9 Exclusion band start value for analog output 1 (1Q6 ÷ 100 %): it allows to exclude a range offrequencies that could create problems to the compressor. – Used during inverter regulation1Q10 Exclusion band end value for analog output 1 (1Q9 ÷ 100 %) – Used during inverter regulation1Q11 Safety value for analog output 1 (0 ÷ 100 %): it’s used in case of probe faulty.1Q12 Delay between the entrance in the regulation band and the regulation activation (0 ÷ 255sec):it’s the delay between the entrance in the regulation band of pressure/temperature and the regulationstart. Used to avoid false inverter starts dued to pressure variations. – Used during inverterregulation.1Q13 Analog output 1 rise time (0 ÷ 255 sec). It’s the time necessary to the analog output to pass fromthe 1Q6 to 100%, when a compressor has started and the pressure/temperature is above theregulation band. – Used during inverter regulation.1Q14 Analog output 1 permanency at 100% before load activation (0 ÷ 255 sec): the analog outputremains at 100% value for this time before a load is activated. – Used during inverter regulation1Q15 Delay between pressure (temperature) goes down the set point and start of analog output 1decreasing (0÷255sec). – Used during inverter regulation1Q16 Analog output 1 decreasing time ( 0 ÷ 255sec) It’s the time taken from the analog output to passfrom the 100% to the 1Q6 value. It’s used during the switching off phase, when the pressure is lowerthan the set point.1Q17 Analog output 1 permanency at 1Q6 before a load is switched off (0 ÷ 255sec) When thepressure (temperature) is below the set point, the analog output remains at 1Q6 value for the 1Q17before a load is switched off.1Q18 Analog output 1 decreasing time when a load is switched on (0 ÷ 255sec) It’s the time necessaryto the analog output to pass from 100% to 1Q7 when a load is switched on.1Q19 Regulation band (0.10÷25.00bar; 0.0÷25.0°C; 1÷250 PSI; 1÷250°F;10÷2500 KPA). It is the bandwith the proportional action. It replaces CP1 for the inverter regulation. It is add to the set point. Theproportional action starts when the temperature/pressure value is higher than the set point and itreaches the 100% when the pressure/temperature is equal or higher than set + 1Q19.1Q20 Integral time (0÷999s; with 0 integral action excluded). It sets the pound of the proportional action.The higher is 1Q20, the lower is the integral action support.1Q21 Band offset (-12.0÷12.0°C -12.00 ÷ 12.00BAR, -120÷120°F, -120÷120PSI; -1200÷1200KPA). Usedto move the regulation band across to the set point.1Q22 Integral action limitation (0.0÷99.0 °C; 0÷180°F; 0.00÷50,00bar; 0÷725PSI; 0÷5000kPA) to stop theincreasing of integral action when the pressure reaches the SET + 1Q22 value.1Q24 Minimum inverter capacity with poor lubrication (0÷99%; with 0 function excluded) If thefrequency compressor works for the 1Q25 time with a frequency (in percentage) equal or lower than1Q24, it is forced to work at 100% for the 1Q26 time in order to make the right lubrication.1Q25 Maximum inverter functioning time at a lower frequency than 1Q24, before working at 100%(1÷255min)1Q26 Time of inverter functioning at 100% to restore the right lubrication (1÷255min)6.1.19 Analog output 2 (2Q1-2Q25)2Q1 Analog output 2 function (term. 33-34)FREE = pure analogue outputCPR = output for inverter frequency compressor – circuit 1CPR2 = output for inverter frequency compressor – circuit 2FAN = output for inverter fans– circuit 1 (only some fans driven by inverter, others enabled by on/off);1592021021 XC1008-1011-1015D GB A5 r.1.5A 12.10.2009 XC1008-1011-1015D 37/66
FAN2 = output for inverter fans – circuit 2 (only some fans driven by inverter, others enabled byon/off);INVF1 = not usedINVF2 = not usednu = not used2Q2 Reference probe for analogue output 2, it’s used only when 2Q1 = FREEPbc1= Suction Probe, circuit 1 (term. 62-63 or 62 -68)Pbc2 = Suction Probe, circuit 2 (term. 64-63 or 64 -68)2Q3 Adjustment of read out for the analog output 2 at 4mA/0V (-1.00÷100.00 bar; -15÷750PSI; -50÷150°C; -58÷302°F; -100÷10000 KPA). It’s used only when 2Q1 = FREE2Q4 Adjustment of read out for the analog output 2 at 20mA/10V (-1.00÷100.00 bar; -15÷750PSI; -50÷150°C; -58÷302°F; -100÷10000 KPA). It’s used only when 2Q1 = FREE2Q5 Minimum value for analogue output 2 (0 ÷ 100%)2Q6 Analog output 2 value after compressor start (2Q5 ÷ 100 %) It’s the value of the analogue outputafter a compressor has started, when the pressure/temperature is above the regulation band. – Usedduring inverter regulation2Q7 Analog output 2 value after compressor is switched off (2Q5 ÷ 100 %) It’s the value of theanalogue output when a compressor has been switched off and the the pressure/temperature isbelow the regulation band. – Used during inverter regulation2Q8 Exclusion band start value for analog output 2 (2Q5 ÷ 100 %): it allows to exclude a range offrequencies that could create problems to the compressor. – Used during inverter regulation2Q9 Exclusion band end value for analog output 2 (2Q8 ÷ 100 %)– Used during inverter regulation2Q10 Safety value for analog output 2 (0 ÷ 100 %): it’s used in case of probe faulty.2Q11 Delay between the entrance in the regulation band and the regulation activation (0 ÷ 255sec):it’s the delay between the entrance in the regulation band of pressure/temperature and the regulationstart. Used to avoid false inverter starts dued to pressure variations. – Used during inverterregulation.2Q12 Analog output 2 rise time (0 ÷ 255 sec) It’s the time necessary to the analog output to pass fromthe 1Q6 to 100%, when a compressor has started and the pressure/temperature is above theregulation band. – Used during inverter regulation.2Q13 Analog output 2 permanency before load activation (0 ÷ 255 sec): the analog output remains at100% value for this time before a load is activated. - Used during inverter regulation2Q14 Delay between pressure (temperature) goes down the set point and start of analog output 2decreasing (0÷255sec). – Used during inverter regulation2Q15 Analog output decreasing time (0 ÷ 255sec) It’s the time taken from the analog output to pass fromthe 100% to the 2Q5 value. It’s used during the switching off phase, when the pressure is below theset point.2Q16 Analog output 2 permanency at 2Q5 value before a load is switched off (0 ÷ 255sec) When thepressure (temperature) is below the set point, the analog output 2 remains at 2Q5 value before aload is switched off.2Q17 Analog output 2 decreasing time when a load is switched on (0 ÷ 255sec) It’s the time necessaryto the analog output to pass from 100% to 2Q6 when a load is switched on.2Q18 Regulation band (0.10÷25.00bar; 0.0÷25.0°C; 1÷250 PSI; 1÷250°F;10÷2500 KPA). It is the bandwith the proportional action. It replaces CP1 for the inverter regulation. It is add to the set point. Theproportional action starts when the temperature/pressure value is higher than the set point and itreaches the 100% when the pressure/temperature is equal or higher than set + 2Q18.2Q19 Integral time (0÷999s; with 0 integral action excluded). It sets the pound of the proportional action.The higher is 1Q20, the lower is the integral action support.2Q20 Band offset (-12.0÷12.0°C -12.00 ÷ 12.00BAR, -120÷120°F, -120÷120PSI; -1200÷1200KPA). Usedto move the regulation band across to the set point.2Q21 Integral action limitation (0.0÷99.0 °C; 0÷180°F; 0.00÷50,00bar; 0÷725PSI; 0÷5000kPA) to stop theincreasing of integral action when the pressure reaches the SET + 1Q22 value.2Q23 Minimum inverter capacity with poor lubrication (0÷99%; with 0 function excluded) If thefrequency compressor works for the 1Q25 time with a frequency (in percentage) equal or lower than2Q23, it is forsed to work at 100% for the 2Q25 time in order to make the right lubrication.2Q24 Maximum inverter functioning time at a lower frequency than 2Q24, before working at 100%(1÷255min)2Q25 Time of Inverter al 100% to restore the right lubrication (1÷255min)1592021021 XC1008-1011-1015D GB A5 r.1.5A 12.10.2009 XC1008-1011-1015D 38/66
6.1.20 Analog Output 3 (3Q2-3Q26)3Q2 Analog output 3 function (term. 31-32)FREE = pure analogue outputCPR = output for inverter frequency compressor – circuit 1CPR2 = output for inverter frequency compressor – circuit 2FAN = output for inverter fans – circuit 1 (only some fans driven by inverter, others enabled by on/off);FAN2 = output for inverter fans – circuit 2 (only some fans driven by inverter, others enabled byon/off);INVF1 = proportional inverter for fans of circuit 1 (all fans driven by inverter)INVF2 = proportional inverter for fans of circuit 2 (all fans driven by inverter)nu = not used3Q3 Reference probe for analogue output 3, it’s used only when 3Q2 = FREE, INVF1 or INVF2Pbc1= Suction Probe, circuit 1 (term. 62-63 or 62 -68)Pbc2 = Suction Probe, circuit 2 (term. 64-63 or 64 -68)3Q4 Adjustment of read out for the analog output 3 (-1.00÷100.00 bar; -15÷750PSI; -50÷150°C; -58÷302°F; -100÷10000 KPA). It’s used only when 3Q2 = FREE3Q5 Adjustment of read out for the analog output 3 at 20mA/10V (-1.00÷100.00 bar; -15÷750PSI; -50÷150°C; -58÷302°F; -100÷10000 KPA). It’s used only when 3Q2 = FREE3Q6 Minimum value for analogue output 3 (0 ÷ 100%)3Q7 Analog output 3 value after load start (3Q6 ÷ 100 %) It’s the value of the analogue output after acompressor has started, when the pressure/temperature is above the regulation band. – Used duringinverter regulation3Q8 Analog output 3 value after a load is switched off (3Q6 ÷ 100 %) It’s the value of the analogueoutput when a compressor has been switched off and the the pressure/temperature is below theregulation band. – Used during inverter regulation3Q9 Exclusion band start value for analog output 3 (3Q6 ÷ 100 %): it allows to exclude a range offrequencies that could create problems to the compressor. – Used during inverter regulation3Q10 Exclusion band end value for analog output 3 (3Q9 ÷ 100 %) – Used during inverter regulation3Q11 Safety value for analog output 3 (0 ÷ 100 %): it’s used in case of probe faulty.3Q12 Delay between the entrance in the regulation band and the regulation activation (0 ÷ 255sec):it’s the delay between the entrance in the regulation band of pressure/temperature and the regulationstart. Used to avoid false inverter starts dued to pressure variations. – Used during inverterregulation.3Q13 Analog output 3 rise time (0 ÷ 255 sec). It’s the time necessary to the analog output to pass fromthe 3Q6 to 100%, when a compressor has started and the pressure/temperature is above theregulation band. – Used during inverter regulation.3Q14 Analog output 3 permanency at 100% before load activation (0 ÷ 255 sec): the analog outputremains at 100% value for this time before a load is activated. – Used during inverter regulation3Q15 Delay between pressure (temperature) goes down the set point and start of analog output 3decreasing (0÷255sec). – Used during inverter regulation3Q16 Analog output decreasing time (0 ÷ 255sec) It’s the time taken from the analog output to pass from100% to the 3Q8 value. It’s used during the switching off phase, when the pressure is below the setpoint.3Q17 Analog output 3 permanency at 3Q6 before a load is switched off (0 ÷ 255sec) When thepressure (temperature) is belove the set point, the analog output 3 remains at 3Q6 value for the3Q17 before a load is switched off.3Q18 Analog output 3 decreasing time when a load is switched on (0 ÷ 255sec) It’s the time necessaryto the analog output to pass from 100% to 3Q7 when a load is switched on.3Q19 Regulation band (0.10÷25.00bar; 0.0÷25.0°C; 1÷250 PSI; 1÷250°F;10÷2500 KPA). It is the bandwith the proportional action. It replaces CP1 for the inverter regulation. It is add to the set point. Theproportional action starts when the temperature/pressure value is higher than the set point and itreaches the 100% when the pressure/temperature is equal or higher than set + 3Q19.3Q20 Integral time (0÷999s; with 0 integral action excluded). It sets the pound of the proportional action.The higher is 3Q20, the lower is the integral action support.3Q21 Band offset (-12.0÷12.0°C -12.00 ÷ 12.00BAR, -120÷120°F, -120÷120PSI; -1200÷1200KPA). Usedto move the regulation band across to the set point.3Q22 Integral action limitation (0.0÷99.0 °C; 0÷180°F; 0.00÷50,00bar; 0÷725PSI; 0÷5000kPA) to stop theincreasing of integral action when the pressure reaches the SET + 3Q22 value.1592021021 XC1008-1011-1015D GB A5 r.1.5A 12.10.2009 XC1008-1011-1015D 39/66
3Q243Q253Q26Minimum inverter capacity with poor lubrication (0÷99%; with 0 function excluded) If thefrequency compressor works for the 3Q25 time with a frequency (in percentage) equal or lower than3Q24, it is forsed to work at 100% for the 3Q26 time in order to make the right lubrication.Time of lower inverter time (1÷255min)Time of Inverter at 100% to restore the right lubrication (1÷255min)6.1.21 Analog output 4 (4Q1-4Q25)4Q1 Analog output 4 function (term. 30-31)FREE = pure analogue outputCPR = output for frequency compressor – circuit 1CPR2 = output for frequency compressor – circuit 2FAN = output for inverter fans– circuit 1 (only some fans driven by inverter, others enabled by on/off);FAN2 = output for inverter fans – circuit 2 (only some fans driven by inverter, others enabled byon/off);INVF1 = proportional inverter for fans of circuit 1 (all the fans driven frequency)INVF2 = proportional inverter for fans of circuit 2 (all the fans driven frequency)nu = not used4Q2 Reference probe for analogue output 4, it’s used only when 4Q1 = FREE, INVF1 or INVF2.Pbc3= Suction Probe, circuit 1 (term. 65-66 or 65 -68)Pbc4 = Suction Probe, circuit 2 (term. 66-67 or 67 -68)4Q3 Adjustment of read out for the analog output 4 at 4mA/0V (-1.00÷100.00 bar; -15÷750PSI; -50÷150°C; -58÷302°F; -100÷10000 KPA). It’s used only when 4Q1 = FREE4Q4 Adjustment of read out for the analog output 4 at 20mA/10V (-1.00÷100.00 bar; -15÷750PSI; -50÷150°C; -58÷302°F; -100÷10000 KPA). It’s used only when 4Q1 = FREE4Q5 Minimum value for analogue output 4 (0 ÷ 100%)4Q6 Analog output 4 value after load start (4Q5 ÷ 100 %) It’s the value of the analogue output after acompressor has started, when the pressure/temperature is above the regulation band. – Used duringinverter regulation4Q7 Analog output 4 value after load is switched off (4Q5 ÷ 100 %) It’s the value of the analogueoutput when a compressor has been switched off and the the pressure/temperature is below theregulation band. – Used during inverter regulation4Q8 Exclusion band start value for analog output 4 (4Q5 ÷ 100 %): it allows to exclude a range offrequencies that could create problems to the compressor. – Used during inverter regulation4Q9 Exclusion band end value for analog output 4 (4Q8 ÷ 100 %)– Used during inverter regulation4Q10 Safety value for analog output 4 (0 ÷ 100 %): it’s used in case of probe faulty.4Q11 Delay between the entrance in the regulation band and the regulation activation (0 ÷ 255sec):it’s the delay between the entrance in the regulation band of pressure/temperature and the regulationstart. Used to avoid false frequency starts dued to pressure variations. – Used during inverterregulation.4Q12 Analog output 4 rise time (0 ÷ 255 sec) It’s the time necessary to the analog output to pass fromthe 1Q6 to 100%, when a compressor has started and the pressure/temperature is above theregulation band. – Used during inverter regulation.4Q13 Analog output 4 permanency before load activation (0 ÷ 255 sec): the analog output remains at100% value for this time before a load is activated. - Used during inverter regulation4Q14 Delay between pressure (temperature) goes down the set point and start of analog output 4decreasing (0÷255sec). – Used during inverter regulation4Q15 Analog output 4 decreasing time ( 0 ÷ 255sec) It’s the time taken from the analog output to passfrom 100% to the 4Q7 value. It’s used during the switching off phase, when the pressure is below theset point.4Q16 Analog output 4 permanency at 4Q5 before a load is switched off (0 ÷ 255sec) The analogoutput remains at 4Q5 value before a load is switched off.4Q17 Analog output 4 decreasing time when a load is switched on (0 ÷ 255sec) It’s the time necessaryto the analog output to pass from 100% to 4Q6 when a load is switched on.4Q18 Regulation band (0.10÷25.00bar; 0.0÷25.0°C; 1÷250 PSI; 1÷250°F;10÷2500 KPA). It is the bandwith the proportional action. It replaces CP1 for the inverter regulation. It is add to the set point. Theproportional action starts when the temperature/pressure value is higher than the set point and itreaches the 100% when the pressure/temperature is equal or higher than set + 4Q18.4Q19 Integral time (0÷999s; with 0 integral action excluded). It sets the pound of the proportional action.The higher is 1Q20, the lower is the integral action support.1592021021 XC1008-1011-1015D GB A5 r.1.5A 12.10.2009 XC1008-1011-1015D 40/66
4Q20 Band offset (-12.0÷12.0°C -12.00 ÷ 12.00BAR, -120÷120°F, -120÷120PSI; -1200÷1200KPA). Usedto move the regulation band across to the set point.4Q21 Integral action limitation (0.0÷99.0 °C; 0÷180°F; 0.00÷50,00bar; 0÷725PSI; 0÷5000kPA) to stop theincreasing of integral action when the pressure reaches the SET + 1Q22 value.4Q23 Minimum inverter capacity with poor lubrication (0÷99%; with 0 function excluded) If thefrequency compressor works for the 1Q25 time with a frequency (in percentage) equal or lower than4Q23, it is forsed to work at 100% for the 4Q25 time in order to make the right lubrication.4Q24 Maximum inverter functioning time at a lower frequency than 4Q24, before working at 100%(1÷255min)4Q25 Time of Inverter at 100% to restore the right lubrication (1÷255min)6.1.22 Auxiliary Outputs (AR1-AR12)AR1 Set point for auxiliary relay 1 (-40÷110°C/-40÷230°F) it’s is used for all the relays configured asAUS1.AR2 Differential for aux relay 1 (0,1÷25,0°C/1÷50°F) Intervention differential for relay AUX1.Cooling (AR3 = CL): Cut IN is AR1+ AR2. Cut OUT is when the temperature reaches the set pointAR1.Heating (AR3=Ht): Cut IN is AR1- AR2. Cut OUT is when the temperature reaches the set point.AR1AR3 Kind of action for aux. 1CL = coolingHt = heatingAR4 Set point for auxiliary relay 2 (-40÷110°C/-40÷230°F) it’s is used for all the relays configured asAUS2.AR5 Differential for aux relay 2 (0,1÷25,0°C/1÷50°F) Intervention differential for relay AUX2.Cooling (AR6 = CL): Cut IN is AR4+ AR5. Cut OUT is when the temperature reaches the set pointAR4.Heating (AR36 = Ht): Cut IN is AR4- AR5. Cut OUT is when the temperature reaches the set point.AR4AR6 Kind of action for aux. 2CL = coolingHt = heatingAR7 Set point for auxiliary relay 3 (-40÷110°C/-40÷230°F) it’s is used for all the relays configured asAUS3.AR8 Differential for aux relay 1 (0,1÷25,0°C/1÷50°F) Intervention differential for relay AUX3.Cooling (AR3 = CL): Cut IN is AR7+ AR8. Cut OUT is when the temperature reaches the set pointAR7.Heating (AR8=Ht): Cut IN is AR7- AR8. Cut OUT is when the temperature reaches the set point.AR7-AR9 Kind of action for aux. 3CL = coolingHt = heatingAR10 Set point for auxiliary relay 4 (-40÷110°C/-40÷230°F) it’s is used for all the relays configured asAUS4.AR11 Differential for aux relay 4 (0,1÷25,0°C/1÷50°F) Intervention differential for relay AUX4.Cooling (AR12 = CL): Cut IN is AR10+ AR11. Cut OUT is when the temperature reaches the setpoint AR10.Heating (AR12=Ht): Cut IN is AR10- AR11. Cut OUT is when the temperature reaches the set point.AR10AR12 Kind of action for aux. 4CL = coolingHt = heating6.1.23 Other (oT1-oT9)OT1 Alarm relay off by keyboard It’s referred to the relay with terminals 84-85-86no = alarm relay remains on for all the duration of the alarmyES = the alarm relay is switched off by pushing a keyOT2 Alarm relay polarity1592021021 XC1008-1011-1015D GB A5 r.1.5A 12.10.2009 XC1008-1011-1015D 41/66
OP = alarm conditions 84-85 closedCL = alarm conditions 84-85 openOT3 Alarm relay 1 off by keyboard It’s referred to the relays configured as ALr1no = alarm relay remains on for all the duration of the alarmyES = the alarm relay is switched off by pushing a keyOT4 Alarm relay 1 polarityOP = the alarm relay terminals are open during an alarmCL = the alarm relay terminals are closed during an alarmOT5 Alarm relay 2 off by keyboard It’s referred to the relays configured as ALr2no = alarm relay remains on for all the duration of the alarmyES = the alarm relay is switched off by pushing a keyOT6 Alarm relay 2 polarityOP= the alarm relay terminals are open during an alarmCL = the alarm relay terminals are closed during an alarmOT7 Serial address 1 ÷ 247OT8 Serial address for keyboard not usedOT9 Off function enablingno = it’s not possible to switch the controller off by keyboardYES = it’s possible to switch the controller off by keyboard7. Regulation7.1 Neutral zone adjustment – only for compressorsThis kind of regulation is available only for compressors. It is used if the parameter C37 = db (C38 =db for circuit 2). The following observations are availables only for adjustment without inverter. Inthis case the neutral zone (CP1) is symmetrical compared to the target set point, with extremes:set+CP1/2 ... set-CP1/2. If the pressure (temperature) is inside this zone the controller maintainsthe same number of loads switched on and off, without changing anything.When the pressure (temperature) goes out from the zone, regulation starts. If the pressure isgreater than SET+CP1/2, the loads are switching on with timing given by CP11parameter.A load is turned on only if the his safety times:CP9 Minimum time between 2 following switching ON of the same compressor (0÷255 min).CP10 Minimum time between the switching off of a compressor and the following switching on.(0÷255min).Note: usually CP9 is greater than CP10CP13 Minimum time load on (0 ÷ 99.5 min; res. 1sec)are over.Regulation stops when the pressure (temperature) comes back into the neutral zone.In the following a simplify example that explains the regulation in neutral zone for compressorhomogeneous with 1 step for each compressors. The safety times CP9, CP10, CP13 are notconsidered. In the real regulation the a load is entered or turned off only if these times are over.Ex. Dead band control, compressors with same capacities, 1 step for each compressor.In this example:C1 = cPr1; C2 = cPr1; C3 = cPr1; number of compressors first circuit.C35 = db dead band regulationC39 = yES rotationCP16 = no “CP11” delay not enabled at first calling after an equilibrium condition.CP17 = no “CP12” delay not enabled at first calling after an equilibrium condition.1592021021 XC1008-1011-1015D GB A5 r.1.5A 12.10.2009 XC1008-1011-1015D 42/66
7.2 Proportional band adjustment – for compressors and fansThis kind of regulation is available for compressors and fans. It is used by compressors if theparameter C37 = Pb (C38 = Pb for circuit 2). The following observations are availables only foradjustment without inverter. Compressors and fans work in the same way.Example:In this case the regulation band (CP1) is divided into as many parts as there are stages according tothe following formula:# steps = C(i) = CPr1 or Step (number of compr. or steps).The numbers of stages switched ON is proportional to the value of the input signal: when thisdistances itself from the target set point and enters the various bands, the compressors areswitched ON, to be then turned OFF when the signal brings near the set point.In this way if the pressure is greater than regulation band, all the compressors are on, if thepressure (temperature) is lower than the regulation band all the compressors are off.Naturally also for this regulations all the delays (CP11 and CP12) safety times (CP9, CP10, CP13)are taken in account.Regulation according to the running hoursThe algorithm switch on and off the loads according to the running hours of each load. In this waythe running hours are balanced.ExampleC1 = cPr1; C2 = cPr1; C3 = cPr1; C4 = cPr1: 4 compressorsC37 = Pb proportional band regulationC39 = yES rotationCP16 = no “CP11” delay not enabled at first calling after a regulation zone.CP17 = no “CP12” delay not enabled at first calling after a regulation zone.1592021021 XC1008-1011-1015D GB A5 r.1.5A 12.10.2009 XC1008-1011-1015D 43/66
1592021021 XC1008-1011-1015D GB A5 r.1.5A 12.10.2009 XC1008-1011-1015D 44/66
8. SCREW COMPRESSORSLoads activation is managed by the neutral zone. They follows general rules of step compressors:a. C1..C14 = screw1 or screw2 have to be present, following C2..C15 that are set as Stp, are linkedto C1..C14 = screwThe relay group is activated depending on the kind of screw compressors that has been selected onthe C16 parameter.8.1 Regulation with screw compressors like Bitzer/ Hanbell/Refcomp etcScrew compressors like Bitzer use up to 4 valves for the power regulation.The first valve is used during the starting phase for the C35 max time, after this time, the step 2 isautomatically activated.Through the C36 parameter it is possible to decide if the step 1 can be subsequently used duringthe standard thermoregulation.8.1.1 Relay activationES. Compressor with 4 steps:C1 = Scrw1; C2 = Stp; C3 = Stp; C4 = Stp; C16 = Btza. Activation with valves ON due to voltage presence (C17=cL).C1 = Screw1 C2 = stp C3 = stp C4 = stpStep 1 (25%) ON ON OFF OFFStep 2 (50%) ON OFF ON OFFStep 3 (75%) ON OFF OFF ONStep 4 (100%) ON OFF OFF OFFb. Activation with valves ON due to voltage absence (C17=oP).C1 = Screw1 C2 = stp C3 = stp C4 = stpStep 1 (25%) ON OFF ON ONStep 2 (50%) ON ON OFF ONStep 3 (75%) ON ON ON OFFStep 4 (100%) ON ON ON ON8.2 Regulation with screw compressors like FrascoldScrew compressors like Frascold use up to 3 valves for the power regulation.The first valve is used during the starting phase for the C35 max time, after this time, the step 2 isautomatically activated.Through the C36 parameter it is possible to decide if the step 1 can be subsequently used duringthe standard thermoregulation.8.2.1 Relay activation1592021021 XC1008-1011-1015D GB A5 r.1.5A 12.10.2009 XC1008-1011-1015D 45/66
ES. Compressor with 4 steps:C1 = Scrw1; C2 = Stp; C3 = Stp; C4 = Stp; C16 = Frtza. Activation with valves ON due to voltage presence. (C17=cL)C1 = Screw1 C2 = stp C3 = stp C4 = stpC1 = Screw1 ON OFF OFF OFFC1 = Screw1 ON ON ON OFFC1 = Screw1 ON ON OFF ONC1 = Screw1 ON ON OFF OFFb. Activation with valves ON due to voltage absence. (C17=oP)oAi = Screw1 oAi+1 = stp oAi+2 = stp oAi+3 = stpStep 1 (25%) ON ON ON ONStep 2 (50%) ON OFF OFF ONStep 3 (75%) ON OFF ON OFFStep 4 (100%) ON OFF ON ON1592021021 XC1008-1011-1015D GB A5 r.1.5A 12.10.2009 XC1008-1011-1015D 46/66
9. ANALOG OUTPUTS FOR INVERTER9.1 Compressor managementThe analog outputs can be used in a rack with frequency compressor, driven by an inverter.The regulation of the compressors in this case is changed as described in the following graph:The following examples shows the behaviour of the analog output with proportional regulation.ES.3 compressors, 1 frequency compressorC1 = FRQ1 C37 = db 1Q8 < 100C2 = CPR1 1Q2 = CPRC3 = CPR1 1Q7 < 100where1Q6 Minimum value for analog out.1 0 ÷ 100 %1Q7 Analog output1 value after compressor on 1Q6 ÷ 100 %1Q8 Analog output1 value after compressor off 1Q6 ÷ 100 %1Q12 Regulation delay after entering the regulation band 0 ÷ 255 (sec)1Q13 Analog output 1 rise time from 1Q6 to 100% when the pressure is above the regulation 0 ÷ 255 (sec)band and a load is switched on.1Q14 Analog output 1 permanency at 100% before load activation 0 ÷ 255 (sec)1Q15 Delay between pressure (temperature) goes down the set point and start of analog 0 ÷ 255 (sec)output 1 decreasing1Q16 Analog output 1 decreasing time from 100% to the 1Q6 value 0 ÷ 255 (sec)1Q17 Analog output1 permanency at 1Q6 before a load is switched off 0 ÷ 255 (sec)1Q18 Analog output1 decreasing time, from 100% to 1Q7 when a load is switched on 0 ÷ 255 (sec)1592021021 XC1008-1011-1015D GB A5 r.1.5A 12.10.2009 XC1008-1011-1015D 47/66
EX.3 compressors, 1 frequency compressor,C1 = FRQ1 C37 = db 1Q8 = 100C2 = CPR1 1Q2 = CPRC3 = CPR1 1Q7 = 100where1Q6 Minimum value for analog out.1 0 ÷ 100 %1Q12 Regulation delay after entering the regulation band 0 ÷ 255 (sec)1Q14 Analog output 1 permanency at 100% before load activation 0 ÷ 255 (sec)1Q15 Delay between pressure (temperature) goes down the set point and start of 0 ÷ 255 (sec)analog output 1 decreasingCP11 2 different load start delay 0 ÷ 99.5 (min.1sec)CP12 2 different load off delay 0 ÷ 99.5 (min.1sec)1592021021 XC1008-1011-1015D GB A5 r.1.5A 12.10.2009 XC1008-1011-1015D 48/66
9.2 Fans management with inverter– 1 fans group with invertermode, others ON in on/off modeWith this configuration, one analog output can be used to drive the inverter (1Q2 or 2Q1 or 3Q2 or4Q1 = FAN or FAN2). Set the first fans relay as inverter (FRQ1F or FRQ2F), and other relays asfans (FAN1 or FAN2).ES.: 4 fans, 1 with inverter. Analog output 1 drives the inverterC1 = FRQ1FC2 = FAN1C3 = FAN1C4 = FAN11Q2 = FAN1Q6 Minimum value for analog output 1 0 ÷ 100 %1Q7 Analog output 1 value after fan activation 1Q6 ÷ 100 %1Q8 Analog output 1 value after fan deactivation 1Q6 ÷ 100 %1Q12 Regulation delay of analog output 1 when the pressure is in the regulation band 0 ÷ 255 (sec)1Q13 Analog output 1 rise time from 1Q6 to 100% when the pressure is outside the 0 ÷ 255 (sec)regulation band1Q14 Analog output 1 permanency at 100% before load activation 0 ÷ 255 (sec)1Q16 Analog output 1 decreasing time from 100% to 1Q6 0 ÷ 255 (sec)1Q17 Analog output 1 permanency at 1Q6 before a fan is switched off with pressure below 0 ÷ 255 (sec)the set1Q18 Analog output 1 decreasing time, from 100% to 1Q7 before a load is switched on 0 ÷ 255 (sec)9.3 Management of all fans with inverter – proportional inverterIn this case all fans of the condensing group are driven by one inverter.The power used by the inverter is proportional to the delivery pressure value.Set one relay as inverter (FRQ1F or FRQ2F) and set the analog output 3 or 4 to drive it (3Q2 or4Q1 = INVF1 or INVF2).The reference probe is the probe set on parameter 3Q3 or 4Q2 = PBC3 or PBC4, respectively thedelivery probe circuit 1 and 2.The analog output is managed in proportional mode according to the pressure/temperature betweenthe SETF and the SETF1 + 3Q19 (or 4Q18).1592021021 XC1008-1011-1015D GB A5 r.1.5A 12.10.2009 XC1008-1011-1015D 49/66
Below the SETF the output is OFF, above the SETF the output works at 100%.If the delivery pressure/temperature is higher than the SETF1(2) value, the relay set as inverter isON; if the delivery pressure is lower than the SETF1(2) value the relay is OFF.9.3.1 Use of fans thermal protectionWith this configuration it’s possible to use XC1000D digital inputs to monitor the fans functioning.It’s necessary to set as much relay as used fans. Connect the thermal protection of every fans to itsdigital input of the relay set as fan.DON’T USE relays set as fans.ES.: 4 fans, driven by one inverter.C1 = FRQ1F C2 = FAN1 C3 = FAN1 C4 = FAN1 C5 = FAN13Q2 = INVF1 3Q3 = PBC3 3Q19 = Regulation band width3Q6= min. value analog outputWith this configuration, connect the thermal protection of:- fan 1 to terminals: 5-6 (i.d. 2)- fan 2 to terminals: 7-8 (i.d. 3)- fan 3 to terminals: 9-10 (i.d. 4)- fan 4 to terminals: 11-12 (i.d. 5)In this way any fans problem is sent to the controller (even if doesn’t affect the regulation)10. Alarm listUsually alarm conditions are signalled by means of:1. Activation of alarm relays2. Buzzer activation3. Message on proper display4. Log of alarms, hour, data and duration1592021021 XC1008-1011-1015D GB A5 r.1.5A 12.10.2009 XC1008-1011-1015D 50/66
10.1 Alarm conditions – summary tableCode Description Cause Action ResetE0L1(E0L2)E0H1(E0H2)Low pressureswitchalarmfor circuit 1 (2)Highpressureswitch frocircuit 1 (2)alarmP1 (P2) Suctionprobe circuit1 (2) failurealarmP3 (P4) Condensingprobe circuit1 (2) failurealarmEA1÷EA15A02FCompressorsafeties alarmFan safetiesalarmLow pressureswitch input 1 (2)enabled,terminals 52-53(56-57).High pressureswitch input 1 (2)enabled- terminals 54-55(58-59)Probe 1 (2)failure or out ofrangeProbe 3 (4)failure or out ofrangeSafetiescompressor inputactivation.NOTE: with stepcompressors 1input for eachcompressor hasto be used.Safeties faninput activation.All compressorsof circuit 1 (2) areturned off. Fansunchanged.- All compressorsof circuit 1 (2)are turned off.- All fans are ofcircuit 1 (2)turned on.The compressorsare activatedaccording to theAC14 (AC18)parameters.The fans areactivatedaccording to theAF8 (AF16)parameters.the correspondingcompressor isturned off. (withstep compressorsall relays referredto the input aredisabled).Thecorrespondingoutput is disabledAutomatically if the number of activation are lessthan Ac12 (Ac16) in the Ac13 (Ac17) time whenthe input is disable.- The compressors restarts workingaccording to the working algorithm.Manually(if Ac12 (Ac16) activation happened inthe Ac13 (Ac17) timeWhen the input is disable:a. turn off and on the instrument..- The compressors restarts workingaccording to the working algorithm.Automatically if the number of activation are lessthan AF7 (AF14) in AF8 (AF15) time when theinput is disable.- Compressors and fans restart workingaccording to the working algorithm.Manually if AF7 (AF14) activation happened inthe AF8 (AF15) timeWhen the input is disable:- turn off and on the instrument..Compressors and fans restarts working accordingto the working algorithm.Automatically as soon as the probe restartsworking.Automatically as soon as the probe restartsworking.Automatically as soon as the input is disabled.Automatically as soon as the input is disabled.1592021021 XC1008-1011-1015D GB A5 r.1.5A 12.10.2009 XC1008-1011-1015D 51/66
Code Description Cause Action ResetMinimum Suction pressurepressure or temperature(temperature) lower thanalarm SETC1-AC3compressors (SETC2 –AC6)for circuit 1 value(2)LAC1(LAC)LAF1(LAF2HAC1(HAC2HAF1(HAF2LL1(LL2)ClockfailureSetclockSEr1÷SEr15Minimum Condensingpressure pressure or(temperature) temperaturealarm fans lower thansection for SETF1-AF1circuit 1 (2) (SETF2 –AF9)valueMaximumpressure(temperature)alarmcompressorsfor circuit 1(2)Suction pressureor temperaturehigher thanSETC1+AC4(SETC2 +AC7)valueMaximum Condensingpressure pressure or(temperature) temperaturealarm fans higher thansection for SETF1+AF2circuit 1 (2) (SETF2 +AF10)valueLiquid levelalarm forcircuit 1 (2)Clock failurealarmClock datalostCompressorsmaintenancealarmProper digitalinput enabledProblem on RTCboardThe clock backup battery isexhaustedA compressorhas worked forthe time set inthe AC10parameter signalling only Automatically: as soon as the pressure ortemperature reaches the SETC1-AC3 (SETC2 –AC6) + differential value.(differential = 0.3bar or 1°C) signalling only Automatically: as soon as the pressure ortemperature reaches the (SETF1-AF1 (SETF2 –AF9) + differential) value.(differential = 0.3bar or 1°C) signalling only Automatically: as soon as the pressure ortemperature reaches the (SETC1-AC4 (SETC2 –AC7) - differential) value.(differential = 0.3bar or 1°C)It depends onparameter AF4(AF12)Automatically: as soon as the pressure ortemperature reaches the SETF1+AF2 (SETF2+AF10) - differential value.(differential = 0.3bar or 1°C) signalling only Automatically as soon as the input is disabled signalling onlyWith this alarm theactivation by RTC ofthe reduced set pointand the alarm log arenot available. signalling only With this alarmthe activation byRTC of thereduced set pointand the alarm logare not available.Manually: it is necessary to replace the RTCboard.Manually: set the data and the time- signalling only Manually: reset the running hour of thecompressor(see par. 4.5)1592021021 XC1008-1011-1015D GB A5 r.1.5A 12.10.2009 XC1008-1011-1015D 52/66
11. Configuration errorsError N. Parameters Alarm description Action1 C1-C15 different from Screw1 or Compressors configuration alarm. Machine stop (all relaysScrew2C16 = Btz or FrscSet properly par. C16configured as compr. orfans OFF)2 One of C1-C15 parameters= Compressors configuration alarm.Screw1 or Screw2Set properly par. C16C16 = SPo3 One of C1-C15 parameters Presence valve without compressorconfigured as StP. Don’tconfigure any C1-C15parameter as compressor.4 One of C1-C15 parameters =Frq1 after CPR1;One of C1-C15 parameters =Frq2 after CPR25 One of C1-C15 parameters =Frq1F after FAN1; One of C1-C15 parameters = Frq2F afterFAN26 One of C1-C15 parameters =Screw1 or Screw2 followed bymore than 3 stpC16 = Btz or Frsc12. Mounting & installationCompressor before inverter: check C1-C15parametersorMore than one relay set as inverter: checkC1-C15 parameters.orOne relay set as frequency compressorsand none analog output set: check C1-C15 parameters and: 1Q2, 2Q1, 3Q2,4Q1.Machine stop (all relaysconfigured as compr. orfans OFF)Machine stop (all relaysconfigured as compr. orfans OFF)Machine stop (all relaysconfigured as compr. orfans OFF)Fan before inverter: check C1-C15 Machine stop (all relaysparameters.configured as compr. ororfans OFF)More than one relay set as inverter: checkC1-C15 parameters.orOne relay set as fan inverter and no analogoutput set: check C1-C15 parametersand: 1Q2, 2Q1, 3Q2, 4Q1.Number of wrong compressor steps: checkC1-C15 parameters.Machine stop (all relaysconfigured as compr. orfans OFF)The instruments are suitable only for internal use. They are din rail mounted.The ambient operating temperature range is between 0÷60°C.Avoid locations subject to heavy vibration, corrosive gases or excessive dirt. The same applies tothe probes. Ensure ventilation around the instrument.1592021021 XC1008-1011-1015D GB A5 r.1.5A 12.10.2009 XC1008-1011-1015D 53/66
12.1 XC1000D dimensions1592021021 XC1008-1011-1015D GB A5 r.1.5A 12.10.2009 XC1008-1011-1015D 54/66
12.2 VG810 dimensions and mounting1592021021 XC1008-1011-1015D GB A5 r.1.5A 12.10.2009 XC1008-1011-1015D 55/66
13. Electrical connectionsThe instruments are provided with disconnectable screw terminal blocks to connect cables with across section up to 2,5 mm 2 .Before connecting cables make sure the power supply complies with the instrument’s requirements.Separate the input connection cables from the power supply cables, from the outputs and the powerconnections. Do not exceed the maximum current allowed on each relay, in case of heavierloads use a suitable external relay.13.1 Probes connectionPressure probe (4 - 20 mA): respect the polarity. If using terminal ends be sure there are no bearparts which could cause short circuiting or introduce noise disturbance at high frequencies. Tominimise the induced disturbances use shielded cables with the shield connected to earth.Temperature probe: it is recommended to place the temperature probe away from direct airstreams to correctly measure the temperature.14. RS485 serial linkAll models can be integrated into the monitoring and alarm system using the RS485 serial port.They use the standard ModBus RTU protocol, so they can be fitted in a system integrator using thisprotocol.15. Technical featuresHousing: plastic self extinguishing V0.1592021021 XC1008-1011-1015D GB A5 r.1.5A 12.10.2009 XC1008-1011-1015D 56/66
Case: 175x132 mm; depth 60 mm.Mounting: DIN rail mountingNumber of configurable relays: XC1015D: 15 (relè 7A 250Vac)<strong>XC1011D</strong>: 11 (relè 7A 250Vac)<strong>XC1008D</strong>: 8 (relè 7A 250Vac)Analog inputs:<strong>XC1011D</strong>, XC1015D: 4 x 4-20mA o 0÷5V o NTC configurable probe.<strong>XC1008D</strong>: 2 x 4-20mA o 0÷5V o NTC configurable probe.Safety alarm inputs – main voltage:<strong>XC1008D</strong>: 8, main voltage, connected to the loads<strong>XC1011D</strong>: 11, main voltage, connected to the loadsXC1015D: 15, main voltage, connected to the loadsConfigurable digital input:<strong>XC1011D</strong>, XC1015D: 4, free voltage.<strong>XC1008D</strong>: 2, free voltage.Safety Pressure switch inputs<strong>XC1011D</strong>, XC1015D: 4 main voltage, LP and HP.<strong>XC1008D</strong>: 2 main voltage, LP and HP.Global Alarm output: 1 relay 8A 250VacPower supply: 24Vac/dc 10%,Type of refrigerant: R22, R134a, R404a,R507Alarm logger: the last 100 alarm conditions are stored and displayedEasy programming: via hot- keyCommunication Protocol: Standard ModBus RTU, full documentedOperating temperature: 0÷60°CStorage temperature: -30÷85 °CResolution: 1/100 Bar, 1/10 °C, 1 °F, 1 PSIAccuracy: better than 1% of F.S.RTC back up battery: full load battery: tipical: 6 months, minimum: 4 month1592021021 XC1008-1011-1015D GB A5 r.1.5A 12.10.2009 XC1008-1011-1015D 57/66
16. Default settingNome<strong>XC1008D</strong><strong>XC1011D</strong>XC1015DLevel DescriptionRangeSETC1 -18.0 -18,0 -18,0 Pr1 Compressor set point circuit 1SETF1 35.0 35,0 35,0 Pr1 Fan set point circuit 1SETC2 -18.0 -18,0 -18,0 Pr1 Compressor set point circuit 2SETF2 35.0 35,0 35,0 Pr1 Fan set point circuit 2C0 1A1d 1A1D 1A1D Pr2 Kind of plant 0A1d(0) - 1A0d(1) - 1A1d(2) - 0A2d(3) -2A0d(4) - 2A1d(5) - 2A2d(6)C1 CPr1 CPr1 CPr1 Pr2 Relay 1 configuration Frq1; Frq2; CPr1; CPr2; StP; Frq1F; Frq2F;FAn1; FAn2; Alr; ALr1; ALr2; AUS1; AUS2;AUS3; AUS4; onF; nuC2 CPr1 CPr1 CPr1 Pr2 Relay 2 configuration Frq1; Frq2; CPr1; CPr2; StP; Frq1F; Frq2F;FAn1; FAn2; Alr; ALr1; ALr2; AUS1; AUS2;AUS3; AUS4; onF; nuC3 CPr1 CPr1 CPr1 Pr2 Relay 3 configuration Frq1; Frq2; CPr1; CPr2; StP; Frq1F; Frq2F;FAn1; FAn2; Alr; ALr1; ALr2; AUS1; AUS2;AUS3; AUS4; onF; nuC4 CPr1 CPr1 CPr1 Pr2 Relay 4 configuration Frq1; Frq2; CPr1; CPr2; StP; Frq1F; Frq2F;FAn1; FAn2; Alr; ALr1; ALr2; AUS1; AUS2;AUS3; AUS4; onF; nuC5 Fan1 CPr1 CPr1 Pr2 Relay 5 configuration Frq1; Frq2; CPr1; CPr2; StP; Frq1F; Frq2F;FAn1; FAn2; Alr; ALr1; ALr2; AUS1; AUS2;AUS3; AUS4; onF; nuC6 Fan1 Fan1 Fan1 Pr2 Relay 6 configuration Frq1; Frq2; CPr1; CPr2; StP; Frq1F; Frq2F;FAn1; FAn2; Alr; ALr1; ALr2; AUS1; AUS2;AUS3; AUS4; onF; nuC7 Fan1 Fan1 Fan1 Pr2 Relay 7 configuration Frq1; Frq2; CPr1; CPr2; StP; Frq1F; Frq2F;FAn1; FAn2; Alr; ALr1; ALr2; AUS1; AUS2;AUS3; AUS4; onF; nuC8 Fan1 Fan1 Fan1 Pr2 Relay 8 configuration Frq1; Frq2; CPr1; CPr2; StP; Frq1F; Frq2F;FAn1; FAn2; Alr; ALr1; ALr2; AUS1; AUS2;AUS3; AUS4; onF; nuC9 - Fan1 Fan1 Pr2 Relay 9 configuration Frq1; Frq2; CPr1; CPr2; StP; Frq1F; Frq2F;FAn1; FAn2; Alr; ALr1; ALr2; AUS1; AUS2;AUS3; AUS4; onF; nuC10 - Fan1 Fan1 Pr2 Relay 10 configuration Frq1; Frq2; CPr1; CPr2; StP; Frq1F; Frq2F;FAn1; FAn2; Alr; ALr1; ALr2; AUS1; AUS2;AUS3; AUS4; onF; nuC11 - FAn1 nu Pr2 Relay 11 configuration Frq1; Frq2; CPr1; CPr2; StP; Frq1F; Frq2F;FAn1; FAn2; Alr; ALr1; ALr2; AUS1; AUS2;AUS3; AUS4; onF; nuC12 - - nu Pr2 Relay 12 configuration Frq1; Frq2; CPr1; CPr2; StP; Frq1F; Frq2F;FAn1; FAn2; Alr; ALr1; ALr2; AUS1; AUS2;AUS3; AUS4; onF; nuC13 - - nu Pr2 Relay 13 configuration Frq1; Frq2; CPr1; CPr2; StP; Frq1F; Frq2F;FAn1; FAn2; Alr; ALr1; ALr2; AUS1; AUS2;AUS3; AUS4; onF; nuC14 - - nu Pr2 Relay 14 configuration Frq1; Frq2; CPr1; CPr2; StP; Frq1F; Frq2F;FAn1; FAn2; Alr; ALr1; ALr2; AUS1; AUS2;AUS3; AUS4; onF; nuC15 - - nu Pr2 Relay 15 configuration Frq1; Frq2; CPr1; CPr2; StP; Frq1F; Frq2F;FAn1; FAn2; Alr; ALr1; ALr2; AUS1; AUS2;AUS3; AUS4; onF; nuC16 SPo SPo SPo Pr2 Kind of compressors SPo(0) - dPo(1)C17 CL cL cL Pr2 Valve polarity circuit 1 OP - CLC18 - cL cL Pr2 Valve polarity circuit 2 OP - CL1592021021 XC1008-1011-1015D GB A5 r.1.5A 12.10.2009 XC1008-1011-1015D 58/66
Nome<strong>XC1008D</strong><strong>XC1011D</strong>XC1015DLevel DescriptionRangeC34 404 0 0 Pr2 Kind of gas 0 ÷ 255C35 60 0 0 Pr2 Screw compressors' second step 0 ÷ 255activation delayC36 NO 0 0 Pr2 Screw compressors' first step used in 0 ÷ 255regulationC37 db 0 0 Pr2 Regulation for compressor circuit 1 0 ÷ 255C38 - 0 0 Pr2 Regulation for compressor circuit 2 0 ÷ 255C41 YES 0 0 Pr2 Compressor rotation circuit 1 0 ÷ 255C42 - 0 0 Pr2 Compressor rotation circuit 2 0 ÷ 255C45 YES 0 0 Pr2 Fan rotation circuit 1 0 ÷ 255C44 - 0 0 Pr2 Fan rotation circuit 2 0 ÷ 255C45 C / dec 0 0 Pr2 Displaying measurement unit 0 ÷ 255C46 rEL 0 0 Pr2 Pressure display (rel/abs) 0 ÷ 255AI1 Cur Cur Cur Pr2 Kind of probe of P1 & P2 Cur(0) - Ptc(1) - ntc(2) - rAt(3)AI2 -0,5 -0.50 -0.50 Pr2 Probe 1 readout at 4mA/0V (-1.00 ÷ AI3) BAR (-15 ÷ AI3) PSIAI3 11,0 11.00 11.00 Pr2 Probe 1 readout at 20mA/5V (AI2 ÷ 100.00) BAR (AI2 ÷ 750) PSIAI4 0,0 0.0 0.0 Pr2 Probe 1 calibration (dEU=bar o °C) -12.0 ÷ 12.0 (dEU=PSI o °F) -120 ÷120AI5 - -0.50 -0.50 Pr2 Probe 2 readout at 4mA/0V (-1.00 ÷ AI6) BAR (-15 ÷ AI6) PSIAI6 - 11.00 11.00 Pr2 Probe 2 readout at 20mA/5V (AI5 ÷ 100.00) BAR (AI5 ÷ 750) PSIAI7 - 0.0 0.0 Pr2 Probe 2 calibration (dEU=bar o °C) -12.0 ÷ 12.0 (dEU=PSI o °F) -120÷120AI8 Cur Cur Cur Pr2 Kind of probe of P3 & P4 Cur(0) - Ptc(1) - ntc(2) - rAt(3)AI9 0,0 0.00 0.00 Pr2 Probe 3 readout at 4mA/0V (-1.00 ÷ AI10) BAR (-15 ÷ AI10) PSIAI10 30,0 30.00 30.00 Pr2 Probe 3 readout at 20mA/5V (AI9 ÷ 100.00) BAR (AI9 ÷ 750) PSIAI11 0,0 0.0 0.0 Pr2 Probe 3 calibration (dEU=bar o °C) -12.0 ÷ 12.0 (dEU=PSI o °F) -120 ÷120AI12 - 0.00 0.00 Pr2 Probe 4 readout at 4mA/0V (-1.00 ÷ AI13) BAR (-15 ÷ AI13) PSIAI13 - 30.00 30.00 Pr2 Probe 4 readout at 20mA/5V (AI12 ÷ 100.00) BAR (AI12 ÷ 750) PSIAI14 - 0.0 0.0 Pr2 Probe 4 calibration (dEU=bar o °C) -12.0 ÷ 12.0 (dEU=PSI o °F) -120 ÷120AI15 ALr ALr ALr Pr2 Alarm relay for regulation faulty probe nu - ALr - ALr1 - ALr2AI16 ntc Ntc Ntc Pr1 Probe 5 setting (ntc/ptc) ptc(0) - ntc(1)AI17 nu nu nu Pr1 Probe 5 action type nu = not used ;Au1 = Probe for AUX1 thermostat;Au2 = Probe for AUX2 thermostat;Au3 = Probe for AUX3 thermostat;Au4 = Probe for AUX4 thermostat;otC1 = dynamic set point for delivery – circuit 1otC2 = dynamic set point for delivery – circuit 2otA1 = dynamic set point for suction – circuit 1otA2 = dynamic set point for suction – circuit 2AI18 0,0 0.0 0.0 Pr1 Probe 5 calibration (dEU=bar o °C) -12.0 ÷ 12.0 (dEU=PSI o °F) -120 ÷120AI19 ntc Ntc Ntc Pr1 Probe 6 setting (ntc/ptc) ptc(0) - ntc(1)AI20 nu nu nu Pr1 Probe 6 action type nu = not used ;Au1 = Probe for AUX1 thermostat;Au2 = Probe for AUX2 thermostat;Au3 = Probe for AUX3 thermostat;Au4 = Probe for AUX4 thermostat;otC1 = dynamic set point for delivery – circuit 1otC2 = dynamic set point for delivery – circuit 2otA1 = dynamic set point for suction – circuit 1otA2 = dynamic set point for suction – circuit 2AI21 0,0 0.0 0.0 Pr1 Probe 6 calibration (dEU=bar o °C) -12.0 ÷ 12.0 (dEU=PSI o °F) -120 ÷120AI22 ntc Ntc Ntc Pr1 Probe 7 setting (ntc/ptc) ptc(0) - ntc(1)1592021021 XC1008-1011-1015D GB A5 r.1.5A 12.10.2009 XC1008-1011-1015D 59/66
Nome<strong>XC1008D</strong><strong>XC1011D</strong>XC1015DLevel DescriptionRangeAI23 nu nu nu Pr1 Probe 7 action type nu = not used ;Au1 = Probe for AUX1 thermostat;Au2 = Probe for AUX2 thermostat;Au3 = Probe for AUX3 thermostat;Au4 = Probe for AUX4 thermostat;otC1 = dynamic set point for delivery – circuit 1otC2 = dynamic set point for delivery – circuit 2otA1 = dynamic set point for suction – circuit 1otA2 = dynamic set point for suction – circuit 2AI24 0,0 0.0 0.0 Pr1 Probe 7 calibration (dEU=bar o °C) -12.0 ÷ 12.0 (dEU=PSI o °F) -120 ÷120AI25 ntc Ntc Ntc Pr1 Probe 8 setting (ntc/ptc) ptc(0) - ntc(1)AI26 nu nu nu Pr1 Probe 8 action type nu = not used ;Au1 = Probe for AUX1 thermostat;Au2 = Probe for AUX2 thermostat;Au3 = Probe for AUX3 thermostat;Au4 = Probe for AUX4 thermostat;otC1 = dynamic set point for delivery – circuit 1otC2 = dynamic set point for delivery – circuit 2otA1 = dynamic set point for suction – circuit 1otA2 = dynamic set point for suction – circuit 2AI27 0,0 0.0 0.0 Pr1 Probe 8 calibration (dEU=bar o °C) -12.0 ÷ 12.0 (dEU=PSI o °F) -120 ÷120AI28 ALr ALr ALr Pr1 Alarm relay for AUX faulty probe nu - ALr - ALr1 - ALr2DI2 cL CL CL Pr2 LP swtich polarity - circuit 1 OP - CLDI3 - CL CL Pr2 LP swtich polarity - circuit 2 OP - CLDI4 cL CL CL Pr2 HP swtich polarity - circuit 1 OP - CLDI5 - CL CL Pr2 HP swtich polarity - circuit 2 OP - CLDI6 ALr ALr ALr Pr2 Relay for pressure switch alarm nu - ALr - ALr1 - ALr2DI7 cL CL CL Pr2 Safe input polarity compressor circuit 1 OP - CLDI8 - CL CL Pr2 Safe input polarity compressor circuit 2 OP - CLDI9 cL CL CL Pr2 Safety input polarity fan circuit 1 OP - CLDI10 - CL CL Pr2 Safety input polarity fan circuit 2 OP - CLDI11 no NO NO Pr2 Manual restart for compressor alarm no - YESDI12 no NO NO Pr2 Manual restart for fan alarm no - YESDI13 ALr ALr ALr Pr2 Relay for compressor or fan alarm nu - ALr - ALr1 - ALr2DI14 CL CL CL Pr1 Polarity of configurable digital input 1 OP - CLDI15 LL1 LL1 LL1 Pr1 Function of configurable digital input 1 ES1 - ES2 - OFF1 - OFF2 - LL1 - LL2 -noCRO- noSTD1- noSTD2DI16 10 20 20 Pr1 Delay of configurable digital input 1 0 ÷ 255 (min)DI17 CL CL CL Pr1 Polarity of configurable digital input 2 OP - CLDI18 ES1 ES1 ES1 Pr1 Function of configurable digital input 2 ES1 - ES2 - OFF1 - OFF2 - LL1 - LL2 -noCRO- noSTD1- noSTD2DI19 0 0 0 Pr1 Delay of configurable digital input 2 0 ÷ 255 (min)DI20 CL CL CL Pr1 Polarity of configurable digital input 3 OP - CLDI21 LL2 LL2 LL2 Pr1 Function of configurable digital input 3 ES1 - ES2 - OFF1 - OFF2 - LL1 - LL2 -noCRO- noSTD1- noSTD2DI22 0 20 20 Pr1 Delay of configurable digital input 3 0 ÷ 255 (min)DI23 CL CL CL Pr1 Polarity of configurable digital input 4 OP - CLDI24 ES2 ES2 ES2 Pr1 Function of configurable digital input 4 ES1 - ES2 - OFF1 - OFF2 - LL1 - LL2 -noCRO- noSTD1- noSTD2DI25 0 0 0 Pr1 Delay of configurable digital input 4 0 ÷ 255 (min)DI26 ALr ALr ALr Pr1 Relay for LL alarm - circuit 1 nu - ALr - ALr1 - ALr2DI27 - ALr ALr Pr1 Relay for LL alarm - circuit 2 nu - ALr - ALr1 - ALr2CP1 4.0 4.0 4.0 Pr1 Regulation band width circuit 1 (BAR) 0.10÷10.00 (°C) 0.0÷25.0 (PSI) 1÷80(°F) 1÷501592021021 XC1008-1011-1015D GB A5 r.1.5A 12.10.2009 XC1008-1011-1015D 60/66
Nome<strong>XC1008D</strong><strong>XC1011D</strong>XC1015DLevel DescriptionRangeCP2 -40,0 -40.0 -40.0 Pr1 Minimum set point circuit 1 BAR: (AI2 ÷ SETC1); °C: (-50.0 ÷ SETC1);PSI : (AI2 ÷ SETC1); °F : (-58.0 ÷ SETC1)CP3 10,0 10.0 10.0 Pr1 Maximum set point circuit 1 BAR: (SETC1÷AI3); °C : (SETC1 ÷ 150.0);PSI : (SETC1 ÷ AI3); °F: (SETC1 ÷ 302)CP4 0 0.0 0.0 Pr1 Energy saving circuit 1 (BAR) -20.00÷20.00 (°C) -50.0÷50.0 (PSI) -300÷300(°F) -90÷90CP5 - 5.0 5.0 Pr1 Regulation band width circuit 2 (BAR) 0.10÷10.00 (°C) 0.0÷25.0 (PSI) 1÷80(°F) 1÷50CP6 - -40.0 -40.0 Pr1 Minimum set point circuit 2 BAR: (AI5 ÷ SETC2); °C: (-50.0 ÷ SETC2);PSI : (AI5 ÷ SETC2); °F : (-58.0 ÷ SETC2)CP7 - 10.0 10.0 Pr1 Maximum set point circuit 2 BAR: (SETC2÷AI6); °C : (SETC2 ÷ 150.0);PSI : (SETC2 ÷ AI6); °F: (SETC2 ÷ 302)CP8 - 0.0 0.0 Pr1 Energy saving circuit 2 (BAR) -20.00÷20.00 (°C) -50.0÷50.0 (PSI) -300÷300(°F) -90÷90CP9 5 5 5 Pr1 2 start compressor delay 0 ÷ 255 (min)CP10 2 2 2 Pr1 Minimum time load off 0 ÷ 255 (min)CP11 15 15 15 Pr1 2 different load start delay 0 ÷ 99.5 (min.1sec)CP12 5 5 5 Pr1 2 different load off delay 0 ÷ 99.5 (min.1sec)CP13 15 15 15 Pr1 Minimum time load on 0 ÷ 99.5 (min.1sec)CP14 0 nu nu Pr1 Maximum time load on (0=nu) 0 ÷ 24 (h) – with 0 the function is disabledCP15 0 0 0 Pr1 Min time Frq1-2 off after CP14 0 ÷ 255 (min)CP16 no NO NO Pr1 CP11 enabled also at first on no - YESCP17 no NO NO Pr1 CP12 enabled also at first off no - YESCP18 10 10 10 Pr1 Output delay at power on 0 ÷ 255 (sec)CP19 - NO NO Pr2 Booster function enabled no - YESF1 4,0 4.0 4.0 Pr1 Regulation band width circuit 1 (BAR) 0.10÷10.00 (°C) 0.0÷30.0 (PSI) 1÷80(°F) 1÷50.0F2 10,0 10.0 10.0 Pr1 Minimum set point circuit 1 BAR: (AI9 ÷SETF1); °C: (-50.0 ÷ SETF1);PSI : (AI9 ÷ SETF1); °F : (-58.0 ÷ SETF1)F3 60,0 60.0 60.0 Pr1 Maximum set point circuit 1 BAR: (SETF1÷AI10); °C : (SETF1 ÷ 150.0);PSI : (SETF1 ÷ AI10); °F: (SETF1 ÷ 302)F4 0,0 0.0 0.0 Pr1 Energy saving circuit 1 (BAR) -20.00÷20.00 (°C) -50.0÷50.0 (PSI) -300÷300 (°F) -90÷90F5 - 4.0 4.0 Pr1 Regulation band width circuit 2 (BAR) 0.10÷10.00 (°C) 0.0÷30.0 (PSI) 1÷80(°F) 1÷50.0F6 - 10.0 10.0 Pr1 Minimum set point circuit 2 BAR: (AI12 ÷ SETF2); °C: (-50.0 ÷ SETF2);PSI : (AI12 ÷ SETF2); °F : (-58.0 ÷ SETF2)F7 - 60.0 60.0 Pr1 Maximum set point circuit 2 BAR: (SETF2÷AI13); °C : (SETF2 ÷ 150.0);PSI : (SETF2 ÷ AI13); °F: (SETF2 ÷ 302)F8 - 0.0 0.0 Pr1 Energy saving circuit 2 (BAR) -20.00÷20.00 (°C) -50.0÷50.0 (PSI) -300÷300 (°F) -90÷90F9 15 15 15 Pr1 2 different fan start delay 1 ÷ 255 (sec)F10 5 5 5 Pr1 2 different fan off delay 1 ÷ 255 (sec)HS1 nu nu nu Pr1 Energy Saving start time on Monday 0:0÷23.5h; nuHS2 00,00 00:00 00:00 Pr1 Monday Energy Saving duration 0:0÷23.5h;HS3 nu nu nu Pr1 Energy Saving start time on Tuesday 0:0÷23.5h; nuHS4 00,00 00:00 00:00 Pr1 Tuesday Energy Saving duration 0:0÷23.5h;HS5 nu nu nu Pr1 Energy Saving start time on0:0÷23.5h; nuWednesdayHS6 00,00 00:00 00:00 Pr1 Wednesday Energy Saving duration 0:0÷23.5h;HS7 nu nu nu Pr1 Energy Saving start time on Thursday 0:0÷23.5h; nuHS8 00,00 00:00 00:00 Pr1 Thursday Energy Saving duration 0:0÷23.5h;HS9 nu nu nu Pr1 Energy Saving start time on Friday 0:0÷23.5h; nuHS10 00,00 00:00 00:00 Pr1 Friday Energy Saving duration 0:0÷23.5h;HS11 nu nu nu Pr1 Energy Saving start time on Saturday 0:0÷23.5h; nuHS12 00,00 00:00 00:00 Pr1 Saturday Energy Saving duration 0:0÷23.5h;1592021021 XC1008-1011-1015D GB A5 r.1.5A 12.10.2009 XC1008-1011-1015D 61/66
Nome<strong>XC1008D</strong><strong>XC1011D</strong>XC1015DLevel DescriptionRangeHS13 nu nu nu Pr1 Energy Saving start time on Sunday 0:0÷23.5h; nuHS14 00,00 00:00 00:00 Pr1 Sunday Energy Saving duration 0:0÷23.5h;AC1 30 30 30 Pr1 Probe 1 alarm delay at power on 0 ÷ 255 (min)AC2 - 30 30 Pr1 Probe 2 alarm delay at power on 0 ÷ 255 (min)AC3 15,0 15.0 15.0 Pr1 Minimum temp/press alarm circuit 1 (0.10 ÷ 30.00) BAR (0.0 ÷ 100.0) °C (1 ÷ 430) PSI(1 ÷ 200.0) °FAC4 20,0 20.0 20.0 Pr1 Maximum temp/press alarm circuit 1 (0.10 ÷ 30.00) BAR (0.0 ÷ 100.0) °C (1 ÷ 430) PSI(1 ÷ 200.0) °FAC5 20 20 20 Pr1 Temp/press alarm delay circuit 1 0 ÷ 255 (min)AC6 - 15.0 15.0 Pr1 Minimum temp/press alarm circuit 2 (0.10 ÷ 30.00) BAR (0.0 ÷ 100.0) °C (1 ÷ 430) PSI(1 ÷ 200.0) °FAC7 - 20.0 20.0 Pr1 Maximum temp/press alarm circuit 2 (0.10 ÷ 30.00) BAR (0.0 ÷ 100.0) °C (1 ÷ 430) PSI(1 ÷ 200.0) °FAC8 - 20 20 Pr1 Temp/press alarm delay circuit 2 0 ÷ 255 (min)AC9 ALr ALr ALr Pr1 Relay for temp/press alarm nu - ALr - ALr1 - ALr2AC10 20000 20000 20000 Pr1 Running hours for maintenance 0 ÷ 25000 – with 0 the function is disabledAC11 ALr ALr ALr Pr1 Relay for maintenance alarm nu - ALr - ALr1 - ALr2AC12 15 15 15 Pr1 LP switch 1 activation number 0 ÷ 15AC13 15 15 15 Pr1 LP switch 1 activation time 0 ÷ 255 (min)AC14 2 2 2 Pr1 Compressure on-faulty probe1 0 ÷ 15AC16 - 15 15 Pr1 LP switch 2 activation number 0 ÷ 15AC17 - 15 15 Pr1 LP switch 2 activation time 0 ÷ 255 (min)AC18 - 2 2 Pr1 Compressure on-faulty probe2 0 ÷ 15AF1 20,0 20.0 20.0 Pr1 Minimum temp/press alarm circuit 1 (0.10 ÷ 30.00) BAR (0.0 ÷ 100.0) °C (1 ÷ 430) PSI(1 ÷ 200.0) °FAF2 20,0 20.0 20.0 Pr1 Maximum temp/press alarm circuit 1 (0.10 ÷ 30.00) BAR (0.0 ÷ 100.0) °C (1 ÷ 430) PSI(1 ÷ 200.0) °FAF3 20 20 20 Pr1 Temp/press alarm delay circuit 1 0 ÷ 255 (min)AF4 no NO NO Pr1 Compressor off with max alarm 1 no - YESAF5 2 2 2 Pr1 Off delay with max alarm 1 0 ÷ 255 (min)AF6 15 15 15 Pr1 HP switch 1 activation number 0 ÷15AF7 15 15 15 Pr1 HP switch 1 activation time 0 ÷ 255 (min)AF8 2 2 2 Pr1 Fans on with faulty probe 3 0 ÷ 15AF9 - 20.0 20.0 Pr1 Minimum temp/press alarm circuit 2 (0.10 ÷ 30.00) BAR (0.0 ÷ 100.0) °C (1 ÷ 430) PSI(1 ÷ 200.0) °FAF10 - 20.0 20.0 Pr1 Maximum temp/press alarm circuit 2 (0.10 ÷ 30.00) BAR (0.0 ÷ 100.0) °C (1 ÷ 430) PSI(1 ÷ 200.0) °FAF11 - 20 20 Pr1 Temp/press alarm delay circuit 2 0 ÷ 255 (min)AF12 - NO NO Pr1 Compressor off with max alarm 2 no - YESAF13 - 2 2 Pr1 Off delay with max alarm 2 0 ÷ 255 (min)AF14 - 15 15 Pr1 HP switch 2 activation number 0 ÷15AF15 - 15 15 Pr1 HP switch 2 activation time 0 ÷ 255 (min)AF16 - 2 2 Pr1 Fans on with faulty probe 3 0 ÷ 15AF17 ALr ALr ALr Pr1 Relay for temp/press alarm nu - ALr - ALr1 - ALr2O1 no NO NO Pr2 Dynamic set enabled - circuit 1 no - YESO2 -18,0 -18.0 -18.0 Pr2 Maximum set for circuit 1 SETC1÷CP3O3 15,0 15.0 15.0 Pr2 Dynamic set start temperature circuit 1 -40÷O4 °C /-40÷O4°FO4 15,0 15.0 15.0 Pr2 Dynamic set stop temperature circuit 1 O3÷150°C /O3÷302°FO5 - NO NO Pr2 Dynamic set enabled - circuit 2 no - YESO6 - -18.0 -18.0 Pr2 Maximum set for circuit 2 SETC2÷CP7O7 - 15.0 15.0 Pr2 Dynamic set start temperature circuit 2 -40÷O8°C /-40÷O8°FO8 - 15.0 15.0 Pr2 Dynamic set stop temperature circuit 2 O7÷150°C /O7÷302°FO9 no NO NO Pr2 Dynamic set enabled - circuit 1 no - YESO10 25,0 25.0 25.0 Pr2 Minimum condens. set - circuit 1 F2÷SETF1O11 15 15.0 15.0 Pr2 Differential dynamic set-circuit 1 (BAR) -20.00÷20.00 (°C) -50.0÷50.0 (PSI) -1592021021 XC1008-1011-1015D GB A5 r.1.5A 12.10.2009 XC1008-1011-1015D 62/66
Nome<strong>XC1008D</strong><strong>XC1011D</strong>XC1015DLevel DescriptionRange300÷300 (°F) -90÷90O12 - NO NO Pr2 Dynamic set enabled - circuit 2 no - YESO13 - 25.0 25.0 Pr2 Minimum condens. set - circuit 2 F6÷SETF2O14 - 15.0 15.0 Pr2 Differential dynamic set-circuit 2 (BAR) -20.00÷20.00 (°C) -50.0÷50.0 (PSI) -300÷300 (°F) -90÷901Q1 4.20mA 4.20mA 4.20mA Pr1 Analog outputs 1-2 setting 4.20 mA (0) - 0.10 V (1)1Q2 nu nu nu Pr1 Analog output 1 function FREE – CPR - CPR2 - FAN - FAN2 - INVF1 -INVF2 - nu1Q3 Pbc1 Pbc1 Pbc1 Pr1 Probe for analog output 1 Pbc1(0) - Pbc2(1) ; used only with 1Q2 = 01Q4 0.0 0.0 0.0 Pr1 Lower limit for analog output 1 -1÷100.00 bar; -15÷750PSI; -50÷150°C; -58÷302°F;1Q5 100.0 100.0 100.0 Pr1 Upper limit for analog output 1 -1÷100.00 bar; -15÷750PSI; -50÷150°C; -58÷302°F;1Q6 30 50 50 Pr1 Minimum value for analog output 1 0 ÷ 100 %1Q7 40 50 50 Pr1 Analog output 1 value after compressor 1Q6 ÷ 100 %start1Q8 40 60 60 Pr1 Analog output 1 value after compressor 1Q6 ÷ 100 %off1Q9 40 50 50 Pr1 Exclusion band start value 1 1Q7 ÷ 100 %1Q10 40 50 50 Pr1 Exclusion band end value 1 1Q9 ÷ 100 %1Q11 50 50 50 Pr1 Safety value for Analog output 1 0 ÷ 100 (%)1Q12 0 0 0 Pr1 Regulation delay after exit from neutral 0 ÷ 255 (sec)zone1Q13 60 60 60 Pr1 Analog output 1 rise time 0 ÷ 255 (sec)1Q14 10 10 10 Pr1 Analog output 1 permanency before 0 ÷ 255 (sec)load activation1Q15 0 2 2 Pr1 Analog output 1 decreasing delay 0 ÷ 255 (sec)1Q16 150 5 5 Pr1 Analog output 1 decreasing time 0 ÷ 255 (sec)1Q17 10 5 5 Pr1 Analog output 1 permanency before 0 ÷ 255 (sec)load off1Q18 5 5 5 Pr1 Analog output 1 decreasing time after 0 ÷ 255 (sec)load off1Q19 4.0 4.0 4.0 Pr1 Regulation band width 1 0.10÷25.00bar; 0.0÷25.0°C; 1÷250 PSI;1÷250°F;10÷2500 KPA1Q20 350 350 350 Pr1 Integral time 1 0÷999s; with 0 integral action excluded1Q21 0.0 0.0 0.0 Pr1 Band offset 1 (-12.0÷12.0°C -12.00 ÷ 12.00BAR, -120÷120°F, -120÷120PSI; -1200÷1200KPA1Q22 4.0 4.0 4.0 Pr1 Anti reset wind-up 1 0.0÷99.0 °C; 0÷180°F; 0.00÷50,00bar;0÷725PSI; 0÷5000kPA1Q24 0 0 0 Pr1 Minimum capacity of inverter 1 0÷99%; with 0 function excluded1Q25 255 255 255 Pr1 Maximum time at minimum capacity of 1÷255mininverter 11Q26 2 2 2 Pr1 Time at maximum capacity of inverter 1 1÷255min2Q1 - nu nu Pr1 Analog output 2 function FREE – CPR - CPR2 - FAN - FAN2 - INVF1 -INVF2 - nu2Q2 - Pbc2 Pbc2 Pr1 Probe for analog output 2 Pbc1(0) - Pbc2(1) ; usata solo quando 2Q2 = 02Q3 - 0.0 0.0 Pr1 Lower limit for analog output 2 -1÷100.00 bar; -15÷750PSI; -50÷150°C; -58÷302°F;2Q4 - 100.0 100.0 Pr1 Upper limit for analog output 2 -1÷100.00 bar; -15÷750PSI; -50÷150°C; -58÷302°F;2Q5 - 50 50 Pr1 Minimum value for analog output 2 0 ÷ 100 (%)2Q6 - 50 50 Pr1 Analog output 2 value after compressor 2Q5 ÷ 100 %start2Q7 - 60 60 Pr1 Analog output 2 value after compressor 2Q5 ÷ 100 %off2Q8 - 50 50 Pr1 Exclusion band start value 2 2Q6 ÷ 100 %2Q9 - 50 50 Pr1 Exclusion band end value 2 2Q8 ÷ 100 %1592021021 XC1008-1011-1015D GB A5 r.1.5A 12.10.2009 XC1008-1011-1015D 63/66
Nome<strong>XC1008D</strong><strong>XC1011D</strong>XC1015DLevel DescriptionRange2Q10 - 50 50 Pr1 Safety value for Analog output 2 0 ÷ 100 (%)2Q11 - 0 0 Pr1 Regulation delay after exit from neutral 0 ÷ 255 (sec)zone2Q12 - 60 60 Pr1 Analog output 2 rise time 0 ÷ 255 (sec)2Q13 - 10 10 Pr1 Analog output 2 permanency before 0 ÷ 255 (sec)load activation2Q14 - 2 2 Pr1 Analog output 2 decreasing delay 0 ÷ 255 (sec)2Q15 - 5 5 Pr1 Analog output 2 decreasing time 0 ÷ 255 (sec)2Q16 - 5 5 Pr1 Analog output 2 permanency before 0 ÷ 255 (sec)load off2Q17 - 5 5 Pr1 Analog output 2 decreasing time after 0 ÷ 255 (sec)load off2Q18 - 4.0 4.0 Pr1 Regulation band width 2 0.10÷25.00bar; 0.0÷25.0°C; 1÷250 PSI;1÷250°F;10÷2500 KPA2Q19 - 350 350 Pr1 Integral time 2 0÷999s; with 0 integral action excluded2Q20 - 0.0 0.0 Pr1 Band offset 2 -12.0÷12.0°C -12.00 ÷ 12.00BAR, -120÷120°F, -120÷120PSI; -1200÷1200KPA2Q21 - 4.0 4.0 Pr1 Anti reset wind-up 2 0.0÷99.0 °C; 0÷180°F; 0.00÷50,00bar;0÷725PSI; 0÷5000kPA2Q23 - 0 0 Pr1 Minimum capacity of inverter 2 0÷99%; with 0 function excluded2Q24 - 255 255 Pr1 Maximum time at minimum capacity of 1÷255mininverter 22Q25 - 2 2 Pr1 Time at maximum capacity of inverter 2 1÷255min3Q1 4.20mA 4.20mA 4.20mA Pr1 Analog outputs 3-4 setting 4.20 mA (0) - 0.10 V (1)3Q2 nu nu nu Pr1 Analog output 3 function FREE – CPR - CPR2 - FAN - FAN2 - INVF1 -INVF2 - nu3Q3 Pbc3 Pbc3 Pbc3 Pr1 Probe for analog output 3 Pbc3(0); Pbc4(1); used with 3Q2 = 03Q4 0.0 0.0 0.0 Pr1 Lower limit for analog output 3 -1÷100.00 bar; -15÷750PSI; -50÷150°C; -58÷302°F;3Q5 100.0 100.0 100.0 Pr1 Upper limit for analog output 3 -1÷100.00 bar; -15÷750PSI; -50÷150°C; -58÷302°F;3Q6 30 50 50 Pr1 Minimum value for analog output 3 0 ÷ 100 (%)3Q7 40 50 50 Pr1 Analog output 3 value after fan start 3Q6 ÷ 100 %3Q8 40 70 70 Pr1 Analog output 3 value after fan off 3Q6 ÷ 100 %3Q9 40 50 50 Pr1 Exclusion band start value 3 3Q7 ÷ 100 %3Q10 40 50 50 Pr1 Exclusion band end value 3 3Q9 ÷ 100 %3Q11 50 50 50 Pr1 Safety value for Analog output 3 0 ÷ 100 (%)3Q12 0 0 0 Pr1 Regulation delay after exit from neutral 0 ÷ 255 (sec)zone3Q13 60 60 60 Pr1 Analog output 3 rise time 0 ÷ 255 (sec)3Q14 10 10 10 Pr1 Analog output 3 permanency before 0 ÷ 255 (sec)load activation3Q15 0 0 0 Pr1 Analog output 3 decreasing delay 0 ÷ 255 (sec)3Q16 150 15 15 Pr1 Analog output 3 decreasing time 0 ÷ 255 (sec)3Q17 10 5 5 Pr1 Analog output 3 permanency before 0 ÷ 255 (sec)load off3Q18 5 5 5 Pr1 Analog output 3 decreasing time after 0 ÷ 255 (sec)load off3Q19 4.0 4.0 4.0 Pr1 Regulation band width 3 0.10÷25.00bar; 0.0÷25.0°C; 1÷250 PSI;1÷250°F;10÷2500 KPA3Q20 500 500 500 Pr1 Integral time 3 0÷999s; with 0 integral action excluded3Q21 0.0 0.0 0.0 Pr1 Band offset 3 (-12.0÷12.0°C -12.00 ÷ 12.00BAR, -120÷120°F, -120÷120PSI; -1200÷1200KPA3Q22 4.0 4.0 4.0 Pr1 Anti reset wind-up 3 0.0÷99.0 °C; 0÷180°F; 0.00÷50,00bar;0÷725PSI; 0÷5000kPA3Q24 0 0 0 Pr1 Minimum capacity of inverter 3 0÷99%; with 0 function excluded1592021021 XC1008-1011-1015D GB A5 r.1.5A 12.10.2009 XC1008-1011-1015D 64/66
Nome<strong>XC1008D</strong><strong>XC1011D</strong>XC1015DLevel DescriptionRange3Q25 255 255 255 Pr1 Maximum time at minimum capacity of 1÷255mininverter 33Q26 2 2 2 Pr1 Time at maximum capacity of inverter 3 1÷255min4Q1 - nu nu Pr1 Analog output 4 function FREE – CPR - CPR2 - FAN - FAN2 - INVF1 -INVF2 - nu4Q2 - Pbc4 Pbc4 Pr1 Probe for analog output 4 Pbc3(0); Pbc4(1); used with 4Q1 = 04Q3 - 0.0 0.0 Pr1 Lower limit for analog output 4 -1÷100.00 bar; -15÷750PSI; -50÷150°C; -58÷302°F;4Q4 - 100.0 100.0 Pr1 Upper limit for analog output 4 -1÷100.00 bar; -15÷750PSI; -50÷150°C; -58÷302°F;4Q5 - 50 50 Pr1 Minimum value for analog output 4 0 ÷ 100 (%)4Q6 - 50 50 Pr1 Analog output 4 value after fan start 4Q5÷ 100 %4Q7 - 70 70 Pr1 Analog output 4 value after fan off 4Q5÷ 100 %4Q8 - 50 50 Pr1 Exclusion band start value 4 4Q6 ÷ 100 %4Q9 - 50 50 Pr1 Exclusion band end value 4 4Q8 ÷ 100 %4Q10 - 50 50 Pr1 Safety value for Analog output 4 0 ÷ 100 (%)4Q11 - 0 0 Pr1 Regulation delay after neutral zone exit 0 ÷ 255 (sec)4Q12 - 60 60 Pr1 Analog output 4 rise time 0 ÷ 255 (sec)4Q13 - 10 10 Pr1 Analog output 4 permanency before 0 ÷ 255 (sec)load activation4Q14 - 0 0 Pr1 Analog output 4 decreasing delay 0 ÷ 255 (sec)4Q15 - 15 15 Pr1 Analog output 4 decreasing time 0 ÷ 255 (sec)4Q16 - 5 5 Pr1 Analog output 4 perm before load off 0 ÷ 255 (sec)4Q17 - 5 5 Pr1 Analog output 4 decreasing time after 0 ÷ 255 (sec)load off4Q18 - 4.0 4.0 Pr1 Regulation band width 4 0.10÷25.00bar; 0.0÷25.0°C; 1÷250 PSI;1÷250°F;10÷2500 KPA4Q19 - 500 500 Pr1 Integral time 4 0÷999s; with 0 integral action excluded4Q20 - 0.0 0.0 Pr1 Band offset 4 (-12.0÷12.0°C -12.00 ÷ 12.00BAR, -120÷120°F, -120÷120PSI; -1200÷1200KPA4Q21 - 4.0 4.0 Pr1 Anti reset wind-up 4 0.0÷99.0 °C; 0÷180°F; 0.00÷50,00bar;0÷725PSI; 0÷5000kPA4Q23 - 0 0 Pr1 Minimum capacity of inverter 4 0÷99%; with 0 function excluded4Q24 - 255 255 Pr1 Maximum time at minimum capacity of 1÷255mininverter 44Q25 2 2 Pr1 Time at maximum capacity of inverter 4 1÷255minAR1 0,0 0,0 0,0 0,0 Set point aux relay 1 -40÷110°C/-40÷230°FAR2 1,0 1,0 1,0 1,0 Differential for aux relay 1 0,1÷25,0°C/1÷50°FAR3 CL CL CL CL Kind of aciton for aux 1 CL = cooling; Ht = heatingAR4 0,0 0,0 0,0 0,0 Set point aux relay 2 -40÷110°C/-40÷230°FAR5 1,0 1,0 1,0 1,0 Differential for aux relay 2 0,1÷25,0°C/1÷50°FAR6 CL CL CL CL Kind of aciton for aux 2 CL = cooling; Ht = heatingAR7 0,0 0,0 0,0 0,0 Set point aux relay 3 -40÷110°C/-40÷230°FAR8 1,0 1,0 1,0 1,0 Differential for aux relay 3 0,1÷25,0°C/1÷50°FAR9 CL CL CL CL Kind of aciton for aux 3 CL = cooling; Ht = heatingAR10 0,0 0,0 0,0 0,0 Set point aux relay 4 -40÷110°C/-40÷230°FAR11 1,0 1,0 1,0 1,0 Differential for aux relay 4 0,1÷25,0°C/1÷50°FAR12 CL CL CL CL Kind of aciton for aux 4 CL = cooling; Ht = heatingOT1 yES yES yES yES Alarm relay off by keyboard no - YESOT2 CL CL CL CL Alarm relay polarity OP - CLOT3 yES yES yES yES Alarm relay 1 off by keyboard no - YESOT4 OP OP OP OP Alarm relay 1 polarity OP - CLOT5 yES yES yES yES Alarm relay 2 off by keyboard no - YESOT6 OP OP OP OP Alarm relay 2 polarity OP - CLOT7 1 1 1 1 Serial address 1 ÷ 2471592021021 XC1008-1011-1015D GB A5 r.1.5A 12.10.2009 XC1008-1011-1015D 65/66
Nome<strong>XC1008D</strong><strong>XC1011D</strong>XC1015DLevel DescriptionOT9 NO NO NO NO Off function enabling no - YESRange1592021021 XC1008-1011-1015D GB A5 r.1.5A 12.10.2009 XC1008-1011-1015D 66/66