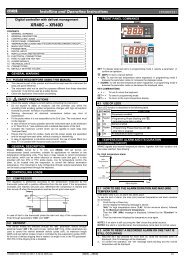
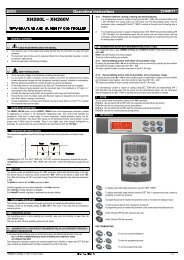
ECP200 EXPERT PULSE - Cool Italia GmbH
ECP200 EXPERT PULSE - Cool Italia GmbH
ECP200 EXPERT PULSE - Cool Italia GmbH

You also want an ePaper? Increase the reach of your titles
YUMPU automatically turns print PDFs into web optimized ePapers that Google loves.
<strong>ECP200</strong> <strong>EXPERT</strong> <strong>PULSE</strong><br />
<strong>ECP200</strong> <strong>EXPERT</strong> <strong>PULSE</strong><br />
ECP 200 <strong>EXPERT</strong> <strong>PULSE</strong> PER EEV <strong>PULSE</strong> 230V<br />
Use and maintenance manual<br />
ENGLISH<br />
READ AND KEEP<br />
REV. 01‐12<br />
ENG<br />
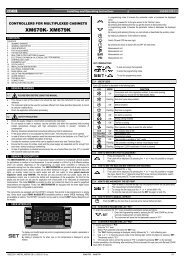
ELECTRICAL BOARDS FOR REFRIGERATING INSTALLATIONS<br />
Pag. 1 Use and maintenance manual Rev. 01-12
<strong>ECP200</strong> <strong>EXPERT</strong> <strong>PULSE</strong><br />
Contents<br />
CONTENTS<br />
INTRODUCTION<br />
Page 3 1.1 General<br />
Page 4 1.2 Product ID codes<br />
Page 4 1.3 Overall dimensions<br />
Page 4 1.4 Identification data<br />
INSTALLATION<br />
Page 5 2.1 Important information for the installer<br />
Page 5 2.2 Standard assembly kit<br />
Page 6 2.3 Installing the unit<br />
TECHNICAL CHARACTERISTICS<br />
Page 8 3.1 Technical characteristics<br />
WARRANTY<br />
Page 9 4.1 Warranty<br />
PARAMETER PROGRAMMING<br />
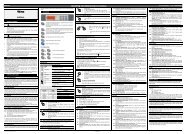
Page 10 5.1 Control panel<br />
Page 10 5.2 Frontal keypad<br />
Page 11 5.3 LED display<br />
Page 12 5.4 Key shortcut<br />
Page 12 5.5 Setting and displaying set points<br />
Page 13 5.6 Level 1 programming<br />
Page 13 5.7 List of Level 1 variables<br />
Page 14 5.8 Level 2 programming<br />
Page 14 5.9 List of Level 2 variables<br />
Page 18 5.10 Level 3 programming<br />
Page 18 5.11 List of Level 3 variables<br />
Page 21 5.12 Loading defaults under variable EEV<br />
Page 22 5.13 Quick menu displaying variables<br />
Page 22 5.14 List of quick menu displaying variables<br />
Page 23 5.15 Mode of operation thermostat<br />
Page 23 5.16 Password protection<br />
Page 23 5.17 Emergency operation in case of error E0<br />
Page 23 5.18 Manual activation of defrost<br />
Page 24 5.19 Force manual defrost end<br />
Page 24 5.20 Hot gas defrosting<br />
Page 24 5.21 Displaying temperature after defrost<br />
Page 24 5.22 Pump down function<br />
OPTIONAL<br />
Page 25 6.1 TeleNET monitoring / supervision system<br />
Page 25 6.2 Net configuration with Modbus-rtu protocol<br />
TROUBLESHOOTING<br />
Page 26 7.1 Troubleshooting<br />
CHAP. 1<br />
CHAP. 2<br />
CHAP. 3<br />
CHAP. 4<br />
CHAP. 5<br />
CAP. 6<br />
CAP. 7<br />
APPENDICES<br />
Page 28 A.1 EC declaration of conformity<br />
Page 29 A.2 Connection Diagram<br />
Page 30 A.3 Part list
Chap. 1 - Introduction<br />
<strong>ECP200</strong> <strong>EXPERT</strong> <strong>PULSE</strong><br />
CHAPTER 1: INTRODUCTION<br />
GENERAL<br />
1.1<br />
DESCRIZIONE:<br />
The <strong>ECP200</strong> <strong>EXPERT</strong> <strong>PULSE</strong> is a new control panel for cold rooms whith magnetothermal<br />
cut-out switch for the management of the refrigeration system with integrated<br />
control of electronic expansion valve ON / OFF with coil to 230 VAC and single-phase<br />
compressor up to 2 HP.<br />
It allows the user to control all the components on a refrigerating system: compressor,<br />
EEV pulse, evaporator fans, defrosting elements room light and thermostat-holder<br />
demisting element.<br />
APPLICATIONS:<br />
- Complete management of single-phase static or ventilated refrigeration systems up to<br />
2 HP, with off-cycle or electrical defrosting and with direct or pump-down compressor<br />
stop.<br />
- for plants with evaporator managed by the electronic expansion valve ON/OFF at<br />
230Vac.<br />
- Real time clock defrosting<br />
- Control of single-phase evaporator unit only with electronic expansion valve ON/OFF<br />
230 Vac or remote condensing unit enable signal.<br />
MAIN CHARACTERISTICS:<br />
- Cold room temperature displaying and regulation with decimal point<br />
- Evaporator temperature displaying from parameter<br />
- Plant control activation/deactivation<br />
- Plant alarms signaling (probe error, minimum and maximum temperature alarm,<br />
compressor protection)<br />
- LED indicators and large display illustrate system status..<br />
- User-friendly keypad.<br />
- Evaporator fans management<br />
- Manual and automatic defrost (static, through heaters, through cycle reversal)<br />
- Direct or pump-down management and control of condensing unit up to 2HP<br />
- Cold room light activation through key on the panel or through door-switch<br />
- Direct control of compressor, defrosting elements, evaporator fans, room light with<br />
outputs directly connectable to the various units.<br />
- Magneto-thermal cut-out switch for isolation and protection of the refrigeration unit.<br />
- Innovative, smartly designed ABS cover with transparent cover for access to the<br />
magneto-thermal cut-out switch, all with an IP65 protection rating so that panel can be<br />
used outside the room.<br />
- Auxiliary relay with parameter-configured<br />
- Possibility, as an alternative to an auxiliary relay, of a RS485 port for connection to the<br />
TeleNET supervision net or to a net with MODBUS-RTU protocol.<br />
Pag. 3 Use and maintenance manual Rev. 01-12
<strong>ECP200</strong> <strong>EXPERT</strong> <strong>PULSE</strong><br />
Chap. 1 - Introduction<br />
1.2<br />
<strong>ECP200</strong> EEV<br />
Chap. 1 - Introduction<br />
PRODUCT ID CODES<br />
controls and manages compressor, defrosting<br />
elements, evaporator fans and room light.<br />
Aux/Alarms relay<br />
Differential magnetothermic circuit breaker 16A<br />
Id=300 mA (Id=30 mA on request)<br />
1.3<br />
OVERALL DIMENSIONS<br />
Dimensions (mm)<br />
1.4<br />
IDENTIFICATION DATA<br />
The unit described in this manual has an ID plate on the side showing all the relevant<br />
identification data<br />
• Name of Manufacturer<br />
• Code and model of unit electrical board<br />
• Serial number<br />
• Power supply<br />
• Rated current<br />
• IP protection rating<br />
Pag. 4 Use and maintenance manual Rev. 01-12
Chap. 2 - Installation<br />
<strong>ECP200</strong> <strong>EXPERT</strong> <strong>PULSE</strong><br />
CHAPTER 2: INSTALLATION<br />
GENERAL WARNINGS FOR THE INSTALLER<br />
2.1<br />
1. Install the device in places where the protection rating is observed and try not to<br />
damage the box when drilling holes for wire/pipe seats.<br />
2. Do not use multi-polar cables in which there are wires connected to inductive/power<br />
loads or signalling wires (e.g. probes/sensors and digital inputs).<br />
3. Do not fit power supply wiring and signal wiring (probes/sensors and digital inputs)<br />
in the same raceways or ducts.<br />
4. Minimise the length of connector wires so that wiring does not twist into a spiral<br />
shape as this could have negative effects on the electronics.<br />
5. All wiring must be of a cross-section suitable for relevant power levels.<br />
6. When it is necessary to make a probe/sensor extension, the wires must have a<br />
cross-section of at least 1 mm2. Probes extension or shortening could alter their<br />
factory calibration; therefore to check and calibrate the probes through an external<br />
thermometer.<br />
STANDARD EQUIPMENT INCLUDED FOR INSTALLATION AND OPERATION<br />
2.2<br />
The electronic controller <strong>ECP200</strong> <strong>EXPERT</strong> <strong>PULSE</strong>, is equipped with the following for<br />
installation and operation:<br />
• 3 sealing gaskets, to place between the fastening screws and the base of the box;<br />
• 1 user manual.<br />
Rev. 01-12<br />
Use and maintenance manual<br />
Pag. 5
<strong>ECP200</strong> <strong>EXPERT</strong> <strong>PULSE</strong><br />
Chap. 2 - Installation<br />
2.3<br />
INSTALLING THE ELECTRICAL PANEL<br />
Fig. 1: Lift the transparent door that protects<br />
the differential magnetothermal circuit<br />
breaker and remove the cover for the<br />
screws on the right side.<br />
Fig. 2: Remove the 4 fastening screws<br />
from the front panel of the box.<br />
Fig. 3: Close the transparent door that<br />
protects the differential<br />
magnetothermal circuit breaker.<br />
Fig.4: Open the front panel of the box by<br />
lifting it and sliding the two hinges<br />
until they reach the end stop.<br />
Fig. 5: Press on the sides of each hinge to<br />
unlodge it and completely remove<br />
the front panel.<br />
Pag. 6 Use and maintenance manual Rev. 01-12
Chap. 2 - Installation<br />
<strong>ECP200</strong> <strong>EXPERT</strong> <strong>PULSE</strong><br />
Fig. 6: Use the three pre-existing holes to<br />
fasten the base of the box with three<br />
adequately long screws based on the<br />
thickness of the wall that the panel will<br />
be installed on. Place a rubber washer<br />
(included) between each fastening<br />
screw and the base of the box.<br />
Fig. 7: Hook the front panel back on to the<br />
base of the box by re-inserting the<br />
hinges into their slots and making<br />
them bend. Rotate the panel<br />
downwards by 180° to access the<br />
PCB.<br />
Make all of the electrical connections according to the attached diagrams for the<br />
corresponding model (see the relative tables in ANNEXES). To make the electrical<br />
<br />
connections in a secure manner and maintain the degree of IP protection of the box it<br />
is advisable to use suitable cable and/or conduit glands to seal all of the cables. It is<br />
advisable to distribute the arrangement of the conductors inside the panel in the most orderly<br />
manner possible, and especially keep the power conductors away from the signal ones. Use<br />
sealing straps if necessary<br />
Fig. 8: Close the front panel again, paying<br />
attention that the cables are inside the<br />
box and that the gasket for the box is<br />
correctly lodged into place. Fasten the<br />
front panel with the 4 screw, and by<br />
re-using the O-rings included on the<br />
throat of each screw. Power the panel<br />
and perform a thorough<br />
reading/programming of all of the set<br />
parameters.<br />
Be sure not to tighten the closing screws excessively as this could cause the box to<br />
become deformed and jeopardise its correct functioning and tactile effect of the<br />
<br />
keyboard on the panel. Install protection devices against power surges for shortcircuits,<br />
in order to avoid damage to the device on all of the loads connected to the<br />
electronic controller <strong>ECP200</strong>. Every time repair and/or maintenance is performed the panel must<br />
be disconnected from the power supply and from all possible inductive and power loads that it may<br />
be connected to; this is to guarantee the maximum safety conditions for the operator.<br />
Rev. 01-12<br />
Use and maintenance manual<br />
Pag. 7
<strong>ECP200</strong> <strong>EXPERT</strong> <strong>PULSE</strong><br />
Chap. 3 – Technical features<br />
CHAPTER 3: TECHNICAL FEATURES<br />
3.1<br />
TECHNICAL FEATURES<br />
Power supply<br />
Voltage<br />
Max. absorbed power (only electronic control)<br />
Maximum absorption allowed<br />
(With all loads connected)<br />
Climatic Conditions<br />
Working temperature<br />
Storage temperature<br />
Ambient relative humidity<br />
General Features<br />
230 V~ ± 10% 50Hz / 60Hz<br />
~ 7 VA<br />
16A<br />
-5 ÷ +50°C<br />
-10 ÷ +70°C<br />
Below 90% Hr<br />
Type of temperature probes that can be connected temperature probes: NTC 10K 1%<br />
Resolution 0.1 .<br />
Precision of the probe readings ± 0,5 °C<br />
Range of reading<br />
-45 ÷ +45 <br />
Type of pressure probe that can be connected: pressure probe: 4/20mA / radiometric 0-5V<br />
Output features<br />
Description Relay installed Description Relay installed<br />
Compressor<br />
(Relay 30A AC1) Compressor<br />
Resistances<br />
Fans<br />
Cold room light<br />
Alarm/Aux (voltage-free<br />
contact)<br />
(Relay 30A AC1)<br />
(Relay 16A AC1)<br />
(Relay 16A AC1)<br />
(Relay 8A AC1)<br />
Resistances<br />
Fans<br />
Cold room light<br />
Alarm/Aux (voltage-free contact)<br />
(Relay 30A AC1)<br />
(Relay 30A AC1)<br />
(Relay 16A AC1)<br />
(Relay 16A AC1)<br />
Pulse valve triac 50VA Pulse valve<br />
General electric protection<br />
Bipolar magnetothermal differential circuit breaker 16A<br />
Id=300mA<br />
(Id=30mA upon request)<br />
Power of interruption 4.5 kA<br />
Features of the measurements<br />
Measurements<br />
16.8cm x 9.7cm x 26.2cm (HxLxW)<br />
Insulation and mechanical features<br />
Degree of IP protection for the box<br />
IP65<br />
Box material<br />
ABS self-extinguishing<br />
Type of insulation<br />
Class II<br />
Pag. 8 Use and maintenance manual Rev. 01-12
Chap. 4 – Warranty<br />
<strong>ECP200</strong> <strong>EXPERT</strong> <strong>PULSE</strong><br />
WARRANTY<br />
4.1<br />
<strong>ECP200</strong> <strong>EXPERT</strong> series products are covered by a 24-month warranty against all<br />
manufacturing defects as from the date indicated on the product ID code or from the date<br />
of product registration card, if present.<br />
In the event of a defect the product must be appropriately packaged and sent to our<br />
factory or any authorized Service Center by authority RMA number received.<br />
Customers are entitled to have defective products repaired, spare parts and labour<br />
included. Transport expenses and risk shall be met entirely by the customer.<br />
Repairs carried out under warranty do not prolong or renew the warranty expiration date.<br />
The Warranty does not cover:<br />
• Damages resulting from tampering, impact or improper installation of humidifier and<br />
its accessories.<br />
• Behaviour inconsistent with Manufacturer’s prescriptions and instructions.<br />
• Damages caused by repairs made by unauthorized persons.<br />
• Spare parts (immersed electrodes steam cylinder)<br />
• Damages caused by natural phenomena as lightning, natural calamities, etc.<br />
Warranty cover may be refused if the device is modified or changed.<br />
Under no circumstances Pego S.r.l. will be responsible for possible loss of data and<br />
information, costs of substitutive goods or services, damages to things, people or animals,<br />
non-sale or non-gain, activity interruption, possible direct, indirect, accidental, property,<br />
covering, punitive, special or consequential damages anyhow caused, whether they are<br />
contractual, extra-contractual or due to negligence or other responsibility, derived from<br />
product use or from its installation.<br />
The wrong machine working caused by manumissions, shoves, inadequate installation<br />
automatically forfeits the warranty right. It is compulsory to respect all information of this<br />
user manual and device operating conditions.<br />
PEGO S.r.l. declines any responsibility for possible errors or inaccuracies written in this<br />
manual as<br />
a result of printing or transcription errors.<br />
PEGO S.r.l. reserves the right to modify its products as it deems necessary without<br />
altering its<br />
main characteristics. Each new release of a PEGO user manual replaces all the previous<br />
ones.<br />
However not expressly indicated, the warranty follows the laws in force and particularly the<br />
section 1512 C.C. (<strong>Italia</strong>n Civil Code)<br />
For any controversy is elected by the parties and recognized the jurisdiction of the Court of<br />
Rovigo.<br />
Rev. 01-12<br />
Use and maintenance manual<br />
Pag. 9
<strong>ECP200</strong> <strong>EXPERT</strong> <strong>PULSE</strong><br />
Chap. 5 – Parameter programming<br />
CHAPTER 5: PARAMETER PROGRAMMING<br />
5.1<br />
FRONT KEYBOARD<br />
<br />
<br />
<br />
<br />
<br />
<br />
<br />
<br />
<br />
<br />
<br />
<br />
5.2<br />
TASTIERA FRONTALE<br />
AUXILIARY RELAY COMMAND/VIEWING CURRENT DATE AND TIME<br />
Command the relay manually if parameter DO5=3<br />
If pressed for 3 seconds it displays the current date/time (when DO5≠3).<br />
UP / MUTE KEY BUZZER ALARM<br />
Increments the values / Scrolls the parameters upwards<br />
Mutes the acoustic alarm if included / Acquires an alarm (if the alarm has been resolved and<br />
the bell is still on, it can be turned off by pressing this key which acquires the alarm, as with<br />
the NANO thermostat)<br />
If pressed for 3 seconds at the same time as the stand-by key you can access menu level 3<br />
(EEV parameters) and a BEEP of confirmation will be generated<br />
STAND BY<br />
Pressed for more than 1 sec. alternates the Stand-by status to normal functioning status,<br />
and vice-versa. A confirmation beep is emitted upon occurred change-over.<br />
In stand-by status the system stops and the screen displays the word OFF and the<br />
temperature alternately.<br />
(If included in programming the word OFF will not be displayed alternately)<br />
SET AMBIENT TEMPERATURE<br />
View the set point<br />
Enables setting the set point if pressed at the same time as the Down or UP key<br />
Restores audio alarm, if included.<br />
Pag. 10 Use and maintenance manual Rev. 01-12
Chap. 5 – Parameter programming<br />
<strong>ECP200</strong> <strong>EXPERT</strong> <strong>PULSE</strong><br />
<br />
<br />
DOWN / DEFROST<br />
When pressed for more than 3 sec. manual defrost is turned on (if the conditions to turn it on<br />
subsist).<br />
When pressed for more than 3 sec. during a defrost function, this operation will be<br />
terminated.<br />
When a defrost function has been inserted / de-inserted manually it will BEEP to confirm.<br />
COLD ROOM LIGHT<br />
DISPLAY LED<br />
5.3<br />
<br />
<br />
<br />
<br />
Value of the ambient temperature / parameters<br />
MICRO DOOR / COLD ROOM LIGHT ICON<br />
Led OFF = Micro door not Active or not used and cold room light off<br />
Led ON = Cold room light ON<br />
Flashing Led = Micro door Active and cold room light ON<br />
OUTPUT STATUS ICON EEV Output status for the electronic valve EEV (if enabled)<br />
Led OFF = EEV output OFF<br />
Led ON = EEV output ON<br />
COLD CALL / COMPRESSOR DRIVE ICON<br />
Led OFF = Cold call OFF<br />
Led ON = Cold call ON<br />
Flashing Led = Cold call ON but awaiting waiting time C1<br />
FANS CALL ICON<br />
Led OFF = Fans call OFF<br />
Led ON = Fans call ON<br />
Flashing led = Fans paused after defrost (see parameter F5)<br />
DEFROST CALL ICON<br />
Led OFF = Defrost call OFF<br />
Led ON = Defrost call ON<br />
Flashing led = Dripping in progress after defrost (see parameter d7)<br />
REAL TIME CLOCK ICON<br />
Led OFF = Defrosting in real time clocks disabled<br />
Led OFF = Defrosting in real time clocks enabled<br />
ALARM PRESENT ICON<br />
Led OFF = No alarm present<br />
Led ON = Alarm triggered and then resolved (HACCP alarm memorised)<br />
Flashing Led = Alarm present<br />
Rev. 01-12<br />
Use and maintenance manual<br />
Pag. 11
<strong>ECP200</strong> <strong>EXPERT</strong> <strong>PULSE</strong><br />
Chap. 5 – Parameter programming<br />
5.4<br />
COMBINATION OF KEYS<br />
+<br />
+ +<br />
+<br />
1ST LEVEL PROGRAMMING<br />
If pressed simultaneously for more than 3 sec. they enable<br />
access to first level programming menu.<br />
A BEEP confirms access to the menu.<br />
EXIT FROM PROGRAMMING<br />
If pressed simultaneously for more than 3 sec. within any<br />
programming menu, they save the settings made exiting the<br />
same menu.<br />
A BEEP confirms you have exited the menu.<br />
2ND LEVEL PROGRAMMING<br />
If pressed simultaneously for more than 3 sec., they enable<br />
access to second level programming menu.<br />
A BEEP confirms access to the menu.<br />
3rd LEVEL PROGRAMMING<br />
( EEV parameters)<br />
If pressed simultaneously for more than 3 sec., they enable<br />
access to third level programming menu.<br />
A BEEP confirms access to the menu.<br />
entering this menu puts it in stand-by<br />
QUICK VARIABLES VIEWING MENU<br />
(READ ONLY)<br />
If pressed simultaneously for more than 3 sec., they enable<br />
access to quick variables viewing menu.<br />
A BEEP confirms access to the menu.<br />
+<br />
From inside this menu the up and down arrows allow you to<br />
view the label and the variables.<br />
By pressing the Set key the label and its value are displayed<br />
alternately. (in this case it switches: it is not necessary to<br />
keep the set key pressed down)<br />
When you view the value of the current label you can view<br />
the previous or next one by pressing the up or down arrows<br />
(you exit value viewing to view the label).<br />
You exit this menu automatically after 2 min of keyboard<br />
inactivity or by pressing arrow up + arrow down (exit beep of<br />
confirmation).<br />
5.5<br />
SETTING AND VIEWING THE SET POINT<br />
1. Press the "Set" key to view the current SETPOINT value (temperature)<br />
2. By holding down the "Set" key and pressing one of the (t) or (u) keys you can change the SETPOINT<br />
value.<br />
Release the "Set" key to go back to viewing the cold room temperature, any changes will be memorised<br />
automatically.<br />
Pag. 12 Use and maintenance manual Rev. 01-12
Chap. 5 – Parameter programming<br />
<strong>ECP200</strong> <strong>EXPERT</strong> <strong>PULSE</strong><br />
FIRST LEVEL PROGRAMMING (User level)<br />
5.6<br />
To access the first level configuration menu you must:<br />
1. Simultaneously keep keys (t) and (u) pressed down for more than 3 seconds until the first<br />
programming variable appears on the display. When you enter the menu an acoustic signal will sound if the<br />
BUZZER is included.<br />
2. Release keys (t) and (u)<br />
3. Select the variable to amend using key (t) or key (u).<br />
4. After having selected the wanted variable it will be possible:<br />
• To display its setting by pressing the SET key<br />
• To amend the setting by keep the SET key pressed and press one of the t) or (u) keys.<br />
To exit the menu once the configuration values are set, simultaneously keep keys (t) and (u) pressed for<br />
a few seconds until the cell humidity value appears again. When you exit the menu an acoustic signal will<br />
sound if the BUZZER is included.<br />
5. Memorisation of the amendments made to the variables will happen automatically when exiting the<br />
configuration menu.<br />
LIST OF FIRST LEVEL VARIABLES (User level)<br />
5.7<br />
VARIA<br />
MEANING VALUES DEFAULT<br />
r0<br />
Temperature differential referred to main set point.<br />
This is expressed in absolute value and defines the hysteresis (positive if mOd=0 0.2 ÷ 10 2 <br />
or negative if mOd=1) of the temperature referred to as the SET POINT.<br />
d0<br />
Interval for defrost (hours)<br />
With d0=0 and dFr=0 the Defrosting operations are excluded<br />
0 ÷ 24 hours 4 hours<br />
Set point for the end of defrost.<br />
d2<br />
Defrost is not carried out if the temperature read by the<br />
defrost probe is greater than the value of d2<br />
-35 ÷ 45 15<br />
(If the probe is broken defrost is performed based on time)<br />
d3 Maximum defrost time (minutes) 1 ÷ 240 min 25 min<br />
Dripping time (minutes)<br />
d7 At the end of defrosting, the compressor and the fans remain still for the d7 set<br />
time, the defrosting led on the front of the panel flashes.<br />
0 ÷ 10 min 0 min<br />
Fans pause after defrosting (minutes)<br />
F5<br />
Enables keeping the fans still for an F5 time after dripping. This time starts from<br />
the end of dripping. If dripping is not set, at the end of defrosting the fans pause 0 ÷ 10 min 0 min<br />
occurs directly.<br />
A1<br />
A2<br />
Minimum temperature alarm<br />
The absolute temperature referred to the ambient probe below which, once the<br />
Ald delay time is over, the LOW temperature alarm is activated, which consists<br />
in activating the Buzzer (if included), with the entry EL which alternates with<br />
the temperature on the display screen and the flashing icon indicating the<br />
presence of the alarm.<br />
When the alarm is resolved the "alarm present" icon stays on (steady) indicating<br />
that the repair has been made until you press the UP key.<br />
From inside the HACCP menu you can see<br />
Maximum temperature alarm<br />
The absolute temperature referred to the ambient probe above which, once the<br />
Ald delay time is over, the HIGH temperature alarm is activated, which consists<br />
in activating the Buzzer (if included), with the entry EH which alternates with<br />
the temperature on the display screen and the flashing icon indicating the<br />
presence of the alarm.<br />
When the alarm is resolved the "alarm present" icon stays on (steady) indicating<br />
that the repair has been made until you press the UP key.<br />
-45 ÷ (A2-1)<br />
°C<br />
A1+1 ÷ +45<br />
°C<br />
-45<br />
+45<br />
Rev. 01-12<br />
Use and maintenance manual<br />
Pag. 13
<strong>ECP200</strong> <strong>EXPERT</strong> <strong>PULSE</strong><br />
Chap. 5 – Parameter programming<br />
dFr<br />
dF1…<br />
dF6<br />
Enabling evaporator defrosting in real time<br />
With d0=0 and dFr=1 it is possible to set up to 6 real time defrostings in a single<br />
day using parameters d41…d46<br />
Programming evaporator defrosting times.<br />
It is possible to set up to 6 times for defrostings.<br />
The time is in the HH.M format where HH represents the hour and M tens of<br />
minutes (Ex. 0=0 min; 1=10 min, etc.). The flashing period (.) indicates that a<br />
time is being viewed, and not a temperature.<br />
0 disabled<br />
1 enabled<br />
0<br />
00.0 ÷ 23.5 --<br />
5.8<br />
2nd LEVEL PROGRAMMING (Installer level)<br />
To access second level programming, keep the UP (t), DOWN (u) and COLD ROOM LIGHT key pressed<br />
for more than 3 seconds. When you enter the menu an acoustic signal will sound if the BUZZER is included.<br />
When the first programming variable appears, the system automatically switches to stand-by.<br />
1. Select the variable to amend using key (t)or key (u). After having selected the wanted variable it will be<br />
possible:<br />
2. To display its setting by pressing the SET key<br />
3. To amend the setting by keep the SET key pressed down and press one of the (t) or (u) keys<br />
4. Once configuration values have been set, to exit the menu press (t) and (u) simultaneously keeping<br />
them pressed for a few seconds, until the temperature value appears. When you exit the menu an acoustic<br />
signal will sound if the BUZZER is included.<br />
5. Memorisation of the amendments made to the variables will happen automatically when exiting the<br />
configuration menu.<br />
6. Press the STAND-BY key to enable electronic control.<br />
5.9<br />
LIST OF 2nd LEVEL VARIABLES (Installer level)<br />
VARIA<br />
BLES<br />
F3<br />
F4<br />
Fst<br />
Fans status with compressor off<br />
Fans pause during defrosting<br />
MEANING VALUES DEFAULT<br />
FAN blocking TEMPERATURE<br />
The fans do not switch on if the value of the<br />
temperature read by the evaporator probe is higher<br />
than the value of this parameter. The block is<br />
deactivated when the evaporator probe is disabled or<br />
presents an error.<br />
0 = Fans in continuous start<br />
1 = Fans running only when the<br />
compressor is running<br />
2 = fans DISABLED (this also disables<br />
the display icon)<br />
0 = Fans working during defrosting<br />
1 = Fans not working during defrosting<br />
-45…+45°C +45<br />
Fd Differential for Fst 1…+10°C 2<br />
dE<br />
d1<br />
C1<br />
Probe included<br />
By excluding the evaporator probe defrosting will be<br />
performed cyclically with a period of d0 and will<br />
terminate when the time expires on d3.<br />
Type of defrosting, at cycle inversion (hot gas) or<br />
resistance<br />
Minimum amount of time between switch off and the<br />
next Time the compressor is switched on.<br />
0 = evaporator probe included<br />
1 = evaporator probe not included<br />
1= with hot gas<br />
0= with resistance<br />
0…15 min 0 min<br />
1<br />
1<br />
0<br />
0<br />
Pag. 14 Use and maintenance manual Rev. 01-12
Chap. 5 – Parameter programming<br />
<strong>ECP200</strong> <strong>EXPERT</strong> <strong>PULSE</strong><br />
CE1<br />
CE2<br />
doC<br />
tdo<br />
In1<br />
Operating time ON for the compressor in case of<br />
broken ambient probe (Emergency function)<br />
With CE1=0 the emergency function with an E0 error<br />
remains disabled, the compressor stays off and<br />
defrosting is inhibited in order to preserve the residual<br />
cold.<br />
Operating time OFF for the compressor in case of<br />
broken ambient probe (Emergency function)<br />
compressor guarding time for the micro door, when<br />
the micro door opens the evaporator fans switch off<br />
and the compressor will continue operating for the<br />
amount of time of doC, then it will switch off<br />
Re-insert compressor time after opening the door.<br />
When the micro door opens and the tdo time is up the<br />
normal operation of the control will be restored and<br />
the open door alarm (Ed) will be sound<br />
With tdo=0 the parameter is disabled.<br />
Digital input DI1 and activation status setting.<br />
0…240 min<br />
0= disabled<br />
5…240 min 5<br />
0…5 minutes<br />
0…240 minutes<br />
0 = disabled<br />
7= Pump-down pressure switch (with<br />
DI=1)<br />
6= Stop defrosting from remote (with DI=1)<br />
(The up impulse front is taken)<br />
5= Start defrosting from remote (with DI=1)<br />
(The up impulse front is taken)<br />
4= Stand-by from remote (with DI=1)<br />
(To indicate remote stand-by IN4<br />
will be viewed on the display alternately<br />
with<br />
the current view)<br />
3= person in refrigerator alarm (with DI=1)<br />
2= Micro door (with DI=1)<br />
1= compressor protection (with DI=1)<br />
0= Disabled<br />
-1= compressor protection (with DI=0)<br />
-2= Micro door (with DI=0)<br />
-3= man in cold room alarm (with DI=0)<br />
-4= Stand-by from remote (with DI=0)<br />
(To indicate remote stand-by IN4<br />
will be displayed alternately with the<br />
current view)<br />
-5= Start defrosting from remote (with DI=0)<br />
(The down impulse front is taken)<br />
-6= Stop defrosting from remote (with DI=0)<br />
(The down impulse front is taken)<br />
-7= Pump-down pressure switch (with<br />
DI=0)<br />
0<br />
0<br />
0<br />
1<br />
In2<br />
Digital input DI2 and activation status setting.<br />
7= Pump-down pressure switch (with<br />
DI=1)<br />
6= Stop defrosting from remote (with DI=1)<br />
(The up impulse front is taken)<br />
5= Start defrosting from remote (with DI=1)<br />
(The up impulse front is taken)<br />
4= Stand-by from remote (with DI=1)<br />
(To indicate remote stand-by IN4<br />
will be viewed on the display alternately<br />
with<br />
the current view)<br />
3= man in cold room alarm (with DI=1)<br />
2= Micro door (with DI=1)<br />
1= compressor protection (with DI=1)<br />
0= Disabled<br />
-1= compressor protection (with DI=0)<br />
-2= Micro door (with DI=0)<br />
-3= man in cold room alarm (with DI=0)<br />
2<br />
-4= Stand-by from remote (with DI=0)<br />
Rev. 01-12<br />
Use and maintenance manual<br />
Pag. 15
<strong>ECP200</strong> <strong>EXPERT</strong> <strong>PULSE</strong><br />
Chap. 5 – Parameter programming<br />
DO5<br />
Digital output DO5 functioning setting.<br />
Configurable auxiliary / alarm relay<br />
(OUTPUT WITH CLEAN CONTACT)<br />
(To indicate remote stand-by IN4<br />
will be displayed alternately with the<br />
current view)<br />
-5= Start defrosting from remote (with DI=0)<br />
(The down impulse front is taken)<br />
-6= Stop defrosting from remote (with DI=0)<br />
(The down impulse front is taken)<br />
-7= Pump-down pressure switch (with<br />
DI=0)<br />
5= automatic auxiliary relay managed by the<br />
StA temperature set referred to the st0<br />
probe with a 2°C differential (this<br />
function does not display the relay status<br />
on the display screen)<br />
4= Relay DO5 is excited with an active cold<br />
request (evaporator solenoid).<br />
In this configuration the DO1 output was<br />
activated by the In1 or In2 digital input<br />
configured as Pump-down pressure<br />
switch (In1 or In2=7 or –7).<br />
3= auxiliary relay switches with the AUX<br />
button (switching and viewing the relay<br />
status is made on the display screen. If<br />
DO5=3 by pressing the AUX key the<br />
relay status is displayed with the words<br />
AOn if excited or AOF if not excited.<br />
The writing on the screen will be<br />
displayed for 2 seconds after the button is<br />
released.<br />
If the AUX button is pressed for 3<br />
seconds it switches the status from AOn<br />
to AOF or vice versa (flip flop) and a<br />
BEEP will sound to signal the switch.<br />
2= Relay DO5 excited with excited<br />
compressor output DO1. Used to call<br />
condensing unit.<br />
1= Relay DO5 excited in presence of alarm<br />
0= RelayDO5 Disabled<br />
-1= Relay DO5 de-excited in presence of<br />
alarm<br />
-2= Relay DO5 de-excited with excited<br />
compressor output DO1. Used for the<br />
casing resistance command. This output<br />
also remains active when the QE is in<br />
STAND-BY.<br />
StA Set temperature for the auxiliary relay -45…+45 0<br />
1<br />
LSE<br />
HSE<br />
Minimum value attributable to set point<br />
Maximum value attributable to set point<br />
-45 ÷ HSE-1<br />
°C<br />
+45 ÷ LSE+1<br />
°C<br />
-45<br />
+45<br />
CAL ambient probe value correction -10,0…+10,0 0,0<br />
Ald<br />
Ad<br />
SEr<br />
Signal delay and alarm display time of minimum or<br />
maximum temperature.<br />
Network address to connect to the TeleNET or<br />
Modbus supervision system<br />
Communication protocol on RS-485<br />
1…240 min<br />
0 ÷ 31 (with SEr=0)<br />
1 ÷ 247 (with SEr=1)<br />
0= TeleNET protocol<br />
1= Modbus-RTU protocol (currently<br />
not available)<br />
120 min<br />
0<br />
0<br />
Pag. 16 Use and maintenance manual Rev. 01-12
Chap. 5 – Parameter programming<br />
<strong>ECP200</strong> <strong>EXPERT</strong> <strong>PULSE</strong><br />
0 = displays only the set point and<br />
allows you to silence the alarms<br />
1 = displays the set point, allows you to<br />
silence the alarms, + defrost + light +<br />
aux key + menu with read-only access<br />
to the variables<br />
P1<br />
PA<br />
Password: type of protection<br />
(active when PA is different from 0).<br />
Password<br />
(see P1 for the type of protection)<br />
2= access blocks in programming for<br />
levels 1 and 2 and 3 (all other functions<br />
are allowed)<br />
3= access blocks in programming for<br />
levels 2 and 3 (all other functions are<br />
allowed)<br />
4= access blocks in programming for<br />
level 3 (all other functions are allowed)<br />
0...999<br />
0 = deactivated function<br />
Yr Set the year 0...99<br />
Mo Set the month 1...12<br />
dy Set the day 1...31<br />
3<br />
0<br />
Hr Set the time 0...23<br />
min Set the minutes 0...59<br />
reL release software read only read only<br />
Rev. 01-12<br />
Use and maintenance manual<br />
Pag. 17
<strong>ECP200</strong> <strong>EXPERT</strong> <strong>PULSE</strong><br />
Chap. 5 – Parameter programming<br />
5.10<br />
3rd LEVEL PROGRAMMING ( EEV PARAMETERS)<br />
To access third level programming, keep the UP (t) and STAND-BY keys pressed for more than 3<br />
seconds.<br />
When the first programming variable appears, the system automatically switches to stand-by.<br />
1. Select the variable to amend using key (t)or key (u). After having selected the wanted variable it will be<br />
possible:<br />
2. To display its setting by pressing the SET key<br />
3. To amend the setting keep the SET key pressed down and press one of the (t) or (u) keys.<br />
4. Once configuration values have been set, to exit the menu press the (t) and (u) keys simultaneously<br />
keeping them pressed for a few seconds, until the temperature value appears.<br />
5. Memorisation of the amendments made to the variables will happen automatically when exiting the<br />
configuration menu.<br />
6. Press the STAND-BY key to enable electronic control.<br />
5.11<br />
LIST OF 3rd LEVEL VARIABLES (EEV PARAMETERS)<br />
VARIA<br />
BLES<br />
ESH<br />
EEV<br />
ErE<br />
ECt<br />
Overheating set point.<br />
MEANING VALUES DEFAULT<br />
Electronic valve EEV management<br />
With EEV=0 all controls and relative alerts are disabled.<br />
Relative errors for probe S3 (Extraction temperature) and S4<br />
(Evaporation pressure) are also disabled and excluded<br />
The settings from 1 to 4 load default values in the ECt, EPb,<br />
EtI, Etd, ELS variables<br />
When you exit programming if the selected value for EEV is<br />
different from the one that was previously memorised the<br />
relative defaults for this selection will be loaded.<br />
Pressing only the Set key to see the current value for EEV will<br />
not load the defaults.<br />
Type of refrigerant GAS employed.<br />
Setting this parameter is essential for correct operation.<br />
Cycle time<br />
This represents the sum of EEV valve opening / closing cycle<br />
times. This is used to calculate the EEV opening and closing<br />
times.<br />
Example: if the EEV valve must be opened by 30% we will<br />
have:<br />
EEV valve opening time = ECt* 30/100<br />
EEV valve closing time = ECt * (100-30)/100<br />
0.1…+25.0 <br />
(increments of 0.1 °C)<br />
0 = disabled<br />
1 = EEV control (default 1)<br />
2 = EEV control (default 2)<br />
3 = EEV control (default 3)<br />
4 = EEV control (default 4)<br />
5 = EEV control (default 5)<br />
0 = 404<br />
1 = 134<br />
2 = R22<br />
3 = 407<br />
4 = 410<br />
5 = 507<br />
6=CO2<br />
6.0<br />
1-20 sec 6 sec<br />
1<br />
0<br />
Pag. 18 Use and maintenance manual Rev. 01-12
Chap. 5 – Parameter programming<br />
<strong>ECP200</strong> <strong>EXPERT</strong> <strong>PULSE</strong><br />
EPb Proportional band (gain) PID overheating adjustment. 1...100% 15%<br />
EtI<br />
Etd<br />
EOE<br />
ESO<br />
ESt<br />
EdO<br />
Edt<br />
EHO<br />
EPP<br />
EP4<br />
EP2<br />
Integral time PID overheating adjustment algorithm<br />
Derivative time PID overheating adjustment algorithm<br />
Percentage of the EEV valve opening in case of error with<br />
probes S3 or S4.<br />
This function allows you to continue with the adjustment,<br />
although not in an optimal fashion, in case the adjustment<br />
probes breakdown.<br />
During the Start phase the EEV valve opens as far as the ESO<br />
percentage and for the ESt time<br />
During the Start phase.<br />
In this phase the MOP,LOP,LSH alarms are disabled.<br />
After Defrost the EEV valve opens as far as EdO percentage<br />
for the Edt time.<br />
During the opening phase of the EdO valve after Defrost.<br />
In this phase the MOP,LOP,LSH alarms are disabled.<br />
Maximum percentage for the EEV valve opening: If the valve<br />
is oversized this variable allows you to limit the maximum<br />
opening and the set percentage.<br />
Type of pressure transducer (S5):<br />
set the type of transducer used to detect the Evaporation<br />
pressure (S5)<br />
Pressure (bar) corresponding to 4mA or to 0V Referred to the<br />
Evaporation pressure probe (S5).<br />
Pressure (bar) corresponding to 20mA or to 5V Referred to<br />
the Evaporation pressure probe (S5).<br />
0-500 sec<br />
2-second steps<br />
0.0-10.0 sec<br />
0.1-second steps<br />
100 sec<br />
2.0 sec<br />
0...100% 50%<br />
0...100% 85%<br />
0-Edt tens of seconds<br />
6<br />
tens of<br />
seconds<br />
0...100% 100%<br />
Est-250 tens of seconds<br />
.<br />
24<br />
tens of<br />
seconds<br />
0...100% 100%<br />
0= 4÷20mA-type pressure<br />
transducer connected to the<br />
instrument<br />
1= ratiometric 0-5V-type pressure<br />
transducer connected to the<br />
instrument<br />
(-1.0 ÷ (EP2-0.2) bar)<br />
(in any case EP4=0)<br />
CA4 Calibration of the Extraction temperature transducer (S4) -10.0…+10.0 0,0<br />
CA5 Calibration of the Evaporation pressure transducer (S5) -10,0…+10,0 Bar 0,0<br />
0<br />
0.0<br />
12.0<br />
LSH<br />
ELS<br />
LSH threshold (Low overheating temperature)<br />
Overheating values that are too low can cause liquid to return<br />
to the compressor or strong oscillations.<br />
Below the LSH value the ELS protection intervenes and acts<br />
by increasing the PID speed when closing the valve to reach<br />
the set overheating set.<br />
LSH protection<br />
If enabled, when tSH < LSH the integration time for the PID<br />
is set based on the ELS selection from 1 to 7.<br />
The setting of 1 is the setting that generates a quicker closing.<br />
When this protection is entered the SHd count for LSH alarm<br />
activation will begin.<br />
THE LSH PROTECTION HAS PRIORITY OVER THE LOP<br />
PROTECTION<br />
LSH PROTECTION IS NOT ACTIVATED<br />
DURING THE START PHASE (ESt TIME), DURING THE<br />
DEFROST OR POST-DEFROST PHASE (Edt TIME)<br />
0... Set SH °C 2 <br />
0= disables the protection<br />
LSH and relative LSH alarm<br />
alert<br />
1= 5% EtI<br />
2= 10% EtI<br />
3= 15% EtI<br />
4= 20% EtI<br />
5= 25% EtI<br />
6= 30% EtI<br />
7= 35% EtI<br />
8= 50% EtI<br />
9= 100% EtI (no correction and<br />
only the LSH alarm is active)<br />
2<br />
Rev. 01-12<br />
Use and maintenance manual<br />
Pag. 19
<strong>ECP200</strong> <strong>EXPERT</strong> <strong>PULSE</strong><br />
Chap. 5 – Parameter programming<br />
SHd<br />
Delay in activating the LSH alarm: the LSH overheating<br />
alarm is signalled only after it has been active for the amount<br />
of the SHd time. In case of an LSH alarm, the valve closing is<br />
nevertheless instantaneous;<br />
The alarm is self-restoring and stops when tSH ≥ LSH<br />
With an active alarm, you have:<br />
- Flashing LSH written on the display screen<br />
- Buzzer<br />
(0 ÷ 240 tens of seconds)<br />
30<br />
MOP<br />
MOP threshold (Maximum saturated evaporation Temperature<br />
referred to the sensor S5)<br />
This represents the maximum evaporation pressure,<br />
expressed in saturated degrees, and activates the MOP<br />
protection when it is exceeded (EMO parameter). If the<br />
MOP kicks in the control will close the valve gradually to<br />
limit the evaporation temperature and avoid the<br />
compressor from stopping for thermal protection.<br />
MOP protection (active with tS5>MOP )<br />
(LOP+1) ...+45°C +45<br />
EMO<br />
With MOP protection on the valve abandons its control<br />
PID and at any other cycle time it closes as established by<br />
the EMO percentage starting from the opening percentage<br />
of the abandoned PID.<br />
When this protection is entered the MOd count for MOP<br />
alarm activation will begin.<br />
0=disables the MOP protection<br />
and relative MOP alarm alert<br />
0…100%<br />
0<br />
THE MOP PROTECTION IS NOT ACTIVATED DURING<br />
THE START PHASE (ESt TIME), DURING THE DEFROST<br />
OR POST-DEFROST PHASE (Edt TIME)<br />
MOd<br />
LOP<br />
Delay in activating the MOP alarm: the MOP alarm is<br />
signalled only once the MOP protection has been active for the<br />
amount of the MOd time.<br />
The alarm is self-restoring when "Temp.S5" ≤ MOP<br />
With an active alarm, you have:<br />
- Flashing MOP written on the display screen<br />
- Buzzer<br />
LOP threshold (Minimum saturated evaporation Temperature<br />
referred to the sensor S5)<br />
This represents the minimum evaporation pressure,<br />
expressed in saturated degrees, and activates the LOP<br />
protection when it falls below this value. In case of LOP the<br />
control opens the valve to avoid the compressor from<br />
stopping due to low pressure (mechanical pressure switch).<br />
LOP protection (active with tS5>LOP )<br />
(0 ÷ 240 tens of seconds) 60<br />
-45°C .. (MOP-1) -45<br />
ELO<br />
With LOP protection on the valve abandons its control PID<br />
and at any other cycle time it opens as established by the<br />
ELO percentage starting from the opening percentage of<br />
the abandoned PID.<br />
When this protection is entered the LOd count for LOP<br />
alarm activation will begin.<br />
THE LSH PROTECTION HAS PRIORITY OVER THE LOP<br />
PROTECTION<br />
THE LOP PROTECTION IS NOT ACTIVATED DURING<br />
THE START PHASE (ESt TIME), DURING THE DEFROST<br />
OR POST-DEFROST PHASE (Edt TIME)<br />
0=disables the LOP protection<br />
and relative LOP alarm alert<br />
0…100%<br />
0<br />
Pag. 20 Use and maintenance manual Rev. 01-12
Chap. 5 – Parameter programming<br />
<strong>ECP200</strong> <strong>EXPERT</strong> <strong>PULSE</strong><br />
LOd<br />
Delay in activating the LOP alarm: the LOP alarm is<br />
signalled only once the LOP protection has been active for the<br />
amount of the LOd time.<br />
The alarm is self-restoring when "Temp.S5" ≥ LOP<br />
With an active alarm, you have:<br />
- Flashing LOP written on the display screen<br />
- Buzzer<br />
(0 ÷ 240 tens of seconds) 30<br />
Note: all calculation times for the LSH, MOP, LOP alarms are reset when adjustment is complete OR<br />
DURING THE START PHASE (ESt TIME), DURING THE DEFROST OR POST-DEFROST PHASE (Edt<br />
TIME)<br />
Loading default settings based on the EEV variable:<br />
5.12<br />
EEV = 1<br />
PEGO DEFAULT<br />
EEV = 2<br />
(COLD ROOM or<br />
TN<br />
REFRIGERATOR<br />
CASE control<br />
with built-in<br />
compressor)<br />
EEV = 3<br />
(COLD ROOM or<br />
BT<br />
REFRIGERATOR<br />
CASE control with<br />
built-in compressor)<br />
EEV = 4<br />
(COLD ROOM or<br />
CHANNELED TN<br />
REFRIGERATOR<br />
CASE control)<br />
EEV = 5<br />
(COLD ROOM or<br />
CHANNELED BT<br />
REFRIGERATOR<br />
CASE control)<br />
ESH 6 °C 6 °C 6 °C 11 °C 11 °C<br />
EPb 15 % 15 % 15 % 15 % 15 %<br />
EtI 100 sec 100 sec 100 sec 150 sec 150 sec<br />
Etd 2 sec 2 sec 2 sec 5 sec 5 sec<br />
LSH 2 °C 2 °C 2 °C 5 °C 5 °C<br />
ELS 2 2 2 2 2<br />
MOP +45 °C 5 °C -15 °C +5 °C -15 °C<br />
EMO 0 5 5 5 5<br />
LOP -45 °C -25 °C -45 °C 0 0<br />
ELO 0 15 15 0 0<br />
Rev. 01-12<br />
Use and maintenance manual<br />
Pag. 21
<strong>ECP200</strong> <strong>EXPERT</strong> <strong>PULSE</strong><br />
Chap. 5 – Parameter programming<br />
5.13<br />
QUICK VARIABLES VIEWING MENU (READ ONLY)<br />
During system start-up it can be useful to check the reading of the various probes or a number of values in a<br />
simple fashion, or optimise the process.<br />
To access quick variables viewing menu, keep the DOWN (u) and STAND-BY keys pressed for more than<br />
3 seconds.<br />
From inside this menu the up or down arrows allow you to view the label and the variables.<br />
By pressing the Set key the label and its value are displayed alternately. (To make the reading easier press<br />
the set key to switch from label to value: it is not necessary to keep the set key pressed down)<br />
When you view the value of the current label you can view the previous or next one by pressing the up or<br />
down arrows (you exit value viewing to view the label).<br />
You exit this menu automatically after 2 min of keyboard inactivity or by pressing arrow up + arrow down.<br />
5.14<br />
LIST OF VARIABLES QUICK VIEWING MENU (READ ONLY)<br />
VARIA<br />
BLES<br />
MEANING<br />
VALUES<br />
tS0 View Ambient Temperature probe (S0) (read only) °C<br />
tS1 View Defrost Temperature probe (S1) (read only) °C<br />
tS4 View Extraction Temperature probe (S4) (read only) °C<br />
tS5 View Evaporation Temperature probe (S5) (read only) °C<br />
PS5 View Evaporation Pressure probe (S5) (read only) Bar<br />
tSH<br />
View Overheating temperature<br />
tSH= tS4 – tS5<br />
(read only) °C<br />
oEV percentage of EEV valve opening (read only) %<br />
Pag. 22 Use and maintenance manual Rev. 01-12
Chap. 5 – Parameter programming<br />
<strong>ECP200</strong> <strong>EXPERT</strong> <strong>PULSE</strong><br />
THERMOSTAT OPERATING MODE<br />
5.15<br />
The mOd variable allows you to choose the operating mode for the thermostat, in particular:<br />
CHILL CALL MODE<br />
The DO1 output is activated when the temperature measured by the Ambient probe reaches or exceeds the<br />
SET POINT+r0 value and stays active until the temperature falls below the SET POINT.<br />
This way the DO1 output mode is coordinated with the chill call icon switching on.<br />
Output<br />
DO1<br />
Set point<br />
r<br />
Ambient<br />
Temperature<br />
PASSWOD FUNCTION<br />
5.16<br />
The password function activates by setting a value different from 0 for parameter PA. See parameter P1 for<br />
the different protection levels.<br />
Protection is enabled automatically after approx. 30 minutes of inactivity on the keyboard.<br />
The digits 000 appear on the display screen. Use the up/down keys to change the number and the SET key<br />
to confirm it.<br />
The mask to enter the password 000 disappears if you do not use the keyboard within 30 seconds<br />
If password is forgotten use universal number 100.<br />
EMERGENCY FUNCTION WHEN ERROR E0 OCCURS<br />
(AMBIENT PROBE OUT OF ORDER)<br />
5.17<br />
This safety mode guarantees the compressor will operate even if the ambient probe is not working (error E0).<br />
With probe error E0 and CE1 other than 0, the compressor works in work pause mode, with compressor ON<br />
for the amount of time of CE1 and OFF for the amount of time of CE2.<br />
With CE1>0, when error E0 occurs defrosting will be managed as in the normal mode of operation.<br />
With CE1=0, the emergency operation with an E0 error stays disabled: the compressor stays off and<br />
defrosting is inhibited per preserve the residual cold,<br />
Eliminate the cause of error E0 as soon as possible and reactivate normal control operations to adjust the<br />
temperature correctly.<br />
MANUAL DEFROST ACTIVATION<br />
5.18<br />
To activate defrost simply press the DOWN key for more than 4 seconds; this will activate the relay for<br />
resistances. Defrosting is not activated if conditions for activation are not met (the set temperature to<br />
terminate defrosting (d2), is lower than the temperature detected by the evaporator probe).<br />
Defrosting will terminate when the terminate defrost temperature has been reached (d2) or for the maximum<br />
duration of defrost (d3) or when terminate defrost is forced manually (terminate defrost key or digital input).<br />
Rev. 01-12<br />
Use and maintenance manual<br />
Pag. 23
<strong>ECP200</strong> <strong>EXPERT</strong> <strong>PULSE</strong><br />
Chap. 5 – Parameter programming<br />
5.19<br />
MANUALLY FORCE TERMINATE DEFROST IN PROGRESS<br />
When defrost is in progress press the DOWN button for 4 seconds to force defrost in progress to terminate.<br />
P.S. x Giuseppe : This function must not be allowed when the set is being adjusted, when more than one key<br />
is being pressed down at the same time, or from inside a programming menu.<br />
When terminating defrost manually the drip phase is also skipped.<br />
5.20<br />
HOT GAS DEFROST<br />
Set parameter d1 = 1 for managing cycle inversion defrosting.<br />
The compressor relay and the defrosting relay are activated for the entire defrosting phase (defrost).<br />
For the correct management of the plant, it will be the responsibility of the installer to use the defrost output,<br />
that must allow the opening of the cycle inversion solenoid valve and the closing of the liquid solenoid valve.<br />
For the capillary plants (without thermostatic valve) it is sufficient to control the cycle inversion electrovalve<br />
using the defrosting relay control (defrost).<br />
5.21<br />
VIEW TEMPERATURE AMBIENT AFTER DEFROSTING<br />
After a defrost the display screen will continue to display the last value for the ambient temperature read<br />
prior to defrost, for 1 minute.<br />
5.22<br />
PUMP DOWN FUNCTION<br />
By setting the parameter In1 or In2 = 7 or –7 the stop compressor in pump down function will be activated.<br />
The digital input will become the work pressure switch input and will manage the compressor output directly<br />
The chill call will only act on the EEV solenoid output.<br />
Pag. 24 Use and maintenance manual Rev. 01-12
Chap. 6 – Options<br />
<strong>ECP200</strong> <strong>EXPERT</strong> <strong>PULSE</strong><br />
CHAPTER 6: OPTIONAL KITS<br />
TELENET MONITORING AND SUPERVISION SYSTEM<br />
6.1<br />
For TeleNET connections to enable RS485 follow the scheme below. Refer to TeleNET<br />
user manual for instrument configuration.<br />
WARNING: During configuration, at entry “Module” to select the entry "Instrument<br />
<strong>ECP200</strong>EEV ".<br />
NET CONFIGURATION WITH MODBUS-RTU PROTOCOL<br />
6.2<br />
For RS485 connections with Modbus-RTU protocol, to enable RS485 output follow the<br />
scheme below.<br />
Refer to MODBUS-RTU_<strong>ECP200</strong>T1 user manual (available on Pego Internet web site) for<br />
MODBUS-RTU communication protocol specification.<br />
Rev. 01-12<br />
Use and maintenance manual<br />
Pag. 25
<strong>ECP200</strong> <strong>EXPERT</strong> <strong>PULSE</strong><br />
Chap. 7 – Diagnostics<br />
CHAPTER 7: DIAGNOSTICS<br />
7.1<br />
DIAGNOSTICS<br />
In case of anomaly, the <strong>ECP200</strong> <strong>EXPERT</strong> controller will alert the operator through the alarm codes displayed<br />
on the screen and with an acoustic signal emitted by a buzzer (if included).<br />
The acoustic alarm can be switched off by pressing the UP key (the error code remains) and can be<br />
reactivated by pressing the SET key.<br />
If an alarm condition arises, one of the following messages will appear on the display screen:<br />
ALARM CODE<br />
E0<br />
E1<br />
E4<br />
E5<br />
EE<br />
E6<br />
E8<br />
Ec<br />
Ed<br />
EL<br />
EH<br />
LSH<br />
POSSIBLE CAUSE<br />
Functional anomaly of the ambient probe (S0)<br />
Functional anomaly of the defrosting probe (S1)<br />
(In this case any defrosting will last for<br />
the amount of time established by d3).<br />
Functional anomaly of the Extraction temperature probe (S4)<br />
Functional anomaly of the Evaporation Pressure probe (S5)<br />
eeprom alarm<br />
An error has been found in the EEPROM memory.<br />
(All of the outputs have been deactivated except for the alarms, if<br />
configured)<br />
Low battery alarm; the control will work for at least 20 more<br />
days, after which time, if there is no longer a power supply to<br />
the panel the time setting will be lost.<br />
Man in cold room alarm<br />
The man in cold room alarm button was pressed from inside the<br />
cold room to signal a hazardous situation.<br />
Insert compressor protection (ex. Thermal protection or max.<br />
pressure switch)<br />
(All of the outputs have been deactivated except for the alarm, if<br />
configured)<br />
Door open alarm. When the micro door opens and the tdo time is<br />
up the normal operation of the control will be restored and the<br />
open door alarm (Ed) will be sound<br />
Minimum temperature alarm<br />
The words EL flash alternately with the temperature<br />
(See parameter A1)<br />
Maximum temperature alarm.<br />
The words EH flash alternately with the temperature<br />
(See parameter A2)<br />
Low overheating temperature alarm<br />
OPERATION TO BE<br />
PERFORMED<br />
• Check that cold room<br />
temperature sensor is<br />
working properly<br />
• If the problem persists<br />
replace the sensor<br />
• Check that cold room<br />
temperature sensor is<br />
working properly<br />
• If the problem persists<br />
replace the sensor<br />
• Switch unit off and back on<br />
• Reset the alarm input inside<br />
the cold room<br />
• Check door switch status<br />
• Check door switch<br />
connections<br />
• If the problem persists<br />
contact the technical<br />
assistance service<br />
Pag. 26 Use and maintenance manual Rev. 01-11
Chap. 7 – Diagnostics<br />
<strong>ECP200</strong> <strong>EXPERT</strong> <strong>PULSE</strong><br />
MOP<br />
Maximum saturated evaporation temperature alarm referred to<br />
sensor S4<br />
LOP<br />
Minimum saturated evaporation temperature alarm referred to<br />
sensor S4<br />
Rev. 01-12<br />
Use and maintenance manual<br />
Pag. 27
<strong>ECP200</strong> <strong>EXPERT</strong> <strong>PULSE</strong><br />
Appendices<br />
APPENDICES<br />
A.1<br />
EC declaration of conformity<br />
COSTRUTTORE:<br />
MANUFACTURER:<br />
PEGO S.r.l. Via Piacentina, 6/b 45030 Occhiobello (RO) – Italy –<br />
Tel. (+39) 0425 762906 Fax. (+39) 0425 762905<br />
DENOMINAZIONE DEL PRODOTTO:<br />
NAME OF THE PRODUCT:<br />
MOD.:<br />
<strong>ECP200</strong> <strong>EXPERT</strong> EEV<br />
IL PRODOTTO E’ CONFORME ALLE SEGUENTI DIRETTIVE CE:<br />
THE PRODUCT IS IN CONFORMITY WITH THE REQUIREMENTS OF THE FOLLOWING EUROPEAN DIRECTIVES:<br />
Direttiva Bassa Tensione (LVD):<br />
Low voltage directive (LVD):<br />
Direttiva EMC:<br />
Electromagnetic compatibility (EMC):<br />
2006/95/CE<br />
EC/2006/95<br />
2004/108/CE<br />
EC/2004/108<br />
LA CONFORMITA’ PRESCRITTA DALLA DIRETTIVA E’ GARANTITA DALL’ADEMPIMENTO A TUTTI GLI EFFETTI<br />
DELLE SEGUENTI NORME (comprese tutte le modifiche):<br />
THE CONFORMITY WITH THE REQUIREMENTS OF THIS DIRECTIVE IS TESTIFIED BY COMPLETE ADHERENCE<br />
TO THE FOLLOWING STANDARDS (including all amendments):<br />
Norme armonizzate: EN 60730-1, EN 60730-2-9, EN 61000-6–1, EN 61000-6–3<br />
European standards: EN 60730-1, EN 60730-2-9, EN 61000-6–1, EN 61000-6–3<br />
IL PRODOTTO E’ COSTITUITO PER ESSERE INCORPORATO IN UNA MACCHINA O PER ESSERE ASSEMBLATO<br />
CON ALTRI MACCHINARI PER COSTITUIRE UNA MACCHINA CONSIDERATE DALLA DIRETTIVA: 2006/42/CE<br />
“Direttiva Macchine”.<br />
THE PRODUCT HAS BEEN MANUFACTURED TO BE INCLUDED IN A MACHINE OR TO BE ASSEMBLED<br />
TOGETHER WITH OTHER MACHINERY TO COMPLETE A MACHINE ACCORDING TO DIRECTIVE: EC/2006/42<br />
“Machinery Directive”.<br />
Occhiobello (RO), 3/02/2011<br />
Pag. 28 Use and maintenance manual Rev. 01-11
Appendices<br />
<strong>ECP200</strong> <strong>EXPERT</strong> <strong>PULSE</strong><br />
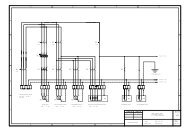
CONNECTIONS DIAGRAM A.2<br />
Rev. 01-12<br />
Use and maintenance manual<br />
Pag. 29
<strong>ECP200</strong> <strong>EXPERT</strong> <strong>PULSE</strong><br />
Appendices<br />
A.3<br />
Part list<br />
LEGENDA<br />
REF. DESCRIPTION<br />
1 BOX REAR IN ABS<br />
2 BOX FRONT IN ABS<br />
3 FRONT COVER IN TRANSPARENT POLYCARBONATE<br />
4 BOX FRONT OPENING HINGE<br />
5 BOX CLOSURE SCREWS<br />
6 BOARD FIXING SCREWS<br />
7 MAGNETO-THERMAL CUT-OUT / POWER BREAKER<br />
8 CPU BOARD<br />
9 POLYCARBONATE SCREW COVER<br />
10 TERMINAL FOR EARTH CONNECTIONS<br />
11 COVER PROTECTION BOARD<br />
Pag. 30 Use and maintenance manual Rev. 01-11
Appendices<br />
<strong>ECP200</strong> <strong>EXPERT</strong> <strong>PULSE</strong><br />
NOTE<br />
Rev. 01-12<br />
Use and maintenance manual<br />
Pag. 31
<strong>ECP200</strong> <strong>EXPERT</strong> <strong>PULSE</strong><br />
PEGO S.r.l.<br />
Via Piacentina, 6/b<br />
Distributor:<br />
45030 OCCHIOBELLO –ROVIGO-<br />
Tel : 0425 762906<br />
Fax: 0425 762905<br />
www.pego.it<br />
Pag. 32 Use and maintenance manual Rev. 01-11<br />
e-mail: info@pego.it