
You also want an ePaper? Increase the reach of your titles
YUMPU automatically turns print PDFs into web optimized ePapers that Google loves.
JX-305 Sep. 1998<br />
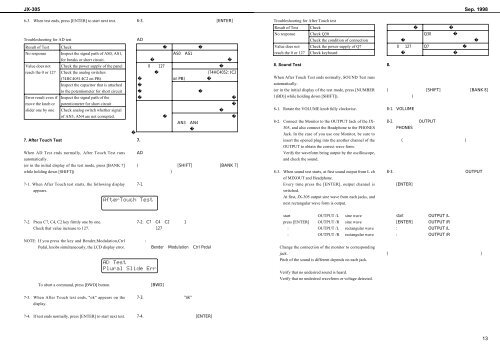
6-3. When test ends, press [ENTER] to start next test.<br />
<br />
Troubleshooting for After Touch test<br />
<br />
<br />
Result of Test<br />
Check<br />
<br />
<br />
Troubleshooting for AD test<br />
<br />
No response<br />
Check Q30<br />
Check the condition of connection<br />
<br />
<br />
<br />
<br />
Result of Test<br />
No response<br />
Check<br />
Inspect the signal path of AS0, AS1,<br />
<br />
<br />
<br />
<br />
Value does not<br />
reach the 0 or 127<br />
Check the power supply of Q7<br />
Check keyboard<br />
<br />
<br />
Value does not<br />
for breaks or short circuit.<br />
Check the power supply of the panel<br />
<br />
<br />
<br />
<br />
8. Sound Test<br />
<br />
reach the 0 or 127<br />
Error result even if<br />
Check the analog switches<br />
(74HC4051:IC2 on PB)<br />
Inspect the capacitor that is attached<br />
to the potentiometer for short circuit<br />
Inspect the signal path of the<br />
<br />
<br />
<br />
<br />
<br />
<br />
<br />
<br />
<br />
<br />
When After Touch Test ends normally, SOUND Test runs<br />
automatically.<br />
(or in the initial display of the test mode, press [NUMBER<br />
1(BD)] while holding down [SHIFT]).<br />
<br />
<br />
<br />
<br />
move the knob or<br />
slider one by one<br />
potentiometer for short circuit<br />
Check analog switch whether signal<br />
<br />
<br />
<br />
<br />
8-1. Rotate the VOLUME knob fully clockwise.<br />
<br />
of AN3, AN4 are not corrupted.<br />
<br />
<br />
<br />
<br />
<br />
8-2. Connect the Monitor to the OUTPUT Jack of the JX-<br />
305, and also connect the Headphone to the PHONES<br />
Jack. In the case of you use one Monitor, be sure to<br />
<br />
<br />
<br />
7. After Touch Test<br />
<br />
insert the opened plug into the another channel of the<br />
<br />
OUTPUT to obtain the correct wave form.<br />
<br />
When AD Test ends normally, After Touch Test runs<br />
<br />
Verify the waveform being output by the oscilloscope,<br />
<br />
automatically.<br />
<br />
and check the sound.<br />
<br />
(or in the initial display of the test mode, press [BANK 7]<br />
<br />
while holding down [SHIFT])<br />
<br />
8-3. When sound test starts, at first sound output from L ch<br />
<br />
of MIXOUT and Headphone.<br />
<br />
7-1. When After Touch test starts, the following display<br />
<br />
Every time press the [ENTER], output channel is<br />
<br />
appears.<br />
<br />
switched.<br />
<br />
At first, JX-305 output sine wave from each jacks, and<br />
<br />
next rectangular wave form is output.<br />
start OUTPUT /L sine wave<br />
<br />
7-2. Press C7, C4, C2 key firmly one by one.<br />
<br />
press [ENTER] OUTPUT /R sine wave<br />
<br />
<br />
Check that value increase to 127.<br />
<br />
: OUTPUT /L rectangular wave<br />
<br />
: OUTPUT /R rectangular wave<br />
<br />
NOTE: If you press the key and Bender,Modulation,Ctrl<br />
<br />
<br />
Pedal, knobs simultaneously, the LCD display error.<br />
<br />
Change the connection of the monitor to corresponding<br />
<br />
<br />
jack.<br />
<br />
Pitch of the sound is different depends on each jack.<br />
Verify that no undesired sound is heard.<br />
<br />
Verify that no undesired waveform or voltage detected.<br />
<br />
To abort a command, press [BWD] button.<br />
<br />
7-3. When After Touch test ends, "ok" appears on the<br />
<br />
display.<br />
7-4. If test ends normally, press [ENTER] to start next test.<br />
<br />
<br />
13