
Create successful ePaper yourself
Turn your PDF publications into a flip-book with our unique Google optimized e-Paper software.
the door and compresses the gasket less<br />
or more.<br />
Finally, to complete the airtight box,<br />
apply a bead of acrylic caulk around the<br />
opening for the cyclone before bolting it<br />
in place.<br />
<strong>The</strong> top is a vise<br />
<strong>The</strong> cool thing about this top is that,<br />
like my new-fangled <strong>workbench</strong>, it has<br />
a clamping system built into it. All you<br />
need are two 3 ⁄4-in. pipe clamps—this<br />
bench is designed for Jorgensen No. 50<br />
Pony clamps—some 3 ⁄4-in.-dia. dowel, and<br />
3 ⁄4-in.-internal-dia. vinyl tubing. <strong>The</strong> dowel<br />
is cut into short lengths to make benchdogs<br />
and the tubing slides over the dogs to<br />
keep them from marring or denting your<br />
work, something you don’t want to have<br />
happen when you’re sanding a door just<br />
before applying a finish.<br />
Here’s how it works. A block of plywood<br />
with a dog hole drilled in it is pushed<br />
against the sliding jaw of the pipe clamp.<br />
<strong>The</strong> other jaw is fixed to the apron. You<br />
can move the sliding jaw wherever you<br />
need it, and the dog hole moves along<br />
with it.<br />
<strong>The</strong> top is made from layers of plywood<br />
strips, but it is plenty rigid for power-tool<br />
work (and some hand-tool work like light<br />
planing). Screw the top and middle layers<br />
together. Mark the locations of the stationary<br />
benchdogs, partially disassemble the<br />
parts, and drill the holes.<br />
Now that the basic structure of the top<br />
has been assembled, make and attach the<br />
riser layer. <strong>The</strong> two end risers need holes<br />
for the pipes to pass through. Drill them<br />
at the drill press.<br />
Next, make and install the sliding benchdog<br />
blocks. Assemble the layers and drill a<br />
hole for the benchdog. Take off the bottom<br />
layer, add some tape to make the groove<br />
a bit wider than the tongue on the top,<br />
and install the blocks. Now attach the bottom<br />
panel to the risers. <strong>The</strong>n set the entire<br />
assembly onto the base and attach it by<br />
screwing through the cleats and into the<br />
bottom panel.<br />
Make filler blocks for the slots. <strong>The</strong>n<br />
make some benchdogs from a length of<br />
dowel and slip some vinyl tubing over one<br />
end. Finally, install the pipe clamps. □<br />
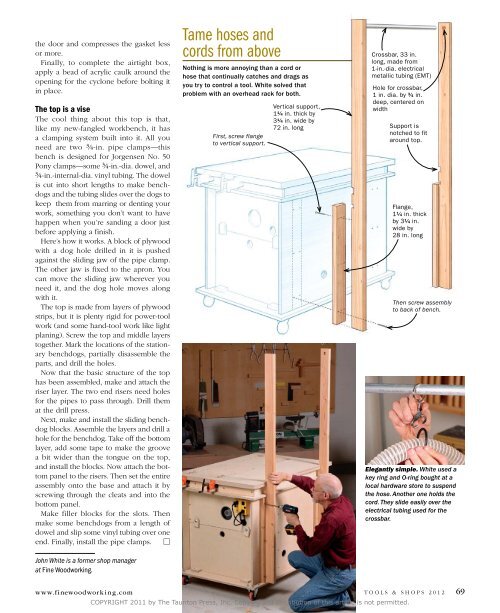
Tame hoses and<br />
cords from above<br />
Nothing is more annoying than a cord or<br />
hose that continually catches and drags as<br />
you try to control a tool. White solved that<br />
problem with an overhead rack for both.<br />
First, screw flange<br />
to vertical support.<br />
Vertical support,<br />
11/4 in. thick by<br />
31/4 in. wide by<br />
Crossbar, 33 in.<br />
long, made from<br />
1-in.-dia. electrical<br />
metallic tubing (EMT)<br />
Hole for crossbar,<br />
1 in. dia. by 3/4 in.<br />
deep, centered on<br />
width<br />
72 in. long Support is<br />
notched to fit<br />
around top.<br />
Flange,<br />
11/4 in. thick<br />
by 31/4 in.<br />
wide by<br />
28 in. long<br />
<strong>The</strong>n screw assembly<br />
to back of bench.<br />
Elegantly simple. White used a<br />
key ring and O-ring bought at a<br />
local hardware store to suspend<br />
the hose. Another one holds the<br />
cord. <strong>The</strong>y slide easily over the<br />
electrical tubing used for the<br />
crossbar.<br />
John White is a former shop manager<br />
at Fine Woodworking.<br />
www.finewoodwor k i n g.com T o o l s & S h o p s 2 0 1 2<br />
COPYRIGHT 2011 by <strong>The</strong> Taunton Press, Inc. Copying and distribution of this article is not permitted.<br />
69