Identifying Valves Used in Sigma Products (SB1001.01)
Identifying Valves Used in Sigma Products (SB1001.01)
Identifying Valves Used in Sigma Products (SB1001.01)

Create successful ePaper yourself
Turn your PDF publications into a flip-book with our unique Google optimized e-Paper software.
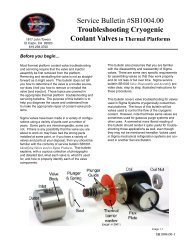
5. Replace the black <strong>in</strong>sulative foam or thermal<br />
barrier washer, this is very important to prevent<br />
coil freeze up and cold “run aways”<br />
(image 2-22 or 2-24).<br />
Tip: If you have a valve with black foam<br />
between the body and coil it is recommended<br />
that you replace the foam with a<br />
<strong>Sigma</strong> thermal barrier washer. To do this,<br />
cut the surround<strong>in</strong>g foam flush with the top<br />
of the valve body (image 2-23). Discard<br />
the black foam and replace it with a <strong>Sigma</strong><br />
thermal barrier washer (image 2-24) (part<br />
number 35831 for “B” and 35830 for “D”<br />
valves).<br />
6. Slide the coil onto the plunger guide.<br />
7. Use coil reta<strong>in</strong><strong>in</strong>g nut to hold the coil <strong>in</strong> place.<br />
Tighten to snug tightness only (image 2-25).<br />
Excess tighten<strong>in</strong>g will compress the <strong>in</strong>sulative<br />
layer and can damage the plunger guide.<br />
Foam under the coil should not be compressed<br />
flat, aga<strong>in</strong> we recommend replacement<br />
of the black foam with a <strong>Sigma</strong> thermal<br />
barrier washer.<br />
Image 2-22<br />
Image 2-23 Image 2-24<br />
END<br />
<strong>SB1001.01</strong>-30<br />
Image 2-25