Owner's Manual (DP-900_OM.pdf) - Roland
Owner's Manual (DP-900_OM.pdf) - Roland
Owner's Manual (DP-900_OM.pdf) - Roland

Create successful ePaper yourself
Turn your PDF publications into a flip-book with our unique Google optimized e-Paper software.
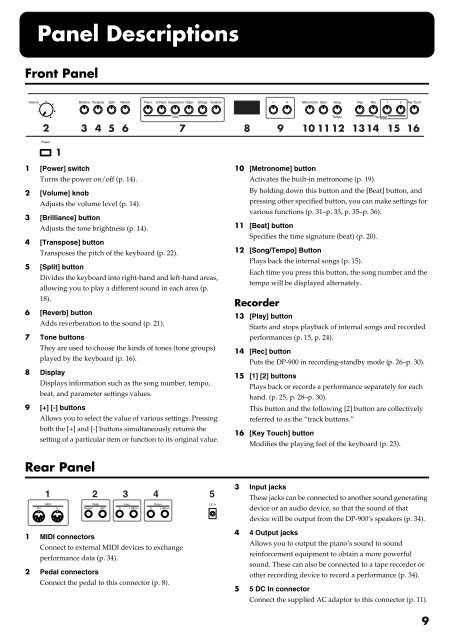
Panel Descriptions<br />
Front Panel<br />
fig.panel<br />
2 3 4 5 6 7 8 9<br />
10 11 12 13 14 15 16<br />
1<br />
1 [Power] switch<br />
Turns the power on/off (p. 14).<br />
2 [Volume] knob<br />
Adjusts the volume level (p. 14).<br />
3 [Brilliance] button<br />
Adjusts the tone brightness (p. 14).<br />
4 [Transpose] button<br />
Transposes the pitch of the keyboard (p. 22).<br />
5 [Split] button<br />
Divides the keyboard into right-hand and left-hand areas,<br />
allowing you to play a different sound in each area (p.<br />
18).<br />
6 [Reverb] button<br />
Adds reverberation to the sound (p. 21).<br />
7 Tone buttons<br />
They are used to choose the kinds of tones (tone groups)<br />
played by the keyboard (p. 16).<br />
8 Display<br />
Displays information such as the song number, tempo,<br />
beat, and parameter settings values.<br />
9 [+] [-] buttons<br />
Allows you to select the value of various settings. Pressing<br />
both the [+] and [-] buttons simultaneously returns the<br />
setting of a particular item or function to its original value.<br />
10 [Metronome] button<br />
Activates the built-in metronome (p. 19).<br />
By holding down this button and the [Beat] button, and<br />
pressing other specified button, you can make settings for<br />
various functions (p. 31–p. 33, p. 35–p. 36).<br />
11 [Beat] button<br />
Specifies the time signature (beat) (p. 20).<br />
12 [Song/Tempo] Button<br />
Plays back the internal songs (p. 15).<br />
Each time you press this button, the song number and the<br />
tempo will be displayed alternately.<br />
Recorder<br />
13 [Play] button<br />
Starts and stops playback of internal songs and recorded<br />
performances (p. 15, p. 24).<br />
14 [Rec] button<br />
Puts the <strong>DP</strong>-<strong>900</strong> in recording-standby mode (p. 26–p. 30).<br />
15 [1] [2] buttons<br />
Plays back or records a performance separately for each<br />
hand. (p. 25, p. 28–p. 30).<br />
This button and the following [2] button are collectively<br />
referred to as the “track buttons.”<br />
16 [Key Touch] button<br />
Modifies the playing feel of the keyboard (p. 23).<br />
Rear Panel<br />
fig.RearPanel<br />
1 2 3 4 5<br />
1 MIDI connectors<br />
Connect to external MIDI devices to exchange<br />
performance data (p. 34).<br />
2 Pedal connectors<br />
Connect the pedal to this connector (p. 8).<br />
3 Input jacks<br />
These jacks can be connected to another sound generating<br />
device or an audio device, so that the sound of that<br />
device will be output from the <strong>DP</strong>-<strong>900</strong>’s speakers (p. 34).<br />
4 4 Output jacks<br />
Allows you to output the piano’s sound to sound<br />
reinforcement equipment to obtain a more powerful<br />
sound. These can also be connected to a tape recorder or<br />
other recording device to record a performance (p. 34).<br />
5 5 DC In connector<br />
Connect the supplied AC adaptor to this connector (p. 11).<br />
9