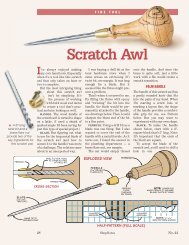
Hinge Mortising Jig - Woodsmith Woodworking Seminars
Hinge Mortising Jig - Woodsmith Woodworking Seminars
Hinge Mortising Jig - Woodsmith Woodworking Seminars

Create successful ePaper yourself
Turn your PDF publications into a flip-book with our unique Google optimized e-Paper software.
JIGS & ACCESSORIES<br />
Two-Part Base, Stop, & Fence ————————————————<br />
1<br />
OVERVIEW<br />
a.<br />
b.<br />
{ Countersink.<br />
Drill a deep<br />
countersink to<br />
ensure the screw<br />
head is below the<br />
surface of the bar.<br />
To get a tight-fitting mortise, you<br />
need to control two things — the<br />
width and length of the mortise. To<br />
do this, the mortising jig consists of<br />
a two-part base, an adjustable stop,<br />
and a pair of aluminum guide bars.<br />
An overview of how these parts fit<br />
together is illustrated in Figure 1.<br />
2<br />
FIGURE<br />
Start With One Piece – As you<br />
can see in the drawing, the aluminum<br />
guide bars fit into dadoes<br />
and rabbets cut in the base parts<br />
and the adjustable stop. Instead of<br />
working with each part individually<br />
as I cut the dadoes and rabbets, I<br />
found it easiest to start with a single<br />
blank — and then cut it into separate<br />
pieces once the joinery was complete,<br />
as in Figure 2. Working with a<br />
larger piece is easier and safer —<br />
and it pretty much guarantees that<br />
the dadoes and rabbets will align<br />
perfectly with each other.<br />
The first thing I did was cut a<br />
single groove in the bottom of the<br />
blank. This groove is sized to match<br />
the thickness of the fence ( 3 / 4") that’s<br />
added later, like you see in Figure 5.<br />
Once the groove was complete, I<br />
cut the dadoes you see in Step 1 of<br />
Figure 2. These two dadoes are cut<br />
in the top of the blank and sized to fit<br />
the aluminum bars that act as guides<br />
for the base of the trim router.<br />
The only thing to keep in mind<br />
here is to be sure to cut the dadoes at<br />
least half the thickness of the bar, as<br />
shown in Figure 1b. A hair deeper is<br />
fine, but if they’re too shallow the<br />
back stop on the jig won’t rest<br />
against the base during use.<br />
Finally, to allow you to lock the<br />
base pieces and back stop in place,<br />
you’ll need to cut a series of slots and<br />
holes for the adjusting knobs and an<br />
insert. You can see where these are<br />
located in Step 1 of Figure 2.<br />
Cut the Base Apart – Now<br />
you’re ready to do what I talked<br />
about earlier — start cutting the<br />
main parts of the jig from the blank.<br />
8 ShopNotes No. 74