Hinge Mortising Jig - Woodsmith Woodworking Seminars
Hinge Mortising Jig - Woodsmith Woodworking Seminars
Hinge Mortising Jig - Woodsmith Woodworking Seminars

You also want an ePaper? Increase the reach of your titles
YUMPU automatically turns print PDFs into web optimized ePapers that Google loves.
JIGS & ACCESSORIES<br />
Final Details ——————————————<br />
Although the basic construction of<br />
the jig is complete, there are still a<br />
few things left to do before you can<br />
use it to rout a mortise for a hinge.<br />
Add an Auxiliary Plate – The<br />
first thing you’ll want to do is add an<br />
auxiliary baseplate to your trim<br />
router, like the one you see in the<br />
photo. The auxiliary baseplate<br />
serves two purposes.<br />
First, using a square piece of clear<br />
plastic for the baseplate provides<br />
better visibility and more support<br />
during use. And second, it limits<br />
where the router bit cuts to match<br />
the hinge you’re installing. You can<br />
see how I added the baseplate by<br />
looking at Figure 6.<br />
Create a Custom Fit — As I<br />
mentioned earlier, the jig will automatically<br />
take care of sizing the mortise<br />
to match the width and length of<br />
the hinge. But to do this, you first<br />
have to custom fit the opening for<br />
6 FIGURE<br />
New Baseplate.<br />
To improve accuracy<br />
and visibility, replace the<br />
round baseplate with a<br />
square piece of clear plastic.<br />
your baseplate and the router bit<br />
you’ll be using to rout the mortises.<br />
Note: The jig is designed to be<br />
used with a 1 / 4"-dia. straight bit. This<br />
will allow you to rout a mortise for a<br />
hinge as small as 3 / 4" long.<br />
Start by sliding the two base pieces<br />
all the way open. And then slide the<br />
stop to the back. Next, you’ll need to<br />
cut past the bottom face of each base.<br />
After adjusting the depth of cut to 5 / 8",<br />
rout clockwise around the inside of<br />
the jig, keeping the baseplate against<br />
the guides and stop (Figure 7).<br />
“Zeroing Out” the Stop – The<br />
last step is to “zero out” the stop so<br />
7<br />
you can easily set the width of the<br />
mortise. To do this, clamp a scrap<br />
against the inside face of the fence and<br />
adjust the stop so the cutting edge of<br />
the router bit is just touching the<br />
scrap when the back edge of the<br />
baseplate is against the stop, as illustrated<br />
in Figure 8a.<br />
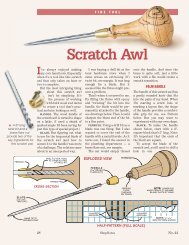
After you lock the back stop in<br />
place, use a scratch awl to scribe a<br />
mark on the top of the aluminum bar.<br />
You can see this in Figure 8.<br />
Using the <strong>Jig</strong> – With the scribe<br />
mark in place, using the jig is just a<br />
matter of following the four-step<br />
process on the opposite page.<br />
8<br />
a.<br />
10 ShopNotes No. 74