M-05-18 GPTLR 25/33 Underride Kit, 96" Wide (P/N ... - Maxon
M-05-18 GPTLR 25/33 Underride Kit, 96" Wide (P/N ... - Maxon
M-05-18 GPTLR 25/33 Underride Kit, 96" Wide (P/N ... - Maxon

Create successful ePaper yourself
Turn your PDF publications into a flip-book with our unique Google optimized e-Paper software.
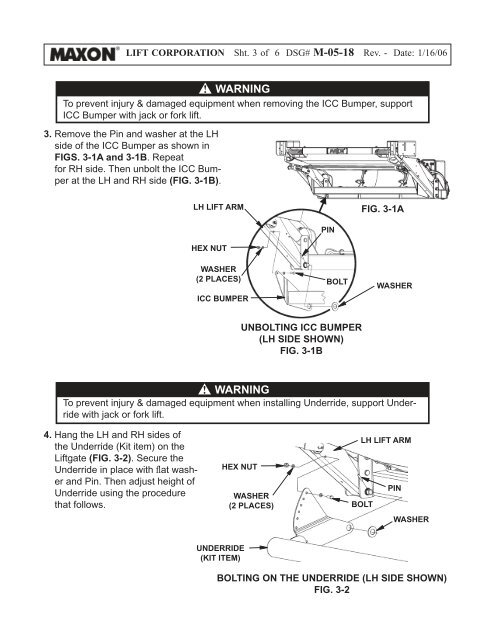
LIFT CORPORATION Sht. 3 of 6 DSG# M-<strong>05</strong>-<strong>18</strong> Rev. - Date: 1/16/06<br />
! WARNING<br />
To prevent injury & damaged equipment when removing the ICC Bumper, support<br />
ICC Bumper with jack or fork lift.<br />
3. Remove the Pin and washer at the LH<br />
side of the ICC Bumper as shown in<br />
FIGS. 3-1A and 3-1B. Repeat<br />
for RH side. Then unbolt the ICC Bumper<br />
at the LH and RH side (FIG. 3-1B).<br />
LH LIFT ARM<br />
FIG. 3-1A<br />
PIN<br />
HEX NUT<br />
WASHER<br />
(2 PLACES) BOLT<br />
ICC BUMPER<br />
WASHER<br />
UNBOLTING ICC BUMPER<br />
(LH SIDE SHOWN)<br />
FIG. 3-1B<br />
! WARNING<br />
To prevent injury & damaged equipment when installing <strong>Underride</strong>, support <strong>Underride</strong><br />
with jack or fork lift.<br />
4. Hang the LH and RH sides of<br />
the <strong>Underride</strong> (<strong>Kit</strong> item) on the<br />
Liftgate (FIG. 3-2). Secure the<br />
<strong>Underride</strong> in place with fl at washer<br />
and Pin. Then adjust height of<br />
<strong>Underride</strong> using the procedure<br />
that follows.<br />
HEX NUT<br />
WASHER<br />
(2 PLACES) BOLT<br />
LH LIFT ARM<br />
PIN<br />
WASHER<br />
UNDERRIDE<br />
(KIT ITEM)<br />
BOLTING ON THE UNDERRIDE (LH SIDE SHOWN)<br />
FIG. 3-2