Owners Manual - Waltco
Owners Manual - Waltco
Owners Manual - Waltco

Create successful ePaper yourself
Turn your PDF publications into a flip-book with our unique Google optimized e-Paper software.
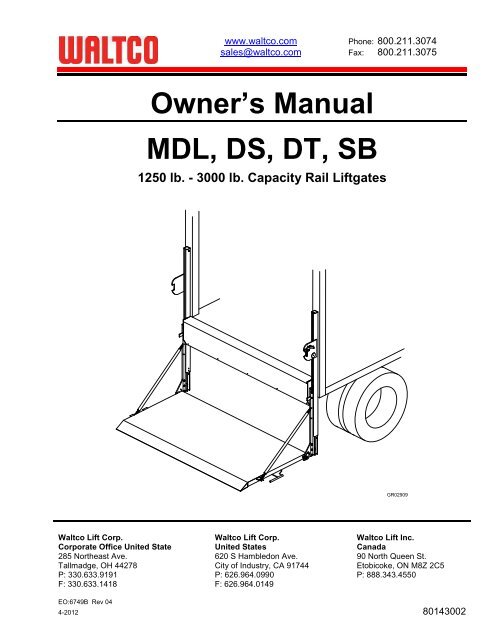
www.waltco.com Phone: 800.211.3074<br />
sales@waltco.com Fax: 800.211.3075<br />
Owner’s <strong>Manual</strong><br />
MDL, DS, DT, SB<br />
1250 lb. - 3000 lb. Capacity Rail Liftgates<br />
GR02909<br />
<strong>Waltco</strong> Lift Corp. <strong>Waltco</strong> Lift Corp. <strong>Waltco</strong> Lift Inc.<br />
Corporate Office United State United States Canada<br />
285 Northeast Ave. 620 S Hambledon Ave. 90 North Queen St.<br />
Tallmadge, OH 44278 City of Industry, CA 91744 Etobicoke, ON M8Z 2C5<br />
P: 330.633.9191 P: 626.964.0990 P: 888.343.4550<br />
F: 330.633.1418 F: 626.964.0149<br />
EO:6749B Rev 04<br />
4-2012 80143002
Table of Contents<br />
Improper operation and maintenance of this liftgate could result in severe<br />
personal injury or death.<br />
Read and understand the contents of this manual and all warning and operation<br />
decals before operating and/or performing maintenance on this liftgate.<br />
Introduction .....................................................................................................................<br />
Safety Information ........................................................................................................... 1<br />
Warranty ......................................................................................................................... 1-3<br />
Liftgate Terminology ....................................................................................................... 2<br />
Operation Instructions ..................................................................................................... 3<br />
Preventive Maintenance ................................................................................................. 4<br />
Placement of Decals ....................................................................................................... 5<br />
Lubrication Instructions ................................................................................................... 6<br />
Schematics ..................................................................................................................... 7<br />
How to Order Parts ......................................................................................................... 8
Introduction<br />
If anyone observes improper installation, improper operation, or damage, they should immediately<br />
contact a qualified person for assistance and correction. We strongly urge anyone that has any<br />
questions or doubts as to the installation, condition, use, operation, maintenance or repair of the liftgate<br />
to contact us at <strong>Waltco</strong> where we have qualified personnel that will be happy to assist you. Telephone<br />
numbers and addresses of these locations are listed in the Owner’s <strong>Manual</strong> and Installation<br />
Instructions.<br />
INSTALLATION<br />
<strong>Waltco</strong> liftgates should only be installed by those with sufficient basic skills to understand the<br />
installation and operation of the liftgate, along with the equipment on which the liftgate is being<br />
installed. <strong>Waltco</strong>’s installation instructions are not intended to give rationale for all the instructions that<br />
are given; however, it is the intent of these instructions to give the installer both the operations and<br />
what we believe to be the most desirable sequence of implementing these operations. These<br />
instructions can in no way expand into an area where they will replace a qualified person, or clear<br />
thinking and a basic knowledge that must be possessed by the installer.<br />
It has been our experience that a knowledgeable journeyman following these instructions and<br />
observing the operation of the liftgate will have a sufficient comprehension of the liftgate to enable this<br />
person to troubleshoot and correct all normal problems that may be encountered.<br />
Failure to follow the installation instructions, adjustments and mounting dimensions may result in<br />
improper and unsafe operation of the liftgate. Unauthorized alterations of the liftgate can cause an<br />
undesirable and dangerous condition.<br />
OWNER’S MANUAL<br />
The <strong>Waltco</strong> Owner’s <strong>Manual</strong> is intended to act as a guide for operation and routine maintenance but<br />
is no way intended to encourage usage or repair of the liftgate by those who are not qualified to do so.<br />
The contents of the owner’s manual include, but are not limited to general operation instructions,<br />
routine lubrication, parts lists, and an outline of things that should be checked but may not be obvious<br />
to those not technically qualified. This manual assumes the liftgate is properly installed, undamaged<br />
and operates correctly. Improper installation, improper operation, or damage should be immediately<br />
corrected by a qualified person.<br />
INSPECTION<br />
As part of the regular inspection of a liftgate and after damage or suspicion of an overload, inspect<br />
for wear or structural damage and make necessary repairs or replacements. Check all structural<br />
components and their attachment to the liftgate for cracked welds, loose fasteners, wear and part<br />
deformation. Check cylinder and hose for leaks. Inspections and repairs should be made by a qualified<br />
mechanic.<br />
REPLACEMENT PARTS<br />
Use only <strong>Waltco</strong> original equipment replacement parts. Components of other liftgate manufacturers<br />
may outwardly appear to be the same but are not interchangeable with <strong>Waltco</strong> products. <strong>Waltco</strong><br />
components are specifically designed for safety requirements, reliability and compatibility with our<br />
products. Refer to your <strong>Waltco</strong> parts manual when ordering parts. NOTE: When ordering, give model<br />
and serial number of liftgate.<br />
DECALS<br />
It is important that every vehicle that has a WALTCO Liftgate have legible DECALS clearly posted on<br />
the vehicle and an OWNER’S MANUAL in the vehicle at all times as a guide for proper operation and<br />
maintenance.<br />
Additional DECALS and OWNER’S MANUALS can be obtained from WALTCO LIFT CORP.
Chapter 1<br />
Safety Information<br />
WARNING<br />
Read, understand, and follow all of the warning listed below.<br />
Failure to follow these warning could result in severe personal injury or death.<br />
<br />
<br />
<br />
<br />
<br />
<br />
<br />
<br />
<br />
<br />
<br />
<br />
<br />
<br />
<br />
<br />
<br />
<br />
<br />
<br />
<br />
<br />
<br />
<br />
<br />
Read and understand the Owner’s <strong>Manual</strong>, all decals and warning on liftgate before operating liftgate.<br />
Do not operate liftgate without a thorough knowledge and understanding of the operation of the liftgate.<br />
Liftgate hazards can result in crushing or falling.<br />
This liftgate is designed for loading and unloading of cargo. If personnel are required to ride liftgate, observe<br />
and familiarize yourself with the liftgate operation, decals and manuals. Ensure stable footing at all times.<br />
Do not ride liftgate with unstable loads.<br />
Wheeled loads must be properly retained from rolling.<br />
Tall, high center of gravity loads must be retained from falling over.<br />
Never overload liftgate:<br />
Load platform as close to the vehicle, and towards the middle of the platform as possible. Refer to owner’s<br />
manual and capacity decal of liftgate for maximum load and load placement.<br />
Keep hands and feet clear of all potential pinch points.<br />
Never use liftgate if it makes any unusual noise, has unusual vibration, raises or lowers unevenly, or fails to<br />
operate smoothly.<br />
Never use liftgate if it shows any signs of structural damage such as cracked welds, bent or distorted<br />
members.<br />
Do not attempt any repairs unless you are qualified to do so. Care should be taken when work is performed<br />
on a disabled liftgate located near moving traffic. When possible the vehicle should be moved away from<br />
traffic areas for repair. Precautionary measures should be taken to ensure personal safety including those<br />
recommended in Federal Motor Vehicle Safety Standards 571.125.<br />
When welding to liftgate, or liftgate components, take all necessary safety precautions, including using<br />
respiratory protection and other pertinent personal protective gear when welding harmful materials.<br />
All protective covers, guards, and safety devices must be in place and access doors closed before operating<br />
liftgate.<br />
Do not allow anyone to stand in, or near area, in which Platform will open and close before opening or closing<br />
Platform.<br />
Do not allow anyone to stand near the Platform where a falling load could land on them.<br />
Platform is always to be properly stored and secured for transit. See the Owner’s <strong>Manual</strong> for details.<br />
Take care to retain cargo during transit for liftgate Platforms which function as the tailgate or door of the cargo<br />
area. Small objects can fall through the space between the vehicle and the folded Platform.<br />
A Lock-Out device or Shut-Off Switch should always be used to prevent unauthorized use of liftgate.<br />
For liftgates with Runners, never use liftgate if Runners do not travel freely and smoothly.<br />
For liftgates with Roller Lifting Chain, the Chain should be replaced every (5) five years or 15,000 cycles,<br />
whichever comes first. Replace only with <strong>Waltco</strong> approved Roller Chain.<br />
Never transfer loads which exceed lifting capacity on or over any part of the Platform unless the liftgate is<br />
equipped with a special reinforced Platform and Platform Support Bars for use when the Platform is used as<br />
loading ramp (dock board). Refer to the “Using Platform as a loading ramp” Chapter in the Operation<br />
Instructions of the BZ/RZ series Owner’s <strong>Manual</strong>.<br />
For liftgates equipped with Trailer Hitches, never exceed the rated capacity of the hitch. Do not exceed the<br />
vehicle’s weight rating. Refer to the vehicle’s Owner’s <strong>Manual</strong>.<br />
Vehicle must comply with all state and federal standards.<br />
Follow the “Maintenance Guide” chapter in the Owner’s <strong>Manual</strong>.
Liftgates with Tilt Function<br />
Proper use of the Control Switches is of extreme importance.<br />
Improper use of Tilt Switch could cause load to fall from the Platform or damage the liftgate.<br />
Platform should be in a generally horizontal position when raising or lowering with a load.<br />
In any tilt position, the Platform may vary from level while raising or lowering the Platform.<br />
Liftgates equipped with spring operated Cam Closer<br />
Replace Cam Release Spring every five (5) years or 15,000 cycles, whichever comes first.<br />
RGL-Series Liftgates<br />
Make certain Platform Brake mechanisms are operating properly.<br />
The Runners are always to remain powered up against the Up-stops Pins when in transit.<br />
Inspect Cables every three (3) months or 750 cycles, whichever comes first. Cables must be replaced if they<br />
show signs of wear, distortion, kinking or if any broken wires are visible<br />
Replace cables every five (5) years or 10,000 cycles, whichever comes first.<br />
This is the safety alert symbol. This manual uses this symbol to alert you to potential personal injury<br />
hazards.<br />
Obey all safety messages that follow this symbol to avoid personal injury or death.<br />
SIGNAL WORDS<br />
WARNING<br />
Indicates a potentially hazardous situation, which if not<br />
avoided, could result in death or serious injury.<br />
Black letters on an orange background<br />
CAUTION<br />
Indicates a potentially hazardous situation, which if not<br />
avoided, may result in minor or moderate injury. May<br />
also be used to alert against unsafe practices.<br />
Black letters on a yellow background.<br />
NOTICE<br />
Indicates a potentially hazardous situation, which if not<br />
avoided, may result in property damage.<br />
WARNING<br />
CAUTION<br />
NOTICE
WALTCO warrants its products free of defects in materials and workmanship.<br />
WALTCO will replace components found defective during the warranty period. Labor will be<br />
reimbursed according to our flat rate labor schedule at the prevailing shop rate.<br />
Contact our Sales or Warranty departments for the warranty period of your model or for<br />
information regarding our flat rate labor schedule.<br />
WALTCO Warranty Claim Procedure<br />
For consideration, all claims must be received within 30 days of repair and include the following<br />
information:<br />
<br />
<br />
<br />
Liftgate Serial Number<br />
Description of problem and corrective actions<br />
Itemization of the labor charge to include the number of hours and labor rate<br />
Replacement warranty parts can be obtained by contacting <strong>Waltco</strong>’s Parts Department.<br />
Parts must be returned for inspection when requested.<br />
Exclusions:<br />
<strong>Waltco</strong>’s warranty does not include reimbursement for service calls, vehicle rental, towing, travel<br />
time, fabrication of parts available from WALTCO, damage from misuse or abuse, negligence,<br />
accidents, alteration, loss of income or overtime expense, oil, or normal wear.<br />
Diagnosis and troubleshooting time are included in the flat rate labor times.<br />
Warranty and technical information is available from WALTCO’s toll free customer service lines<br />
from 8:00 a.m. to 5:00 p.m. EST.<br />
<strong>Waltco</strong> Lift Corp<br />
285 Northeast Ave, Box 354, Tallmadge, OH 44278<br />
1-800-211-3074, 330-633-9191<br />
Please visit our websites: http://www.waltco.com or http://www.hiab.com<br />
We're behind you all the way!
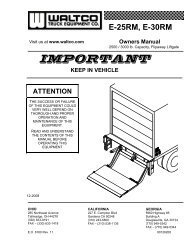
TERMINOLOGY<br />
Chapter 2<br />
1. Travel Plate (Snap Lock Design)<br />
1A. Travel Plate (Drop-In Design)<br />
2. Rail (Track)<br />
3. Lift Cylinder<br />
4. Crossbeam Box (Housing)<br />
5. Lifting Chain<br />
6. Anchor Bolt<br />
7. Pump Unit<br />
8. Flow Control Valve<br />
Liftgate Terminology<br />
9. Latch<br />
10. Spec Tag<br />
11. Switch Assembly<br />
12. Support Chain<br />
13. Runner (Slider)<br />
14. Travel Ear and Grab Handle<br />
15. Platform<br />
16. Housing Cover<br />
GR02833<br />
Page 2-1
Chapter 2<br />
Liftgate Terminology<br />
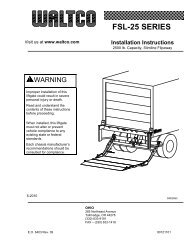
Explanation of Specification Tag<br />
Model Name Description Capacity<br />
MDL-12 Medium Duty Lift 1200 lbs.<br />
MDL-16 Medium Duty Lift 1600 lbs.<br />
MDL-20 Medium Duty Lift 2000 lbs.<br />
MDL-30 Medium Duty Lift 3000 lbs.<br />
MDLBG-16 MDL Bottle Gas 1600 lbs.<br />
MDLBG-20 MDL Bottle Gas 2000 lbs.<br />
DS-16 Dock Storage 1600 lbs.<br />
DS-20 Dock Storage 2000 lbs.<br />
DS-30 Dock Storage 3000 lbs.<br />
SB-12 Service Body 1200 lbs.<br />
SB-16 Service Body 1600 lbs.<br />
DT-16 Dump Through 1600 lbs.<br />
DT-20 Dump Through 2000 lbs.<br />
DT-30 Dump Through 3000 lbs.<br />
MODEL NAME<br />
RATED CAPACITY<br />
Based on an evenly<br />
distributed load on the<br />
platform flat surface.<br />
SERIAL NUMBER<br />
of liftgate. To be used<br />
when ordering parts or<br />
when contacting <strong>Waltco</strong><br />
for service or warranty<br />
questions<br />
DATE OF<br />
MANUFACTURE<br />
Month / Year<br />
GR00241<br />
Specification<br />
Tag<br />
GR00241<br />
GR02834<br />
Page 2-2
Chapter 3<br />
Operation Instructions<br />
TO OPEN PLATFORM<br />
Snap Lock Design<br />
Remove latch pin from hole in travel plate.<br />
Pull down latch lever to clear travel ear on<br />
platform.<br />
Using grab handle, pull platform to open<br />
position.<br />
Never force platform open.<br />
Keep hands away from pinch<br />
points.<br />
If necessary use Up and Down switch to free<br />
travel ear in travel plate.<br />
GR02840<br />
TO OPEN PLATFORM<br />
Drop-In Design w/Power Close<br />
Make certain area around platform<br />
is clear before opening platform.<br />
Keep hands away from pinch<br />
points.<br />
Raise platform so travel ear is completely out<br />
of travel plate.<br />
Use Down and Open switches simultaneously<br />
to open platform.<br />
Use Up and Down switch to raise and lower<br />
platform.<br />
GR02841<br />
Page 3-1
Chapter 3<br />
Operation Instructions<br />
TO STORE PLATFORM<br />
Snap Lock Design<br />
Raise platform to comfortable position for lifting<br />
into vertical position using grab handle.<br />
Keep hands away from pinch<br />
points.<br />
Use Up and Down switch to adjust platform<br />
until travel ear can be placed into travel plate<br />
and latch lever engaged over ear.<br />
Insert latch pin into travel plate hole.<br />
Turn power of to liftgate to prevent<br />
unauthorized use of liftgate.<br />
GR02842<br />
TO STORE PLATFORM<br />
Drop-In Design<br />
With platform open, power platform all the way<br />
up.<br />
Use Up and Close switches simultaneously to<br />
close platform.<br />
Use Down switch to lower travel ears into<br />
travel plates.<br />
Keep hands away from pinch<br />
points.<br />
Turn power of to liftgate to prevent<br />
unauthorized use of liftgate.<br />
GR02843<br />
Page 3-2
Chapter 3<br />
Operation Instructions<br />
LOADING OF PLATFORM<br />
Load and unload from rear of platform and not side of<br />
platform. Never remove side linkage to load or unload<br />
platform.<br />
Always load as close to center of platform and as close<br />
to truck sill as possible.<br />
Never operate lift trucks on or over any part of platform.<br />
This unit is intended for loading and unloaded of cargo<br />
only. Do not use for anything but its intended use.<br />
GR02844<br />
POWER OFF TO LIFTGATE<br />
Turn power off to liftgate by turning off the Cab<br />
Shut-Off switch inside the cab of vehicle.<br />
This may be a toggle or rotary type switch.<br />
Turn power of to liftgate to prevent<br />
unauthorized use of liftgate.<br />
Cab Shut<br />
Off Switch<br />
GR00379<br />
Page 3-3
Chapter 4<br />
Preventive Maintenance<br />
<strong>Waltco</strong> recommends that the MDL, DS, DT, and SB-Series liftgates be inspected at 6 month or 3000 cycle intervals<br />
to help assure proper function and operation of the liftgate.<br />
Note: Photocopy the following PM Checklist to help keep track of periodic maintenance on the liftgate. Keep<br />
completed form with maintenance records.<br />
For more detailed instructions on the following checklist items, refer to the appropriate sections in this Owner’s<br />
<strong>Manual</strong>.<br />
Do not continue to use liftgate if any points of inspection, listed below, may cause you to<br />
think the liftgate is unsafe. Repair immediately.<br />
If liftgate is found to be in need of repair or adjustment not covered in this manual, contact<br />
your nearest <strong>Waltco</strong> Distributor.<br />
WALTCO MDL, DS, DT, and SB-SERIES LIFTGATE<br />
PREVENTIVE MAINTENANCE CHECKLIST<br />
PM Interval: 6 Months or 3000 Cycles Date: ______________ Vehicle No.__________<br />
Mechanic:_________________ Liftgate S/N:____________ Model:______________<br />
Check appropriate box below for each step:<br />
6 Month Liftgate PM Procedures<br />
1 OK Repair Required Corrected Check for apparent damage to the lifting structure, such as bent or<br />
distorted members or cracked welds, which may have resulted from<br />
overloading or abuse.<br />
2 OK Repair Required Corrected Check that all pins, bolts and fasteners are tight and secure.<br />
3 OK Repair Required Corrected Check for worn or damaged bearings sprockets, and roller chains.<br />
4 OK Repair Required Corrected Check that controls operate properly.<br />
7 OK Repair Required Corrected Check that cab shut-off switch cuts power to liftgate.<br />
5 OK Repair Required Corrected Check all battery cables and connections (both positive and ground<br />
cables) to be sure they are tight and free of corrosion.<br />
6 OK Repair Required Corrected Check that platform is level.<br />
7 OK Repair Required Corrected Check torsion bars and related hardware.<br />
8 OK Repair Required Corrected Check platform support chains.<br />
9 OK Repair Required Corrected Check for hydraulic leaks in hydraulic cylinder(s), hoses, fittings, and<br />
valves.<br />
10 OK Repair Required Corrected Check oil level in reservoir.<br />
11 OK Repair Required Corrected Check lowering speed of platform.<br />
12 OK Repair Required Corrected Check that all decals are in place and legible.<br />
13 OK Repair Required Corrected Lubricate the liftgate per the “Lubrication Instructions”.<br />
12 Month Liftgate PM Procedures (Includes steps 1-13 above)<br />
14 OK Repair Required Corrected Inspect Pump Motor for wear and/or damage.<br />
15 OK Repair Required Corrected Drain and replace Hydraulic Fluid.<br />
Page 4-1
Chapter 4<br />
Preventive Maintenance<br />
MONTHLY INSPECTION<br />
Operate the liftgate throughout its entire<br />
operational cycle. Check for:<br />
<br />
<br />
<br />
<br />
<br />
<br />
<br />
<br />
<br />
Damage to lifting structure such as bent<br />
or distorted members or cracked welds.<br />
Worn or damaged roller chain,<br />
sprockets, and bearings.<br />
Bent or distorted pins or damaged<br />
cylinder.<br />
Torsion bars are in place and properly<br />
working.<br />
All pivot and cylinder pins are securely<br />
in place, undamaged and retained by<br />
their proper fasteners.<br />
Damaged or worn bearings that pivot<br />
and cylinder pins rest in.<br />
Controls operate correctly (refer to<br />
chapter 3, “Operations Instructions”)<br />
Check all power cables, ground cables,<br />
and connections.<br />
Clean and tighten all loose connections.<br />
Replace any damaged or corroded<br />
wires or connectors.<br />
Do not continue to use liftgate if<br />
any points of inspection listed at<br />
left, or below, may cause you to<br />
think the liftgate is unsafe. Repair<br />
immediately.<br />
If liftgate is found to be in need of<br />
repair or adjustment not covered in<br />
this manual, contact your nearest<br />
<strong>Waltco</strong> Distributor.<br />
Cab shut-off switch cuts power to liftgate.<br />
This cab shut-off switch is an<br />
important safety device to help<br />
prevent unauthorized use of liftgate.<br />
Cab Shut<br />
Off Switch<br />
GR00379<br />
Page 4-2
Chapter 4<br />
Preventive Maintenance<br />
PLATFORM ADJUSTMENT<br />
Unfold and raise platform to bed level and<br />
check for:<br />
1. If platform travels more than ¼” above<br />
the top of the crossbeam box, and<br />
liftgate is not an Above Floor model<br />
liftgate, see below for adjustment.<br />
Street<br />
Side<br />
Top of<br />
Platform<br />
Top of<br />
Crossbeam Box<br />
“X”<br />
Curb<br />
Side<br />
2. If platform is uneven see below for<br />
adjustment.<br />
Lower platform to ground. Remove access<br />
cover from crossbeam box.<br />
If liftgate is Above Floor model:<br />
Adjust as required to level platform.<br />
If liftgate is not an Above Floor model:<br />
Adjust platform so it is level with top of<br />
crossbeam box.<br />
For non-Above Floor liftgates, never<br />
adjust platform to travel above the<br />
crossbeam box.<br />
Never adjust nut out less than 3/8”<br />
from end of anchor bolt.<br />
Never have any part of your body<br />
underneath the platform while making<br />
adjustments.<br />
GR02871<br />
ABOVE FLOOR TRAVEL<br />
If above floor travel is to be reduced, additional links will need to be added to the lifting chains.<br />
If additional above floor travel is desired, contact <strong>Waltco</strong> for assistance. Ability to increase travel<br />
varies with each specific model of liftgate and bed height of vehicle.<br />
Page 4-3
Chapter 4<br />
Preventive Maintenance<br />
HYDRAULICS<br />
Inspect for oil leaks in:<br />
Hydraulic cylinder(s)<br />
Hydraulic hoses - Replace hoses if they<br />
show signs of excessive abrasion<br />
Hydraulic fittings and valves<br />
Tighten or replace all hydraulic components<br />
as may be required to stop oil leakage<br />
CHECK AND FILL HYDRAULIC RESERVOIR<br />
<br />
<br />
<br />
<br />
<br />
Lower platform to ground and remove<br />
access cover.<br />
Remove reservoir breather cap.<br />
Oil level should be 1/2” from top of<br />
reservoir.<br />
If low, fill as required. Use appropriate fluid<br />
per chart.<br />
Replace breather cap.<br />
Breather<br />
Cap<br />
GR02836<br />
Recommended Fluids<br />
Fill reservoir<br />
Temperature Range Acceptable Fluids Fill with recommended fluid or equivalent.<br />
0 to 120 F<br />
<strong>Waltco</strong> Biodegradable Fill the reservoir to within 1/2” from the top.<br />
Liftlube TM part #85803860 Fluids are available from the <strong>Waltco</strong> parts<br />
Shell Tellus S2 V 32<br />
Dept. 1-800-411-5685 www.waltco.com<br />
Chevron AW32<br />
-20 to 90 F <strong>Waltco</strong> Biodegradable<br />
LiftLube Arctic part<br />
#85803866<br />
NOTE:<br />
Do not use the following fluids:<br />
Shell Tellus S2 V 15<br />
Mobil DTE 13<br />
MIL – H - 5606<br />
Brake Fluid<br />
Power steering fluid<br />
Automatic Transmission Fluid (ATF)<br />
A good quality SAE 10W motor oil may also be used in<br />
temperatures above 32 F.<br />
Page 4-4
Chapter 4<br />
Preventive Maintenance<br />
There is no speed adjustment on this<br />
liftgate.<br />
Lowering speed is controlled by the pressure<br />
compensative valve plumbed at the cylinder.<br />
Regardless of weight on platform, liftgate<br />
should lower at approximately six (6) inches<br />
per second.<br />
Bed Height<br />
(inches)<br />
6<br />
= Lowering Time<br />
(seconds)<br />
Pressure<br />
Compensative Flow<br />
Control Valve<br />
This liftgate must have the correct<br />
pressure compensative valve<br />
install:<br />
GR00160<br />
INSPECT DECALS AND LUBRICATE<br />
LIFTGATE<br />
Inspect all decals per Chapter 5 of this manual.<br />
Replace any that are missing or damaged.<br />
Lubricate liftgate per Chapter 6 of this manual.<br />
ANNUAL INSPECTION<br />
Inspect power motor:<br />
Disconnect battery cable.<br />
Remove end cover.<br />
Examine armature brushes for wear<br />
(Motor should be replaced if less than<br />
1/8" long).<br />
Clean out all residue from inside of<br />
motor housing.<br />
Apply several drops of light weight<br />
machine oil to armature shaft bearing in<br />
motor end cover.<br />
Reassemble motor.<br />
Drain hydraulic fluid and replace with new fluid<br />
per recommended fluids chart.<br />
Remove cover to<br />
check brushes and<br />
clean out motor<br />
GR02836<br />
Page 4-5
Chapter 5<br />
Placement of Decals<br />
All decals must be in place and legible or all warranties are void.<br />
ITEM DECAL QTY PART NO. LOCATION<br />
Safety Instructions 1 80100850<br />
1<br />
Operation, Snap Lock<br />
1<br />
80101205<br />
Operation, Drop-In 80101536<br />
Hazard Decal 1 80101370<br />
Important Decal 1 80100828<br />
Locate in a conspicuous place near controls.<br />
1250 # Capacity Decal<br />
80100266<br />
1600 # Capacity Decal 80100252<br />
2<br />
2000 # Capacity Decal 80100253<br />
3000 # Capacity Decal 80100257<br />
2 Caution Decal 4 75089296<br />
3 Protective Cover Decal 2 75089282<br />
Locate one in a conspicuous place near controls.<br />
Locate one on curb side of platform.<br />
Locate one in a conspicuous place near controls.<br />
Locate one in a conspicuous place on driver side of vehicle.<br />
Locate two on bottom of platform.<br />
Locate one on hydraulic cylinder.<br />
Locate on back of crossbeam box.<br />
4 Cab Shut Off Decal 1 75089267 Locate next to cab shut-off switch inside vehicle.<br />
5 Switch Decal 1<br />
80101532<br />
80101533<br />
6 Warning Decal 1 80100829<br />
Locate on switch housing (single toggle switch)<br />
Locate on switch housing (2 toggle switch)<br />
Locate next to liftgate circuit breaker.<br />
In applications where more than one circuit breaker is used,<br />
decal must be placed in both locations.<br />
If your liftgate is equipped with dual controls, an additional Safety Instruction decal<br />
(80100850) is to be placed in a conspicuous place near the second set of controls.<br />
To maximize decal adhesion to surfaces:<br />
Surface must be dry and clean<br />
Firm pressure must be applied to decal<br />
Minimum surface temperature 65º<br />
Heat gun may be used to heat surface<br />
GR02861<br />
Page 5-1
Chapter 6<br />
Lubrication Instructions<br />
Lubricate lifting chains including sections in<br />
crossbeam box, rails, & runner assemblies<br />
with machine oil or motor oil.<br />
Lubricate latch, inside rails, crossbeam<br />
box, and platform hinges with machine oil<br />
or motor oil.<br />
Lubricate driver and passenger side tracks.<br />
Suggested Minimum Lubrication Schedule (in<br />
days)<br />
Monthly<br />
Cycles<br />
Light<br />
Duty<br />
Medium<br />
Duty<br />
Heavy<br />
Duty<br />
< 250 45 30 21<br />
250 – 350 30 21 14<br />
350 – 450 21 14 7<br />
> 450 Contact Factory<br />
Lubricate every 30 days if cycles are<br />
unknown.<br />
GR02860<br />
Page 6-1
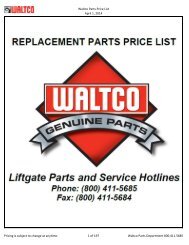
Chapter 7.<br />
Schematics<br />
GR02850<br />
GR02849
How To Order Parts<br />
Repairs should be made only by authorized mechanics using WALTCO<br />
Replacement parts.<br />
When ordering repair or replacement parts, please include all the information<br />
asked for below. If this information is not available, a complete written description<br />
or sketch of the required part will help WALTCO identify and deliver the needed<br />
part to you.<br />
________________________________________________________________<br />
THE FOLLOWING INFORMATION MUST BE INCLUDED:<br />
1. SERIAL NUMBER - [WALTCO liftgate serial numbers can be found on the<br />
Specification Tag attached to the mount frame.]<br />
2. MODEL NUMBER<br />
3. CAPACITY<br />
4. PLATFORM SIZE<br />
________________________________________________________________<br />
THEN INCLUDE THE FOLLOWING INFORMATION:<br />
5. PART NUMBERS<br />
6. DESCRIPTION<br />
7. QUANTITY REQUIRED<br />
________________________________________________________________<br />
MAIL, E-MAIL OR PHONE YOUR REQUEST TO:<br />
<strong>Waltco</strong> Lift Corp<br />
285 Northeast Avenue<br />
Tallmadge, OH 44278<br />
1-800-411-5685<br />
FAX: 1-800-411-5684<br />
E-MAIL: parts@waltco.com<br />
ALL PARTS ARE F.O.B. FROM THE SHIPPING FACTORY<br />
________________________________________________________________<br />
PLEASE NOTE:<br />
To assure you of continuing and effective quality control, our warranty policy<br />
permits replacement of hydraulic cylinders, valves and motor pump units when<br />
their factory seals are intact. Parts under warranty will be exchanged promptly<br />
after careful inspection of the returned assemblies.<br />
________________________________________________<br />
Page 8
Every vehicle that has a WALTCO Liftgate must have legible<br />
WARNING AND OPERATION DECALS clearly posted on the<br />
vehicle and an OWNER’S MANUAL in the vehicle at all times as<br />
a guide for proper operation and maintenance.<br />
Additional WARNING DECALS, OPERATION DECALS and OWNER’S MANUALS can<br />
be obtained from WALTCO LIFT CORP.<br />
____________________<br />
NOTE:<br />
When ordering, give model<br />
and serial number of the liftgate.<br />
____________________
IMPORTANT<br />
KEEP THIS OWNER’S MANUAL IN THE VEHICLE<br />
WARNING<br />
Improper operation and maintenance of this<br />
liftgate could result in severe personal injury<br />
or death.<br />
Read and understand the contents of this<br />
manual and all warning and operation decals<br />
before operating and/or performing<br />
maintenance on this liftgate.<br />
For SAFETY information on this liftgate see<br />
Chapter 1 of this manual<br />
80101519 EO6156<br />
Rev 01