EM 01 â ELSE EM 03 â ELSE EM 04 â ELSE - Emuge UK
EM 01 â ELSE EM 03 â ELSE EM 04 â ELSE - Emuge UK
EM 01 â ELSE EM 03 â ELSE EM 04 â ELSE - Emuge UK

Create successful ePaper yourself
Turn your PDF publications into a flip-book with our unique Google optimized e-Paper software.
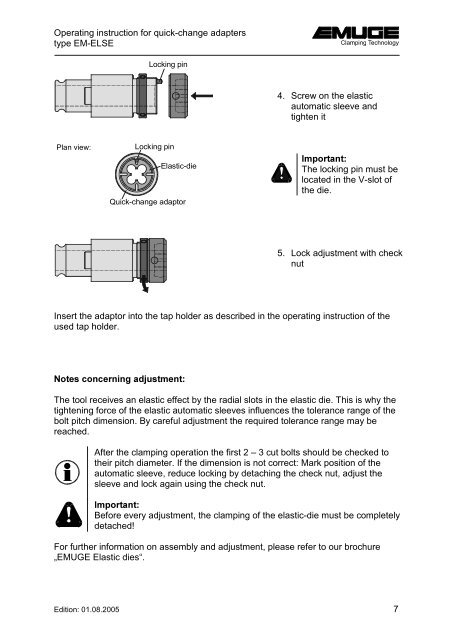
Operating instruction for quick-change adapters<br />
type <strong>EM</strong>-<strong>ELSE</strong><br />
Locking pin<br />
4. Screw on the elastic<br />
automatic sleeve and<br />
tighten it<br />
Plan view:<br />
Locking pin<br />
Elastic-die<br />
Quick-change adaptor<br />
,PSRUWDQW<br />
The locking pin must be<br />
located in the V-slot of<br />
the die.<br />
5. Lock adjustment with check<br />
nut<br />
Insert the adaptor into the tap holder as described in the operating instruction of the<br />
used tap holder.<br />
1RWHVFRQFHUQLQJDGMXVWPHQW<br />
<br />
The tool receives an elastic effect by the radial slots in the elastic die. This is why the<br />
tightening force of the elastic automatic sleeves influences the tolerance range of the<br />
bolt pitch dimension. By careful adjustment the required tolerance range may be<br />
reached.<br />
After the clamping operation the first 2 – 3 cut bolts should be checked to<br />
their pitch diameter. If the dimension is not correct: Mark position of the<br />
automatic sleeve, reduce locking by detaching the check nut, adjust the<br />
sleeve and lock again using the check nut.<br />
,PSRUWDQW<br />
Before every adjustment, the clamping of the elastic-die must be completely<br />
detached!<br />
For further information on assembly and adjustment, please refer to our brochure<br />
„<strong>EM</strong>UGE Elastic dies“.<br />
Edition: <strong>01</strong>.08.2005 7