- Page 1 and 2: PFS Lessons Easy step by step Start
- Page 3 and 4: Lesson O9: Change date format to Da
- Page 5 and 6: PFS Desktop software: PFS Lesson 26
- Page 7 and 8: PFS Lesson 01: Install and Register
- Page 9 and 10: Register the PFS software 1 2 3 9
- Page 11 and 12: Register the PFS software Marcel 4:
- Page 13 and 14: Prepare your management tree The ha
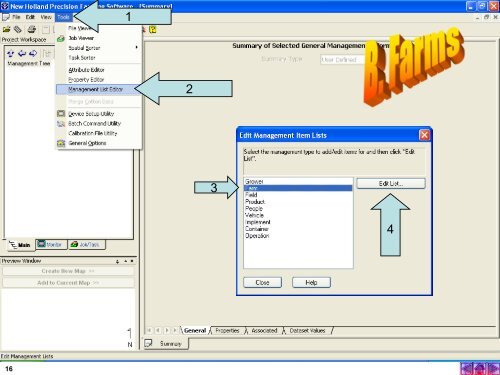
- Page 15: 2 1 3 Repeat step 1, 2 and 3 for al
- Page 19 and 20: 3 1 Repeat step 1, 2 and 3 for all
- Page 21 and 22: 1 2 Repeat step 1, 2 and 3 for all
- Page 23 and 24: 1 2 Learn now how to export your Ma
- Page 25 and 26: 1 2 3 25
- Page 27 and 28: 1. People 4: See next page 2 3 Repe
- Page 29 and 30: 1 2 3 Repeat step 1 and 2and 4 for
- Page 31 and 32: Select: “New Holland Voyager 2”
- Page 33 and 34: 33 PFS Lesson 04: Get started in th
- Page 35 and 36: 1. Set up: Advanced mode 1 35
- Page 37 and 38: 2. Clean the Management tree BEFORE
- Page 39 and 40: 39 2. Clean the Management tree
- Page 41 and 42: 2. Clean the Management tree 1 41
- Page 43 and 44: Select the desired: Farmer/Farm/Fie
- Page 45 and 46: 1 2 3. Memory stick 4. xxxxxxxx.CNH
- Page 47 and 48: Verify On the right side of the wor
- Page 49 and 50: 49 PFS Lesson 06: Make a profession
- Page 51 and 52: 2. Create the map of the boundary 1
- Page 53 and 54: Pinting 1. Click on File, 2. Print
- Page 56 and 57: 2. Select layer 2 1. Double click O
- Page 58 and 59: 1 2. Drag & Drop 58 3. Double click
- Page 60 and 61: 1 3 4 60
- Page 62: 2. When you are satisfied with the
- Page 65 and 66: DOWNLOADING A PRINT LAYOUT 2° UNZI
- Page 67 and 68:
67 DOWNLOADING A PRINT LAYOUT
- Page 69 and 70:
1. Open the harvest load from the f
- Page 71 and 72:
1. Select the Grower from the farm
- Page 73 and 74:
1. Expand the clipping area: choose
- Page 75 and 76:
2. Press Accept 1. Add the image to
- Page 77 and 78:
77 PFS Lesson 7B: Use ANY TYPE OF M
- Page 79 and 80:
79 Type in the Latitude and the Lon
- Page 81 and 82:
81 Open “Microsoft Photo Editor
- Page 83 and 84:
83 1. Click: “File”, “Import
- Page 85 and 86:
85 Give a name
- Page 87:
87 Select
- Page 90 and 91:
PFS Lesson 7B: You want to have a n
- Page 92 and 93:
92 Surf on the internet to: http://
- Page 94 and 95:
94 Type in the Latitude and the Lon
- Page 96 and 97:
1° Click on “File”, “Save”
- Page 98 and 99:
Eventually Use the Zoom tool 3 98
- Page 100 and 101:
100 Click Right Mouse Select : Set
- Page 102 and 103:
102
- Page 104 and 105:
PFS Lesson 8: The use of background
- Page 106 and 107:
1 2 2. Check that image that covers
- Page 108 and 109:
108
- Page 110 and 111:
When was my field harvested See DA
- Page 112 and 113:
1 2 112
- Page 114 and 115:
Refresh your screen and …….. DA
- Page 116 and 117:
PFS Lesson 10: Apply a SIMPLE ANALY
- Page 118 and 119:
1 3. Select ALL attributes that are
- Page 120 and 121:
This symbol shows that on these dat
- Page 122 and 123:
I want the boundaries of my fields
- Page 125 and 126:
I have a problem !!! When I do ―T
- Page 127 and 128:
1 The following step can take sever
- Page 129 and 130:
PFS Lesson 12: The driver forgot to
- Page 131 and 132:
1 2 3 131
- Page 133 and 134:
133 (1‟). If needed “ADD NEW”
- Page 135 and 136:
135 Delete all
- Page 137 and 138:
137
- Page 139 and 140:
3 2 139
- Page 141 and 142:
141 2
- Page 143 and 144:
143 PFS Lesson 13: GPS Technology a
- Page 145 and 146:
How precise is GPS, D-GPS & RTK D-G
- Page 147 and 148:
How precise is GPS, D-GPS & RTK GPS
- Page 149 and 150:
IntelliSteer on CX & CR & Tractores
- Page 151 and 152:
Mapping on CSX DIA: Yield Monitor (
- Page 153 and 154:
CSX: Customer Support 87349865 All
- Page 155 and 156:
155 PFS Lesson 14: Make a PDF of my
- Page 157 and 158:
1 2 3 157
- Page 159 and 160:
159 1. Click on ―File‖ and sele
- Page 161 and 162:
PFS Lesson 15: Use the Trace bounda
- Page 163 and 164:
163 PFS Lesson 16A: Create a SOIL S
- Page 165 and 166:
2 2 2 2 2 2 2 3 165
- Page 167 and 168:
3 4 5: Check 6 1 167
- Page 169 and 170:
1. Click Right mouse 2 169
- Page 171 and 172:
171 PFS Lesson 16B: Import into my
- Page 173 and 174:
PFS Lesson 17: Prepare a Management
- Page 175 and 176:
The data Card • Buy an SD-card (1
- Page 177 and 178:
Create your Management Tree 3 1. De
- Page 179 and 180:
Create your Management Tree 2 1 The
- Page 181 and 182:
Use the Management tree in the Comb
- Page 183 and 184:
Log data into a farm/field 1 3 2 4
- Page 185 and 186:
Start Combining the field 1 3 2 Cli
- Page 187 and 188:
Put the SD-card in the computer or
- Page 189 and 190:
1 4. In case the Farmer is not corr
- Page 191 and 192:
1 2 191
- Page 193 and 194:
Use The Printer with the Yield Moni
- Page 195 and 196:
Verify the Setup for Printing 1 3 S
- Page 197 and 198:
Right click on harvest for the corr
- Page 199 and 200:
click on the field Click on harvest
- Page 201 and 202:
So now, the yield goes over the bou
- Page 203 and 204:
1. Choose “Attribute(Yield mass (
- Page 205:
1. Click lower 3
- Page 208 and 209:
1 2 208
- Page 210 and 211:
1 2. Check 4 5 6 3 210 7
- Page 212 and 213:
212 1: Do not change
- Page 214 and 215:
2 6 3: Just verify 5 214 7
- Page 216 and 217:
216 PFS Lesson 23: Problem: The sha
- Page 218 and 219:
WGS84 and the UTM zone See also Tut
- Page 220 and 221:
Menu, Analysis, Analysis Wizard 1 3
- Page 222 and 223:
1 4 2 3 222
- Page 224 and 225:
224
- Page 226 and 227:
226 Store this map in ―NO YEAR‖
- Page 228 and 229:
Assumptions In this example we will
- Page 230 and 231:
230 Soil texture map. (How to creat
- Page 232 and 233:
1 4 2 5 6 3 7 232
- Page 234 and 235:
234 1
- Page 236 and 237:
2 3 4 236
- Page 238 and 239:
2 3 4 238
- Page 240 and 241:
1 2 3 4 5 240
- Page 242 and 243:
1 2 3 6 7 242
- Page 244 and 245:
1 2 3 4 4 5 244
- Page 246 and 247:
1 2 3 4 246
- Page 248 and 249:
248 Export to DISPLAY: ―TOOLS,
- Page 250 and 251:
250 To start, go to Analysis, and B
- Page 252 and 253:
252 (Optional) You can create a cus
- Page 254 and 255:
254 Select the type of report to ru
- Page 256 and 257:
256 Apply any custom settings that
- Page 258 and 259:
258 Select the custom map layout th
- Page 260 and 261:
260 We have no setup a Booklet: 1 G
- Page 262 and 263:
262 Select the Year, Grower, Farm,
- Page 264 and 265:
264
- Page 266 and 267:
3 1 2 266
- Page 268 and 269:
1 2 268
- Page 270 and 271:
270 2
- Page 272 and 273:
2: give a clear name 1 3 272
- Page 274 and 275:
274 1
- Page 276 and 277:
Can I export my field reports resul
- Page 278 and 279:
Can I TEST my D-GPS mapping system.
- Page 280 and 281:
1. Click Right Mouse 2. Select
- Page 282 and 283:
2 1. uncheck
- Page 284 and 285:
Management tree
- Page 286 and 287:
Recording obstacles
- Page 288 and 289:
Recording swaths
- Page 290 and 291:
Trip data Note: only for tractors c
- Page 292 and 293:
Use the accessories. Set Crop densi
- Page 294 and 295:
Click here 1° Position combine on
- Page 296 and 297:
296 PFS Lesson 34: Working with PFS
- Page 298 and 299:
2 4 5 7 1 6 3
- Page 300 and 301:
1 2
- Page 302 and 303:
Step 3: Make sure you can MAP fuel
- Page 305 and 306:
Step 4: Make the report 1 2
- Page 307 and 308:
2 3 5 1 4 6
- Page 310 and 311:
310 PFS Lesson 35: Can I use my EZ5
- Page 312 and 313:
On the side of the EZ500 Add also t
- Page 314 and 315:
2 1 3 4
- Page 316 and 317:
In the IntelliView III 11 Change if
- Page 318 and 319:
Build a PF-run screen Create a grow
- Page 320 and 321:
Test the system Record a boundary C
- Page 322 and 323:
Click on the load: click right mous
- Page 324 and 325:
Check if map is OK 1° 2°
- Page 326 and 327:
Conclusion •If all checks are OK
- Page 328 and 329:
328 Traced boundary are is the boun
- Page 330 and 331:
330 2°
- Page 332 and 333:
1° 2° 332