

Woodworking Magazine, Spring 2004 - Popular Woodworking ...
Woodworking Magazine, Spring 2004 - Popular Woodworking ...
Woodworking Magazine, Spring 2004 - Popular Woodworking ...

Create successful ePaper yourself
Turn your PDF publications into a flip-book with our unique Google optimized e-Paper software.
Routers Aren’t for Everything<br />
The router table was my first choice for a couple<br />
of reasons: Router cuts are exceptionally clean<br />
and maintaining the squareness of the joint’s<br />
shoulders is no problem.<br />
But after cutting a lot of rabbets on my router<br />
table, I concluded that routers are not the best<br />
choice for all-around casework rabbeting. It sounds<br />
like blasphemy, but here’s what I concluded: Most<br />
routers actually are quite underpowered for the<br />
job, so you end up cutting your projects’ joints<br />
in small, time-consuming nibbles.<br />
A1 1 ⁄ 2-horsepower router does not deliver the<br />
same sustainable torque that a 1 1 ⁄ 2-hp contractor<br />
saw does (no matter what the tool’s label or packaging<br />
says). Part of the problem is marketing hype<br />
among the router manufacturers, and part of<br />
the problem is in the way a universal router motor<br />
is built compared to a traditional induction motor<br />
on a contractor saw. The bottom line is this: Ask<br />
a typical router to hog out a 3 ⁄ 4"-wide x 3 ⁄ 8"-<br />
deep rabbet in one pass and it will bog down or<br />
even stall in the cut.<br />
A router also is noisier than a table saw, and<br />
large cabinet pieces become unwieldy when you<br />
try to maneuver them on the router table. You<br />
could cut smaller rabbets on small pieces on<br />
the router table (drawers are about the right scale<br />
for most router tables). But here’s how I feel about<br />
that: Learn the rabbeting process on one machine<br />
and then do it over and over the same way so you<br />
become an expert at that process. Jumping around<br />
from technique to technique will only slow your<br />
progress as you learn the subtleties of each.<br />
Some people use their jointer and its rabbeting<br />
ledge to cut this joint. The jointer is a powerful<br />
machine, and this technique actually works<br />
pretty well for narrow stock such as face frames<br />
and door parts. But try to rabbet the end of a<br />
30" x 20" cabinet side and you’ll see why this<br />
isn’t the way most people prefer to cut rabbets.<br />
So I went back to the table saw, which has guts<br />
galore and a big table, to see if I could find a different<br />
way to skin this wily animal.<br />
Single Setup with Stack Dado Set<br />
One nice thing about making a rabbet on the router<br />
table is that you can (within reason) do it with a<br />
single tool setup. You can control the width and<br />
depth of the joint simultaneously, tweaking the<br />
height of the bit and the fence (which exposes the<br />
tooling) until the joint is just right.<br />
To do this same thing on the table saw you<br />
need two things: a stack dado set and a long length<br />
of plywood you can clamp over the working surface<br />
of your rip fence. The wood allows you to<br />
“bury” the dado stack in the fence so it will work<br />
like the fence on a router table.<br />
This accessory fence should be straight, at<br />
least 1 ⁄ 2" thick and as long as the table saw’s rip<br />
fence. Plywood is a logical choice of material because<br />
it doesn’t tend to warp.<br />
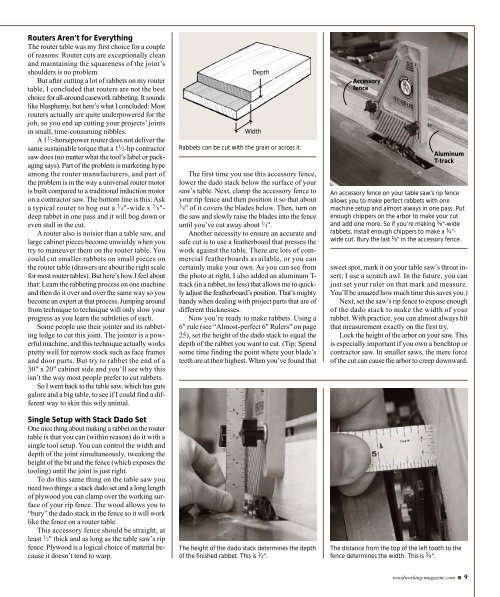
Depth<br />
Width<br />
Rabbets can be cut with the grain or across it.<br />
The first time you use this accessory fence,<br />
lower the dado stack below the surface of your<br />
saw’s table. Next, clamp the accessory fence to<br />
your rip fence and then position it so that about<br />
1 ⁄ 8" of it covers the blades below. Then, turn on<br />
the saw and slowly raise the blades into the fence<br />
until you’ve cut away about 1 ⁄ 4".<br />
Another necessity to ensure an accurate and<br />
safe cut is to use a featherboard that presses the<br />
work against the table. There are lots of commercial<br />
featherboards available, or you can<br />
certainly make your own. As you can see from<br />
the photo at right, I also added an aluminum T-<br />
track (in a rabbet, no less) that allows me to quickly<br />
adjust the featherboard’s position. That’s mighty<br />
handy when dealing with project parts that are of<br />
different thicknesses.<br />
Now you’re ready to make rabbets. Using a<br />
6" rule (see “Almost-perfect 6" Rulers” on page<br />
25), set the height of the dado stack to equal the<br />
depth of the rabbet you want to cut. (Tip: Spend<br />
some time finding the point where your blade’s<br />
teeth are at their highest. When you’ve found that<br />
The height of the dado stack determines the depth<br />
of the finished rabbet. This is 1 ⁄ 2".<br />
Accessory<br />
fence<br />
Aluminum<br />
T-track<br />
An accessory fence on your table saw’s rip fence<br />
allows you to make perfect rabbets with one<br />
machine setup and almost always in one pass. Put<br />
enough chippers on the arbor to make your cut<br />
and add one more. So if you’re making 5 ⁄ 8"-wide<br />
rabbets, install enough chippers to make a 3 ⁄ 4"-<br />
wide cut. Bury the last 1 ⁄ 8" in the accessory fence.<br />
sweet spot, mark it on your table saw’s throat insert;<br />
I use a scratch awl. In the future, you can<br />
just set your ruler on that mark and measure.<br />
You’ll be amazed how much time this saves you.)<br />
Next, set the saw’s rip fence to expose enough<br />
of the dado stack to make the width of your<br />
rabbet. With practice, you can almost always hit<br />
that measurement exactly on the first try.<br />
Lock the height of the arbor on your saw. This<br />
is especially important if you own a benchtop or<br />
contractor saw. In smaller saws, the mere force<br />
of the cut can cause the arbor to creep downward.<br />
The distance from the top of the left tooth to the<br />
fence determines the width. This is 3 ⁄ 4".<br />
woodworking-magazine.com ■ 9


