

Woodworking Magazine, Spring 2004 - Popular Woodworking ...
Woodworking Magazine, Spring 2004 - Popular Woodworking ...
Woodworking Magazine, Spring 2004 - Popular Woodworking ...

You also want an ePaper? Increase the reach of your titles
YUMPU automatically turns print PDFs into web optimized ePapers that Google loves.
Making a Strong Case<br />
Once you select your boards and joint and plane<br />
them down to the correct thickness, you should<br />
mill all the parts for the carcase. Joint one long<br />
edge of each board, rip them to width and then<br />
crosscut them to finished length. Leave the door<br />
parts and frame stiles long for now – you will cut<br />
them to fit the assembled carcase.<br />
The first joints to cut with this project are the<br />
three rabbets in each side piece. Set up your table<br />
saw to cut a 3 ⁄ 4"-wide x 1 ⁄ 4"-deep rabbet using the<br />
instructions provided in “Cut Accurate and Clean<br />
Rabbets.” Make a test cut in some scrap that’s<br />
the same thickness as your sides. Check your<br />
work with a square and some care. If this joint<br />
does not have a dead-on 90° corner, your carcase<br />
won’t have one either. If it is square, check the<br />
dimension of the rabbet using a dial caliper. This<br />
might sound like overkill, but it’s not. Here’s why:<br />
If this joint is just a little off, then all the joints<br />
that follow it will have to compensate for this<br />
small error – especially when you start building<br />
the door and fitting it to the case. Small errors like<br />
this tend to add up during the course of a project.<br />
When you’re satisfied with the setup of your<br />
dado stack and rip fence, lock the height of the<br />
arbor. This is important for a couple of reasons.<br />
With some less-expensive table saws, you can<br />
actually force the arbor to creep downward<br />
during a cut with a dado stack. I’ve seen it happen<br />
– your dado will look like a ramp for skateboarders<br />
instead of a properly made joint. Also,<br />
you will be keeping this exact height for the next<br />
two joinery operations, so locking in your setting<br />
is a good idea. With your saw set, cut this rabbet<br />
on the ends of the two side pieces. This joint holds<br />
the top and bottom of the case in place.<br />
Next, cut the rabbet in the sides that will hold<br />
the back panel. To create this rabbet, you need<br />
only adjust your rip fence to make a 1 ⁄ 2"-wide x<br />
1 ⁄ 4"-deep rabbet and cut that rabbet on the long<br />
back edge of each side piece.<br />
After that, cut the dados in the side pieces that<br />
will hold the two 1 ⁄ 2"-thick shelves in place. To<br />
make your life easier, make sure you do not change<br />
the height of the dado stack you just used to cut<br />
the rabbets. Remove the dado stack from the arbor<br />
and install the correct number of wings, chippers<br />
and shims to produce a perfect 1 ⁄ 2"-wide dado.<br />
The dados for the shelves are 1 ⁄ 4" deep. By<br />
leaving the height of the blades alone, you ensure<br />
that the shelves, top and bottom will keep<br />
your case square. If you change the height of the<br />
blades even a tiny bit before cutting the dados,<br />
one of two bad things will happen. If your cut is<br />
too deep, your shelves won’t seat all the way down<br />
into the bottoms of the dados without some extraordinary<br />
clamping pressure. (If you manage<br />
to close this joint, your carcase will end up with<br />
an hourglass shape and the rabbets at the top and<br />
bottom will be gappy and weak.) If your dado cut<br />
is too shallow, the shelves will cause the sides to<br />
bulge out in the center and the rabbets at the top<br />
and bottom will be gappy, unattractive and weak.<br />
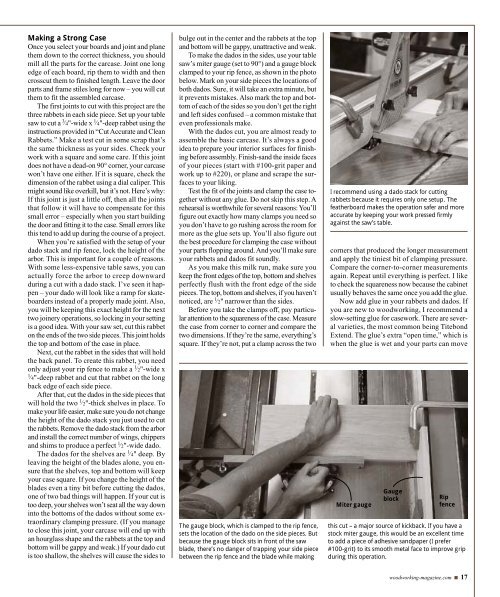
To make the dados in the sides, use your table<br />
saw’s miter gauge (set to 90°) and a gauge block<br />
clamped to your rip fence, as shown in the photo<br />
below. Mark on your side pieces the locations of<br />
both dados. Sure, it will take an extra minute, but<br />
it prevents mistakes. Also mark the top and bottom<br />
of each of the sides so you don’t get the right<br />
and left sides confused – a common mistake that<br />
even professionals make.<br />
With the dados cut, you are almost ready to<br />
assemble the basic carcase. It’s always a good<br />
idea to prepare your interior surfaces for finishing<br />
before assembly. Finish-sand the inside faces<br />
of your pieces (start with #100-grit paper and<br />
work up to #220), or plane and scrape the surfaces<br />
to your liking.<br />
Test the fit of the joints and clamp the case together<br />
without any glue. Do not skip this step. A<br />
rehearsal is worthwhile for several reasons: You’ll<br />
figure out exactly how many clamps you need so<br />
you don’t have to go rushing across the room for<br />
more as the glue sets up. You’ll also figure out<br />
the best procedure for clamping the case without<br />
your parts flopping around. And you’ll make sure<br />
your rabbets and dados fit soundly.<br />
As you make this milk run, make sure you<br />
keep the front edges of the top, bottom and shelves<br />
perfectly flush with the front edge of the side<br />
pieces. The top, bottom and shelves, if you haven’t<br />
noticed, are 1 ⁄ 2" narrower than the sides.<br />
Before you take the clamps off, pay particular<br />
attention to the squareness of the case. Measure<br />
the case from corner to corner and compare the<br />
two dimensions. If they’re the same, everything’s<br />
square. If they’re not, put a clamp across the two<br />
The gauge block, which is clamped to the rip fence,<br />
sets the location of the dado on the side pieces. But<br />
because the gauge block sits in front of the saw<br />
blade, there’s no danger of trapping your side piece<br />
between the rip fence and the blade while making<br />
I recommend using a dado stack for cutting<br />
rabbets because it requires only one setup. The<br />
featherboard makes the operation safer and more<br />
accurate by keeping your work pressed firmly<br />
against the saw’s table.<br />
corners that produced the longer measurement<br />
and apply the tiniest bit of clamping pressure.<br />
Compare the corner-to-corner measurements<br />
again. Repeat until everything is perfect. I like<br />
to check the squareness now because the cabinet<br />
usually behaves the same once you add the glue.<br />
Now add glue in your rabbets and dados. If<br />
you are new to woodworking, I recommend a<br />
slow-setting glue for casework. There are several<br />
varieties, the most common being Titebond<br />
Extend. The glue’s extra “open time,” which is<br />
when the glue is wet and your parts can move<br />
Miter gauge<br />
Gauge<br />
block<br />
Rip<br />
fence<br />
this cut – a major source of kickback. If you have a<br />
stock miter gauge, this would be an excellent time<br />
to add a piece of adhesive sandpaper (I prefer<br />
#100-grit) to its smooth metal face to improve grip<br />
during this operation.<br />
woodworking-magazine.com ■ 17


