

Woodworking Magazine, Spring 2004 - Popular Woodworking ...
Woodworking Magazine, Spring 2004 - Popular Woodworking ...
Woodworking Magazine, Spring 2004 - Popular Woodworking ...

Create successful ePaper yourself
Turn your PDF publications into a flip-book with our unique Google optimized e-Paper software.
Understanding Wipe-on Finishes<br />
The moment of truth for many projects comes<br />
long after the shop is cleaned, the tools are put<br />
away and the work is sanded. Applying a finish<br />
stops many woodworkers dead in their tracks.<br />
Finishing is the chore almost all woodworkers<br />
fear most because it has the greatest potential<br />
for spoiling the project. So it’s only natural that<br />
woodworkers would seek a risk-free finish. For<br />
this reason, many choose a finish that’s wiped<br />
on. Finishing manufacturers have capitalized on<br />
this fear and have developed rag-on finishes –<br />
that’s the good news about many products today.<br />
The bad news is that the finishes you find on<br />
the shelves at your home centers have similar<br />
names but aren’t alike – and you can’t figure out<br />
what each one does by simply reading the can.<br />
This is what they all have in common: You<br />
wipe them on, allow them to dry and then add<br />
more coats for additional protection.<br />
But the real questions for us are: Just how<br />
many coats do you need And how much protection<br />
can you expect To get these answers you<br />
first have to have some knowledge of the finishing<br />
product’s contents. Because the actual contents<br />
aren’t listed on most products and the names<br />
can’t always be trusted, you can do a simple test<br />
at home to get some answers.<br />
With the exception of pure oil finishes (such<br />
as boiled linseed oil) most wiping finishes are either<br />
a varnish that’s thinned with a reducer (like<br />
paint thinner or mineral spirits) or a combination<br />
of oil and varnish. To see which one you have,<br />
pour a small amount on a hard surface like glass<br />
or metal to form a small puddle. Let the puddle<br />
dry for a couple of days. If the puddle dries<br />
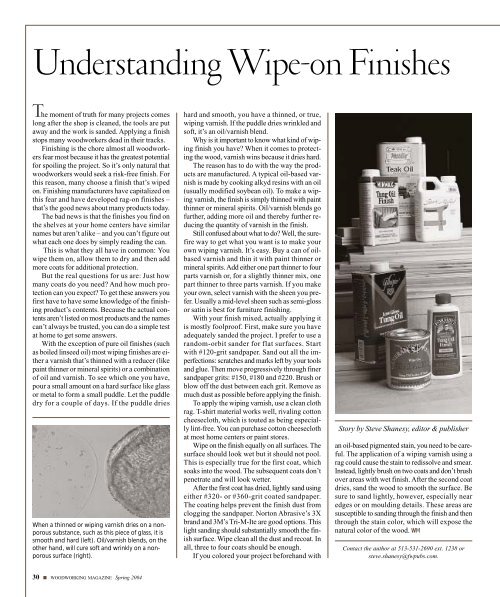
When a thinned or wiping varnish dries on a nonporous<br />
substance, such as this piece of glass, it is<br />
smooth and hard (left). Oil/varnish blends, on the<br />
other hand, will cure soft and wrinkly on a nonporous<br />
surface (right).<br />
hard and smooth, you have a thinned, or true,<br />
wiping varnish. If the puddle dries wrinkled and<br />
soft, it’s an oil/varnish blend.<br />
Why is it important to know what kind of wiping<br />
finish you have When it comes to protecting<br />
the wood, varnish wins because it dries hard.<br />
The reason has to do with the way the products<br />
are manufactured. A typical oil-based varnish<br />
is made by cooking alkyd resins with an oil<br />
(usually modified soybean oil). To make a wiping<br />
varnish, the finish is simply thinned with paint<br />
thinner or mineral spirits. Oil/varnish blends go<br />
further, adding more oil and thereby further reducing<br />
the quantity of varnish in the finish.<br />
Still confused about what to do Well, the surefire<br />
way to get what you want is to make your<br />
own wiping varnish. It’s easy. Buy a can of oilbased<br />
varnish and thin it with paint thinner or<br />
mineral spirits. Add either one part thinner to four<br />
parts varnish or, for a slightly thinner mix, one<br />
part thinner to three parts varnish. If you make<br />
your own, select varnish with the sheen you prefer.<br />
Usually a mid-level sheen such as semi-gloss<br />
or satin is best for furniture finishing.<br />
With your finish mixed, actually applying it<br />
is mostly foolproof. First, make sure you have<br />
adequately sanded the project. I prefer to use a<br />
random-orbit sander for flat surfaces. Start<br />
with #120-grit sandpaper. Sand out all the imperfections:<br />
scratches and marks left by your tools<br />
and glue. Then move progressively through finer<br />
sandpaper grits: #150, #180 and #220. Brush or<br />
blow off the dust between each grit. Remove as<br />
much dust as possible before applying the finish.<br />
To apply the wiping varnish, use a clean cloth<br />
rag. T-shirt material works well, rivaling cotton<br />
cheesecloth, which is touted as being especially<br />
lint-free. You can purchase cotton cheesecloth<br />
at most home centers or paint stores.<br />
Wipe on the finish equally on all surfaces. The<br />
surface should look wet but it should not pool.<br />
This is especially true for the first coat, which<br />
soaks into the wood. The subsequent coats don’t<br />
penetrate and will look wetter.<br />
After the first coat has dried, lightly sand using<br />
either #320- or #360-grit coated sandpaper.<br />
The coating helps prevent the finish dust from<br />
clogging the sandpaper. Norton Abrasive’s 3X<br />
brand and 3M’s Tri-M-Ite are good options. This<br />
light sanding should substantially smooth the finish<br />
surface. Wipe clean all the dust and recoat. In<br />
all, three to four coats should be enough.<br />
If you colored your project beforehand with<br />
Story by Steve Shanesy, editor & publisher<br />
an oil-based pigmented stain, you need to be careful.<br />
The application of a wiping varnish using a<br />
rag could cause the stain to redissolve and smear.<br />
Instead, lightly brush on two coats and don’t brush<br />
over areas with wet finish. After the second coat<br />
dries, sand the wood to smooth the surface. Be<br />
sure to sand lightly, however, especially near<br />
edges or on moulding details. These areas are<br />
susceptible to sanding through the finish and then<br />
through the stain color, which will expose the<br />
natural color of the wood. WM<br />
Contact the author at 513-531-2690 ext. 1238 or<br />
steve.shanesy@fwpubs.com.<br />
30 ■ WOODWORKING MAGAZINE <strong>Spring</strong> <strong>2004</strong>


