

Woodworking Magazine, Spring 2004 - Popular Woodworking ...
Woodworking Magazine, Spring 2004 - Popular Woodworking ...
Woodworking Magazine, Spring 2004 - Popular Woodworking ...

You also want an ePaper? Increase the reach of your titles
YUMPU automatically turns print PDFs into web optimized ePapers that Google loves.
Shortcuts<br />
Handy Drill Storage<br />
I don’t know about other woodworkers, but I really<br />
appreciate having my drills, corded and cordless,<br />
at hand and ready to use. I solved this by<br />
mounting a ready-made “scabbard” on the wall<br />
right over my bench where most of the drilling<br />
takes place. Just be sure to air it out first.<br />
Albert Beale<br />
Littleriver, California<br />
Handle of drill is<br />
easy to access<br />
Mount shoe<br />
to wall<br />
Cutting<br />
line<br />
Relief cuts<br />
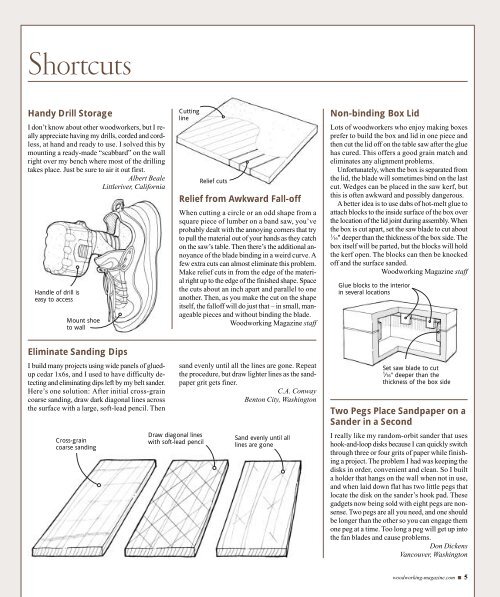
Relief from Awkward Fall-off<br />
When cutting a circle or an odd shape from a<br />
square piece of lumber on a band saw, you’ve<br />
probably dealt with the annoying corners that try<br />
to pull the material out of your hands as they catch<br />
on the saw’s table. Then there’s the additional annoyance<br />
of the blade binding in a weird curve. A<br />
few extra cuts can almost eliminate this problem.<br />
Make relief cuts in from the edge of the material<br />
right up to the edge of the finished shape. Space<br />
the cuts about an inch apart and parallel to one<br />
another. Then, as you make the cut on the shape<br />
itself, the falloff will do just that – in small, manageable<br />
pieces and without binding the blade.<br />
<strong>Woodworking</strong> <strong>Magazine</strong> staff<br />
Non-binding Box Lid<br />
Lots of woodworkers who enjoy making boxes<br />
prefer to build the box and lid in one piece and<br />
then cut the lid off on the table saw after the glue<br />
has cured. This offers a good grain match and<br />
eliminates any alignment problems.<br />
Unfortunately, when the box is separated from<br />
the lid, the blade will sometimes bind on the last<br />
cut. Wedges can be placed in the saw kerf, but<br />
this is often awkward and possibly dangerous.<br />
A better idea is to use dabs of hot-melt glue to<br />
attach blocks to the inside surface of the box over<br />
the location of the lid joint during assembly. When<br />
the box is cut apart, set the saw blade to cut about<br />
1<br />
⁄16" deeper than the thickness of the box side. The<br />
box itself will be parted, but the blocks will hold<br />
the kerf open. The blocks can then be knocked<br />
off and the surface sanded.<br />
<strong>Woodworking</strong> <strong>Magazine</strong> staff<br />
Glue blocks to the interior<br />
in several locations<br />
Eliminate Sanding Dips<br />
I build many projects using wide panels of gluedup<br />
cedar 1x6s, and I used to have difficulty detecting<br />
and eliminating dips left by my belt sander.<br />
Here’s one solution: After initial cross-grain<br />
coarse sanding, draw dark diagonal lines across<br />
the surface with a large, soft-lead pencil. Then<br />
Cross-grain<br />
coarse sanding<br />
Draw diagonal lines<br />
with soft-lead pencil<br />
sand evenly until all the lines are gone. Repeat<br />
the procedure, but draw lighter lines as the sandpaper<br />
grit gets finer.<br />
C.A. Conway<br />
Benton City, Washington<br />
Sand evenly until all<br />
lines are gone<br />
Set saw blade to cut<br />
1 ⁄16" deeper than the<br />
thickness of the box side<br />
Two Pegs Place Sandpaper on a<br />
Sander in a Second<br />
I really like my random-orbit sander that uses<br />
hook-and-loop disks because I can quickly switch<br />
through three or four grits of paper while finishing<br />
a project. The problem I had was keeping the<br />
disks in order, convenient and clean. So I built<br />
a holder that hangs on the wall when not in use,<br />
and when laid down flat has two little pegs that<br />
locate the disk on the sander’s hook pad. These<br />
gadgets now being sold with eight pegs are nonsense.<br />
Two pegs are all you need, and one should<br />
be longer than the other so you can engage them<br />
one peg at a time. Too long a peg will get up into<br />
the fan blades and cause problems.<br />
Don Dickens<br />
Vancouver, Washington<br />
woodworking-magazine.com ■ 5


