

Woodworking Magazine, Spring 2004 - Popular Woodworking ...
Woodworking Magazine, Spring 2004 - Popular Woodworking ...
Woodworking Magazine, Spring 2004 - Popular Woodworking ...

Create successful ePaper yourself
Turn your PDF publications into a flip-book with our unique Google optimized e-Paper software.
correct length. Test the fit in the door’s opening<br />
and fine-tune things until the door has a perfectly<br />
consistent gap all around. You can use a table<br />
saw to do this, but I prefer a hand plane because<br />
I mess things up in a much slower fashion<br />
than with a power tool. Once your door fits, you<br />
can tweak its position in its opening if you use<br />
the hinges we recommend in the Supplies box<br />
below. Add the knob of your choice and a catch<br />
(the magnetic ones are the easiest to install).<br />
More Notches in Your Back<br />
As I designed this project, I tried different ways<br />
to make it so the back was not one piece of 17 1 ⁄ 2"-<br />
wide solid wood. The solutions were more complex<br />
than I liked or they didn’t look right, so I decided<br />
to stick with the original wide back.<br />
To make this work, I first had to calculate how<br />
much the back would expand and contract in a<br />
typical Midwestern environment (which has some<br />
pretty radical humidity fluctuations, I can tell<br />
you). Using the formulas in R. Bruce Hoadley’s<br />
“Understanding Wood” (Taunton Press), I figured<br />
out how much movement to expect. According<br />
to Hoadley’s formulas, the panel will expand<br />
about 1 ⁄ 8" when the humidity fluctuates between<br />
8 percent and 14 percent. This is a reasonable<br />
range to expect in our climate.<br />
So now you need to measure the space between<br />
the two rabbets on the backside of your assembled<br />
carcase. It should measure 17". So the<br />
lower part of the back piece should measure 16 7 ⁄ 8"<br />
wide. That’s simple enough. The real difficulty<br />
comes when dealing with the curvy top part of<br />
the back. It’s 17 1 ⁄ 2" wide. That extra width overhangs<br />
the top of the cabinet. Once again this means<br />
you have to create a stopped notch on the two<br />
long edges of the back.<br />
The simplest procedure is to use the same trick<br />
you used for creating the notch on the top piece:<br />
Gluing small pieces on the back to make a notch.<br />
And that’s a fine way to do it as long as you pay<br />
close attention to matching the grain. This is a<br />
very visible part of the cabinet.<br />
Make your back piece a bit wider to start with:<br />
18" is about right. Rip two strips off each long<br />
edge so the back ends up 16 7 ⁄ 8" wide. Keep track<br />
of which edge each strip came from because that<br />
will make it easier to match the grain when regluing<br />
the blocks in place. Now take those narrow<br />
strips and crosscut 5" off the top of each. Reglue<br />
these blocks to the back.<br />
After the glue dries, mark the curvy shape<br />
on the back and cut to that line. Aband saw, scroll<br />
saw or coping saw will do. Just make sure it’s a<br />
fine-tooth blade. Clean up the rough saw-cut edges<br />
with sandpaper, files or a spokeshave. Then drill<br />
the 1 1 ⁄ 4"-diameter hanging hole in the location<br />
shown in the drawing. Finish-sand your back.<br />
Attaching the back is easy if you pay attention<br />
to the issue of wood movement. The back is<br />
attached by screwing through it into the top and<br />
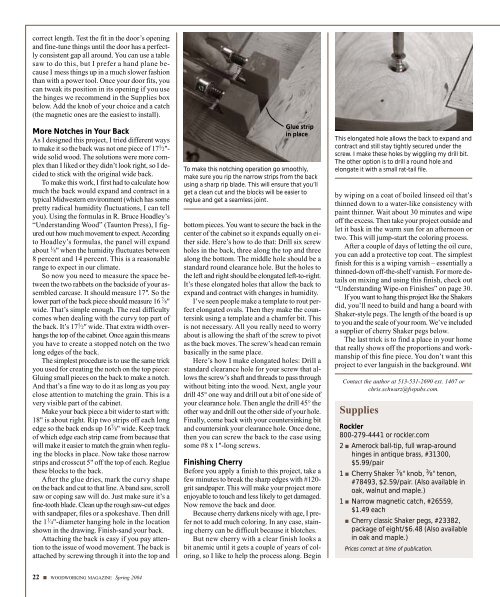
Glue strip<br />
in place<br />
To make this notching operation go smoothly,<br />
make sure you rip the narrow strips from the back<br />
using a sharp rip blade. This will ensure that you’ll<br />
get a clean cut and the blocks will be easier to<br />
reglue and get a seamless joint.<br />
bottom pieces. You want to secure the back in the<br />
center of the cabinet so it expands equally on either<br />
side. Here’s how to do that: Drill six screw<br />
holes in the back, three along the top and three<br />
along the bottom. The middle hole should be a<br />
standard round clearance hole. But the holes to<br />
the left and right should be elongated left-to-right.<br />
It’s these elongated holes that allow the back to<br />
expand and contract with changes in humidity.<br />
I’ve seen people make a template to rout perfect<br />
elongated ovals. Then they make the countersink<br />
using a template and a chamfer bit. This<br />
is not necessary. All you really need to worry<br />
about is allowing the shaft of the screw to pivot<br />
as the back moves. The screw’s head can remain<br />
basically in the same place.<br />
Here’s how I make elongated holes: Drill a<br />
standard clearance hole for your screw that allows<br />
the screw’s shaft and threads to pass through<br />
without biting into the wood. Next, angle your<br />
drill 45° one way and drill out a bit of one side of<br />
your clearance hole. Then angle the drill 45° the<br />
other way and drill out the other side of your hole.<br />
Finally, come back with your countersinking bit<br />
and countersink your clearance hole. Once done,<br />
then you can screw the back to the case using<br />
some #8 x 1"-long screws.<br />
Finishing Cherry<br />
Before you apply a finish to this project, take a<br />
few minutes to break the sharp edges with #120-<br />
grit sandpaper. This will make your project more<br />
enjoyable to touch and less likely to get damaged.<br />
Now remove the back and door.<br />
Because cherry darkens nicely with age, I prefer<br />
not to add much coloring. In any case, staining<br />
cherry can be difficult because it blotches.<br />
But new cherry with a clear finish looks a<br />
bit anemic until it gets a couple of years of coloring,<br />
so I like to help the process along. Begin<br />
This elongated hole allows the back to expand and<br />
contract and still stay tightly secured under the<br />
screw. I make these holes by wiggling my drill bit.<br />
The other option is to drill a round hole and<br />
elongate it with a small rat-tail file.<br />
by wiping on a coat of boiled linseed oil that’s<br />
thinned down to a water-like consistency with<br />
paint thinner. Wait about 30 minutes and wipe<br />
off the excess. Then take your project outside and<br />
let it bask in the warm sun for an afternoon or<br />
two. This will jump-start the coloring process.<br />
After a couple of days of letting the oil cure,<br />
you can add a protective top coat. The simplest<br />
finish for this is a wiping varnish – essentially a<br />
thinned-down off-the-shelf varnish. For more details<br />
on mixing and using this finish, check out<br />
“Understanding Wipe-on Finishes” on page 30.<br />
If you want to hang this project like the Shakers<br />
did, you’ll need to build and hang a board with<br />
Shaker-style pegs. The length of the board is up<br />
to you and the scale of your room. We’ve included<br />
a supplier of cherry Shaker pegs below.<br />
The last trick is to find a place in your home<br />
that really shows off the proportions and workmanship<br />
of this fine piece. You don’t want this<br />
project to ever languish in the background. WM<br />
Contact the author at 513-531-2690 ext. 1407 or<br />
chris.schwarz@fwpubs.com.<br />
Supplies<br />
Rockler<br />
800-279-4441 or rockler.com<br />
2 ■ Amerock ball-tip, full wrap-around<br />
hinges in antique brass, #31300,<br />
$5.99/pair<br />
1 ■ Cherry Shaker 7 ⁄ 8" knob, 3 ⁄ 8" tenon,<br />
#78493, $2.59/pair. (Also available in<br />
oak, walnut and maple.)<br />
1 ■ Narrow magnetic catch, #26559,<br />
$1.49 each<br />
■ Cherry classic Shaker pegs, #23382,<br />
package of eight/$6.48 (Also available<br />
in oak and maple.)<br />
Prices correct at time of publication.<br />
22 ■ WOODWORKING MAGAZINE <strong>Spring</strong> <strong>2004</strong>


