

Woodworking Magazine, Spring 2004 - Popular Woodworking ...
Woodworking Magazine, Spring 2004 - Popular Woodworking ...
Woodworking Magazine, Spring 2004 - Popular Woodworking ...

You also want an ePaper? Increase the reach of your titles
YUMPU automatically turns print PDFs into web optimized ePapers that Google loves.
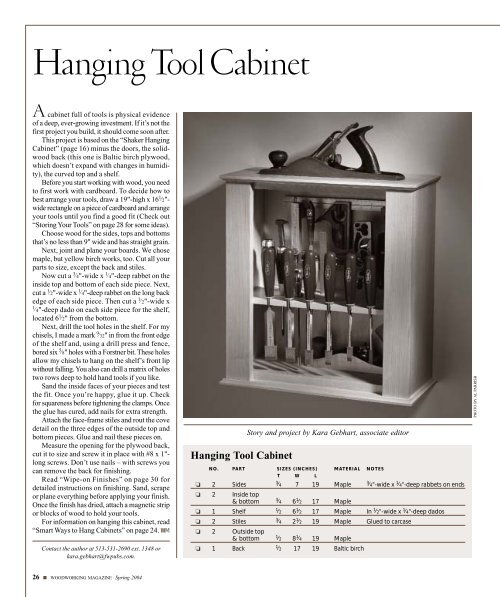
Hanging Tool Cabinet<br />
A cabinet full of tools is physical evidence<br />
of a deep, ever-growing investment. If it’s not the<br />
first project you build, it should come soon after.<br />
This project is based on the “Shaker Hanging<br />
Cabinet” (page 16) minus the doors, the solidwood<br />
back (this one is Baltic birch plywood,<br />
which doesn’t expand with changes in humidity),<br />
the curved top and a shelf.<br />
Before you start working with wood, you need<br />
to first work with cardboard. To decide how to<br />
best arrange your tools, draw a 19"-high x 16 1 ⁄ 2"-<br />
wide rectangle on a piece of cardboard and arrange<br />
your tools until you find a good fit (Check out<br />
“Storing Your Tools” on page 28 for some ideas).<br />
Choose wood for the sides, tops and bottoms<br />
that’s no less than 9" wide and has straight grain.<br />
Next, joint and plane your boards. We chose<br />
maple, but yellow birch works, too. Cut all your<br />
parts to size, except the back and stiles.<br />
Now cut a 3 ⁄ 4"-wide x 1 ⁄ 4"-deep rabbet on the<br />
inside top and bottom of each side piece. Next,<br />
cut a 1 ⁄ 2"-wide x 1 ⁄ 4"-deep rabbet on the long back<br />
edge of each side piece. Then cut a 1 ⁄ 2"-wide x<br />
1 ⁄ 4"-deep dado on each side piece for the shelf,<br />
located 6 1 ⁄ 2" from the bottom.<br />
Next, drill the tool holes in the shelf. For my<br />
chisels, I made a mark 9 ⁄ 32" in from the front edge<br />
of the shelf and, using a drill press and fence,<br />
bored six 5 ⁄ 8" holes with a Forstner bit. These holes<br />
allow my chisels to hang on the shelf’s front lip<br />
without falling. You also can drill a matrix of holes<br />
two rows deep to hold hand tools if you like.<br />
Sand the inside faces of your pieces and test<br />
the fit. Once you’re happy, glue it up. Check<br />
for squareness before tightening the clamps. Once<br />
the glue has cured, add nails for extra strength.<br />
Attach the face-frame stiles and rout the cove<br />
detail on the three edges of the outside top and<br />
bottom pieces. Glue and nail these pieces on.<br />
Measure the opening for the plywood back,<br />
cut it to size and screw it in place with #8 x 1"-<br />
long screws. Don’t use nails – with screws you<br />
can remove the back for finishing.<br />
Read “Wipe-on Finishes” on page 30 for<br />
detailed instructions on finishing. Sand, scrape<br />
or plane everything before applying your finish.<br />
Once the finish has dried, attach a magnetic strip<br />
or blocks of wood to hold your tools.<br />
For information on hanging this cabinet, read<br />
“Smart Ways to Hang Cabinets” on page 24. WM<br />
Contact the author at 513-531-2690 ext. 1348 or<br />
kara.gebhart@fwpubs.com.<br />
Hanging Tool Cabinet<br />
Story and project by Kara Gebhart, associate editor<br />
NO. PART SIZES (INCHES) MATERIAL NOTES<br />
T W L<br />
❏ 2 Sides<br />
3 ⁄ 4 7 19 Maple<br />
3 ⁄ 4"-wide x 1 ⁄ 4"-deep rabbets on ends<br />
❏ 2 Inside top<br />
& bottom<br />
3 ⁄ 4 6 1 ⁄ 2 17 Maple<br />
❏ 1 Shelf<br />
❏ 2 Stiles<br />
❏ 2 Outside top<br />
& bottom<br />
❏ 1 Back<br />
1 ⁄ 2 6 1 ⁄ 2 17 Maple In 1 ⁄ 2"-wide x 1 ⁄ 4"-deep dados<br />
3 ⁄ 4 2 1 ⁄ 2 19 Maple Glued to carcase<br />
1 ⁄ 2 8 1 ⁄ 4 19 Maple<br />
1 ⁄ 2 17 19 Baltic birch<br />
PHOTO BY AL PARRISH<br />
26 ■ WOODWORKING MAGAZINE <strong>Spring</strong> <strong>2004</strong>


