

MAINTENANCE MANUAL - Meritor
MAINTENANCE MANUAL - Meritor
MAINTENANCE MANUAL - Meritor

You also want an ePaper? Increase the reach of your titles
YUMPU automatically turns print PDFs into web optimized ePapers that Google loves.
Assembly<br />
C - Apply sealing paste FAG-3 to the thread of<br />
the pinion box setscrews.<br />
D - Install and tighten the washers and setscrews<br />
of the pinion box, with the value specified.<br />
See the TORQUES TABLE. (figure<br />
73 ).<br />
IMPORTANT:<br />
Do not use a hammer to install the fork of<br />
the universal joint, as it can be damaged.<br />
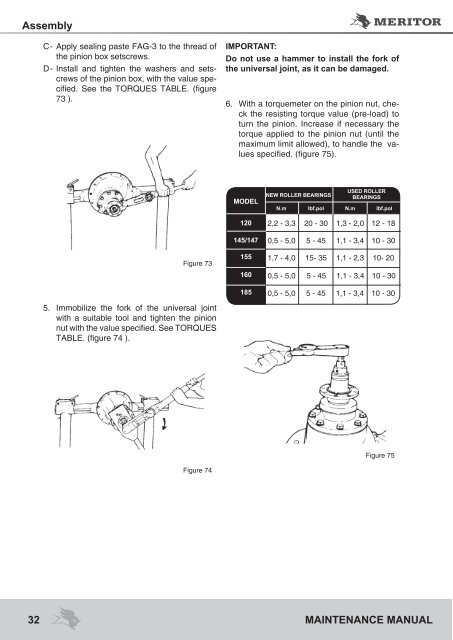
6. With a torquemeter on the pinion nut, check<br />
the resisting torque value (pre-load) to<br />
turn the pinion. Increase if necessary the<br />
torque applied to the pinion nut (until the<br />
maximum limit allowed), to handle the values<br />
specified. (figure 75).<br />
MODEL<br />
USED ROLLER<br />
NEW ROLLER BEARINGS<br />
BEARINGS<br />
N.m lbf.pol N.m lbf.pol<br />
120<br />
2,2 - 3,3<br />
20 - 30<br />
1,3 - 2,0<br />
12 - 18<br />
145/147<br />
0,5 - 5,0<br />
5 - 45<br />
1,1 - 3,4<br />
10 - 30<br />
Figure 73<br />
155<br />
1,7 - 4,0<br />
15- 35 1,1 - 2,3 10- 20<br />
160<br />
0,5 - 5,0<br />
5 - 45 1,1 - 3,4 10 - 30<br />
185<br />
0,5 - 5,0<br />
5 - 45 1,1 - 3,4 10 - 30<br />
5. Immobilize the fork of the universal joint<br />
with a suitable tool and tighten the pinion<br />
nut with the value specified. See TORQUES<br />
TABLE. (figure 74 ).<br />
Figure 75<br />
Figure 74<br />
32 <strong>MAINTENANCE</strong> <strong>MANUAL</strong>


