Acids & Bases: pH Measurements, Titrations and Buffers
Acids & Bases: pH Measurements, Titrations and Buffers
Acids & Bases: pH Measurements, Titrations and Buffers

Create successful ePaper yourself
Turn your PDF publications into a flip-book with our unique Google optimized e-Paper software.
<strong>Acids</strong> & <strong>Bases</strong> I Revised: 4/22/13<br />
ACIDS & BASES, TITRATIONS & BUFFERS<br />
Introduction<br />
In an acid-base titration, the concentration of an analyte (acid or base) is quantitatively<br />
determined by the addition of a known volume of titrant (base or acid, respectively) in the<br />
presence of a good indicator. What is an indicator <strong>and</strong> what makes it good What is the<br />
equivalence point <strong>and</strong> how is it determined How does the strength <strong>and</strong> number of protons on<br />
the acid effect the titration<br />
In this experiment, a strong base, ~0.10 M NaOH will be used to titrate ~0.10 M solution of<br />
acetic acid, HC 2 H 3 O 2 . What are the balanced chemical equation for this neutralization reaction<br />
A titration curve is a plot of <strong>pH</strong> versus volume of titrant. The titrant, ~0.1 M NaOH, will<br />
slowly drip from a buret (solvent reservoir) into the acid solution which contains a computerinterfaced<br />
<strong>pH</strong> electrode. Volume will be recorded by arranging a drop counter beneath the buret<br />
(solvent reservoir) <strong>and</strong> allowing the drops to fall through the “optical path slot” an infrared beam<br />
is interrupted, sending a digital signal to the LabPro interface. The data collection program<br />
records the drops <strong>and</strong> converts them to volume in milliliters.<br />
As base is initially added to acid, a gradual change in <strong>pH</strong> occurs. For a weak acid, this section of<br />
the titration curve is referred to as the buffering region. As base is added <strong>and</strong> reacts with the<br />
acid, a buffer solution forms - a solution of an acid (HA) <strong>and</strong> it’s conjugate base (A - ). Hence, the<br />
gradual change in <strong>pH</strong> – a buffer has formed that is resisting the change. At the midway point of<br />
this region, the concentration of HA equals the concentration of A - . Derivation of the<br />
Henderson-Hasselbach equation demonstrates that the <strong>pH</strong> when [HA] = [A - ] is the pK a of the<br />
weak acid:<br />
A weak acid (HA) dissociates in water according to equation:<br />
(1) HA (aq) + H 2 O(l) D H 3 O + (aq) + A – (aq) K a = [H 3 O + ] [A – ] / [HA]<br />
The acid dissociation constant is algebraically rearranged:<br />
(2) [H 3 O + ] = K a [HA] / [A - ]<br />
Taking the negative log of both sides of equation (2) results in the derivation of the Henderson-<br />
Hasselbach equation for a weak acid:<br />
(3) <strong>pH</strong> = pK a + log ([A – ] / [HA])<br />
If [HA] = [A – ], the ratio [A – ] / [HA] = 1 <strong>and</strong> log (1) is equal to zero simplifying equation 2:<br />
(4) <strong>pH</strong> = pK a (half-way to equivalence point)<br />
At some point most of the acid is reacted away, exhausting the buffer <strong>and</strong> the <strong>pH</strong> begins to<br />
change rapidly. The equivalence point, or stoichiometric point, is the titrant volume <strong>and</strong><br />
solution <strong>pH</strong> when enough titrant has been added to react with all of the analyte present. At this<br />
point the reaction has gone to completion - in other words, only products are present in the flask<br />
below the buret (solvent reservoir). The concentration <strong>and</strong> volume of the titrant at the<br />
equivalence point can be used to determine the moles of titrant needed to stoichiometrically react
<strong>Acids</strong> & <strong>Bases</strong> I Revised: 4/22/13<br />
with the analyte. Therefore, the moles of analyte can be determined by using the mole ratio from<br />
the balanced chemical equation for the reaction between the titrant <strong>and</strong> analyte. Where is the<br />
equivalence point on a titration curve<br />
The equivalence point is the inflection point of a titration curve. As a sigmoidal shaped curve,<br />
the inflection point is where the curvature changes sign (or direction) on a titration curve. Note:<br />
(1) The <strong>pH</strong> of the inflection point can be used to pick an indicator for a titration (then a <strong>pH</strong> probe<br />
wouldn’t be necessary anymore). Also, an indicator can be chosen by calculating the theoretical<br />
<strong>pH</strong> at the equivalence point. (2) Half the volume of base required to reach the equivalence point<br />
is needed to reach the point where [HA] = [A - ] <strong>and</strong> the <strong>pH</strong> = pK a .<br />
An endpoint is the titrant volume <strong>and</strong> solution <strong>pH</strong> at which the indicator changes color.<br />
Endpoints are a property of the indicator being used, not a function of the titrant or analyte. An<br />
indicator is a weak acid that when deprotonated (forming its conjugate base) changes color. The<br />
<strong>pH</strong> range of the color change is around the pK a of the indicator. If the indicator’s color change<br />
occurs at a <strong>pH</strong> near a titration’s equivalence point, the indicator can be used in place of the <strong>pH</strong><br />
probe for a titration. Continuing beyond the equivalence point, when more base has been added<br />
than acid, another buffering region with more gradual changes in <strong>pH</strong> are observed.<br />
The indicator used in this experiment is bromothymol blue (pK a , 7.10). The removal of the “H”<br />
from the acidic form (HIn) results in a change in the conjugation, <strong>and</strong>, therefore, color in the<br />
basic form (In - ).<br />
HO<br />
Br<br />
CH(CH 3 ) 2 CH(CH 3 ) 2<br />
O<br />
Br<br />
CH 3 CH 3<br />
SO - 3<br />
B:<br />
HB<br />
- O<br />
Br<br />
CH(CH 3 ) 2 CH(CH 3 ) 2<br />
O<br />
Br<br />
CH 3 CH 3<br />
SO - 3<br />
O<br />
Br<br />
CH(CH 3 ) 2 CH(CH 3 ) 2<br />
O -<br />
Br<br />
CH 3 CH 3<br />
SO - 3<br />
Yellow, HIn Blue, In -<br />
Bromothymol blue will also be used to show how <strong>pH</strong> can control speciation. Five buffer<br />
solutions ranging from <strong>pH</strong> 1 to 13 will be created. Because bromothymol blue is a weak acid<br />
that changes color when deprotonated, the amount of each species (HIn or In - ) in solution can be<br />
quantified by visible spectroscopy.<br />
In this experiment, you will find out how electrolytic strength <strong>and</strong> number of acid protons effect<br />
the titration curves shape <strong>and</strong> equivalence point <strong>pH</strong>. A strong base (NaOH) will be used to titrate<br />
a weak acid (HC 2 H 3 O 2 ) in the presence of bromothymol blue indicator. The K a of acetic will be<br />
determined. Bromothymol blue’s speciation between acid <strong>and</strong> base form will be investigated by<br />
combining it with buffers of differing <strong>pH</strong>.
<strong>Acids</strong> & <strong>Bases</strong> I Revised: 4/22/13<br />
Safety<br />
<strong>Acids</strong> <strong>and</strong> bases are caustic solutions <strong>and</strong> should be h<strong>and</strong>led with care. If spills occur, wash<br />
affected areas immediately <strong>and</strong> inform your TA or course instructor.<br />
Procedures<br />
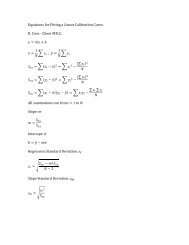
Part A. St<strong>and</strong>ardization & Titration Curves<br />
1. Work in pairs. Set up Vernier <strong>pH</strong> meter <strong>and</strong> drop counter as follows:<br />
Reagent Reservoir<br />
Ring St<strong>and</strong><br />
2-Way Valve<br />
<strong>pH</strong> Sensor<br />
Drop Counter<br />
• Connect the <strong>pH</strong> sensor to CH 1 <strong>and</strong> connect the drop counter to the Dig/Sonic 1 channel<br />
of the LabPro interface. Start Logger Pro on your computer. Select “File”→ “Open”→<br />
“Experiments”→ “Chemistry with Vernier”→ “24b Acid-Base (Drop Count)”.<br />
• Go to the “Experiment” menu, select “Set Up Sensor” → “Show All Interface”. Select<br />
“<strong>pH</strong> Sensor” in the drop down menu for CH 1, <strong>and</strong> select Drop Counter for Dig/Sonic 1.<br />
Close this window after the probes have been recognized.<br />
• Calibrate the <strong>pH</strong> probe: Go to the “Experiment” menu <strong>and</strong> under “Calibrate” choose<br />
the channel with the <strong>pH</strong> probe (ex: “CH1:<strong>pH</strong>”). Choose the Calibration tab in the<br />
window that appears. Click on “Calibrate Now”. Rinse the <strong>pH</strong> meter with copious<br />
amounts of deionized water. Carefully blot dry. Dip the <strong>pH</strong> meter in less than 10 mL of<br />
<strong>pH</strong> 4 buffer. When the voltage reading stabilizes enter the <strong>pH</strong> value of the buffer in the<br />
field beneath “Enter Value”. Repeat the process with <strong>pH</strong> 10 buffer. To check the<br />
calibration, measure the <strong>pH</strong> of <strong>pH</strong> 7 buffer. Click “Done” to complete the calibration<br />
process. This new calibration becomes the current calibration for the sensor. Rinse the<br />
electrode with deionized water <strong>and</strong> then place in a beaker with deionized water.
<strong>Acids</strong> & <strong>Bases</strong> I Revised: 4/22/13<br />
• Adjust the flow rate of the reagent reservoir: Fill the reservoir with titrant (0.10 M<br />
NaOH). Temporarily, place an empty beaker below the spout of the reagent reservoir.<br />
Completely open the bottom 2-way valve; then slowly open the top valve until a very<br />
slow drip rate is achieved – one drop every two seconds or slower. Make sure the drops<br />
are falling between the openings where the sensor is on the drop counter. Now close the<br />
bottom valve. Take care not to move the position of the valve or the reservoir after these<br />
adjustments have been completed.<br />
• Calibrate the Drop Counter: Go to the “Experiment” menu <strong>and</strong> under “Calibrate”<br />
choose the channel with the drop counter (ex: “DIG1:Drop Counter”). Select<br />
“Automatic” in the menu that appears. Place a 10 mL graduated cylinder below the slot<br />
of the drop counter. Make sure the reservoir has at least 10 mL of titrant. Click “Start”.<br />
Open the bottom 2-way valve to begin releasing drops from the reservoir to the Drop<br />
Counter. Continue to release drops until between 4 <strong>and</strong> 5 mL of liquid in the graduated<br />
cylinder. Close the bottom 2-way valve to stop the drops. Enter the precise volume of<br />
liquid in the graduated cylinder in the Volume (mL) box on the screen. Click “OK”. You<br />
are now ready to perform your titration.<br />
3. St<strong>and</strong>ardization. Weigh 0.25 g of KHP <strong>and</strong> record the mass to the nearest milligram. (KHP<br />
is kept in a desiccator to keep it dry, be careful sliding the desiccator lid off <strong>and</strong> make sure<br />
that you put it back on.) In a 125-mL Erlenmeyer flask, dissolve the KHP in ~20 mL of DI<br />
water <strong>and</strong> add 2-3 drops of bromothymol blue indicator. Place the beaker on the stir plate<br />
underneath the spout of the reagent reservoir, add a stir bar, <strong>and</strong> adjust the stirrer to a slow<br />
stirring speed. (The magnetic stirrer may cause the computer monitor to flicker.)<br />
4. Refill the reagent reservoir with 0.10 M NaOH solution.<br />
5. Experiment “24b Acid-Base (Drop Count)” should still be open on your computer. To start<br />
the titration click “Collect” → “Erase <strong>and</strong> Continue”. Click “Start”. Open the bottom 2-way<br />
valve to begin releasing drops from the reservoir to the drop counter.<br />
6. Record in your lab notebook the volume <strong>and</strong> <strong>pH</strong> that the indicator changes color. The<br />
titration is finished once the horizontal region at higher <strong>pH</strong>s appears similar in length to the<br />
one at lower <strong>pH</strong>s (i.e., the curve appears somewhat symmetrical). Click “Stop”. Pour the<br />
titrated solutions into a 1 L beaker <strong>and</strong> set aside.<br />
7. Save this file on your memory stick (the data is needed for answering the postlab questions).<br />
To print a copy of <strong>pH</strong> vs. time:<br />
a. Click on the graph title. In the edit box that appears, enter an appropriate title.<br />
b. Change the minimum <strong>and</strong> maximum values for the x & y axes so the curve completely<br />
fills the data window.<br />
c. Print a copy of the graph window. Enter your name(s) <strong>and</strong> the number of copies.
<strong>Acids</strong> & <strong>Bases</strong> I Revised: 4/22/13<br />
d. Read <strong>pH</strong> <strong>and</strong> volume values along the <strong>pH</strong> curve by clicking the Examine button. As the<br />
mouse cursor moves across the graph, <strong>pH</strong> <strong>and</strong> volume data points are displayed in the<br />
examine box on the graph.<br />
8. Share st<strong>and</strong>ardization data with at least 5 other students so that you can calculate an average<br />
concentration.<br />
9. Trial #1: Place exactly 100-mL of DI water into a 250-mL beaker. Add 8.0 mL of 0.10 M<br />
acetic acid solution <strong>and</strong> 3 drops of bromothymol blue.<br />
10. Place the beaker on the stir plate underneath the spout of the reagent reservoir, add a stir bar,<br />
<strong>and</strong> adjust the stirrer to a slow stirring speed. (The magnetic stirrer may cause the computer<br />
monitor to flicker.)<br />
11. Refill the reagent reservoir with 0.10 M NaOH solution. (Note: All trials (#1-3) will use<br />
NaOH in the reagent reservoir.)<br />
12. Experiment “24b Acid-Base (Drop Count)” should still be open on your computer. To start<br />
the titration click “Collect” → “Erase <strong>and</strong> Continue”. Click “Start”. Open the bottom 2-way<br />
valve to begin releasing drops from the reservoir to the drop counter.<br />
13. Record in your lab notebook the volume <strong>and</strong> <strong>pH</strong> that the indicator changes color. The<br />
titration is finished once the horizontal region at higher <strong>pH</strong>s appears similar in length to the<br />
one at lower <strong>pH</strong>s (i.e., the curve appears somewhat symmetrical). Click “Stop”. Pour the<br />
titrated solutions into a 1 L beaker <strong>and</strong> set aside.<br />
14. After determining the volume to reach the equivalence point, divide that number by two for<br />
the volume for "half-way" to equivalence point. Use the Examine button, <strong>and</strong> move the<br />
cursor across the graph. Determine the <strong>pH</strong> value at the half-way point. Record this value as<br />
the pK a of the acid.<br />
15. Save this file on your memory stick (the data is needed for answering the postlab questions).<br />
To print a copy of <strong>pH</strong> vs. time:<br />
a. Click on the graph title. In the edit box that appears, enter an appropriate title.<br />
b. Change the minimum <strong>and</strong> maximum values for the x & y axes so the curve completely<br />
fills the data window.<br />
c. Print a copy of the graph window. Enter your name(s) <strong>and</strong> the number of copies.<br />
d. Read <strong>pH</strong> <strong>and</strong> volume values along the <strong>pH</strong> curve by clicking the Examine button. As the<br />
mouse cursor moves across the graph, <strong>pH</strong> <strong>and</strong> volume data points are displayed in the<br />
examine box on the graph.<br />
16. Drain the remaining NaOH from the buret into the 1 L beaker containing the used titrated<br />
solutions. Add 1 M HCl, until the solution is neutral according to <strong>pH</strong> paper. If you<br />
accidently make the solution acidic, add NaHCO 3 with stirring until the solution is neutral<br />
(<strong>pH</strong> 7). Once the solution is neutralized, pour it down the drain.
<strong>Acids</strong> & <strong>Bases</strong> I Revised: 4/22/13<br />
Part B. Spectrophotometric Determination of the pK a of Bromothymol Blue<br />
17. Use pipet to deliver 1.00 mL of the bromothymol blue solution to each of two, labeled 25 mL<br />
volumetric flasks. Fill to the line with 0.1 M HCl in the first flask. The resulting solution<br />
should have a <strong>pH</strong> between 1~2. Fill the second flask to the line with 0.1 M NaOH. The<br />
solution should have a <strong>pH</strong> between 12~13.<br />
18. Create buffered solutions with different <strong>pH</strong>'s in this step: Label five 25 mL volumetric<br />
flasks with numbers 1 through 5. Use a pipet to deliver 1.00 mL of the bromothymol blue<br />
solution to each of the flasks. Add the volumes of the 0.10 M Na 2 HPO 4 solution <strong>and</strong> the 0.10<br />
M NaH 2 PO 4 solution to each flask indicated in the table below. Dilute each solution to<br />
volume with deionized water.<br />
Flask Number mL NaH 2 PO 4 mL Na 2 HPO 4<br />
1 5.0 0.0<br />
2 5.0 1.0<br />
3 10.0 5.0<br />
4 1.0 5.0<br />
5 1.0 10.0<br />
19. Use the <strong>pH</strong> meter to measure the <strong>pH</strong> of the solutions prepared in step 17 & 18.<br />
20. Using the spectrometer, record the spectra of the bromothymol blue solutions made in step<br />
18. From the recorded spectra choose one wavelength (λ 1 ) at which the <strong>pH</strong> 1~2 solution<br />
absorbs strongly but the <strong>pH</strong> 12~13 solution absorbs weakly, <strong>and</strong> a second wavelength (λ 2 ) at<br />
which the <strong>pH</strong> 12~13 solution absorbs strongly but the <strong>pH</strong> 1~2 solution absorbs weakly.<br />
21. Measure the absorbance of each of the 5 buffered solutions at λ 1 & λ 2 . (Postlab hint: A<br />
=ε·l·c, c is the concentration of the species.)