

Linksys WAP300N User Guide - eStore.com.au
Linksys WAP300N User Guide - eStore.com.au
Linksys WAP300N User Guide - eStore.com.au

You also want an ePaper? Increase the reach of your titles
YUMPU automatically turns print PDFs into web optimized ePapers that Google loves.
<strong>Linksys</strong> <strong>WAP300N</strong><br />
Setting Up: Basics<br />
Number of Wireless Networks—The number of wireless networks that<br />
were detected.<br />
Wireless Network Name—The network name (SSID) of each discovered<br />
wireless network.<br />
Signal—The percentage of signal strength.<br />
Security—The security method used by each wireless network. If the<br />
network supports Wi‐Fi Protected Setup, the Wi-Fi Protected Setup icon<br />
appears next to the security method.<br />
Refresh—Updates the on-screen information.<br />
3. To connect to a wireless network, select the network, then click Connect.<br />
A screen opens that shows you the network name (SSID) and security<br />
mode of the selected wireless network. Depending on the security mode<br />
of the network, you may be asked to enter additional information (see<br />
the following table).<br />
Security mode<br />
WPA/WPA2<br />
Personal<br />
WEP<br />
Information<br />
Required<br />
Passphrase<br />
Encryption<br />
Key 1<br />
Authentication<br />
Description<br />
Enter the passphrase shared by this<br />
device and your wireless router (or<br />
access point).<br />
Select a level of WEP encryption, 40 /<br />
64-bit (10 hex digits) or 104 / 128-bit<br />
(26 hex digits).<br />
Enter the WEP key of your network.<br />
Key 1 is the transmit key used by this<br />
device.<br />
The def<strong>au</strong>lt is Auto, which allows<br />
either open system or shared<br />
key <strong>au</strong>thentication to be used.<br />
Select Open to use open system<br />
<strong>au</strong>thentication (a WEP key is not used<br />
for <strong>au</strong>thentication). Select Shared to<br />
use shared key <strong>au</strong>thentication (a WEP<br />
key is used for <strong>au</strong>thentication).<br />
4. After you have entered all required information, click Connect to connect<br />
to the network.<br />
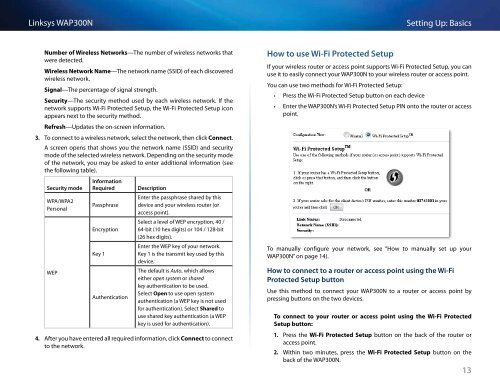
How to use Wi-Fi Protected Setup<br />
If your wireless router or access point supports Wi-Fi Protected Setup, you can<br />
use it to easily connect your <strong>WAP300N</strong> to your wireless router or access point.<br />
You can use two methods for Wi-Fi Protected Setup:<br />
••<br />
Press the Wi-Fi Protected Setup button on each device<br />
••<br />
Enter the <strong>WAP300N</strong>’s Wi-Fi Protected Setup PIN onto the router or access<br />
point.<br />
To manually configure your network, see “How to manually set up your<br />
<strong>WAP300N</strong>” on page 14).<br />
How to connect to a router or access point using the Wi-Fi<br />
Protected Setup button<br />
Use this method to connect your <strong>WAP300N</strong> to a router or access point by<br />
pressing buttons on the two devices.<br />
To connect to your router or access point using the Wi-Fi Protected<br />
Setup button:<br />
1. Press the Wi-Fi Protected Setup button on the back of the router or<br />
access point.<br />
2. Within two minutes, press the Wi-Fi Protected Setup button on the<br />
back of the <strong>WAP300N</strong>.<br />
13