UNIGATE CL - LONWorks
UNIGATE CL - LONWorks
UNIGATE CL - LONWorks

You also want an ePaper? Increase the reach of your titles
YUMPU automatically turns print PDFs into web optimized ePapers that Google loves.
Instruction manual<br />
Universal Fieldbus-Gateway<br />
<strong>UNIGATE</strong> ®<br />
<strong>UNIGATE</strong> <strong>CL</strong> - <strong>LONWorks</strong><br />
V3624E<br />
Deutschmann Automation GmbH & Co. KG Carl-Zeiss-Str. 8 D-65520 Bad Camberg<br />
Tel:+49-(0)6434-9433-0 Hotline: +49-(0)6434-9433-33 Fax: +49-(0)6434-9433-40<br />
Internet: http://www.deutschmann.de
Deutschmann Automation GmbH & Co. KG<br />
1 Information on CE marking of the module . . . . . . . . . . . . . . . . 8<br />
1.1 EU Directive EMC . . . . . . . . . . . . . . . . . . . . . . . . . . . . . . 8<br />
1.2 Scope of application . . . . . . . . . . . . . . . . . . . . . . . . . . . . . 8<br />
1.3 Note installation guidelines . . . . . . . . . . . . . . . . . . . . . . . . . 8<br />
1.4 Installation of the unit . . . . . . . . . . . . . . . . . . . . . . . . . . . . 8<br />
1.5 Working on switch cabinets . . . . . . . . . . . . . . . . . . . . . . . . . 8<br />
2 Information for the machine manufacturers . . . . . . . . . . . . . . . 9<br />
2.1 Introduction . . . . . . . . . . . . . . . . . . . . . . . . . . . . . . . . . 9<br />
2.2 EU Machinery Directive . . . . . . . . . . . . . . . . . . . . . . . . . . . 9<br />
3 Introduction . . . . . . . . . . . . . . . . . . . . . . . . . . . . . . . 10<br />
3.1 Difference in the hardware version . . . . . . . . . . . . . . . . . . . . 10<br />
3.2 <strong>UNIGATE</strong> <strong>CL</strong> software flow-chart . . . . . . . . . . . . . . . . . . . . . 11<br />
3.3 <strong>UNIGATE</strong> block diagram . . . . . . . . . . . . . . . . . . . . . . . . . 12<br />
3.4 <strong>UNIGATE</strong> application diagram . . . . . . . . . . . . . . . . . . . . . . 12<br />
4 Operation modes of the Gateway. . . . . . . . . . . . . . . . . . . . 13<br />
4.1 Configuration mode (config mode) . . . . . . . . . . . . . . . . . . . . 13<br />
4.2 Test mode . . . . . . . . . . . . . . . . . . . . . . . . . . . . . . . . . 13<br />
4.3 Data exchange mode . . . . . . . . . . . . . . . . . . . . . . . . . . . 14<br />
5 RS-interface . . . . . . . . . . . . . . . . . . . . . . . . . . . . . . . 15<br />
5.1 RS-interfaces at the <strong>UNIGATE</strong> <strong>CL</strong> . . . . . . . . . . . . . . . . . . . . 15<br />
5.2 Buffer sizes at the <strong>UNIGATE</strong> <strong>CL</strong> . . . . . . . . . . . . . . . . . . . . . 15<br />
5.3 Framing Check . . . . . . . . . . . . . . . . . . . . . . . . . . . . . . 15<br />
6 SSI-interface . . . . . . . . . . . . . . . . . . . . . . . . . . . . . . . 16<br />
6.1 Initiation of the SSI-interface . . . . . . . . . . . . . . . . . . . . . . . 16<br />
6.2 Hardware-wiring . . . . . . . . . . . . . . . . . . . . . . . . . . . . . . 16<br />
7 The Debug-interface . . . . . . . . . . . . . . . . . . . . . . . . . . . 18<br />
7.1 Overview of the Debug-interface . . . . . . . . . . . . . . . . . . . . . 18<br />
7.2 Starting in the Debug-mode . . . . . . . . . . . . . . . . . . . . . . . . 18<br />
7.3 Communication parameter for the Debug-interface . . . . . . . . . . . . 18<br />
7.4 Possibilities with the Debug-interface . . . . . . . . . . . . . . . . . . . 18<br />
7.5 Commands of the Debug-interface . . . . . . . . . . . . . . . . . . . . 18<br />
8 Mode of operation of the system . . . . . . . . . . . . . . . . . . . . 19<br />
8.1 General explanation . . . . . . . . . . . . . . . . . . . . . . . . . . . . 19<br />
8.2 Interfaces . . . . . . . . . . . . . . . . . . . . . . . . . . . . . . . . . 19<br />
8.3 Data exchange . . . . . . . . . . . . . . . . . . . . . . . . . . . . . . 19<br />
8.4 Possible network variables and their data lengths . . . . . . . . . . . . 19<br />
8.5 Run-up phase . . . . . . . . . . . . . . . . . . . . . . . . . . . . . . . 19<br />
9 Generating a Script . . . . . . . . . . . . . . . . . . . . . . . . . . . 20<br />
9.1 What is a Script . . . . . . . . . . . . . . . . . . . . . . . . . . . . . 20<br />
9.2 Memory efficiency of the programs . . . . . . . . . . . . . . . . . . . . 20<br />
9.3 What can you do with a Script device . . . . . . . . . . . . . . . . . . 20<br />
9.4 Independence of buses . . . . . . . . . . . . . . . . . . . . . . . . . . 20<br />
9.5 Further settings at the Gateway . . . . . . . . . . . . . . . . . . . . . . 20<br />
9.6 The use of the Protocol Developer . . . . . . . . . . . . . . . . . . . . 21<br />
9.7 Accuracies of the baud rates . . . . . . . . . . . . . . . . . . . . . . . 21<br />
14.7.10 <strong>UNIGATE</strong> fieldbus gateway <strong>UNIGATE</strong> <strong>CL</strong> - <strong>LONWorks</strong> V. 1.4 3
Deutschmann Automation GmbH & Co. KG<br />
9.8 Script processing times . . . . . . . . . . . . . . . . . . . . . . . . . . 22<br />
10 Hardware ports, switches and LEDs . . . . . . . . . . . . . . . . . . 23<br />
10.1 Device labeling . . . . . . . . . . . . . . . . . . . . . . . . . . . . . . 23<br />
10.2 Connectors . . . . . . . . . . . . . . . . . . . . . . . . . . . . . . . . 23<br />
10.2.1 Connector to the external device (RS-interface) . . . . . . . . . . . . . . . . . 23<br />
10.2.2 Connector supply voltage and DEBUG-interface. . . . . . . . . . . . . . . . . 24<br />
10.2.3 <strong>LONWorks</strong>-connector. . . . . . . . . . . . . . . . . . . . . . . . . . . . . . . 24<br />
10.2.4 Power supply . . . . . . . . . . . . . . . . . . . . . . . . . . . . . . . . . . . 24<br />
10.3 LEDs . . . . . . . . . . . . . . . . . . . . . . . . . . . . . . . . . . . 24<br />
10.3.1 LED "Service". . . . . . . . . . . . . . . . . . . . . . . . . . . . . . . . . . .24<br />
10.3.2 LED "Rx" (at <strong>LONWorks</strong> 62 only). . . . . . . . . . . . . . . . . . . . . . . . .25<br />
10.3.3 LED "Tx" (at <strong>LONWorks</strong> 62 only) . . . . . . . . . . . . . . . . . . . . . . . . .25<br />
10.3.4 LED “(Bus) State“. . . . . . . . . . . . . . . . . . . . . . . . . . . . . . . . . 25<br />
10.3.5 LED "Power" . . . . . . . . . . . . . . . . . . . . . . . . . . . . . . . . . . . 25<br />
10.3.6 LED "State" . . . . . . . . . . . . . . . . . . . . . . . . . . . . . . . . . . . .25<br />
10.3.7 LEDs 1 / 2 / 4 / 8 (Error No. / Select ID) . . . . . . . . . . . . . . . . . . . . . 25<br />
10.4 Switches . . . . . . . . . . . . . . . . . . . . . . . . . . . . . . . . . 25<br />
10.4.1 Termination Rx 422 + Tx 422 (serial interface). . . . . . . . . . . . . . . . . . 25<br />
10.4.2 Rotary coding switches S4 + S5 (serial interface) . . . . . . . . . . . . . . . . 26<br />
10.4.3 Pushbutton "Service" . . . . . . . . . . . . . . . . . . . . . . . . . . . . . . . 26<br />
10.5 The Debug cable for <strong>UNIGATE</strong> <strong>CL</strong> . . . . . . . . . . . . . . . . . . . . 26<br />
11 Error handling . . . . . . . . . . . . . . . . . . . . . . . . . . . . . . 27<br />
11.1 Error handling at <strong>UNIGATE</strong> <strong>CL</strong> . . . . . . . . . . . . . . . . . . . . . . 27<br />
12 Installation guidelines . . . . . . . . . . . . . . . . . . . . . . . . . . 28<br />
12.1 Installation of the module . . . . . . . . . . . . . . . . . . . . . . . . . 28<br />
12.1.1 Mounting . . . . . . . . . . . . . . . . . . . . . . . . . . . . . . . . . . . . . 28<br />
12.1.2 Removal . . . . . . . . . . . . . . . . . . . . . . . . . . . . . . . . . . . . . 28<br />
12.2 Wiring . . . . . . . . . . . . . . . . . . . . . . . . . . . . . . . . . . . 28<br />
12.2.1 Connection systems . . . . . . . . . . . . . . . . . . . . . . . . . . . . . . .28<br />
12.2.1.1 Power supply . . . . . . . . . . . . . . . . . . . . . . . . . . . . . . . . . . . . . 28<br />
12.2.1.2 Equipotential bonding connection . . . . . . . . . . . . . . . . . . . . . . . . . . . 28<br />
12.2.2 <strong>LONWorks</strong> communication interface . . . . . . . . . . . . . . . . . . . . . . . 29<br />
12.2.2.1 Bus line with copper cable. . . . . . . . . . . . . . . . . . . . . . . . . . . . . . . 29<br />
12.2.3 Line routing, shield and measures to combat interference voltage. . . . . . . .29<br />
12.2.4 General information on line routing . . . . . . . . . . . . . . . . . . . . . . . .29<br />
12.2.4.1 Shielding of lines . . . . . . . . . . . . . . . . . . . . . . . . . . . . . . . . . . . 29<br />
13 <strong>LONWorks</strong>. . . . . . . . . . . . . . . . . . . . . . . . . . . . . . . . . 31<br />
13.1 Nodes . . . . . . . . . . . . . . . . . . . . . . . . . . . . . . . . . . . 31<br />
13.2 Network variables (NVTs) . . . . . . . . . . . . . . . . . . . . . . . . . 31<br />
13.2.1 Implementing the network variables into the <strong>UNIGATE</strong>-<strong>LONWorks</strong> . . . . . . . 32<br />
13.2.2 Installation . . . . . . . . . . . . . . . . . . . . . . . . . . . . . . . . . . . . 32<br />
13.2.3 Technical data (characteristics) for <strong>LONWorks</strong>. . . . . . . . . . . . . . . . . . 32<br />
13.3 Script examples for the initialization of <strong>LONWorks</strong> . . . . . . . . . . . . 33<br />
13.4 LON-specific parameters . . . . . . . . . . . . . . . . . . . . . . . . . 34<br />
13.5 Darstellung der Daten in <strong>LONWorks</strong> . . . . . . . . . . . . . . . . . . . 34<br />
13.5.1 Network variables (NVTs) . . . . . . . . . . . . . . . . . . . . . . . . . . . . 35<br />
4 <strong>UNIGATE</strong> fieldbus gateway <strong>UNIGATE</strong> <strong>CL</strong> - <strong>LONWorks</strong> V. 1.4 14.7.10
Deutschmann Automation GmbH & Co. KG<br />
13.5.2 Determination of a LON-Gateway’s update time . . . . . . . . . . . . . . . . 35<br />
14 Technical data . . . . . . . . . . . . . . . . . . . . . . . . . . . . . . 36<br />
14.1 Device data . . . . . . . . . . . . . . . . . . . . . . . . . . . . . . . . 36<br />
14.1.1 Interface data . . . . . . . . . . . . . . . . . . . . . . . . . . . . . . . . . . 37<br />
15 Commissioning guide . . . . . . . . . . . . . . . . . . . . . . . . . . 38<br />
15.1 Note . . . . . . . . . . . . . . . . . . . . . . . . . . . . . . . . . . . . 38<br />
15.2 Components . . . . . . . . . . . . . . . . . . . . . . . . . . . . . . . . 38<br />
15.3 Installation . . . . . . . . . . . . . . . . . . . . . . . . . . . . . . . . . 38<br />
15.4 Dimensional drawing <strong>UNIGATE</strong> <strong>CL</strong> - <strong>LONWorks</strong> . . . . . . . . . . . . . 38<br />
15.5 Commissioning . . . . . . . . . . . . . . . . . . . . . . . . . . . . . . 38<br />
15.6 <strong>LONWorks</strong> connection . . . . . . . . . . . . . . . . . . . . . . . . . . 38<br />
15.7 Connection to the process device . . . . . . . . . . . . . . . . . . . . . 39<br />
15.8 Connecting the supply voltage . . . . . . . . . . . . . . . . . . . . . . 39<br />
15.9 Shield connection . . . . . . . . . . . . . . . . . . . . . . . . . . . . . 39<br />
15.10 Project planning . . . . . . . . . . . . . . . . . . . . . . . . . . . . . . 39<br />
15.11 Literature . . . . . . . . . . . . . . . . . . . . . . . . . . . . . . . . . 39<br />
16 Servicing . . . . . . . . . . . . . . . . . . . . . . . . . . . . . . . . . 40<br />
16.1 Returning a device . . . . . . . . . . . . . . . . . . . . . . . . . . . . 40<br />
16.2 Downloading PC software . . . . . . . . . . . . . . . . . . . . . . . . . 40<br />
17 Annex. . . . . . . . . . . . . . . . . . . . . . . . . . . . . . . . . . . 41<br />
17.1 Hexadecimal table . . . . . . . . . . . . . . . . . . . . . . . . . . . . 41<br />
18 Declaration of conformity . . . . . . . . . . . . . . . . . . . . . . . . 42<br />
18.1 EC declaration of conformity . . . . . . . . . . . . . . . . . . . . . . . 42<br />
14.7.10 <strong>UNIGATE</strong> fieldbus gateway <strong>UNIGATE</strong> <strong>CL</strong> - <strong>LONWorks</strong> V. 1.4 5
Deutschmann Automation GmbH & Co. KG<br />
6 <strong>UNIGATE</strong> fieldbus gateway <strong>UNIGATE</strong> <strong>CL</strong> - <strong>LONWorks</strong> V. 1.4 14.7.10
Deutschmann Automation GmbH & Co. KG<br />
Disclaimer of liability<br />
We have checked the contents of the document for conformity with the hardware and software<br />
described. Nevertheless, we are unable to preclude the possibility of deviations so that we are<br />
unable to assume warranty for full compliance. The information given in the publication is,<br />
however, reviewed regularly. Necessary amendments are incorporated in the following editions.<br />
We would be pleased to receive any improvement proposals which you may have.<br />
Copyright<br />
Copyright (C) Deutschmann Automation GmbH & Co. KG 1997 – 2010. All rights reserved.<br />
This document may not be passed on nor duplicated, nor may its contents be used or disclosed<br />
unless expressly permitted. Violations of this clause will necessarily lead to compensation in<br />
damages. All rights reserved, in particular rights of granting of patents or registration of<br />
utility-model patents.<br />
Art.-No.: V3652E<br />
14.7.10 <strong>UNIGATE</strong> fieldbus gateway <strong>UNIGATE</strong> <strong>CL</strong> - <strong>LONWorks</strong> V. 1.5 7
Information on CE marking of the module<br />
Deutschmann Automation GmbH & Co. KG<br />
1 Information on CE marking of the module<br />
1.1 EU Directive EMC<br />
The following applies to the module described in this User Manual:<br />
Products which bear the CE mark comply with the requirements of EU Directive „Electromagnetic<br />
Compatibility“ and the harmonized European Standards (EN) listed therein.<br />
The EU Declarations of Conformity are available at the following location for perusal by the<br />
responsible authorities in accordance with the EU Directive, Article 10:<br />
Deutschmann Automation GmbH & Co. KG, Carl-Zeiss-Straße 8, 65520 Bad Camberg, Germany.<br />
1.2 Scope of application<br />
The modules are designed for use in the industrial sector and comply with the following<br />
requirements.<br />
Scope of application<br />
Requirement applicable to<br />
Emitted interference Interference immunity<br />
Industry EN 55011, cl. A (2007) EN 61000-6-2 (2005)<br />
1.3 Note installation guidelines<br />
The module complies with the requirements if you<br />
1. comply with the installation guidelines described in the User Manual when installing and operating<br />
the module.<br />
2. also follow the rules below on installation of the equipment and on working on switch cabinets.<br />
1.4 Installation of the unit<br />
Modules must be installed in electrical equipment rooms/areas or in enclosed housings (e.g.<br />
switch boxes made of metal or plastic). Moreover, you must earth the unit and the switch box<br />
(metal box) or at least the top-hat rail (plastic box) onto which the module has been snapped.<br />
1.5 Working on switch cabinets<br />
In order to protect the modules against static electrical discharge, the personnel must discharge<br />
themselves electrostatically before opening switch cabinets or switch boxes.<br />
8 <strong>UNIGATE</strong> fieldbus gateway <strong>UNIGATE</strong> <strong>CL</strong> - <strong>LONWorks</strong> V. 1.5 14.7.10
Deutschmann Automation GmbH & Co. KG<br />
Information for the machine manufacturers<br />
2 Information for the machine manufacturers<br />
2.1 Introduction<br />
The <strong>UNIGATE</strong> module does not constitute a machine as defined by the EU "Machinery“<br />
Directive. Consequently, the module does not have a Declaration of Conformity in relation to the<br />
EU Machinery Directive.<br />
2.2 EU Machinery Directive<br />
The EU Machinery Directive stipulates the requirements applicable to a machine. The term<br />
"machine" is taken to mean a totality of connected parts or fixtures (see also EN 292-1, Paragraph<br />
3.1)<br />
The module is a part of the electrical equipment of the machine and must thus be included by the<br />
machine manufacturer in the Declaration of Conformity process.<br />
14.7.10 <strong>UNIGATE</strong> fieldbus gateway <strong>UNIGATE</strong> <strong>CL</strong> - <strong>LONWorks</strong> V. 1.5 9
Introduction<br />
Deutschmann Automation GmbH & Co. KG<br />
3 Introduction<br />
The module <strong>UNIGATE</strong> <strong>CL</strong>-<strong>LONWorks</strong> 62 or <strong>CL</strong>-<strong>LONWorks</strong> 512 serves to adapt a serial port to<br />
the LON-bus. In this application, it functions as Gateway. It can be operated at any LON-bus with<br />
FTT-10A.<br />
The module <strong>CL</strong>-<strong>LONWorks</strong> essentially consists of the following hardware components:<br />
• FTT-10A interface<br />
• <strong>LONWorks</strong> ECHOLON ASIC<br />
• Microprocessor T89 C51RD2<br />
• RAM and EPROM<br />
• Optionally electrically isolated RS-interface<br />
• Serial interface (RS232, RS485 and RS422) to the device connected externally<br />
3.1 Difference in the hardware version<br />
LONworks 512<br />
<strong>LONWorks</strong> 62<br />
up to 256 input SNVTs and 256 output SNVTs<br />
up to 62 SNVTs, input and output distributed in a variable way<br />
10 <strong>UNIGATE</strong> fieldbus gateway <strong>UNIGATE</strong> <strong>CL</strong> - <strong>LONWorks</strong> V. 1.5 14.7.10
Deutschmann Automation GmbH & Co. KG<br />
Introduction<br />
3.2 <strong>UNIGATE</strong> <strong>CL</strong> software flow-chart<br />
14.7.10 <strong>UNIGATE</strong> fieldbus gateway <strong>UNIGATE</strong> <strong>CL</strong> - <strong>LONWorks</strong> V. 1.5 11
Introduction<br />
Deutschmann Automation GmbH & Co. KG<br />
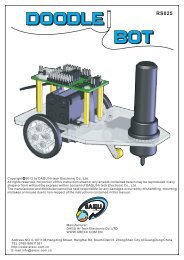
3.3 <strong>UNIGATE</strong> block diagram<br />
The following picture shows a typical <strong>UNIGATE</strong>-module design.<br />
3.4 <strong>UNIGATE</strong> application diagram<br />
The following graph shows a typical connection scheme.<br />
12 <strong>UNIGATE</strong> fieldbus gateway <strong>UNIGATE</strong> <strong>CL</strong> - <strong>LONWorks</strong> V. 1.5 14.7.10
Deutschmann Automation GmbH & Co. KG<br />
Operation modes of the Gateway<br />
4 Operation modes of the Gateway<br />
4.1 Configuration mode (config mode)<br />
The configuration mode serves to configure the Gateway. The following adjustments are possible<br />
in this mode.<br />
• Loading a Script<br />
• Updating the firmware<br />
The Gateway will be starting in this mode in case both switches S4 as well as S5 are set on position<br />
"F" when switching on the Gateway. Right after switching on the Gateway in the configuration<br />
mode it will be sending its starting message, that looks analog with the following message:<br />
"RS-LN(62)-<strong>CL</strong> (232/422/485) V2.0 [30] (c)dA Switch=0xFF Script(8k)="Leer" Author="Deutschmann<br />
Automation GmbH" Version="1.0" Date=21.08.2001 SN=47110001 Neuron-ID=04 36 EB<br />
13 02 00“.<br />
In the configuration mode the Gateway always operates with the settings 9600 Bauds, no Parity,<br />
8 databits and 1 stopbit, the RS-State LED will always be flashing red, the "Error No/Select ID"<br />
LEDs are of no account for the user. All software revisions contain the configuration mode.<br />
4.2 Test mode<br />
Setting of the test mode<br />
The test mode is set by bringing the switches S4 and S5 in position "E". All other switches will not<br />
be taken into consideration for the setting of the test mode. Now the Gateway has to be restarted<br />
with these settings (by a short disconnection from the power supply).<br />
In the test mode the Gateway always operates with the settings 9600 baud, no parity, 8 databits<br />
and 1 stopbit.<br />
The test mode may be helpful to integrate the Gateway in the relevant environment, for instance<br />
to test the parameters of the RS-interfaces.<br />
Mode of operation of the test mode<br />
After the restart in the test mode the Gateway will be sending the values 0-15 in hexadecimal<br />
representation ("0".."F") in ASCII-coding on the serial side every second. Simultaneously the<br />
same values are issued binary on the fieldbus-interface.<br />
In this mode the State-LED on the RS-side will be flashing red, the "Error No/Select ID" LEDs will<br />
be displaying the value in a binary way, that is issued that moment. Additionally each character<br />
that is received at one of the interfaces will also be output at the same interface as a local echo.<br />
On the fieldbus-side only the first byte will be used for the local echo, that means on receiving as<br />
well as on transmitting only the first byte of the bus data is looked at, the other bus data do not<br />
change compared to the last data.<br />
Attention:<br />
In the testmode the Gateway <strong>UNIGATE</strong>-<strong>LONWorks</strong> 62 automatically generates a<br />
variable In and Out of the type SNVT_count. The Out-variable is incremented by<br />
one every second.<br />
The program ID is changed to “TM004711“.<br />
„Testmode“ stands in the selfdocstring.<br />
Existing bindings are deleted!<br />
14.7.10 <strong>UNIGATE</strong> fieldbus gateway <strong>UNIGATE</strong> <strong>CL</strong> - <strong>LONWorks</strong> V. 1.5 13
Operation modes of the Gateway<br />
Deutschmann Automation GmbH & Co. KG<br />
4.3 Data exchange mode<br />
The Gateway has to be in the data exchange mode, so that a data exchange between the<br />
RS-side of the Gateway and the fieldbus is possible. As long as the Gateway is not in the configuration<br />
mode or the test mode, the data exchange mode is active. In the data exchange mode<br />
the Gateway will execute the downloaded Script.<br />
14 <strong>UNIGATE</strong> fieldbus gateway <strong>UNIGATE</strong> <strong>CL</strong> - <strong>LONWorks</strong> V. 1.5 14.7.10
Deutschmann Automation GmbH & Co. KG<br />
RS-interface<br />
5 RS-interface<br />
5.1 RS-interfaces at the <strong>UNIGATE</strong> <strong>CL</strong><br />
The <strong>UNIGATE</strong> <strong>CL</strong> - <strong>LONWorks</strong> has the interfaces RS232, RS422 and RS485 available. The<br />
hardware always features a DEBUG-interface, see chapter 7.<br />
5.2 Buffer sizes at the <strong>UNIGATE</strong> <strong>CL</strong><br />
<strong>UNIGATE</strong> <strong>CL</strong> features at the serial side a buffer with the size of 1024 bytes for input data and<br />
output data each.<br />
The FIFO of the application interface (RS-interface) can be changed in any Gateway form Script<br />
revision 26 on, that is capable for Script. For it please check in the Protocol Developer under<br />
"Device Control" - "Hardware".<br />
5.3 Framing Check<br />
The length of the stop bit received by the Gateway is checked through the function "Framing<br />
Check". Here the stop bit generated by the Gateway is always long enough, so that connected<br />
participants can evaluate the stop bit.<br />
Please be aware that the function "Framing Check" becomes effective only in case of 8 data bit<br />
and the setting "No parity".<br />
An error is detected and indicated by the Error LEDs in case the stop bit does not show the<br />
length 1 bit during the activated check.<br />
The possible setting for this parameter can be controlled by the Script (see online help from Protocol<br />
Developer). The presetting for the "Stop Bit Framing Check" is "enabled".<br />
14.7.10 <strong>UNIGATE</strong> fieldbus gateway <strong>UNIGATE</strong> <strong>CL</strong> - <strong>LONWorks</strong> V. 1.5 15
SSI-interface<br />
Deutschmann Automation GmbH & Co. KG<br />
6 SSI-interface<br />
The <strong>UNIGATE</strong> also supports the connection of applications or products, that communicate via<br />
SSI.<br />
6.1 Initiation of the SSI-interface<br />
The required Script (example_SSI), the firmware- (Cust0023) and Protocol Developer-extension<br />
(Cust_ssi.xml) are available free of charge from our website at www.deutschmann.de, as well as<br />
the softwaretool Protocol Developer and the configuration software WINGATE.<br />
• In the Protocol Developer (see chapter 7, The Debug-interface) the ConfigFile "Cust_ssi.xml"<br />
has to be added. At Options -> Settings -> ConfigFiles.<br />
• Load the Script "example_SSI.dss" into the Protocol Developer.<br />
• The encoder type has to be defined in the Script itself under "Set number of bits" and "Set<br />
typ" (default = 12-Bit-Single-Turn-Gray):<br />
// Set number of bits (1..16 = Single Turn, 17..32 = Multi Turn)<br />
moveconst (bAnzBit, 12); // i.e. 12 Bit single turn<br />
// Set typ<br />
// Values of bTyp:<br />
// 0 = Reserved<br />
// 1 = Output-value without change (i.e. binary encoder)<br />
// 2 = Output-value changed from Gray to Binary (i.e. Gray encoder)<br />
// >2 = Reserved<br />
moveconst ( wTyp, 2); // i.e. 12 Bit Gray<br />
• Load the Script into the device. Open WINGATE and activate the device in the configuation<br />
mode (see chapter 4.1, Configuration mode (config mode)) - an actuation message appears,<br />
that looks in line with the following (example <strong>CL</strong>-PB):<br />
Special Firmware (23) not loaded<br />
RS-PBV1-<strong>CL</strong> (232/422/485) V7.31[30] (c)dA Switch=0x02FF Script(8k)="SSI" Author="Deutschmann<br />
Automation" Version="V 1.0" Date=20.03.2008 SN=47110002 ID=2<br />
Konfigmode...<br />
The note "Special Firmware (23) not loaded" means that the firmware-extension is not yet<br />
loaded. The extension is loaded through Extras -> Firmware Script Extension. Select the file<br />
"Cust0023 (Cmd 23 + 24 for SSI).hex" and choose "write extension".<br />
• Re-start the device -> now only the device’s actual actuation message appears and not the<br />
note any more.<br />
• Bring the device into the data exchange mode (see chapter 4.3, Data exchange mode) -><br />
DONE!<br />
6.2 Hardware-wiring<br />
The clock wires of the SSI-interface are placed onto the Tx-wires of the RS422-interface and the<br />
data wires onto the Rx-wires at the <strong>UNIGATE</strong> <strong>CL</strong>.<br />
16 <strong>UNIGATE</strong> fieldbus gateway <strong>UNIGATE</strong> <strong>CL</strong> - <strong>LONWorks</strong> V. 1.5 14.7.10
Deutschmann Automation GmbH & Co. KG<br />
SSI-interface<br />
X1 (3pin + 4pin screw-plug-connector):<br />
Pin no. Name Function at SSI<br />
1 Rx 232 n. c.<br />
2 Tx 232 n. c.<br />
3 AP-GND n. c.<br />
4 Rx 422+ SSI DAT+<br />
5 Rx 422- SSI DAT-<br />
6 Tx 422+ SSI <strong>CL</strong>K+<br />
7 Tx 422- SSI <strong>CL</strong>K-<br />
14.7.10 <strong>UNIGATE</strong> fieldbus gateway <strong>UNIGATE</strong> <strong>CL</strong> - <strong>LONWorks</strong> V. 1.5 17
The Debug-interface<br />
Deutschmann Automation GmbH & Co. KG<br />
7 The Debug-interface<br />
7.1 Overview of the Debug-interface<br />
The <strong>UNIGATE</strong>® IC features a Debug-interface, that allows a step-by-step processing of a Script.<br />
Normally this interface is only required for the development of a Script.<br />
7.2 Starting in the Debug-mode<br />
When applying power to the <strong>UNIGATE</strong>® (power up) the firmware will output the binary character<br />
0 (0x00) after a self-test was carried out on this interface. If the <strong>UNIGATE</strong>® receives an<br />
acknowledgement via this interface within 500 ms, it is in the Debug-mode. The<br />
acknowledgement is the ASCII-character O (0x4F).<br />
With the start in the Debug-mode the further execution of Script commands will be put to a stop.<br />
7.3 Communication parameter for the Debug-interface<br />
The Debug-interface is always operating with 9600 baud, no parity, 8 data bit, 1 stop bit. It is not<br />
possible to change this parameter in the Protocol Developer. Please consider the fact that these<br />
settings have to be in accordance with those of the PC-COM-interface and that the flow control<br />
(protocol) has to be set on „none“ there.<br />
7.4 Possibilities with the Debug-interface<br />
Usually the Protocol Developer is connected to the Debug-interface. With it a step-by-step processing<br />
of a Script, monitoring jumps and decisions and looking at memory areas is possible.<br />
Moreover breakpoints can be set. It basically possesses all characteristics a software-development<br />
tool is typically supposed to have. However, it is also possible to carry out a Scrip-update<br />
via this interface.<br />
From Script version [27] on you can also output data with the Script command<br />
"SerialOutputToDebugInterface". Please also pay attention to the remark in the manual ’Protocol<br />
Developer’.<br />
7.5 Commands of the Debug-interface<br />
The commands for the use of the Debug-interface are described in the instruction manual Protocol<br />
Developer.<br />
18 <strong>UNIGATE</strong> fieldbus gateway <strong>UNIGATE</strong> <strong>CL</strong> - <strong>LONWorks</strong> V. 1.5 14.7.10
Deutschmann Automation GmbH & Co. KG<br />
Mode of operation of the system<br />
8 Mode of operation of the system<br />
8.1 General explanation<br />
Communication can be split into seven layers, layer 1 to layer 7, in accordance with the<br />
ISO/OSI-model.<br />
The DEUTSCHMANN AUTOMATION <strong>LONWorks</strong>-Gateways convert all layers in accordance<br />
with the LONTalk-protocol. Layer 7 is realized according to chapter 8.3.<br />
8.2 Interfaces<br />
The Gateway features the interfaces RS232, RS485 and RS422.<br />
8.3 Data exchange<br />
The <strong>UNIGATE</strong> has to be connected to the LON-bus through a projecting tool. In the Gateway the<br />
data received from the bus is transferred to the externall device depending on the loaded Script.<br />
The external device responds in accordance with the protocol conventions.<br />
The data received from the external device is written by the Gateway into the internal RAM to the<br />
fixed network variable.<br />
All data is transferred consistently by the Gateway in both directions. The maximum data length<br />
of consistent data must be considered in the case of data exchange between the participants.<br />
8.4 Possible network variables and their data lengths<br />
At present the <strong>UNIGATE</strong> supports all network variables from the SNVT master list of May<br />
2002.<br />
Maximum amount of SNVTs<br />
Total byte<br />
<strong>UNIGATE</strong> Input Output Input Output<br />
<strong>LONWorks</strong> 512 256 256 512 512<br />
<strong>LONWorks</strong> 62 62 altogether 512 512<br />
Aliases<br />
<strong>UNIGATE</strong> Amount of alias table entries<br />
<strong>LONWorks</strong> 512 62<br />
<strong>LONWorks</strong> 62 62<br />
8.5 Run-up phase<br />
The Gateway is programmed and configured in the run-up phase. Data exchange with the external<br />
device does not occur until after the run-up phase has been completed with no errors.<br />
14.7.10 <strong>UNIGATE</strong> fieldbus gateway <strong>UNIGATE</strong> <strong>CL</strong> - <strong>LONWorks</strong> V. 1.5 19
Generating a Script<br />
Deutschmann Automation GmbH & Co. KG<br />
9 Generating a Script<br />
9.1 What is a Script<br />
A Script is a sequence of commands, that are executed in that exact order. Because of the fact<br />
that also mechanisms are given that control the program flow in the Script it is also possible to<br />
assemble more complex processes from these simple commands.<br />
The Script is memory-oriented. It means that all variables always refer to one memory area.<br />
While developing a Script you do not have to take care of the memory management though. The<br />
Protocol Developer takes on this responsibility for you.<br />
9.2 Memory efficiency of the programs<br />
A Script command can carry out e. g. a complex checksum like a CRC-16 calculation via data.<br />
For the coding of this command only 9 byte are required as memory space (for the command<br />
itself). This is only possible when these complex commands are contained in a library.<br />
A further advantage of this library is, that the underlying functions have been in practical use for a<br />
couple of years and therefore can be described as ’void of errors’. As these commands are also<br />
present in the native code for the controller, at this point also the runtime performance of the<br />
Script is favorable.<br />
9.3 What can you do with a Script device<br />
Our Script devices are in the position to process a lot of commands. In this case a command is<br />
always a small firmly outlined task. All commands can be put into classes or groups. A group of<br />
commands deals with the communication in general. This group’s commands enable the Gateway<br />
to send and receive data on the serial side as well as on the bus-side.<br />
9.4 Independence of buses<br />
Basically the Scripts do not depend on the bus, they are supposed to operate on. It means that a<br />
Script which was developed on a Profibus Gateway can also be operated on an Interbus without<br />
changes, since the functioning of these buses is very similar. In order to also process this Script<br />
on an Ethernet Gateway, perhaps further adjustments have to be made in the Script, so that the<br />
Script can be executed reasonably.<br />
There are no fixed rules how which Scripts have to operate properly. When writing a Script you<br />
should take into account on which target hardware the Script is to be executed, so the necessary<br />
settings for the respective buses can be made.<br />
9.5 Further settings at the Gateway<br />
Most devices require no further adjustments, except for those made in the Script itself. However,<br />
there are also exceptions to it. These settings are made by means of the software WINGATE. If<br />
you know our <strong>UNIGATE</strong>-series, you are already familiar with the proceeding with it. An example<br />
is the adjustment of the IP-address and the net-mask of an Ethernet-Gateway. These values<br />
have to be known as fixed values and are not available for the runtime. Another reason for the<br />
configuration of the values in WINGATE is the following: After an update of the Script these values<br />
remain untouched, i. e. the settings that were made once are still available after a change of<br />
the Script.<br />
Only this way it is also possible that the same Script operates on different Ethernet-Gateways,<br />
that feature different IP-addresses.<br />
20 <strong>UNIGATE</strong> fieldbus gateway <strong>UNIGATE</strong> <strong>CL</strong> - <strong>LONWorks</strong> V. 1.5 14.7.10
Deutschmann Automation GmbH & Co. KG<br />
Generating a Script<br />
9.6 The use of the Protocol Developer<br />
The Protocol Developer is a tool for an easy generation of a Script for our Script Gateways. Its<br />
operation is exactly aimed at this use. After starting the program the Script that was loaded the<br />
last time is loaded again, provided that it is not the first start.<br />
Typical for Windows Script commands can be added by means of the mouse or the keyboard. As<br />
far as defined and required for the corresponding command, the dialog to the corresponding<br />
command is displayed, and after entering the values the right text is automatically added to the<br />
Script. The insertion of new commands by the Protocol Developer is carried out in a way that<br />
existing commands will not be overwritten. Generally a new command is inserted in front of the<br />
one where the cursor is positioned. Of course the commands can also be written by means of the<br />
keyboard or already written commands can also be modified.<br />
9.7 Accuracies of the baud rates<br />
The baud rate of the serial interface is derived from the processor’s crystal frequency.<br />
Meanwhile all Script-Gateways are working with a crystal frequency of 40 MHz.<br />
You can enter any desired integer baud rate into the Script. After that the firmware adjusts the<br />
baud rate, that can be derived the most precisely from the crystal frequency.<br />
The baud rate the Gateway is actually working with (BaudIst) can be determined as follows:<br />
BaudIst= (F32 / K)<br />
F32 = Crystal frequency [Hz] / 32<br />
K = Round (F32 / BaudSoll);<br />
Round () is a commercial roundoff<br />
Example:<br />
The actual baud rate is to be calculated, when 9600 baud are pre-set, where the Gateway is<br />
operated with 40 MHz:<br />
F32 = 40000000 / 32 = 1250000<br />
K = Round(1250000 / 9600) = Round(130.208) = 130<br />
BaudIst= 1250000 / 130 = 9615.38<br />
I. e.: The baud rate actually adjusted by the Gateway is 9615.38 baud<br />
The resulting error in per cent can be calculated as follows:<br />
Error[%] = (abs(BaudIst - BaudSoll) / BaudSoll) * 100<br />
In our example the following error results:<br />
Error = (abs(9615.38 - 9600) / 9600) * 100 = 0.16%<br />
In practise errors below 2% can be tolerated!<br />
In the following please find a listing of baud rates at a 40 MHz-crystal frequency with the corresponding<br />
errors:<br />
14.7.10 <strong>UNIGATE</strong> fieldbus gateway <strong>UNIGATE</strong> <strong>CL</strong> - <strong>LONWorks</strong> V. 1.5 21
Generating a Script<br />
Deutschmann Automation GmbH & Co. KG<br />
4800 baud: 0.16%<br />
9600 baud: 0.16%<br />
19200 baud: 0.16%<br />
38400 baud: 1.35%<br />
57600 baud: 1.35%<br />
62500 baud: 0%<br />
115200 baud: 1.35%<br />
312500 baud: 0%<br />
625000 baud: 0%<br />
9.8 Script processing times<br />
The Script is translated by the Protocol Developer and the consequently generated code is loaded<br />
into the Gateway. Now the processor in the Gateway interprets this code. In this case, there<br />
are commands that can be processed very fast (e. g. "Set Parameter"). There are also commands,<br />
however, that take longer (e. g. copying 1000 bytes). Consequently, for one thing the processing<br />
time differs due to the kind of Sript command. But the processing time of the Script<br />
commands is considerably more determined by the processor time that is available for this process.<br />
Since the processor has to carry out several tasks simultaneously (multitasking system)<br />
only a part of the processor's capacity is available for the Script processing. The following tasks -<br />
in the order of priority - are executed on the processor:<br />
• Sending and receiving data at the Debug-interface (provided that the Protocol Developer has<br />
been started on the PC)<br />
• Sending and receiving data at the RS-interface<br />
• Sending and receiving data at the Fieldbus-interface<br />
• Tasks controlled via internal clock (1 ms) (e. g. flashing of an LED)<br />
• Processing of the Script<br />
From experience approximately 0.5 ms can be calculated for each Script line. This value confirmed<br />
itself again and again in many projects as a standard value. He is always quite right if the<br />
processor has enough time available for the Script processing.<br />
By means of the tasks mentioned above, the following recommendation can be formulated in<br />
order to receive a rather fast Script processing:<br />
• Deactivate the Debug-interface (it is the normal case in the serial use)<br />
• Keep the data length at the RS-interface as small as possible. The baud rate is not the problem<br />
here, but the amount of characters which are transfered per second.<br />
• Do not unnecessarily extend the data length at the Fieldbus side. Especially at acyclical bus<br />
data, if possible do only send them when changes were made. The data length at buses that<br />
are configured to a fixed length (e. g. Profibus) should not be longer than absolutely necessary.<br />
If the processing time should be too large in spite of these measures, there is the possibility to<br />
generate a customized Script command, that executes several tasks in one Script command.<br />
Please contact our support department for this purpose.<br />
22 <strong>UNIGATE</strong> fieldbus gateway <strong>UNIGATE</strong> <strong>CL</strong> - <strong>LONWorks</strong> V. 1.5 14.7.10
Deutschmann Automation GmbH & Co. KG<br />
Hardware ports, switches and LEDs<br />
10 Hardware ports, switches and LEDs<br />
10.1 Device labeling<br />
Picture 1: Terminal labeling and termination<br />
Picture 2: Front panel: Rotary switches, pushbutton and LEDs<br />
10.2 Connectors<br />
10.2.1 Connector to the external device (RS-interface)<br />
The serial interface is available at the plug accessible on the upper side of the device.<br />
Pin assignment X1 (3-pole and 4-pole screw-type plug connector)<br />
Pin No. Name Function<br />
1 Rx 232 Receive signal<br />
2 Tx 232 Transmit signal<br />
3 AP-GND Application Ground<br />
4 Rx 422+ (485+) Receive signal<br />
5 Rx 422- (485-) Receive signal<br />
6 Tx 422+ (485+) Transmit signal<br />
7 Tx 422- (485-) Transmit signal<br />
For the operation at a 485-interface the two pins labeled "485-" have to<br />
be connected together.<br />
Also the two pins "485+".<br />
14.7.10 <strong>UNIGATE</strong> fieldbus gateway <strong>UNIGATE</strong> <strong>CL</strong> - <strong>LONWorks</strong> V. 1.5 23
Hardware ports, switches and LEDs<br />
Deutschmann Automation GmbH & Co. KG<br />
10.2.2 Connector supply voltage and DEBUG-interface<br />
Pin assignment X2 (4-pole screw-plug connector, on the bottom side, at the back)<br />
Pin No. Name Function<br />
1 UB (Pwr) 10..33 V supply voltage / DC<br />
2 0 V (Pwr) 0 V supply voltage / DC<br />
3 Rx-Debug Receive signal Debug<br />
4 Tx-Debug Transmit signal Debug<br />
Attention:<br />
At isolated devices (option GT) Ground for the DEBUG-Interface must be<br />
connected with pin 3 (AP-GND) of the RS-interface!<br />
At devices that are not isolated also the 0V (Pwr)-signal can be used as<br />
reference.<br />
10.2.3 <strong>LONWorks</strong>-connector<br />
The plug (labeled: <strong>LONWorks</strong>) for the connection to the LON-bus is available on the lower side of<br />
the device.<br />
Pin assignment X3 (4-pole screw-plug connector)<br />
Pin No. Name Function<br />
1 NET A- Data signal <strong>LONWorks</strong><br />
2 NET B Data signal <strong>LONWorks</strong> (connected with pin 1)<br />
3 NET A Data signal <strong>LONWorks</strong> (connected with pin 2)<br />
4 NET B Data signal <strong>LONWorks</strong><br />
10.2.4 Power supply<br />
The device must be powered with 10-33 VDC, The voltage supply is made through the 4-pole<br />
screw-plug connector at the device’s bottom side.<br />
Please note that the devices of the series <strong>UNIGATE</strong> should not be operated with AC voltage.<br />
10.3 LEDs<br />
The Gateway <strong>UNIGATE</strong> <strong>CL</strong> - <strong>LONWorks</strong> features 10 LEDs with the following significance:<br />
LED Service green Control service pushbutton<br />
LED Rx green LON Rx communication<br />
LED Tx green LON Tx communiction<br />
LED (Bus) State red/green Interface state <strong>LONWorks</strong><br />
LED Power green Supply voltage serial interface<br />
LED State red/green User-defined / general Gateway error<br />
LEDs 1 / 2 / 4 / 8 (Error No. / Select ID) green User-defined / general Gateway error<br />
10.3.1 LED "Service"<br />
For the version <strong>LONWorks</strong> 512<br />
Lights green<br />
Blinks green<br />
Off<br />
For the version <strong>LONWorks</strong> 62<br />
No application, not configured or service pin button<br />
Network variables not connected<br />
Configured and connected with network<br />
Lights green<br />
Blinks green<br />
Off<br />
Service pin button pressed<br />
Not configured<br />
Configured<br />
24 <strong>UNIGATE</strong> fieldbus gateway <strong>UNIGATE</strong> <strong>CL</strong> - <strong>LONWorks</strong> V. 1.5 14.7.10
Deutschmann Automation GmbH & Co. KG<br />
Hardware ports, switches and LEDs<br />
10.3.2 LED "Rx" (at <strong>LONWorks</strong> 62 only)<br />
This LED is jittering when data is received.<br />
10.3.3 LED "Tx" (at <strong>LONWorks</strong> 62 only)<br />
This LED is jittering when data is sent.<br />
10.3.4 LED “(Bus) State“<br />
For the version <strong>LONWorks</strong> 512<br />
Lights green Hardware init o. k.<br />
Blinks green/red<br />
Software error or wink command<br />
Lights red<br />
Hardware error or reset<br />
For the version <strong>LONWorks</strong> 62<br />
Off<br />
Blinks green<br />
Green on<br />
Red/green<br />
10.3.5 LED "Power"<br />
This LED is connected directly to the (optionally also electrically isolated) supply voltage of the<br />
serial interface (RS232/422/485).<br />
10.3.6 LED "State"<br />
Lights green<br />
Flashes green<br />
Flashes green/red<br />
Lights red<br />
Flashes red<br />
10.3.7 LEDs 1 / 2 / 4 / 8 (Error No. / Select ID)<br />
If these 4 LEDs flash and LED “State“ simultaneously lights red, the error number is displayed in<br />
binary notation (conversion table, see Annex) in accordance with the table in chapter "Error<br />
handling". Additionally there LEDs are controllable via Script.<br />
10.4 Switches<br />
The Gateway features 5 switches with the following functions:<br />
Termination Rx 422<br />
Termination Tx 422<br />
Rotary coding switch S4<br />
Rotary coding switch S5<br />
Pushbutton "Service"<br />
Iinitialization error<br />
Operational<br />
Fieldbus data exchange o. k. , i. e. wink or poll received<br />
WInk: blinks for 10 seconds in turns<br />
Controllable via Script<br />
Controllable via Script<br />
Controllable via Script<br />
General Gateway error (see LEDs Error No.), controllable via Script<br />
<strong>UNIGATE</strong> is in the configuration / test mode, controllable via Script<br />
switchable Rx 422-terminating resistor for the serial interface<br />
switchable Tx 422- or RS485-terminating resistor for the serial<br />
interface<br />
ID High for serial interface i. e. configmode<br />
ID Low for serial interface i. e. configmode<br />
LON net login<br />
10.4.1 Termination Rx 422 + Tx 422 (serial interface)<br />
If the Gateway is operated as the physically first or last device in an RS485-bus or as 422, there<br />
must be a bus termination at this Gateway. In order to do this the termination switch is set to position<br />
ON. The resistor (150 Ω) integrated in the Gateway is activated. In all other cases, the switch<br />
remains in position OFF.<br />
Please refer to the general RS485 literature for further information on the subject of bus terminations.<br />
14.7.10 <strong>UNIGATE</strong> fieldbus gateway <strong>UNIGATE</strong> <strong>CL</strong> - <strong>LONWorks</strong> V. 1.5 25
Hardware ports, switches and LEDs<br />
Deutschmann Automation GmbH & Co. KG<br />
If the integrated resistor is used, please allow for the fact that this also activates a pull-down<br />
resistor (390 Ω) to ground and a pull-up resistor (390 Ω) to VCC.<br />
At RS48 only the Tx 422-switch must be set to ON.<br />
The Rx 422-switch has to be on OFF.<br />
10.4.2 Rotary coding switches S4 + S5 (serial interface)<br />
These two switches can be read out through the Script command "Get (RS_Switch, Destination)"<br />
and the value can be used for further functions. This value is read in when the Gateway is<br />
switched on or always after a Script command has been executed. The switch positions "EE"<br />
(testmode) and "FF" (config mode) are reserved.<br />
10.4.3 Pushbutton "Service"<br />
When pressing that pushbutton the device sends a service pin message to the LON network.<br />
With it the device can be logged in the network.<br />
10.5 The Debug cable for <strong>UNIGATE</strong> <strong>CL</strong><br />
As accessory a pre-configured Debug cable is available. The Debug cable connects the Gateway<br />
to Debug and RS.<br />
26 <strong>UNIGATE</strong> fieldbus gateway <strong>UNIGATE</strong> <strong>CL</strong> - <strong>LONWorks</strong> V. 1.5 14.7.10
Deutschmann Automation GmbH & Co. KG<br />
Error handling<br />
11 Error handling<br />
11.1 Error handling at <strong>UNIGATE</strong> <strong>CL</strong><br />
If the Gateway detects an error, the error is signalled by the “State“ LED lighting red and, simultaneously,<br />
the error number being indicated by means of LEDs “Error No.“ (flashing frequency 1<br />
hertz) as shown in the table below. A distinction can be made between two error categories:<br />
Serious errors (1-5): In this case, the Gateway must be switched off and switched back on again.<br />
If the error occurs again, the Gateway must be exchanged and returned for repair.<br />
Warnings (6-15): These warnings are displayed for one minute simply for information purposes<br />
and are then automatically reset. If such warnings occur frequently, please inform After-Sales<br />
Service.<br />
In the configuration mode these displays are not valid and only meant for internal use.<br />
Error no.<br />
LED8 LED4 LED2 LED1 resp. ID Error description<br />
0 0 0 0 0 Reserved<br />
0 0 0 1 1 Hardware fault<br />
0 0 1 0 2 EEROM error<br />
0 0 1 1 3 Internal memory error<br />
0 1 0 0 4 Fieldbus hardware error or wrong Fieldbus-ID<br />
0 1 0 1 5 Script error<br />
0 1 1 0 6 Reserved<br />
0 1 1 1 7 RS-transmit buffer overflow<br />
1 0 0 0 8 RS-receive buffer overflow<br />
1 0 0 1 9 RS timeout<br />
1 0 1 0 10 General fieldbus error<br />
1 0 1 1 11 Parity-or frame-check-error<br />
1 1 0 0 12 Reserved<br />
1 1 0 1 13 Fieldbus configuration error<br />
1 1 1 0 14 Fieldbus data buffer overflow<br />
1 1 1 1 15 Reserved<br />
Table 1: Error handling at <strong>UNIGATE</strong> <strong>CL</strong><br />
For user-defined errors the flash frequency is 0.5 hertz. The error is displayed as long as defined<br />
by "Set Warning Time".<br />
14.7.10 <strong>UNIGATE</strong> fieldbus gateway <strong>UNIGATE</strong> <strong>CL</strong> - <strong>LONWorks</strong> V. 1.5 27
Installation guidelines<br />
Deutschmann Automation GmbH & Co. KG<br />
12 Installation guidelines<br />
12.1 Installation of the module<br />
The module with the dimensions 23 x 116 x 115 mm (W x H x D) has been developed for switch<br />
cabinet use (IP 20) and can thus be mounted only on a standard mounting channel (deep<br />
DIN-rail to EN 50022).<br />
12.1.1 Mounting<br />
• Engage the module from the top in the top-hat rail and swivel it down so that the module<br />
engages in position.<br />
• Other modules may be rowed up to the left and right of the module.<br />
• There must be at least 5 cm clearance for heat dissipation above and below the module.<br />
• The standard mounting channel must be connected to the equipotential bonding strip of the<br />
switch cabinet. The connection wire must feature a cross-section of at least 10 mm².<br />
12.1.2 Removal<br />
• First disconnect the power supply and signal lines.<br />
• Then push the module up and swivel it out of the top-hat rail.<br />
Vertical installation<br />
The standard mounting channel may also be mounted vertically so that the module is mounted<br />
turned through 90°.<br />
12.2 Wiring<br />
12.2.1 Connection systems<br />
The following connection systems must resp. may be used when wiring the module:<br />
• Standard screw-type/plug connection (power supply + RS + <strong>LONWorks</strong>)<br />
a) In the case of standard screw-type terminals, one lead can be clamped per connection point. It<br />
is best to then use a screwdriver with a blade width of 3.5 mm to firmly tighten the screw.<br />
Permitted cross-sections of the line:<br />
• Flexible line with wire-end ferrule:<br />
• Solid conductor:<br />
• Tightening torque:<br />
1 x 0.25 ... 1.5 mm²<br />
1 x 0.25 ... 1.5 mm²<br />
0.5 ... 0.8 Nm<br />
b) The plug-in connection terminal strip is a combination of standard screw-type terminal and<br />
plug connector. The plug connection section is coded and can thus not be plugged on the<br />
wrong way round.<br />
12.2.1.1 Power supply<br />
The device must be powered with 10..33 V DC.<br />
• Connect the supply voltage to the 4-pole plug-in screw terminal in accordance with the labelling<br />
on the device.<br />
12.2.1.2 Equipotential bonding connection<br />
The connection to the potential equalization automatically takes place it is put on the DIN-rail.<br />
28 <strong>UNIGATE</strong> fieldbus gateway <strong>UNIGATE</strong> <strong>CL</strong> - <strong>LONWorks</strong> V. 1.5 14.7.10
Deutschmann Automation GmbH & Co. KG<br />
Installation guidelines<br />
12.2.2 <strong>LONWorks</strong> communication interface<br />
12.2.2.1 Bus line with copper cable<br />
This interface is located on the module in the form of a 4-pin screw-plug-connector on the lower<br />
side of the housing.<br />
• Plug the <strong>LONWorks</strong> connecting plug onto the socket labelled "<strong>LONWorks</strong>".<br />
12.2.3 Line routing, shield and measures to combat interference voltage<br />
This chapter deals with line routing in the case of bus, signal and power supply lines, with the aim<br />
of ensuring an EMC-compliant design of your system.<br />
12.2.4 General information on line routing<br />
- Inside and outside of cabinets<br />
In order to achieve EMC-compliant routing of the lines, it is advisable to split the lines into the following<br />
line groups and to lay these groups separately.<br />
⇒ Group A:<br />
⇒ Group B:<br />
⇒ Group C:<br />
• shielded bus and data lines (e. g. for ProfibusDP, RS232C and printers etc.)<br />
• shielded analogue lines<br />
• unshielded lines for DC voltages ≥ 60 V<br />
• unshielded lines for AC voltage ≥ 25 V<br />
• coaxial lines for monitors<br />
• unshielded lines for DC voltages ≥ 60 V and ≥ 400 V<br />
• unshielded lines for AC voltage ≥ 24 V and ≥ 400 V<br />
• unshielded lines for DC voltages > 400 V<br />
The table below allows you to read off the conditions for laying the line groups on the basis of the<br />
combination of the individual groups.<br />
Group A Group B Group C<br />
Group A 1 2 3<br />
Group B 2 1 3<br />
Group C 3 3 1<br />
Table 3: Line laying instructions as a function of the combination of line groups<br />
1) Lines may be laid in common bunches or cable ducts.<br />
2) Lines must be laid in separate bunches or cable ducts (without minimum clearance).<br />
3) Lines must be laid in separate bunches or cable ducts inside cabinets but on separate cable<br />
racks with at least 10 cm clearance outside of cabinets but inside buildings.<br />
12.2.4.1 Shielding of lines<br />
Shielding is intended to weaken (attenuate) magnetic, electrical or electromagnetic interference<br />
fields.<br />
Interference currents on cable shields are discharged to earth via the shielding bus which is connected<br />
conductively to the chassis or housing. A low-impedance connection to the PE wire is<br />
particularly important in order to prevent these interference currents themselves becoming an<br />
interference source.<br />
Wherever possible, use only lines with braided shield. The coverage density of the shield should<br />
exceed 80%. Avoid lines with foil shield since the foil can be damaged very easily as the result of<br />
tensile and compressive stress on attachment. The consequence is a reduction in the shielding<br />
effect.<br />
14.7.10 <strong>UNIGATE</strong> fieldbus gateway <strong>UNIGATE</strong> <strong>CL</strong> - <strong>LONWorks</strong> V. 1.5 29
Installation guidelines<br />
Deutschmann Automation GmbH & Co. KG<br />
In general, you should always connect the shields of cables at both ends. The only way of<br />
achieving good interference suppression in the higher frequency band is by connecting the<br />
shields at both ends.<br />
The shield may also be connected at one end only in exceptional cases. However, this then<br />
achieves only an attenuation of the lower frequencies. Connecting the shield at one end may be<br />
more favorable if<br />
• it is not possible to lay an equipotential bonding line<br />
• analogue signals (a few mV resp. mA) are to be transmitted<br />
• foil shields (static shields) are used.<br />
In the case of data lines for serial couplings, always use metallic or metallized plugs and connectors.<br />
Attach the shield of the data line to the plug or connector housing.<br />
If there are potential differences between the earthing points, a compensating current may flow<br />
via the shield connected at both ends. In this case, you should lay an additional equipotential<br />
bonding line.<br />
Please note the following points when shielding:<br />
• Use metal cable clips to secure the shield braiding. The clips must surround the shield over a<br />
large area and must have good contact.<br />
• Downstream of the entry point of the line into the cabinet, connect the shield to a shielding bus.<br />
Continue the shield as far as the module, but do not connect it again at this point!<br />
30 <strong>UNIGATE</strong> fieldbus gateway <strong>UNIGATE</strong> <strong>CL</strong> - <strong>LONWorks</strong> V. 1.5 14.7.10
Deutschmann Automation GmbH & Co. KG<br />
<strong>LONWorks</strong><br />
13 <strong>LONWorks</strong><br />
The <strong>UNIGATE</strong> <strong>LONWorks</strong> module communicates according to the LONTalk record. That means<br />
that it can communicate with all <strong>LONWorks</strong> nodes which correspond to this record. For further<br />
information on <strong>LONWorks</strong> technology see www.echelon.com and www.lonmark.org.<br />
13.1 Nodes<br />
Nodes are devices that interact with physically fixed control units and communicate via a net, that<br />
features the LONTalk-protocol. Every node in the net contains stored intelligence that realizes<br />
and carries out control functions (handling of the I/O signals). No central service or master-slave<br />
construction is required and therefore a <strong>LONWorks</strong> net is often called "distributed I/O net".<br />
Every node includes a physical interface, a transmitter to a communication media. The UNIG-<br />
ATE-LON-module uses the FTT-10A (Free Topology Twisted pair) from the Echelon association.<br />
This is the medium usually mostly used in automation and this construction supports the star, bus<br />
and loop wiring. The FTT-10A-transmitter is connected to the twisted bus cable and has a baud<br />
rate of 78 kbit/s. The FTT-10A has a high impedance if no voltage is supplied and it does not disturb<br />
the network communication if the operating voltage breaks down.<br />
13.2 Network variables (NVTs)<br />
A network variable is an object on a node that can be connected with one or several network<br />
variables at one or several nodes. The network variable of a node defines its „input“ and its „output“<br />
from a network position and allows the sharing of the data in a distributed application. Every<br />
time an application writes in one of its network output variables, the new value of the net variables<br />
is then distributed via the net to all nodes with the network input variables that were connected<br />
with those network output variables. For example: In order to turn on the light via a<br />
<strong>LONWorks</strong>-net, the net output variable of a switching node has to be logically connected to the<br />
net input node of the lamp node. When the switch is activated, the network variable is distributed<br />
via the net and it is received in the lamp node. The light is turned on. See picture below.<br />
The LONMark Organisation accepted several net variables, that represent different ways of standard<br />
data illustrations e. g. temperature, pressure, percentage, voltage. They are called standard<br />
network variables or SNVT's and they are listed in the "SNVT master and the programming<br />
manual" of the Echelon association.<br />
A SNVT includes information on the type, resolution and size. The LONMark association defines<br />
objects that are used for a specific application as a group of SNVT's. Please consider that the<br />
customer can also define network variables as not standard and that they are generally called<br />
network variables or NVs.<br />
14.7.10 <strong>UNIGATE</strong> fieldbus gateway <strong>UNIGATE</strong> <strong>CL</strong> - <strong>LONWorks</strong> V. 1.5 31
<strong>LONWorks</strong><br />
Deutschmann Automation GmbH & Co. KG<br />
13.2.1 Implementing the network variables into the <strong>UNIGATE</strong>-<strong>LONWorks</strong><br />
A <strong>LONWorks</strong>-node is application-specific - which means that it is impossible to have one universal<br />
group of network variables for all kinds of different applications. For that reason the UNIG-<br />
ATE-LON has to be pre-configured with a fixed group of network variables, that might be required<br />
for a certain kind of application.<br />
13.2.2 Installation<br />
The network variables can be connected with the nodes by means of an installation tool. This<br />
bonding connects the network variables between different nodes. As soon as the bonding is<br />
completed, the installation tool can be taken from the net. During the installation time every node<br />
receives a unique net identity. Fro more information on <strong>LONWorks</strong> please read <strong>LONWorks</strong>-technology<br />
data from Motorola or the <strong>LONWorks</strong> documentation from Echelon.<br />
13.2.3 Technical data (characteristics) for <strong>LONWorks</strong><br />
Technical transmission Free topology (FTT-10A) twisted pair cable, transmission rate 78 kbits/s<br />
Max. bus length<br />
Bus up to 2000 m (with bus intensifiers)<br />
Max. node-to-node distance 500 m<br />
Max. number of nodes 32.385 nodes divided into 127 nodes/subnet 255-subnets/domain<br />
Kinds of data<br />
Peer to peer Communication<br />
32 <strong>UNIGATE</strong> fieldbus gateway <strong>UNIGATE</strong> <strong>CL</strong> - <strong>LONWorks</strong> V. 1.5 14.7.10
Deutschmann Automation GmbH & Co. KG<br />
<strong>LONWorks</strong><br />
13.3 Script examples for the initialization of <strong>LONWorks</strong><br />
//************************ LON init *******************************************************<br />
// Type No from SNVT Master-List<br />
// http://www.tsd.org/ieee1473/SNVT.pdf [LON_SNVT_MasterList_May2002]<br />
// UG62 max count of SNVT´s = 62 In and Out SNVT´s together<br />
// UG512 max count of SNVT´s = 256 In and 256 Out-SNVT´s<br />
// 36=31byte, 37=31byte, 83=2byte, 88=29byte, 93=6byte =>99byte<br />
// set In SNVT´s<br />
var InMapTable: buffer[5]; moveConst( InMapTable[0], #36#37#83#88#93 );<br />
var InMapsize : word;<br />
moveConst( InMapsize, 5); // count of In SNVT´s<br />
// set Out SNVT´s<br />
var OutMapTable: buffer[5]; moveConst( OutMapTable[0],#36#37#83#88#93 );<br />
var OutMapsize : word;<br />
moveConst( OutMapsize, 5); // count of Out SNVT´s<br />
// init SNVT´s<br />
LonInMapping( InMapTable[0], InMapsize);<br />
LonOutMapping(OutMapTable[0], OutMapsize);<br />
// set SelfDocString<br />
var SelfDocBuffer: buffer[20]; moveConst( SelfDocBuffer[0], "Vorlage LON SC");<br />
var SelfDocsize : word ; moveConst( SelfDocsize, 14);<br />
// init SelfDocString<br />
LonSelfDocString( SelfDocBuffer[0], SelfDocsize);<br />
// note: new init will activate only if ProgramID or SNVT types are changed,<br />
// like Configmode or Testmode. In this case also bindings will be lost!<br />
// define ProgramID, default = SC000000 (SD... for UG512 V1.82 with new LON-module<br />
Set ( LONProgramID , 123456 ) ; // SC123456, SC = normal mode<br />
// CM006969 Configmode<br />
// TM004711 Testmode<br />
// define BusMethode for fieldbusIN<br />
Set ( BusdataTriggerMethod , DataChange ) ; // new fieldbus IN data only if changed<br />
moveconst (OnChange, 1); // 1 = TRUE, 0 = FALSE<br />
if OnChange equal TRUE then :LonInitEnd;<br />
Set ( BusdataTriggerMethod , BusEvent ) ; // new fieldbus IN data on BusEvent<br />
// note: BusEvent - you receive the same data and you can read out from wich index<br />
:LonInitEnd;<br />
//************************ LON init end ***************************************************<br />
Set ( RS_State_LED , StaticRed ) ;<br />
//*********** start fieldbus **************************************************************<br />
BusStart ;<br />
Wait ( Bus_Active ) ;<br />
Get ( BusInputLen16 , wBusInSize ) ;<br />
Get ( BusOutputLen16 , wBusOutSize ) ;<br />
Set ( RS_State_LED , RedGreenFlashing ) ;<br />
//********************* main **************************************************************<br />
:start ;<br />
Get ( BusDataChanged , bDestination ) ;// sind geänderte Busdaten gekommen <br />
if bDestination equal b0 then :CheckRS_In;<br />
ReadBus ( aBusInBuf[0] , wBusInSize ) ;<br />
This routine is an extract from the example „LON_SC.dss“, that can be found in the Protocol<br />
Developer under menu „New“.<br />
More LON Script examples are to be found in the folder „Examples“.<br />
14.7.10 <strong>UNIGATE</strong> fieldbus gateway <strong>UNIGATE</strong> <strong>CL</strong> - <strong>LONWorks</strong> V. 1.5 33
<strong>LONWorks</strong><br />
Deutschmann Automation GmbH & Co. KG<br />
13.4 LON-specific parameters<br />
// Bus specific -<br />
// LON<br />
// Lon Input SNVT Mapping<br />
LonInMapping ( a_Source[0] , w_NumberChar ) ;<br />
// Lon Output SNVT Mapping<br />
LonOutMapping ( a_Source[0] , w_NumberChar ) ;<br />
// Lon Self Documentation String<br />
LonSelfDocString ( a_Source[0] , w_NumberChar ) ;<br />
Set ( BusdataTriggerMethod , BusEvent ) ; // DataChange<br />
// BusStart:<br />
BusStart ;<br />
// Device Control -<br />
// Wait State:<br />
Wait ( Bus_Active ) ;<br />
//******************************************************************************<br />
Get ( AvailableBusData , w_word ) ;<br />
Get ( BusDataChanged , b_byte ) ;<br />
// - 0..BusInputSize<br />
// Read Busdata:<br />
ReadBus ( a_Destination[0] , w_NumberChar ) ;<br />
// Write Busdata:<br />
WriteBus ( a_Source[0] , w_NumberChar ) ;<br />
// Wait for changing Busdata:<br />
WaitBusDataChanged ( w_Timeout , w_NumberChar ) ;<br />
// Get Parameter: Set Parameter<br />
// ============== ==============<br />
Get ( BusInputSize , b_byte ) ; // 0..255<br />
Get ( BusOutputSize , b_byte ) ; // 0..255<br />
// supported from ScriptRev 26 and higher<br />
Get ( BusInputLen16 , w_word ) ; // 0..512<br />
Get ( BusOutputLen16 , w_word ) ; // 0..512<br />
//..............................................................................<br />
// LON only:<br />
// --------<br />
Get ( LONProgramID , l_long ) ; Set ( LONProgramID , 0 ) ; // 0 .. 999999<br />
Get ( CHANGED_SNVT_INDEX , wDestination ) ;<br />
SetByVar ( CHANGED_SNVT_INDEX , wDestination ) ; // -1..255 (UG512)<br />
// -1..61 (UG 62)<br />
//******************************************************************************<br />
13.5 Darstellung der Daten in <strong>LONWorks</strong><br />
Any standard-compliant <strong>LONWorks</strong> participant can exchange data with the Gateway. It is also<br />
possible to use very "simple" master connections owing to the data structure.<br />
After programming, the participants are connected through network variables. If the user has set<br />
the Flag ’Length byte’, then it is the maximum length of the user data.<br />
The user also configures the configuration telegram in the "Binding".<br />
34 <strong>UNIGATE</strong> fieldbus gateway <strong>UNIGATE</strong> <strong>CL</strong> - <strong>LONWorks</strong> V. 1.5 14.7.10
Deutschmann Automation GmbH & Co. KG<br />
<strong>LONWorks</strong><br />
13.5.1 Network variables (NVTs)<br />
The SNVTs are assigned by the user as desired in the Script.<br />
var InMapsize : word;<br />
var OutMapsize : word;<br />
var InMapTable: buffer[62];<br />
var OutMapTable: buffer[62];<br />
moveConst( InMapsize, 1);<br />
moveConst( OutMapsize, 1);<br />
moveConst( InMapTable[0], #83 );<br />
moveConst( OutMapTable[0], #83 );<br />
LonInMapping( InMapTable[0], InMapsize);<br />
LonOutMapping(OutMapTable[0], OutMapsize);<br />
var SelfDocsize : word ; moveConst( SelfDocsize, 10);<br />
var SelfDocBuffer: buffer[60];<br />
moveConst( SelfDocBuffer[0], "SC <strong>UNIGATE</strong>" );<br />
LonSelfDocString( SelfDocBuffer[0], SelfDocsize);<br />
Set ( LONProgramID , 943325 ) ;<br />
13.5.2 Determination of a LON-Gateway’s update time<br />
In order to determine the average update time of a LON-Gateway, the following experimental<br />
setup was made:<br />
Two LON-Gateways with 30 Input- and 30 Output-SNVTs each were connected with each other<br />
via LON (FTT10A system with 78 kbit/s) and a Binding between the 30 Input-SNVTs of the one<br />
Gateway and the 30 Output-SNVTs of the other Gateway was created. At this Binding for all<br />
SNVTs "Sending without acknowledgement of receipt" was selected since it is the only way to<br />
measure the plain Gateway-delay time. All SNVTs had a length of 2 bytes.<br />
The measuring was started by a simultaneous change of all 30 SNVTs with the Script command<br />
"WriteBus()" and by means of a Protocol Analyser the period between the single SNVT-Updates<br />
on the LON-Bus were observed.<br />
With it the average update time for the <strong>LONWorks</strong> modules <strong>UNIGATE</strong> 512 and <strong>UNIGATE</strong> 62 is<br />
10 ms for the unconfirmed service.<br />
At these measurings neither the times caused by the Script are taken into consideration nor the<br />
transmission times via the serial interface since these times are application specific.<br />
Furthermore in a real environment the utilization capacity of the bus must be considered as well<br />
as potential response times with confirmed connections.<br />
For more detailed information on the topic "Benchmarks" we like to refer to the book "LON-Technologie"<br />
[Hüthig-Verlag] (chapter 14).<br />
14.7.10 <strong>UNIGATE</strong> fieldbus gateway <strong>UNIGATE</strong> <strong>CL</strong> - <strong>LONWorks</strong> V. 1.5 35
Technical data<br />
Deutschmann Automation GmbH & Co. KG<br />
14 Technical data<br />
14.1 Device data<br />
The technical data of the module is given in the table below.<br />
No. Parameter Data Explanations<br />
1 Location Switch cabinet DIN-rail mounting<br />
2 Enclosure IP20 Protection against foreign<br />
bodies and water to IEC 529<br />
(DIN 40050)<br />
3 Service life 10 years<br />
4 Housing size 23 x 116 x 115 mm<br />
W x H x D<br />
(screw-plug-connector included)<br />
23 x 100 x 115 mm<br />
(screw-plug connector not included)<br />
5 Installation position Any<br />
6 Weight 130 g<br />
7 Operating temperature 0ºC ... +55ºC<br />
8 Storage/transport<br />
-40 ºC ... +70 ºC<br />
temperature<br />
9 Atmospheric pressure<br />
during operation<br />
during transport<br />
795 hPa ... 1080 hPa<br />
660 hPa ... 1080 hPa<br />
10 Installation altitude 2000 m<br />
4000 m<br />
Table: Technical data of the module<br />
Unrestricted<br />
Restricted -<br />
Ambient temperature ≤ 40ºC<br />
11 Relative humidity Max. 80 % No condensation,<br />
no corrosive atmosphere<br />
12 External<br />
power supply<br />
10..33 V DC Standard power supply unit to<br />
DIN 19240<br />
13 Current consumption at 24 Typ. 120 mA<br />
At 10.8V. typ. 350 mA<br />
VDC<br />
max 150 mA<br />
14 Reverse voltage protection Yes But does not function!<br />
15 Short-circuit protection Yes<br />
16 Overload protection Poly-switch Thermal fuse<br />
17 Undervoltage detection ≤ 9 V DC<br />
(USP)<br />
18 Emergency power supply ≥ 5 ms Device fully operable<br />
36 <strong>UNIGATE</strong> fieldbus gateway <strong>UNIGATE</strong> <strong>CL</strong> - <strong>LONWorks</strong> V. 1.5 14.7.10
Deutschmann Automation GmbH & Co. KG<br />
Technical data<br />
14.1.1 Interface data<br />
The table below lists the technical data of the interfaces and ports on the device. The data has<br />
been taken from the corresponding Standards.<br />
Interface designation <strong>LONWorks</strong> RS232-C RS485/RS422<br />
No. Physical interface FTT-10A RS232-C RS485/RS422<br />
1 Standard Echelon DIN 66020 EIA Standard<br />
2 Transmission mode<br />
Asymmetrical Symmetrical<br />
asynchronous asynchronous<br />
serial serial<br />
full duplex half-duplex<br />
full duplex at RS422<br />
→ Difference signal → Level → Difference signal<br />
3 Transmission method Master / master Master / slave Master / slave<br />
4 Number of users: - Transmitters 32.385<br />
1<br />
32<br />
- Receivers 32.385<br />
1<br />
32<br />
split in 127 nodes/subnet,<br />
255 subnets/domain<br />
5 Cable length:<br />
- Maximum<br />
- Baud rate-dependent<br />
2000 m (with repeater)<br />
max. nodes 500 m<br />
Table: Technical data of the interfaces and ports on the module<br />
15 m<br />
no<br />
1200 m<br />
Commissioning guide<br />
Deutschmann Automation GmbH & Co. KG<br />
15 Commissioning guide<br />
15.1 Note<br />
Only trained personnel following the safety regulations may commission the <strong>UNIGATE</strong>.<br />
15.2 Components<br />
You will require the following components to commission the <strong>UNIGATE</strong>:<br />
• <strong>UNIGATE</strong><br />
• Connection cable from gateway to the process<br />
• Connector for the LON-bus-connection to the Gateway<br />
• <strong>LONWorks</strong> (twisted pair) cable (generally this cable is already installed on site!)<br />
• 10..33 V DC power supply (DIN 19240)<br />
• XIF-file and user manual can be ordered separately or downloaded free of charge from our<br />
homepage at www.deutschmann.de.<br />
15.3 Installation<br />
The <strong>UNIGATE</strong> <strong>CL</strong> - LON module features protection type IP20 and is thus suitable for switch<br />
cabinet use. The device is designed for snapping onto a 35 mm DIN-rail.<br />
15.4 Dimensional drawing <strong>UNIGATE</strong> <strong>CL</strong> - <strong>LONWorks</strong><br />
15.5 Commissioning<br />
It is essential that you perform the following steps during commissioning in order to ensure that<br />
the module operates correctly.<br />
15.6 <strong>LONWorks</strong> connection<br />
Connect the device to the <strong>LONWorks</strong> at the interface labelled "<strong>LONWorks</strong>".<br />
38 <strong>UNIGATE</strong> fieldbus gateway <strong>UNIGATE</strong> <strong>CL</strong> - <strong>LONWorks</strong> V. 1.5 14.7.10
Deutschmann Automation GmbH & Co. KG<br />
Commissioning guide<br />
15.7 Connection to the process device<br />
Please also read the manual for the process device when commissioning the process device.<br />
15.8 Connecting the supply voltage<br />
Please connect 10..33 DC voltage to the terminals provided for this.<br />
15.9 Shield connection<br />
Earth the top-hat rail onto which the module has been snapped.<br />
15.10 Project planning<br />
Use a project planning tool for Binding, i. e. the Pathfinder from TLON (www.tlon.de).<br />
15.11 Literature<br />
In order to get into the subject LON bus fast and intensively as well as for the operating mode of<br />
the available ASICs, we recommend the book "Verteilte Systeme in der Anwendung der<br />
LON-Technologie", ISBN: 3-7785-2581-6 (Hüthig Verlag) or "<strong>LONWorks</strong> Technology - An introduction)<br />
by F. Tiersch DESOTRON publishing company Dr. Günter Hartmann & Partner, GbR<br />
ISBN: 3-932875-11-7 (English version) or <strong>LONWorks</strong> ’Installationshandbuch’, ISBN<br />
3-8007-2575-4.<br />
14.7.10 <strong>UNIGATE</strong> fieldbus gateway <strong>UNIGATE</strong> <strong>CL</strong> - <strong>LONWorks</strong> V. 1.5 39
Servicing<br />
Deutschmann Automation GmbH & Co. KG<br />
16 Servicing<br />
Should questions which are not covered in this Manual crop up, please contact us directly.<br />
Please note down the following information before calling:<br />
• Device designation<br />
• Serial number (S/N)<br />
• Article number<br />
• Error number and error description<br />
You can reach us during hotline hours which are as follows<br />
Monday to Thursday from 8 am to midday and from 1 pm to 4 pm, Friday from 8 am to midday.<br />
Deutschmann Automation GmbH & Co. KG<br />
Carl-Zeiss-Straße 8<br />
D-65520 Bad-Camberg<br />
Germany<br />
Central office and sales department +49-(0)6434-9433-0<br />
Technical hotline +49-(0)6434-9433-33<br />
Fax sales department +49-(0)6434-9433-40<br />
Fax technical hotline +49-(0)6434-9433-44<br />
E-mail technical hotline<br />
16.1 Returning a device<br />
hotline@deutschmann.de<br />
If you return a device, we require as comprehensive a fault/error description as possible. We<br />
require the following information in particular:<br />
• What error number was displayed<br />
• What is the supply voltage (±0.5 V) with Gateway connected<br />
• What were you last doing or what last happened on the device (programming, error on<br />
power-up, ...)<br />
The more precise information a fault/error description you provide, the more exactly we will be<br />
able to pinpoint the possible causes.<br />
16.2 Downloading PC software<br />
You can download current information and software free of charge from our Internet server.<br />
http://www.deutschmann.de<br />
40 <strong>UNIGATE</strong> fieldbus gateway <strong>UNIGATE</strong> <strong>CL</strong> - <strong>LONWorks</strong> V. 1.5 14.7.10
Deutschmann Automation GmbH & Co. KG<br />
Annex<br />
17 Annex<br />
17.1 Hexadecimal table<br />
Hex Decimal Binary<br />
0 0 0000<br />
1 1 0001<br />
2 2 0010<br />
3 3 0011<br />
4 4 0100<br />
5 5 0101<br />
6 6 0110<br />
7 7 0111<br />
8 8 1000<br />
9 9 1001<br />
A 10 1010<br />
B 11 1011<br />
C 12 1100<br />
D 13 1101<br />
E 14 1110<br />
F 15 1111<br />
14.7.10 <strong>UNIGATE</strong> fieldbus gateway <strong>UNIGATE</strong> <strong>CL</strong> - <strong>LONWorks</strong> V. 1.5 41
Declaration of conformity<br />
Deutschmann Automation GmbH & Co. KG<br />
18 Declaration of conformity<br />
18.1 EC declaration of conformity<br />
42 <strong>UNIGATE</strong> fieldbus gateway <strong>UNIGATE</strong> <strong>CL</strong> - <strong>LONWorks</strong> V. 1.5 14.7.10