HP LaserJet P4010 and P4510 Series Printers UPD PCL 5 Printing ...
HP LaserJet P4010 and P4510 Series Printers UPD PCL 5 Printing ...
HP LaserJet P4010 and P4510 Series Printers UPD PCL 5 Printing ...

Create successful ePaper yourself
Turn your PDF publications into a flip-book with our unique Google optimized e-Paper software.
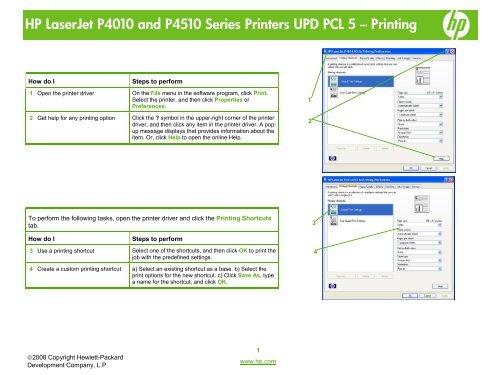
<strong>HP</strong> <strong>LaserJet</strong> <strong>P4010</strong> <strong>and</strong> <strong>P4510</strong> <strong>Series</strong> <strong>Printers</strong> <strong>UPD</strong> <strong>PCL</strong> 5 – <strong>Printing</strong><br />
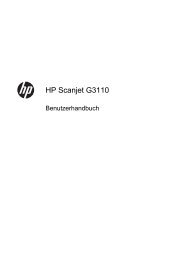
How do I Steps to perform<br />
1 Open the printer driver On the File menu in the software program, click Print.<br />
Select the printer, <strong>and</strong> then click Properties or<br />
Preferences.<br />
2 Get help for any printing option Click the ? symbol in the upper-right corner of the printer<br />
driver, <strong>and</strong> then click any item in the printer driver. A popup<br />
message displays that provides information about the<br />
item. Or, click Help to open the online Help.<br />
To perform the following tasks, open the printer driver <strong>and</strong> click the <strong>Printing</strong> Shortcuts<br />
tab.<br />
How do I Steps to perform<br />
3 Use a printing shortcut Select one of the shortcuts, <strong>and</strong> then click OK to print the<br />
job with the predefined settings.<br />
4 Create a custom printing shortcut a) Select an existing shortcut as a base. b) Select the<br />
print options for the new shortcut. c) Click Save As, type<br />
a name for the shortcut, <strong>and</strong> click OK.<br />
©2008 Copyright Hewlett-Packard<br />
Development Company, L.P.<br />
1<br />
www.hp.com<br />
1<br />
2<br />
3<br />
4
<strong>HP</strong> <strong>LaserJet</strong> <strong>P4010</strong> <strong>and</strong> <strong>P4510</strong> <strong>Series</strong> <strong>Printers</strong> <strong>UPD</strong> <strong>PCL</strong> 5 – <strong>Printing</strong><br />
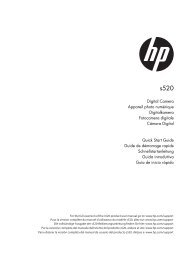
To perform the following tasks, open the printer driver <strong>and</strong> click the Paper/Quality tab.<br />
How do I Steps to perform<br />
5 Select a page size Select a size from the Paper size drop-down list.<br />
6 Select a custom page size a) Click Custom. The Custom Paper Size dialog box<br />
opens. b) Type a name for the custom size, specify the<br />
dimensions, <strong>and</strong> click OK.<br />
7 Select a paper source Select a tray from the Paper source drop-down list.<br />
8 Select a paper type Select a type from the Paper type drop-down list.<br />
9 Print covers on different paper<br />
Print the first or last page on<br />
different paper<br />
10 Adjust the resolution of printed<br />
images<br />
©2008 Copyright Hewlett-Packard<br />
Development Company, L.P.<br />
a) In the Special pages area, click Covers or Print<br />
pages on different paper, <strong>and</strong> then click Settings. b)<br />
Select an option to print a blank or preprinted front cover,<br />
back cover, or both.<br />
Or, select an option to print the first or last page on<br />
different paper. c) Select options from the Paper source<br />
<strong>and</strong> Paper type drop-down lists, <strong>and</strong> then click Add. d)<br />
Click OK.<br />
In the Print Quality area, select an option from the dropdown<br />
list. See the printer-driver online Help for<br />
information about each of the available options.<br />
2<br />
www.hp.com<br />
5<br />
6<br />
7<br />
8<br />
9<br />
10
<strong>HP</strong> <strong>LaserJet</strong> <strong>P4010</strong> <strong>and</strong> <strong>P4510</strong> <strong>Series</strong> <strong>Printers</strong> <strong>UPD</strong> <strong>PCL</strong> 5 – <strong>Printing</strong><br />
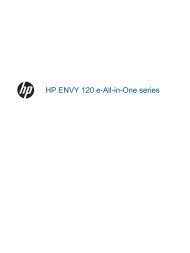
To perform the following tasks, open the printer driver <strong>and</strong> click the Effects tab.<br />
How do I Steps to perform<br />
11 Scale a page to fit on a selected<br />
paper size<br />
12 Scale a page to be a percent of the<br />
actual size<br />
©2008 Copyright Hewlett-Packard<br />
Development Company, L.P.<br />
Click Print document on, <strong>and</strong> then select a size from<br />
the dropdown list.<br />
Click % of actual size, <strong>and</strong> then type the percent or<br />
adjust the slider bar.<br />
13 Print a watermark a) Select a watermark from the Watermarks drop-down<br />
list. b) To print the watermark on the first page only, click<br />
First page only. Otherwise, the watermark is printed on<br />
each page.<br />
14 Add or edit watermarks<br />
NOTE: The printer driver must be<br />
stored on your computer or this to<br />
work.<br />
a) In the Watermarks area, click Edit. The Watermark<br />
Details dialog box opens. b) Specify the settings for the<br />
watermark, <strong>and</strong> then click OK.<br />
To perform the following tasks, open the printer driver <strong>and</strong> click the Finishing tab.<br />
How do I Steps to perform<br />
15 Print on both sides (Duplex) Click Print on both sides. If you will bind the document<br />
along the top edge, click Flip pages up.<br />
16 Print a booklet a) Click Print on both sides. b) In the Booklet layout<br />
dropdown list, click Left binding or Right binding. The<br />
Pages per sheet option automatically changes to<br />
2 pages per sheet.<br />
17 Print multiple pages per sheet a) Select the number of pages per sheet from the Pages<br />
per sheet drop-down list. b) Select the correct options<br />
for Print page borders, Page order, <strong>and</strong> Orientation.<br />
18 Select page orientation a) In the Orientation area, click Portrait or L<strong>and</strong>scape.<br />
b) To print the page image upside down, click Rotate by<br />
180 degrees.<br />
3<br />
www.hp.com<br />
11<br />
12<br />
13<br />
14<br />
15<br />
16<br />
17<br />
18
<strong>HP</strong> <strong>LaserJet</strong> <strong>P4010</strong> <strong>and</strong> <strong>P4510</strong> <strong>Series</strong> <strong>Printers</strong> <strong>UPD</strong> <strong>PCL</strong> 5 – <strong>Printing</strong><br />
To perform the following tasks, open the printer driver <strong>and</strong> click the Services tab.<br />
How do I Steps to perform<br />
19 Obtain support information for the<br />
product <strong>and</strong> order supplies online<br />
©2008 Copyright Hewlett-Packard<br />
Development Company, L.P.<br />
In the Internet Services drop-down list, select a support<br />
option, <strong>and</strong> click Go!<br />
4<br />
www.hp.com<br />
19
<strong>HP</strong> <strong>LaserJet</strong> <strong>P4010</strong> <strong>and</strong> <strong>P4510</strong> <strong>Series</strong> <strong>Printers</strong> <strong>UPD</strong> <strong>PCL</strong> 5 – <strong>Printing</strong><br />
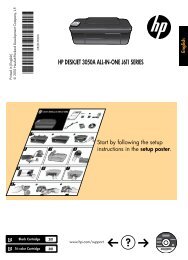
To perform the following tasks, open the printer driver <strong>and</strong> click the Job Storage tab.<br />
How do I Steps to perform<br />
20 Print one copy for proof before<br />
printing all the copies)<br />
21 Temporarily store a private job on<br />
the product <strong>and</strong> print it later<br />
22 Temporarily store a job on the<br />
product<br />
NOTE: These jobs are deleted if the<br />
product is turned off.<br />
23 Permanently store a job on the<br />
product<br />
24 Make a permanently stored job<br />
private so that anyone who tries to<br />
print it must provide a PIN<br />
25 Receive notification when someone<br />
prints a stored job<br />
©2008 Copyright Hewlett-Packard<br />
Development Company, L.P.<br />
In the Job Storage Mode area, click Proof <strong>and</strong> Hold.<br />
The product prints the first copy only. A message<br />
appears on the product control panel that prompts you to<br />
print the rest of the copies.<br />
a) In the Job Storage Mode area, click Personal Job.<br />
b) In the Make Job Private area, enter a 4-digit personal<br />
identification number (PIN).<br />
In the Job Storage Mode area, click Quick Copy. One<br />
copy of the job is printed immediately, but you can print<br />
more copies from the product control panel.<br />
In the Job Storage Mode area, click Stored Job.<br />
a) In the Job Storage Mode area, click Stored Job.<br />
b) In the Make Job Private area, click PIN to print, <strong>and</strong><br />
then enter a 4-digit personal identification number (PIN).<br />
In the Job Notification Options area, click Display Job<br />
ID when printing.<br />
26 Set the user name for a stored job In the User Name area, click User name to use the<br />
Windows default user name. To provide a different user<br />
name, click Custom <strong>and</strong> type the name.<br />
27 Specify a name for the stored job a) In the Job Name area, click Automatic to use the<br />
default job name. To specify a job name, click Custom<br />
<strong>and</strong> type the name. b) Select an option from the If job<br />
name exists dropdown list. Select Use Job Name + (1-<br />
99) to add a number to the end of the existing name, or<br />
select Replace Existing File to overwrite a job that<br />
already has that name.<br />
5<br />
www.hp.com<br />
20<br />
21<br />
22<br />
23<br />
24<br />
25<br />
26<br />
27
<strong>HP</strong> <strong>LaserJet</strong> <strong>P4010</strong> <strong>and</strong> <strong>P4510</strong> <strong>Series</strong> <strong>Printers</strong> <strong>UPD</strong> <strong>PCL</strong> 5 – <strong>Printing</strong><br />
To perform the following tasks, open the printer driver <strong>and</strong> click the Services tab.<br />
How do I Steps to perform<br />
28 Obtain support information for the<br />
product <strong>and</strong> order supplies online<br />
©2008 Copyright Hewlett-Packard<br />
Development Company, L.P.<br />
In the Internet Services drop-down list, select a support<br />
option, <strong>and</strong> click Go!<br />
6<br />
www.hp.com<br />
28
<strong>HP</strong> <strong>LaserJet</strong> <strong>P4010</strong> <strong>and</strong> <strong>P4510</strong> <strong>Series</strong> <strong>Printers</strong> <strong>UPD</strong> <strong>PCL</strong> 5 – <strong>Printing</strong><br />
To perform the following tasks, open the printer driver <strong>and</strong> click the Advanced tab.<br />
How do I Steps to perform<br />
29 Select advanced printing options In any of the sections, click a current setting to activate a<br />
dropdown list so you can change the setting.<br />
30 Change the number of copies that<br />
are printed<br />
NOTE: If the software program that<br />
you are using does not provide a<br />
way to print a particular number of<br />
copies, you can change the number<br />
of copies in the driver.<br />
Changing this setting affects the<br />
number of copies for all print jobs.<br />
After your job has printed, restore<br />
this setting to the original value.<br />
31 Print colored text as black, rather<br />
than as shades of gray.<br />
32 Change the order in which pages<br />
are printed<br />
©2008 Copyright Hewlett-Packard<br />
Development Company, L.P.<br />
Open the Paper/Output section, <strong>and</strong> then enter the<br />
number of copies to print. If you select 2 or more copies,<br />
you can select the option to collate the pages.<br />
a) Open the Document Options section, <strong>and</strong> then open<br />
the Printer Features section. b) In the Print All Text as<br />
Black drop-down list, select Enabled.<br />
a) Open the Document Options section, <strong>and</strong> then open<br />
the Layout Options section. b) In the Page Order dropdown<br />
list, select Front to Back to print the pages in the<br />
same order as they are in the document, or select Back<br />
to Front to print the pages in the reverse order.<br />
7<br />
www.hp.com<br />
29<br />
30<br />
31<br />
32