

Standard (22-132) 1. Read through installation ... - Classic Auto Air
Standard (22-132) 1. Read through installation ... - Classic Auto Air
Standard (22-132) 1. Read through installation ... - Classic Auto Air

Create successful ePaper yourself
Turn your PDF publications into a flip-book with our unique Google optimized e-Paper software.
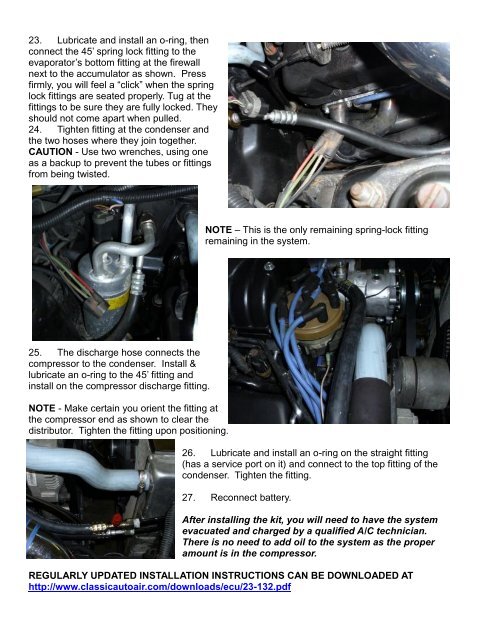
23. Lubricate and install an o-ring, then<br />
connect the 45’ spring lock fitting to the<br />
evaporator’s bottom fitting at the firewall<br />
next to the accumulator as shown. Press<br />
firmly, you will feel a “click” when the spring<br />
lock fittings are seated properly. Tug at the<br />
fittings to be sure they are fully locked. They<br />
should not come apart when pulled.<br />
24. Tighten fitting at the condenser and<br />
the two hoses where they join together.<br />
CAUTION - Use two wrenches, using one<br />
as a backup to prevent the tubes or fittings<br />
from being twisted.<br />
NOTE – This is the only remaining spring-lock fitting<br />
remaining in the system.<br />
25. The discharge hose connects the<br />
compressor to the condenser. Install &<br />
lubricate an o-ring to the 45’ fitting and<br />
install on the compressor discharge fitting.<br />
NOTE - Make certain you orient the fitting at<br />
the compressor end as shown to clear the<br />
distributor. Tighten the fitting upon positioning.<br />
26. Lubricate and install an o-ring on the straight fitting<br />
(has a service port on it) and connect to the top fitting of the<br />
condenser. Tighten the fitting.<br />
27. Reconnect battery.<br />
After installing the kit, you will need to have the system<br />
evacuated and charged by a qualified A/C technician.<br />
There is no need to add oil to the system as the proper<br />
amount is in the compressor.<br />
REGULARLY UPDATED INSTALLATION INSTRUCTIONS CAN BE DOWNLOADED AT<br />
http://www.classicautoair.com/downloads/ecu/23-<strong>132</strong>.pdf


