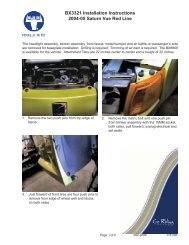
BX88274 High Current Fuse ByPass Switch Installation ... - Blue Ox
BX88274 High Current Fuse ByPass Switch Installation ... - Blue Ox
BX88274 High Current Fuse ByPass Switch Installation ... - Blue Ox

Create successful ePaper yourself
Turn your PDF publications into a flip-book with our unique Google optimized e-Paper software.
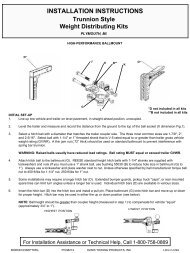
<strong>BX88274</strong><br />
<strong>High</strong> <strong>Current</strong> <strong>Fuse</strong> <strong>ByPass</strong> <strong>Switch</strong><br />
<strong>Installation</strong> Instructions<br />
Test the <strong>Fuse</strong> <strong>ByPass</strong> <strong>Switch</strong> by checking that when the button on the top of the <strong>Fuse</strong> <strong>ByPass</strong> <strong>Switch</strong><br />
is in the drive position that the car dash lights and functions operate the same as they did before.<br />
With the car engine and key turned fully off, flip the <strong>Fuse</strong> <strong>ByPass</strong> <strong>Switch</strong> to<br />
the tow position.<br />
All lights and operations that are controlled by the fuse in this circuit should<br />
be off. This mimics the fuse being removed from the fuse panel when towing.<br />
If the <strong>Fuse</strong> <strong>ByPass</strong> <strong>Switch</strong> operates as expected, continue, if not, please<br />
reference the Troubleshooting section.<br />
5. Remove the <strong>Fuse</strong> <strong>ByPass</strong> <strong>Switch</strong> connectors and adapter if supplied, from the fuse box. Note<br />
which terminal the red connector was installed in.<br />
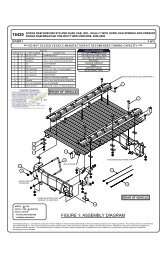
6. Select one of the methods below to route the wiring out of the fuse panel.<br />
Method A<br />
a. Measure from the end of the fuse panel to the center over the<br />
removed fuse terminals. Write down the dimensions.<br />
b. Measure from the side of the fuse panel to the same location over<br />
the removed fuse terminals and write down the dimension.<br />
c. Properly orient the fuse panel cover over the fuse panel and mark<br />
the two dimensions on the cover of the fuse panel.<br />
d. Drill a 5/8” hole at the intersection of these dimensions use a flat power auger.<br />
Method B<br />
a. Alternatively drill a 5/8” hole at the top, left corner of the cover using a flat power auger.<br />
7. Feed the <strong>Fuse</strong> <strong>ByPass</strong> <strong>Switch</strong> terminals through the hole insuring<br />
that the black loom extends from the hole.<br />
8. Reinstall the connectors and replace the cover making sure it<br />
locks on using the plastic tabs.<br />
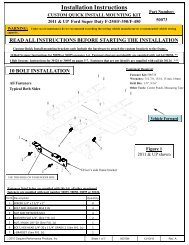
9. If a Mini <strong>Fuse</strong> <strong>ByPass</strong> <strong>Switch</strong> must be installed, it should be<br />
located at the lower, center of the top cover. Reference the dotted lines in the images shown<br />
above.<br />
Note: this requires a 3/4” hole and the drive position has the white dot side of the switch<br />
depressed when driving the vehicle and the tow position has the black (unmarked side)<br />
depressed when towing. This is opposite of the <strong>High</strong> <strong>Current</strong> <strong>Fuse</strong> <strong>ByPass</strong> <strong>Switch</strong>. Install the<br />
labels supplied with the white dot on the switch matched to the drive label.<br />
405-0241 Page 2 of 3 2/8/12