VPAL100 Software Upgrade Procedure - messkom.de
VPAL100 Software Upgrade Procedure - messkom.de
VPAL100 Software Upgrade Procedure - messkom.de

Create successful ePaper yourself
Turn your PDF publications into a flip-book with our unique Google optimized e-Paper software.
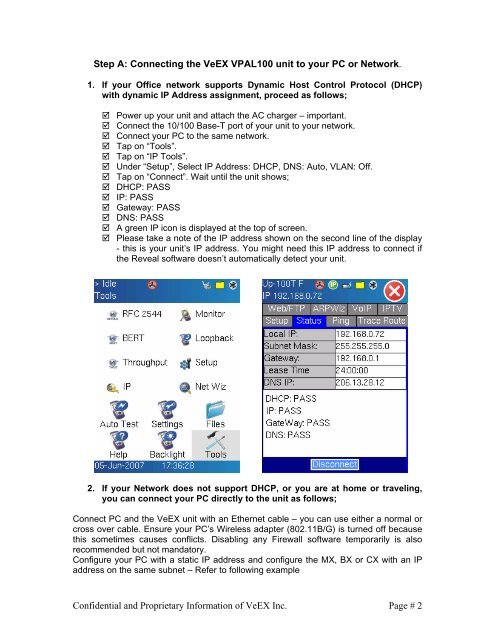
Step A: Connecting the VeEX <strong>VPAL100</strong> unit to your PC or Network.<br />
1. If your Office network supports Dynamic Host Control Protocol (DHCP)<br />
with dynamic IP Address assignment, proceed as follows;<br />
� Power up your unit and attach the AC charger – important.<br />
� Connect the 10/100 Base-T port of your unit to your network.<br />
� Connect your PC to the same network.<br />
� Tap on “Tools”.<br />
� Tap on “IP Tools”.<br />
� Un<strong>de</strong>r “Setup”, Select IP Address: DHCP, DNS: Auto, VLAN: Off.<br />
� Tap on “Connect”. Wait until the unit shows;<br />
� DHCP: PASS<br />
� IP: PASS<br />
� Gateway: PASS<br />
� DNS: PASS<br />
� A green IP icon is displayed at the top of screen.<br />
� Please take a note of the IP address shown on the second line of the display<br />
- this is your unit’s IP address. You might need this IP address to connect if<br />
the Reveal software doesn’t automatically <strong>de</strong>tect your unit.<br />
2. If your Network does not support DHCP, or you are at home or traveling,<br />
you can connect your PC directly to the unit as follows;<br />
Connect PC and the VeEX unit with an Ethernet cable – you can use either a normal or<br />
cross over cable. Ensure your PC’s Wireless adapter (802.11B/G) is turned off because<br />
this sometimes causes conflicts. Disabling any Firewall software temporarily is also<br />
recommen<strong>de</strong>d but not mandatory.<br />
Configure your PC with a static IP address and configure the MX, BX or CX with an IP<br />
address on the same subnet – Refer to following example<br />
Confi<strong>de</strong>ntial and Proprietary Information of VeEX Inc.<br />
Page # 2