SPS-5 v8 Programming Guide
SPS-5 v8 Programming Guide
SPS-5 v8 Programming Guide

Create successful ePaper yourself
Turn your PDF publications into a flip-book with our unique Google optimized e-Paper software.
<strong>SPS</strong>-5 <strong>v8</strong> <strong>Programming</strong> <strong>Guide</strong><br />
Refer to the <strong>SPS</strong>-5 <strong>v8</strong> “Quick Start <strong>Guide</strong>” for other Information.<br />
“We Deliver Information at the Speed of Light”<br />
Getting Started<br />
Insert the “Product Support CD” into a Laptop or Desktop.<br />
On the Main Screen of the CD find and install the Encoder Setup <strong>v8</strong> Program Software.<br />
Attach the paging system using the supplied standard RS-232 serial cable to Com Port 1.<br />
The <strong>SPS</strong>-5 <strong>v8</strong> will be Auto-Detected by the Encoder Setup Software when you Open the Com Port.<br />
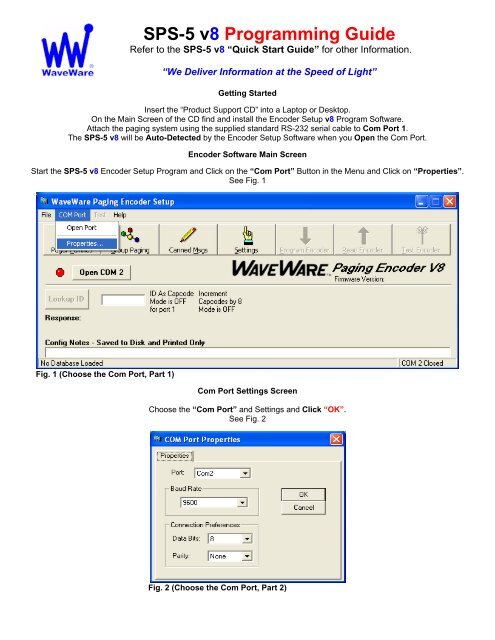
Encoder Software Main Screen<br />
Start the <strong>SPS</strong>-5 <strong>v8</strong> Encoder Setup Program and Click on the “Com Port” Button in the Menu and Click on “Properties”.<br />
See Fig. 1<br />
Fig. 1 (Choose the Com Port, Part 1)<br />
Com Port Settings Screen<br />
Choose the “Com Port” and Settings and Click “OK”.<br />
See Fig. 2<br />
Fig. 2 (Choose the Com Port, Part 2)
Encoder Software Main Screen<br />
On the Main Screen of Encoder Setup Program, Click on the “Open Com (X)” Button next to the RED Light.<br />
See Fig. 3<br />
Fig. 3 (Open the Com Port, Part 1)<br />
The Software will detect the <strong>SPS</strong>-5 <strong>v8</strong> Paging System and Open the Com Port and the Light will turn Green.<br />
See Fig. 4<br />
Fig. 4 (Open the Com Port, Part 2)<br />
The Software has detected the <strong>SPS</strong>-5 <strong>v8</strong> Paging System, Opened the Port and will now READ the Database.<br />
Click “OK” See Fig. 5<br />
Fig. 5 (You MUST read the Database)
On the Main Screen of Encoder Setup Program, Click on the “Pager Families” Icon to Open the Pager Database.<br />
See Fig. 6<br />
Fig. 6 (Open the Pager Database)<br />
Pager Families Screen: Enter Quantity, Pager ID’s, 7-Digit Cap Code, Baud Rate, Pager Type and Function code.<br />
Function Code 4 is normally for Alphanumeric Pagers and Function Code 1 is normally for Numeric Pagers.<br />
When Finished, Click “OK” See Fig. 7<br />
Fig. 7 (Enter Pagers in the Database) If Family 1 is Red, Click to Activate and to Add Pagers, it will turn Green.
On the Main Screen of Encoder Setup Program, Click on “Group Paging” to Open the Pager Database.<br />
See Fig. 8<br />
Fig. 8 (Group Paging)<br />
Pager Groups Screen: Enter The Group ID and list the pager ID’s you want in that group. The ID’s must be in the Pager<br />
Families, programmed previously. Note: In most cases you would use a “Common” Pager Cap Code in the Pager<br />
themselves instead of using Pager Groups. Using a Common Cap code will page all pagers at the same time; whereas<br />
using a group will page each pager one at a time, which is slow.<br />
Pager Groups would be used primarily when “Timer Active” Mode is needed.<br />
When finished, Click “OK” See Fig. 9<br />
Fig. 9 (Pager Groups Setup) If Group 1 is RED, click on the Box to Activate that Group, it will turn Green.
Pager Groups “Timer” Screen: This will send a page every 2 minutes to the pagers listed in that Group unless the “Host<br />
system issues a “Reset” Command. You create the message to be sent in the “Canned Messages” Screen.<br />
When Finished, Click “OK”. See Fig. 10<br />
Fig. 10 (Activate Timer) If Timer in the group is RED, click on the Box to Activate and it will turn Green.<br />
“Timer Message”: Choose the Number of the Canned Message you want to send.<br />
<strong>Programming</strong> the Canned (Predefined) Messages (See next page).
On the Main Screen of Encoder Setup Program, Click on the “Canned Messages” Icon to Open the Predefined<br />
Messages Screen.<br />
See Fig. 11<br />
Fig. 11 (Canned Messages)<br />
In the “Predefined Messages Setup” Screen type the Message you want sent, 1 Message per Line and Click “OK”.<br />
See Fig. 12<br />
Fig. 12 (Add Predefined Messages)
On the Main Screen of Encoder Setup Program, Click on the “Settings” Icon to Open the Predefined Messages Screen.<br />
See Fig. 13<br />
Fig. 13 (Settings Icon)<br />
The <strong>SPS</strong>-5 <strong>v8</strong> Encoder has a New “Dual Com Port” Feature as an Option (Must be Requested at Time of Purchase).<br />
The Dual Com Port is an “Add-On” Option and will add to the cost of the system.<br />
The “Advanced Settings” Button will give you more Options.<br />
The “Program Radio” Button is Non-Functional at this time.<br />
Below are the “Encoder Settings” screen for the Com Ports and Protocols.<br />
NOTE: Defaults are shown below. Fig. 14<br />
When Finished, Click “OK”.<br />
Encoder Settings:<br />
A: Protocol for the Com Port<br />
Choices are TAP, PET and TAP, COMP1, COMP2,<br />
WaveWare and Scope.<br />
B: Settings for the Com Port<br />
Choices are Verbose or Non-Verbose and Baud<br />
Rates of 300, 1200, 2400 and 9600 with Connection<br />
Settings of N 8, E 7 or 0 7.<br />
C: Restore Defaults Button<br />
Click on this Button to “Restore” Settings to<br />
Factory Defaults.<br />
D: Advanced Encoder Settings Button<br />
Click on this Button to open the “Advanced Encoder<br />
Settings Screen for more Options. See next page.<br />
Fig. 14 (Factory Defaults Shown)<br />
The “Advance Settings” Screen is next:
To enter the “Advanced Encoder Settings” Screen you must type in the User ID “Maint” (Not Case Sensitive).<br />
Click “OK”. See Fig. 15<br />
Fig. 15 (Enter Password “Maint”)<br />
Below is the Advanced Encoder Settings Screen.<br />
In MOST cases you will NOT have to adjust these settings.<br />
The “Restore Defaults” Button will set each field back to the original default settings and affects the Entire screen.<br />
When finished, Click “OK”.<br />
See Fig. 16<br />
Fig. 16 (Default Settings)<br />
Advance Encoder Settings – “Default Settings”: (As Shown) Fig. 16<br />
A: Carrier Detect = 0v<br />
B: Transmitter Duty Cycle = 66% and Carrier Signal Detection is “ON”<br />
C: Data Encoding Polarity = Normal<br />
D: Max Messages per Batch = 10 and Increment Cap Codes by 8 is “OFF” (Not Checked)<br />
E: Settings for Com Port = Serial Port RESET of Timed Paging (Checked) and<br />
Flow Control- Setting = Hardware (RTS/CTS)<br />
F: Restore Defaults- This Button will set the Entire Screen to Original Factory Default Settings.
<strong>Programming</strong>, Reading and Saving the Pager Database and Settings<br />
On the Main Screen of Encoder Setup Program, Click on the “Program Encoder” Icon to program the Encoder.<br />
Programs the <strong>SPS</strong>-5 <strong>v8</strong>’s Pager Database and all Settings.<br />
See Fig. 17<br />
Fig. 17 (Programs the <strong>SPS</strong>-5 <strong>v8</strong>’sEncoder)<br />
On the Main Screen of Encoder Setup Program, Click on the “Read Encoder” Icon to see the Database information.<br />
Used when you want to check to be sure everything you have programmed into the database was saved and is correct.<br />
See Fig. 18<br />
Fig. 18 (Reads the <strong>SPS</strong>-5 <strong>v8</strong>’s Pager Database and all Settings)<br />
Saving the Database and Settings, see next page.
It is recommended that you save the Database “Before and After” you have finished <strong>Programming</strong> the <strong>SPS</strong>-5 <strong>v8</strong>.<br />
See Fig. 19<br />
Fig. 19 (Click on “Files” and then Click “Save As” and name your file)<br />
After “Reading” the Database for the first time (before you make any changes to the database), save the information.<br />
This would give you a “Base Program” to fall back on in case you ever need the “Original” database and settings.<br />
After making your changes and you have programmed the new information into the Database, save your completed work<br />
as a different name, (maybe for that particular job location).<br />
Test the Encoder, Next Page.
Test the Encoder with Pagers<br />
On the Main Screen of Encoder Setup Program, Click on the “Test Encoder” Icon to send a test message.<br />
See Fig. 20<br />
Fig. 20 (Open the Test Encoder Screen)<br />
Test Encoder Screen<br />
In this screen you can Test your Pagers, Create and Archive Messages, View Com Port Logging, save the Logs to a File.<br />
See Fig. 21<br />
Fig. 21 (Test Encoder Screen)<br />
A: Pager Pin = Enter the Pager “ID” of the pager you want to test. It MUST match the Pager ID in the Database.<br />
B: Pager Message = Type the Message you want to send to the Pager.<br />
C: Message Archive = When you type a Message (B) you have the choice to save it by Highlighting the Message and<br />
click on the “ADD” Button. The Message will show in the Archive Window (C) and you may click on it anytime to move it to<br />
the Pager Message Window to send that message to a pager. You can “Replace” any message with a different message<br />
or “Delete” a Message from the Archive List.<br />
D: Com Port Log = Shows a Log of All Activity with the Option of saving the Logs to a file.<br />
E: Send Button = Click on this Button to send the message to a pager.
Range Test Function<br />
This Function is to help test the “Coverage Area” of the transmitter.<br />
To use the “Range Test”, you must first enter in a “Pager ID” (A) and the “Pager ID” must be valid in the Database.<br />
After you enter the “Pager ID”, then you can click “Start Range Test”.<br />
See Fig. 22<br />
Fig. 22 (Range Test Function)<br />
Range Test Setup<br />
In this screen you can use the Default “Test” message or type any message in the “Base Message” Field (A).<br />
See Fig. 23<br />
Fig. 23 (Range Test Setup)<br />
A: Base Message = Use Default Message “Test” or any Custom message you want.<br />
B: Pin = Use the Pager ID you entered in previous screen or type another Pager ID you want to use.<br />
C: Cycle Time = Default is 30 seconds but you may enter a different cycle time.<br />
D: Start / Cancel = When ready click “Start” to begin test. When finished click “Cancel” to end the Range Test.
Lookup ID Function<br />
The “Lookup ID” Function (A) will help you determine whether a Pager ID number you want to use is Valid or not. If it is<br />
valid, the “Response:” will show the Pager Information (B) and if the ID is NOT in the Pager Families Database, it will be<br />
Invalid and the “Response:” will show “Pager ID is Invalid”.<br />
See Fig. 24<br />
Fig. 24 (Lookup ID Function and Response)<br />
“We Deliver Information at the Speed of Light”<br />
WaveWare Sales: 1.800.373.1466 - WaveWare Fax: 972.479.1735<br />
WaveWare Technical Support: 1.800.373.1466 x216 - Website: www.WirelessMessaging.com