
You also want an ePaper? Increase the reach of your titles
YUMPU automatically turns print PDFs into web optimized ePapers that Google loves.
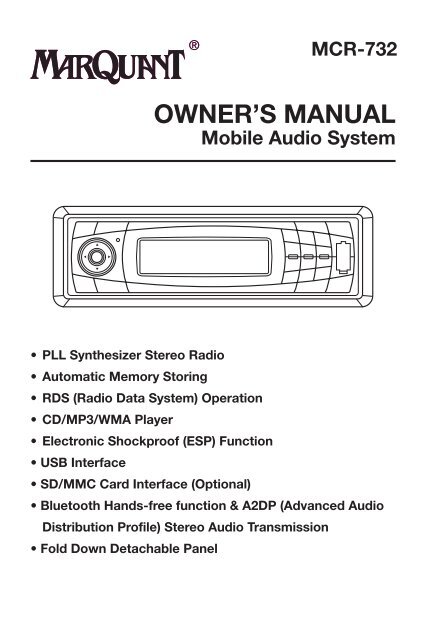
MCR-732<br />
OWNER’S MANUAL<br />
Mobile Audio System<br />
• PLL Synthesizer Stereo Radio<br />
• Automatic Memory Storing<br />
• RDS (Radio Data System) Operation<br />
• CD/MP3/WMA Player<br />
• Electronic Shockproof (ESP) Function<br />
• USB Interface<br />
• SD/MMC Card Interface (Optional)<br />
• Bluetooth Hands-free function & A2DP (Advanced Audio<br />
Distribution Profile) Stereo Audio Transmission<br />
• Fold Down Detachable Panel
CONTENTS<br />
Installation ...........................................3<br />
Take out screw before installation.........3<br />
DIN Front-Mount (Method A) ................3<br />
Installing the unit...................................3<br />
Removing the unit.................................4<br />
DIN Rear-Mount (Method B) .................4<br />
Using the detachable front panel ......5<br />
Wiring Connection ..............................6<br />
Location of keys..................................7<br />
Basic operation ...................................8<br />
Switching on/off the unit.......................8<br />
Faceplate release..................................8<br />
Sound adjustment.................................8<br />
System setting ......................................8<br />
Mute ......................................................8<br />
Loudness ..............................................8<br />
Set the clock .........................................8<br />
Equalization...........................................9<br />
Reset function.......................................9<br />
Mode selection .....................................9<br />
ESP function .........................................9<br />
Radio operation...................................9<br />
Switching to radio mode.......................9<br />
Selecting the frequency band ...............9<br />
Selecting station ...................................9<br />
Automatic memory storing &<br />
program scanning .................................9<br />
Scan ......................................................9<br />
Station storing.......................................9<br />
RDS (radio data system) operation.......9<br />
CD/MP3/WMA operation..................10<br />
Switching to CD mode........................10<br />
Selecting tracks ..................................10<br />
Pausing playing...................................10<br />
Previewing all tracks ...........................10<br />
Repeating the same track...................10<br />
Playing all tracks in random................10<br />
Ejecting a disc.....................................11<br />
Special function for MP3/WMA disc...11<br />
USB play operation ...........................11<br />
Support MP3/WMA decoding mode...<br />
............................................................12<br />
2<br />
SD/MMC operation (optional) ..........12<br />
Disc notes ..........................................13<br />
Bluetooth operation..........................13<br />
Preparing for operation .......................13<br />
Pairing .................................................13<br />
Re-Connect.........................................13<br />
T-menu ................................................14<br />
Answering/Rejecting an incoming call...15<br />
Making an outgoing call......................15<br />
Transfer the call between mobile phone<br />
and the unit .........................................15<br />
Bluetooth audio (A2DP function).........15<br />
Specification......................................19<br />
Trouble shooting ...............................20
INSTALLATION<br />
Notes:<br />
• Choose the mounting location where<br />
the unit will not interfere with the normal<br />
driving function of the driver.<br />
• Before finally installing the unit, connect<br />
the wiring temporarily and make sure it<br />
is all connected up properly and the unit<br />
and the system work properly.<br />
• Use only the parts included with the unit<br />
to ensure proper installation. The use<br />
of unauthorized parts can cause<br />
malfunctions.<br />
• Consult with your nearest dealer if<br />
installation requires the drilling of holes<br />
or other modifications of the vehicle.<br />
• Install the unit where it does not get in<br />
the driver’s way and cannot injure the<br />
passenger if there is a sudden stop, like<br />
an emergency stop.<br />
• If installation angel exceeds 30°from<br />
horizontal, the unit might not give its<br />
optimum performance.<br />
30˚<br />
• Avoid installing the unit where it would<br />
be subject to high temperature, such as<br />
from direct sunlight, or from hot air, from<br />
the heater, or where it would be subject<br />
to dust, dirt or excessive vibration.<br />
DIN FRONT/REAR-MOUNT<br />
This unit can be properly installed either<br />
from “Front” (conventional DIN Frontmount)<br />
or “Rear” (DIN Rear-mount<br />
installation, utilizing threaded screw holes<br />
at the sides of the unit chassis). For details,<br />
refer to the following illustrated installation<br />
methods.<br />
TAKE OUT SCREW BEFORE<br />
INSTALLATION<br />
Before install the unit, please remove the<br />
two screws.<br />
Take out screw before installation.<br />
3<br />
DIN FRONT-MOUNT (Method A)<br />
Installation Opening<br />
This unit can be installed in any dashboard<br />
having an opening as shown below:<br />
182 mm<br />
Installing the unit<br />
Be sure you test all connections first, and<br />
then follow these steps to install the unit.<br />
1.Make sure the ignition is turned off, and<br />
then disconnect the cable from the<br />
vehicle battery’s negative (-) terminal.<br />
2.Disconnect the wire harness and the<br />
antenna.<br />
3.Press the release button on the front<br />
panel and remove the control panel (see<br />
the steps of “removing the front panel”).<br />
4.Lift the top of the outer trim ring then<br />
pull it out to remove it.<br />
5.The two supplied keys release tabs<br />
inside the unit’s sleeve so you can<br />
remove it. Insert the keys as far as they<br />
will go (with the notches facing up) into<br />
the appropriate slots at the middle left<br />
and right sides of the unit. Then slide<br />
the sleeve off the back of the unit.<br />
Sleeve<br />
L Key<br />
Outer Trim Ring<br />
Front Panel<br />
R Key<br />
53 mm<br />
6. Mount the sleeve by inserting the sleeve<br />
into the opening of the dashboard and<br />
bend open the tabs located around the<br />
sleeve with a screwdriver. Not all tabs<br />
will be able to make contact, so examine<br />
which ones will be most effective.<br />
Bending open the appropriate tabs<br />
behind the dashboard to secure the<br />
sleeve in place.<br />
Screwdriver<br />
Tabs<br />
Dashboard<br />
Sleeve
INSTALLATION<br />
7.Reconnect the wire harness and the<br />
antenna and be careful not to pinch any<br />
wires or cables.<br />
8.Slide the unit into the sleeve until it locks<br />
into place.<br />
9.To further secure the unit, use the<br />
supplied metal strap to secure the<br />
back of the unit in place. Use the<br />
supplied hardware (Hex Nut (M5mm)<br />
and Spring Washer) to attach one end<br />
of the strap to the mounting bolt on the<br />
back of the unit. If necessary, bend the<br />
metal strap to fit your vehicle’s mounting<br />
area. Then use the supplied hardware<br />
(Tapping Screw (5x25mm) and Plain<br />
Washer) to attach the other end of metal<br />
strap to a solid metal part of the vehicle<br />
under the dashboard. This strap also<br />
helps ensure proper electrical grounding<br />
of the unit. Note to install the short<br />
threading terminal of the mounting bolt<br />
to the back of the unit and the other<br />
long threading terminal to the<br />
dashboard.<br />
Metal Strap<br />
Mounting Bolt<br />
Spring Washer<br />
Hex Nut<br />
Plain Washer<br />
Tapping Screw<br />
10. Reconnect the cable to the vehicle<br />
battery’s negative (-) terminal. Then<br />
replace the outer trim ring and install<br />
the unit’s front panel (see the steps of<br />
“installing the front panel”).<br />
Removing the unit<br />
1.Make sure the ignition is turned off, then<br />
disconnect the cable from the vehicle<br />
battery’s negative (-) terminal.<br />
2.Remove the metal strap attached the<br />
back of the unit (if attached).<br />
3.Press the release button to remove the<br />
front panel.<br />
4.Lift the top of the outer trim ring then<br />
pull it out to remove it.<br />
4<br />
5.Insert both of the supplied keys into the<br />
slots at the middle left and right sides<br />
of the unit, then pull the unit out of the<br />
dashboard.<br />
DIN REAR-MOUNT (Method B)<br />
If your vehicle is a Nissan, Toyota, follow<br />
these mounting instructions. Use the<br />
screw holes marked T (Toyota), N (Nissan)<br />
located on both sides of the unit to fasten<br />
the unit to the factory radio mounting<br />
brackets supplied with your vehicle.<br />
Factory Radio<br />
Mounting<br />
Bracket<br />
Screw<br />
Side view showing<br />
Screw Holes marked T, N<br />
Screw<br />
Dashboard or<br />
Console<br />
To fasten the unit to the factory radio<br />
mounting brackets.<br />
Align the screw holes on the bracket with<br />
the screw holes on the unit, and then<br />
tighten the screws (5x5mm) on each side.<br />
Note: the outer trim ring, sleeve and the<br />
metal strap are not used for method B<br />
installation.
USING THE DETACHABLE FRONT PANEL<br />
To Detach the Front Panel<br />
1.Press the release ( ) button, then the<br />
front panel will be folded down.<br />
Open<br />
2.To remove the front panel, lift it up at a<br />
little angle from horizontal position, then<br />
first pull out the right side and then pull<br />
out the left side.<br />
The left side<br />
Front Panel<br />
Front Panel<br />
The left side<br />
Front Panel<br />
Protective Case<br />
The right side<br />
3.For safekeeping, store the front panel<br />
in the supplied protective case<br />
immediately after being removed.<br />
To Install the Front Panel<br />
1.To install the front panel, first insert the<br />
left side into proper position then insert<br />
the right side into place.<br />
The right side<br />
2.When the two sides fixed into place,<br />
push the front panel into main unit.<br />
3.Note that if the front panel fails to lock<br />
in position properly, pressing control<br />
button may not function and the display<br />
may be missing some segments. Press<br />
the release button and then reinstall the<br />
front panel again.<br />
5<br />
Precautions when handling<br />
1.Do not drop the front panel.<br />
2.Do not put pressure on the display or<br />
control buttons when detaching or reinstalling<br />
the front panel.<br />
3.Do not touch the contacts on the front<br />
panel or on the main unit body. It may<br />
result in poor electrical contact.<br />
4.If any dirt or foreign substances adhered<br />
on the contacts, they can be removed<br />
with a clean and dry cloth.<br />
5.Do not expose the front panel to high<br />
temperatures or direct sunlight in<br />
anywhere.<br />
6.Keep away any volatile agents (e.g.<br />
benzene, thinner, or insecticides) from<br />
touching the surface of the front panel<br />
7.Do not attempt to disassemble the front<br />
panel.
WIRING CONNECTION<br />
ISO CONNECTION<br />
Antenna Socket<br />
Rch RED<br />
Lch WHITE<br />
(Green/Black)<br />
(Green)<br />
(White/Black)<br />
(White)<br />
(Gray/Black)<br />
(Gray)<br />
(Violet/Black)<br />
(Violet)<br />
Part C<br />
Part B<br />
Part A<br />
4-speaker System<br />
GREY<br />
Rear Left<br />
Speaker<br />
Front Left<br />
Speaker<br />
Front Right<br />
Speaker<br />
Rear Right<br />
Speaker<br />
Ground Wire (Black)<br />
+12V Accessory/Switch (Red)<br />
Power Antenna/Amplifier Turn On (Blue)<br />
+12V Constant Power Supply (Yellow)<br />
6<br />
FUSE (15A)<br />
2x25W<br />
2-speaker System<br />
(Green/Black)<br />
(Green)<br />
Lch<br />
(White/Black)<br />
Speaker<br />
(White)<br />
(Gray/Black)<br />
(Gray)<br />
Rch<br />
(Violet/Black)<br />
Speaker<br />
(Violet)
OPERATION<br />
LOCATION OF KEYS<br />
1 3 4 2 22 5 6 7 8 9 10 11 12 13 14<br />
24 23<br />
1. / (volume up/down buttons)<br />
2. SEL / MENU<br />
3. (release button)<br />
4. (hang up)/BND/LOU/ENT/CLR<br />
5. LCD<br />
6. DIR-<br />
7. SHF<br />
8. PAU<br />
9. SCN<br />
10. MODE/PAIR<br />
11. PRT<br />
12. / MUTE<br />
13. DIR+<br />
14. USB interface<br />
15. PTY<br />
21<br />
25<br />
20 19 18 17 16<br />
26 27<br />
29 28<br />
7<br />
15<br />
16. # SCAN/RE-CON<br />
17. T-MENU<br />
18. DISP<br />
19. */ + AS/ PS/ Navi-SCH<br />
20. AF<br />
21. TA/ EQ<br />
22. Mic (microphone)<br />
23. / (tune/seek/track down/up<br />
buttons)<br />
24. (pick up)<br />
25. 1-6 preset buttons<br />
26. disc slot<br />
27. eject button<br />
28. SD/MMC interface<br />
29. reset button
OPERATION<br />
BASIC OPERATION<br />
• SWITCHING ON/OFF THE UNIT<br />
Press button (12) to turn on the unit,<br />
When the unit is on, press and hold<br />
button (12) to turn the unit off.<br />
• FACEPLATE RELEASE<br />
Press button (3) to detach the<br />
removable faceplate.<br />
• SOUND ADJUSTMENT<br />
Shortly press SEL/MENU button (2) to<br />
enter AUDIO SETTING mode, use<br />
SEL/MENU button (2) to select the<br />
desired adjustment mode. The<br />
adjustment mode will change in the<br />
following order:<br />
VOL BAS TRE BAL FAD<br />
(Volume) (Bass) (Treble) (Balance) (Fader)<br />
Shortly press / (1) to adjust the<br />
sound quality up or down step by step,<br />
press and hold / (1) will change the<br />
sound quality continuously.<br />
• SYSTEM SETTING<br />
Press and hold SEL/MENU button (2)<br />
on the front panel to enter SYSTEM<br />
SETTING mode. Then shortly press<br />
SEL/MENU button (2) to select the item<br />
you want to change, and use / (1)<br />
to change the corresponding setting.<br />
1) BEEP ON/OFF<br />
Use volume Up/Down button to set<br />
Beep sound on or off.<br />
2) P-VOL<br />
Use Volume Up/Down button to select<br />
the volume level when the unit turns on.<br />
3) AREA EUR/USA<br />
Use Volume Up/Down button to set<br />
EUR or US area frequency spacing<br />
4) HOUR 24H/12H<br />
Use Volume Up/Down button to set<br />
24Hours or 12Hours format<br />
5) PCLK ON/OFF<br />
Use Volume Up/Down button to set<br />
clock on or off when power off, When<br />
set PCLK ON, clock will appear with<br />
backlight on when power off.<br />
8<br />
• MUTE<br />
Shortly press MUTE button (12) will<br />
mute the sound instantly, press it again<br />
will resume the sound.<br />
• LOUDNESS<br />
Press LOU button (4) for several<br />
seconds to switch loudness function<br />
on, and “LOUD” will appear on the LCD.<br />
Press it for several seconds again to<br />
release this function, and “LOUD” will<br />
disappear.<br />
• SET THE CLOCK<br />
Press the DISP button (18) shortly until<br />
the clock is shown on the LCD display.<br />
Then hold down DISP button (18) until<br />
the clock flashes. Then press the button<br />
to change minutes or the button to<br />
change hours.<br />
• EQUALIZATION<br />
Press EQ button (21) shortly to turn on<br />
equalization function and to select<br />
desired audio mode. There are several<br />
kinds of mode as below:<br />
CLASSIC POP ROCK DSP OFF<br />
• RESET FUNCTION<br />
Reset button (29) must be activated<br />
with either a ballpoint pen or thin metal<br />
object. The reset button is to be<br />
activated for the following reasons:<br />
- Initial installation of the unit when all<br />
wiring is completed.<br />
- All the function buttons do not operate.<br />
- Error symbol on the display.<br />
Note: if press the reset button (29), the<br />
unit can’t work yet, please use a cotton<br />
swab soaked in isopropyl alcohol to<br />
clean the socket on the front panel.<br />
• MODE SELECTION<br />
Shortly press MODE button (10) to<br />
select the desired mode, such as Radio,<br />
CD (MP3), USB, SD, AUX.<br />
When there isn’t an USB or SD<br />
connected to the unit, the corresponding<br />
mode will be skipped.<br />
For Bluetooth function, when pairing<br />
successful, you can select BT or A2DP<br />
(Bluetooth audio) mode through MODE<br />
button.
OPERATION<br />
• ESP FUNCTION<br />
The unit can be shockproof about thirty<br />
seconds.<br />
RADIO OPERATION<br />
• SELECTING THE FREQUENCY BAND<br />
At radio mode, press BND button (4)<br />
shortly to select the desired band.<br />
The reception band will change in the<br />
following order:<br />
FM1 FM2 FM3 MW<br />
• SELECTING STATION<br />
Shortly press / buttons (23) to<br />
activate automatic seek function. Press<br />
for several seconds until “MANUAL”<br />
appears on the display, the manual<br />
tuning mode is selected. If both buttons<br />
have not been pressed for several<br />
seconds, they will return to seek tuning<br />
mode and “AUTO” appears on the<br />
display then disappears.<br />
• AUTOMATIC MEMORY STORING &<br />
PROGRAM SCANNING<br />
- Automatic memory storing<br />
Press AS/PS button (19) for several<br />
seconds “SEARCH” will appear on LCD.<br />
the radio will search from the current<br />
frequency and checks the signal<br />
strength until one cycle search is<br />
finished. And then 6 strongest stations<br />
are stored into the corresponding preset<br />
number button.<br />
- Program scanning Press AS/PS button<br />
(19) shortly to scan preset station. And<br />
the corresponding station number<br />
P1~P6 will flash on LCD.<br />
• SCAN<br />
Press SCAN (button (16) to enter scan<br />
mode, the unit will scan to higher<br />
frequency station and keep on each<br />
station for several seconds (the<br />
corresponding frequency will flash 3<br />
times on LCD).<br />
• STATION STORING<br />
Press any one of the preset buttons (25)<br />
(1 to 6) to select a station, which had<br />
been stored in the memory. Press this<br />
button for several seconds (until 2’nd<br />
beeps come out), current station is<br />
stored into the number button.<br />
9<br />
RDS (RADIO DATA SYSTEM)<br />
OPERATION<br />
- Setting RDS mode<br />
Press AF button (20) to switch<br />
on or off RDS mode.<br />
- USE PTY BUTTON (15)<br />
Press PTY button (15) will enter PTY<br />
SELECT mode, the program name will<br />
be displayed on the LCD, you can use<br />
/ (1) to select the items and press<br />
/ buttons (23) to begin search the<br />
corresponding program.<br />
-RDS Setting<br />
Press and hold PTY button (15) to<br />
enter RDS Setting mode.Then shortly<br />
press PTY button(15) to select the item<br />
you want to change,and use Volume-<br />
Up/Down button to change the<br />
corresponding setting as below:<br />
TA SEEK(TA ALARM)-- > PI SOUND<br />
(PI MUTE)-- > RETUNE S(RETUNEL)<br />
-- > MASK DPI(MASK ALL)-- > EONTA DX<br />
(EONTA LO)-- > TAVOL 30-- > REG OFF<br />
(REG ON)<br />
- Listening to Traffic Announcement<br />
TA button (21) is operated as follows:<br />
When pressed and held for several<br />
seconds, it is engaging whether /<br />
mode on or off.<br />
When TA mode, is on and a traffic<br />
announcement is transmitted:<br />
When the unit was in CD (MP3) mode<br />
or AUX IN mode, it will switch<br />
temporarily to radio mode.<br />
Temporary switch over to an EON linked<br />
station when EON detects a traffic<br />
announcement on that other program.<br />
If the volume level was under the<br />
threshold point it will be raised to the<br />
threshold point. But the user changed<br />
the volume level, which was more than<br />
the threshold point (min. TA volume<br />
level), it will be set to the last level.<br />
When TA mode is on, TA of individual<br />
segment is turned on.
OPERATION<br />
When a TP station is received, TP of<br />
individual segment is turned on.<br />
TA interruption function<br />
The current traffic announcement is<br />
cancelled by pressing this key. But the<br />
TA mode will not be off.<br />
The RDS data used are the PI, PS, AF,<br />
TP, TA, EON and PTY data.<br />
PI: Program Identification code<br />
Code for identifying programs<br />
PS: Program Service Name<br />
Broadcast station name data<br />
expressed in alphanumerically<br />
characters<br />
AF: Alternative Frequencies<br />
Frequency list of broadcasting<br />
stations transmitting the same<br />
program<br />
TP: Traffic Program Identification<br />
Identification data for traffic<br />
information-broadcasting station<br />
TA: Traffic Announcement Identification<br />
Identification data showing traffic<br />
information is being transmitted or<br />
not<br />
EON: Enhanced Other Networks<br />
Information<br />
Broadcasting information on PI,<br />
AF, TP, TA, etc, relating to<br />
networks other than the network<br />
used for current reception<br />
PTY: Program Type Code<br />
Contents of programs such as<br />
news, light music, sports etc.<br />
10<br />
CD/MP3/WMA OPERATION<br />
SWITCHING TO CD MODE<br />
If there is no CD/MP3/WMA disc inserted<br />
into the driver:<br />
Gently insert the CD/MP3/WMA disc with<br />
the printed side uppermost into the disc<br />
compartment until you feel some<br />
resistance. The disc will be drawn into<br />
the driver automatically. CD/MP3/WMA<br />
playback begins.<br />
Note when you insert the disc, you must<br />
be sure the LED on the disc slot is lighting.<br />
When the unit is on, the disc can be drawn<br />
into the driver automatically.<br />
If a CD/MP3/WMA disc is already inserted<br />
in the driver:<br />
Keep pressing MODE button (10) shortly.<br />
• SELECTING TRACKS<br />
Press / (23) will skip to the<br />
previous/next track. Track number will<br />
be showed on display. Press and hold<br />
/ (23) will fast reverse/forward. Disc<br />
play starts when you release the button.<br />
• PAUSING PLAYING<br />
Press PAU button (8) to pause the<br />
player. Press it again to resume play.<br />
• PREVIEWING ALL TRACKS<br />
Press SCN button (9) to play first several<br />
seconds of each track on the current<br />
disc. Press again to stop intro and listen<br />
to track.<br />
• REPEATING THE SAME TRACK<br />
Press RPT button (11) to continuously<br />
repeat the same track. Press it again<br />
to stop repeat.<br />
• PLAYING ALL TRACKS IN RANDOM<br />
Press SHF button (7) to play all tracks<br />
on the disc in random order. Press again<br />
to cancel the function.
OPERATION<br />
• EJECTING A DISC<br />
Press button (27) to stop<br />
CD/MP3/WMA playing and eject the<br />
disc from the disc slot (26).<br />
• SPECIAL FUNCTIONS FOR MP3/<br />
WMA DISC<br />
1) SELECTING DIRECTORY UP/DOWN<br />
Press DIR- button (6) or DIR+ button<br />
(13) to select directory downward or<br />
upward. If the MP3/WMA disc does not<br />
contain any directory, there is no<br />
function of pressing DIR- button (6) or<br />
DIR+ button (13).<br />
2) SELECTING TRACKS BY AS/PS /Navi-<br />
SCH BUTTON<br />
AS/PS (Navi-SCH) button (19) is<br />
assigned as Digital Audio Mode<br />
selection button in MP3 operation.<br />
When pressed, it is activated as<br />
selecting each mode of Digital Audio.<br />
“Searching track” => “Searching<br />
Directory or File Name”=> “Navigation”<br />
from root by volume up/down buttons.<br />
- Searching Track Directly<br />
Press AS/PS (Navi-SCH) button (19)<br />
for one time. It enters into “Searching<br />
track” in Digital Audio CD.<br />
You can use the volume up/down<br />
buttons / (1) to select the track<br />
number in a sequence. The<br />
corresponding track number, such as<br />
“TRACK 12” will appear on the display.<br />
Press BND/LOU/ENT button (4) to<br />
confirm and start the play.<br />
- Searching Directory or File Name<br />
Press AS/PS (Navi-SCH) button (19)<br />
for two times. It enters into “Searching<br />
Directory or File Name” in Digital Audio<br />
CD.<br />
- Use the volume up/down buttons to<br />
select the characters A to Z, blank, 0<br />
to 9, _, -, +.<br />
- Press SEL button (2) to confirm entry<br />
of each characters.<br />
- Press BND/LOU/ENT button (4) to<br />
start the title search.<br />
In case the selected title is a directory<br />
name, display will show (‘ ‘), then<br />
- Use the volume up/down buttons<br />
11<br />
/ (1) to list all songs under this<br />
directory and select the title.<br />
- Press BND/LOU/ENT button (4) to<br />
confirm and start the play.<br />
- Repeat the above steps if the newly<br />
selected title is again a directory.<br />
- Searching From Root Directory<br />
Press AS/PS (Navi-SCH) button (19)<br />
for three times. The unit searches file<br />
or directory from root by tune/seek/track<br />
up/down buttons / (23). (D-DIR icon<br />
turns on if the name is directory). Display<br />
will list all available directories and<br />
songs. Select the desired<br />
directory/songs by using volume<br />
up/down buttons / (1) and<br />
BND/LOUD/ENT button (24) to confirm.<br />
If the selected title is a song, it starts<br />
to play.<br />
If the selected title is a directory name,<br />
display will show (‘ ‘), then use the<br />
volume up/down buttons / (1) to list<br />
all songs under this directory and select<br />
the title. Press BND/LOU/ENT button<br />
to confirm and start the play. Repeat<br />
the above steps if the newly selected<br />
title is again a directory.<br />
3) DISPLAY INFORMATION<br />
Press DISP button (18) to show the<br />
following information, such as the track<br />
number, the clock and other information.<br />
For the disc with MP3 ID3 function<br />
version only: ID3 TAG (if available: song<br />
title, directory name, artist name, other<br />
contents…) will be displayed on the<br />
screen without pressing DISP button.<br />
USB PLAY OPERATION<br />
In the front panel of the unit, there is an<br />
USB interface (14). You can connect an<br />
USB device through this interface (14).<br />
When you connect an USB device through<br />
the interface, the unit will search the MP3<br />
files or WMA files in the USB driver and<br />
start to play MP3 files or WMA files<br />
automatically.<br />
If in other mode, you can also press MODE<br />
button (10) to select USB mode. When<br />
playing the MP3 files or WMA files in the
OPERATION<br />
device, the operation is the same with the<br />
MP3/WMA operation described above.<br />
Note<br />
• The main unit can only support the<br />
standard USB-memory disc which is<br />
approved by Microsoft.<br />
• USB MP3 player is not a standard which<br />
means different brand name or different<br />
models have their own standard. So<br />
our product cannot support every MP3<br />
player.<br />
• When connecting an MP3 player and<br />
there has normal battery in the player<br />
(non rechargeable battery), you should<br />
remove the battery from the MP3 player<br />
then connect it to the USB interface.<br />
Otherwise, it may cause battery burst<br />
• When in USB play mode, be sure not<br />
to remove the USB driver from the USB<br />
interface.<br />
CAUTION<br />
When there are important files in the USB<br />
device, do not connect it to the main unit<br />
to play. And don’t play the CD-R/RW disc<br />
that has important files in it. Because any<br />
wrong operation may cause files loss.<br />
And our company assumes no<br />
responsibility for this.<br />
SUPPORTED MP3/WMA DECODING<br />
MODES<br />
The main unit supports MP3/WMA<br />
(Windows Media Audio) decoding modes<br />
as below.<br />
Standard<br />
MPEG1 Audio<br />
Layer 3<br />
(44.1kHz)<br />
Windows<br />
Media Audio<br />
(44.1kHz)<br />
Bit Rate<br />
(kbps)<br />
16~320Kbps<br />
& VBR<br />
16~320Kbps<br />
& VBR<br />
The USB solution can support:<br />
1. Folder: 256 max.<br />
2. File: 30000 max.<br />
Supports<br />
Mode<br />
Stereo<br />
Stereo<br />
12<br />
SD/MMC OPERATION (OPTIONAL)<br />
According to the customer’s need, the<br />
unit will add a SD/MMC interface. See<br />
below, the SD/MMC interface is on the<br />
housing of the unit.<br />
SD/MMC INTERFACE<br />
When you insert a SD/MMC card in the<br />
SD/MMC interface, the unit will search<br />
the MP3 files or WMA files in the card and<br />
start to play MP3 files or WMA files<br />
automatically. The operation is the same<br />
with the MP3 operation described above.<br />
If in other mode, you can also press<br />
MODE button (10) to select SD/MMC<br />
mode.<br />
When there are important files in the<br />
SD/MMC card, do not connect it to the<br />
main unit to play.
OPERATION<br />
DISC NOTES<br />
A. Notes on discs:<br />
1.Attempting to use non-standard shape<br />
discs (e.g. square, star, heart) may<br />
damage the unit. Be sure to use round<br />
shape CD discs only for this unit.<br />
2.Do not stick paper or tape, etc, onto<br />
the label side or the recording side of<br />
any discs, as it may cause a malfunction.<br />
3.Dirt, dust, scratches and warping discs<br />
will cause misoperation.<br />
B. Notes on CD-Rs (recordable<br />
CDs)/CD-RWs (rewritable CDs):<br />
1.Be sure to use discs with following<br />
marks only for the unit to play:<br />
Recordable Rewritable<br />
2.The unit cannot play a CD-R and CD-<br />
RW that is not finalized. (Please refer to<br />
the manual of your CD-R/CD-RW<br />
recorder or CD-R/CD-RW software for<br />
more information on finalization<br />
process).<br />
3.Depending on the recording status,<br />
conditions of the disc and the<br />
equipment used for the recording, some<br />
CD-Rs/CD-RWs may not be played on<br />
this unit. (see *1)<br />
*1: To have more reliable play back, please<br />
see following recommendations:<br />
a: Use CD-RWs with speed 1x to 4x and<br />
write with speed 1x to 2x.<br />
b. Use CD-Rs with speed 1x to 8x and<br />
write with speed 1x to 2x.<br />
c. Do not play a CD-RW which has been<br />
written for more than 5 times.<br />
C. Notes on MP3 files (MP3 Version<br />
Only):<br />
1.The disc must be in the ISO9660 level<br />
1 or level 2 format, or Joliet or Romeo<br />
in the expansion format.<br />
2.When naming a MP3 file, be sure the<br />
file name extension is “.MP3”.<br />
3.For a non-MP3 file, even though the file<br />
name extension is “.MP3”, the unit<br />
cannot recognize it.<br />
BOUETOOTH OPERATION<br />
• PREPARE FOR OPERATION<br />
(1) When use Bluetooth, please make sure<br />
the mobile phone supports Bluetooth<br />
function.<br />
13<br />
(2) For the different kind of mobile phone,<br />
Bluetooth emissive power has some<br />
difference. To get the best conversation<br />
quality, it is commended that the<br />
distance between the mobile phone<br />
and the unit is within 3m. And please<br />
don’t put any metal object or any<br />
obstacle between the path of the<br />
mobile phone and the unit.<br />
• PAIRING<br />
1) Long pressing MODE button until LCD<br />
display "PAIRING"to enter paring mode.<br />
On the mobile phone, select the<br />
Bluetooth set up. (Please refer to the<br />
instruction manual of your mobile phone<br />
on how to operate Bluetooth.)<br />
2) “HOTWELL_Vxx.xx.x” should appear<br />
in the list,on your mobile phone, please<br />
select“HOTWELL_Vxx.xx.x” and then<br />
input password “0000”.<br />
3) The unit has auto pairing function, it<br />
will searching the Bluetooth mobile<br />
phone automatically.<br />
4) When successful paired, the Bluetooth<br />
sign will be displayed on LCD.<br />
5) If pairing failed, try to pair again within<br />
several seconds. You can refer to the<br />
operation about your mobile phone,<br />
delete the device that just searching for<br />
and repair again.<br />
6) Note: During pairing, only (release)<br />
button (3), volume up/down buttons<br />
/ (1) and MUTE button (12) are<br />
functional, other keys are disabled<br />
during pairing mode.During pairing,if you<br />
want to exit it ,long pressing MODE button<br />
until LCD appears *PAIR END*.<br />
• RE-CONNECTING<br />
This unit is built-in auto-reconnection<br />
function. In some conditions, the unit<br />
will auto reconnect with the mobile<br />
phone (note: the mobile phone must<br />
have been paired with the unit before.)<br />
Before dialing you need to confirm the<br />
Bluetooth sign is displayed on LCD.<br />
Within ten seconds in the following<br />
conditions:<br />
a. when you turn off the unit and then turn<br />
it on again.
OPERATION<br />
b.switch off the ACC wire and switch it<br />
on again.<br />
c. press (release) button (3) to release<br />
the front panel and install the panel<br />
again.<br />
Press button (24), ‘NOT PAIR’ may<br />
be displayed on the LCD. You can wait<br />
for several seconds to let the unit<br />
reconnection automatically or press and<br />
hold RE-CON button (16) for several<br />
seconds to reconnect. During<br />
reconnecting, LCD will show*COON<br />
TRY* serval times and then show<br />
*CONN OK*if successfully connect.<br />
• T-MENU<br />
When successful paired, shortly press<br />
T-MENU button (17) on the front panel<br />
will enter the telephone menu, keep<br />
pressing this button or press >/ < button<br />
to change the items,<br />
in this menu. The items will be displayed<br />
in the following sequence: PRE NUM<br />
/RECEIVED/ DIALED/ MISSED/ MANU<br />
ANS/TALK XX<br />
The details please see the following<br />
instruction.<br />
- PRE NUM: Display the speed dial<br />
phone number you have stored in the<br />
preset memory. The system can store<br />
maximum 10 numbers.<br />
Note: Every system reset operation by<br />
pressing reset button (29), the setup of<br />
PRE NUM will be cleared.<br />
1) Store speed dial numbers<br />
a. Press T-MENU button and select PRE<br />
NUM item.<br />
b.Use / (1) to scan which memory<br />
available store.<br />
c. If any memory is available for input, the<br />
phone item is empty, and you can see<br />
the Memory No. (”0”~”9”) will appear<br />
on LCD.<br />
d.Press SEL/MENU button (2) to enter<br />
the input interface. You can see “DAIL<br />
-->”<br />
on the LCD.<br />
e. Use 0~9, *, #, to input the desired<br />
telephone number.<br />
Note: When you input a wrong number,<br />
shortly press CLR button (4) will clear<br />
it. Press and hold CLR button (4) will<br />
clear all the numbers.<br />
14<br />
f. When you finish input, press SEL/MENU<br />
button (2) to store the number into the<br />
preset memory.LCD will show *SAVE OK*<br />
2) Make a speed dial call<br />
Press button (24), then press and hold<br />
the preset buttons (M0~M9) to call the<br />
phone number stored in the memory.<br />
And the number you stored in it will be<br />
displayed on LCD.<br />
3) Preview the speed list<br />
Press T-MENU button (17) to select<br />
PRE NUM menu, If you want to call<br />
any number in dial list, use / (1) to<br />
select the speed dial number, and<br />
shortly press button (24) to confirm<br />
the dialing.<br />
4) Edit the speed dial list<br />
Select the number you want to edit from<br />
the speed dial list, then shortly press<br />
SEL/MENU button (2) to enter the edit<br />
interface.<br />
- RECEIVED: Display the last call you<br />
have received. You can use / (1) to<br />
scan the last received numbers. And<br />
you can shortly press button (24) to<br />
confirm the dialing.<br />
- DIALED: Display the last 10 dialed<br />
number.<br />
You can use / (1) to scan the<br />
numbers. And you can shortly press<br />
button (24) to confirm the dialing.<br />
- MISSED: Display the call you have<br />
missed.<br />
You can use / (1) to scan the<br />
numbers. And you can shortly press<br />
button (24) to confirm the dialing.<br />
- MANU ANS/AUTO ANS<br />
In this mode, press / (volume<br />
up/down) buttons (1) to select MANU<br />
ANS (manual answer) or AUTO ANS<br />
(auto answer).<br />
In AUTO ANS mode, when a call<br />
coming. The unit will answer the call<br />
automatically.<br />
In MANU ANS mode, when a call<br />
coming. You can press button (24) to<br />
answer the call, or press button (4)<br />
to reject the incoming call.<br />
- TALK VOLUME: Display the current<br />
talk volume level, you can use /<br />
(volume up/down) buttons (1) to adjust<br />
the talk volume level in a certain range.
OPERATION<br />
• ANSWERING/REJECTING AN<br />
INCOMING CALL<br />
Please refer to the MANU ANS/AUTO<br />
ANS paragraph in T-MENU section.<br />
• MAKING AN OUTGOING CALL<br />
1) Making an outgoing call from PRE NUM,<br />
RECEIVED, DIALED, MISSED, please<br />
refer to the T-MENU section.<br />
2) Making an outgoing call by inputting<br />
the phone number manually. Press<br />
button (24) on the front panel. Use 0~9,<br />
*, # buttons to enter the phone number<br />
you want to dial. Then press button<br />
(24) again will call the number. Note: if<br />
you input the wrong number, shortly<br />
press CLR button (4) will clear it. Press<br />
and hold CLR button (4) will clear all<br />
number.<br />
3) Marking last call number,press PHONE<br />
button two times LCD will show *LAST<br />
NUM*,then press PHONE button again to<br />
call out the last call number.<br />
• TRANSFER THE CALL BETWEEN<br />
MOBILE PHONE AND THE UNIT<br />
During the talking mode, you can press<br />
and hold T-MENU button (17) to transfer<br />
the phone call between the mobile<br />
phone and the unit.<br />
Note:<br />
If you transfer the call to mobile phone,<br />
the mute of the present mode will be<br />
released at the same time.<br />
15<br />
• BLUETOOTH AUDIO (A2DP<br />
FUNCITON)<br />
The unit supports Bluetooth audio<br />
function. If your mobile phone can play<br />
stereo audio, when the paring is ok, you<br />
can select an audio file and set to A2DP<br />
function on your mobile phone (It is up<br />
to the mobile phone, the different mobile<br />
phone has the different define.)<br />
When in A2DP mode, only / buttons<br />
(23) and PAU button are functional. Use<br />
/ buttons (23) on the front panel of<br />
the unit to choose the previous/next<br />
track.<br />
Press PAU button (8) to pause the play.<br />
Note: when playing music, you can not<br />
make any phone call. When there is an<br />
incoming call, you can choose to answer<br />
it or not.
SPECIFICATION<br />
GENERAL<br />
Power Supply Requirements : DC 12 Volts, Negative Ground<br />
Chassis Dimensions<br />
Tone Controls<br />
: 178 (W) x 160 (D) x 50 (H)<br />
- Bass (at 100 Hz) : ± 10 dB<br />
- Treble (at 10 KHz) : ± 10 dB<br />
Maximum Output Power : 4x40 watts<br />
Current Drain : 15 Ampere (max.)<br />
CD PLAYER<br />
Signal to Noise Ratio : More than 55 dB<br />
Channel Separation : More than 50 dB<br />
Frequency Response : 40 Hz - 18 KHz<br />
RADIO<br />
For 2 Bands<br />
(Europe.)<br />
FM<br />
Frequency Coverage : 87.5<br />
to 108 MHz<br />
IF : 10.7<br />
MHz<br />
Sensitivity (S/N = 30 dB) : 4 μV<br />
Stereo Separation : > 25 dBu<br />
MW<br />
Frequency Coverage : 522 to 1620 KHz<br />
IF : 450 KHz<br />
Sensitivity (S/N = 20 dB) : 36 dBu<br />
19
TROUBLE SHOOTING<br />
Before going through the checklist, check wiring connection. If any of the problems<br />
persist after checklist has been made, consult your nearest service dealer.<br />
Symptom Cause Solution<br />
No power. The car ignition switch is If the power supply is<br />
not on. connected to the car accessory<br />
circuits, but the engine is not<br />
moving, switch the ignition<br />
key to “ACC”.<br />
The fuse is blown. Replace the fuse.<br />
Disc cannot be Presence of CD disc inside Remove the disc in the player,<br />
loaded or ejected. the player. then put a new one.<br />
Inserting the disc in reverse Insert the compact disc with<br />
direction. the label facing upward.<br />
Compact disc is extremely Clean the disc or try to play a<br />
dirty or defective disc. new one.<br />
Temperature inside the car Cool off or until the ambient<br />
is too high. temperature return to normal.<br />
Condensation. Leave the player off for an hour<br />
or so, then try again.<br />
No sound. Volume is in minimum. Adjust volume to a desired<br />
level.<br />
Wiring is not properly Check wiring connection.<br />
connected.<br />
Sound skips. The installation angle is Adjust the installation angle<br />
more than 30 degrees. less than 30 degrees.<br />
The disc is extremely dirty Clean the compact disc, then<br />
or defective disc. try to play a new one.<br />
The operation keys The built-in microcomputer Press the RESET button.<br />
do not work. is not operating properly Front panel is not properly<br />
due to noise. fixed into its place.<br />
The radio does not The antenna cable is not Insert the antenna cable firmly.<br />
work. The radio connected.<br />
station automatic<br />
selection does not The signals are too weak. Select a station manually.<br />
work.<br />
20<br />
8471001576
MCR-732<br />
MANUEL DE L’UTILISATEUR<br />
Système Audio Portable<br />
• PLL Radio Stéréo Synthétiseur<br />
• Mise en mémoire automatique<br />
• Fonctionnement RDS (Système de données radio)<br />
• Lecteur CD/MP3/WMA<br />
• Fonction Electronic Shockproof (ESP) (fonction anti-choc).<br />
• Interface USB<br />
• Interface carte SD/MMC (en option)<br />
• Fonction mains libres Bluetooth & A2DP (Advanced Audio<br />
Distribution Profile) Transmission audio stéréo<br />
• Panneau amovible qui s’abaisse
INSTALLATION<br />
Notes:<br />
• Choisir l’endroit où installer l’unité de façon<br />
à ne pas interférer avec la fonction de<br />
conduite normale.<br />
• Avant d’installer définitivement l’unité,<br />
connectez les câbles temporairement et<br />
assurez vous que tout soit bien connecté<br />
et que le système fonctionne<br />
correctement.<br />
• N’utilisez que les pièces fournies avec<br />
l’unité pour vous assurer de la bonne<br />
installation. L’utilisation de pièces non<br />
autorisées peut causer des mauvais<br />
fonctionnements.<br />
• Consultez vos revendeurs si l’installation<br />
nécessite de percer des trous ou nécessite<br />
d’autres modifications du véhicule.<br />
• Installez l’unité pour ne pas gêner le<br />
conducteur et ne pas blesser les<br />
passagers en cas d’arrêt soudain, comme<br />
un arrêt d’urgence.<br />
• Si l’angle d’installation excède 30° à<br />
l’horizontale, l’unité peut ne pas donner<br />
sa performance optimale.<br />
30˚<br />
• Evitez d’installer l’unité où elle sera<br />
exposée à de hautes températures, telle<br />
que la lumière directement du soleil, ou<br />
de l’air chaud provenant du chauffage,<br />
ou un endroit où l’unité serait exposée à<br />
la poussière, la saleté ou à des vibrations<br />
excessive.<br />
MONTAGE AVANT / ARRIERE DIN<br />
Cette unité peut être correctement installée<br />
à l’“Avant”(Montage conventionnel avant<br />
DIN) ou “Arrière” (pour l’installation à<br />
l’arrière DIN, utilisez les trou des têtes de<br />
vis sur les côtés du châssis de l’unité.).<br />
Pour plus de détails, veuillez vous référer<br />
aux illustrations de méthodes d’installation<br />
suivantes.<br />
RETIRER LES VIS AVANT INSTALLATION<br />
Avant d’installer l’unité, veuillez retirer les<br />
deux vis.<br />
Retirez les vis avant installation.<br />
2<br />
MONTAGE AVANT DIN (Méthode A)<br />
Ouverture d’installation<br />
Cette unité peut être installée sur n’importe<br />
quel tableau de bord ayant une ouverture<br />
comme illustrée ci-dessous:<br />
182 mm<br />
53 mm<br />
Installer l’unité<br />
Assurez vous d’avoir tout d’abord testé<br />
toutes les connexions, puis suivre les étapes<br />
suivantes pour installer l’unité.<br />
1. Assurez vous que le contact soit éteint,<br />
et que le câble soit déconnecté du terminal<br />
négatif (-) de la batterie du véhicule.<br />
2. Déconnecté le harnais du fil et l’antenne.<br />
3. Appuyez sur le bouton de relâchement<br />
sur le panneau avant et retirez le panneau<br />
de contrôle (voir les étapes de “détacher<br />
le panneau avant”).<br />
4. Soulevez le dessus de l’anneau de finition<br />
extérieur, puis retirez le panneau.<br />
5.Les deux clés fournies relâchent les<br />
languettes du boîtier à l’intérieur de l’unité<br />
afin de pouvoir la retirer. Insérez les clés<br />
au maximum (avec les encoches vers le<br />
haut) dans les fentes prévues au milieu<br />
des côtés gauche et droit de l’unité. Puis<br />
faites glisser le boîtier au dos de l’unité.<br />
Anneau de<br />
finition<br />
extérieur<br />
Panneau<br />
avant<br />
Boîtier<br />
Clé L<br />
Clé R<br />
6. Montez le boîtier en l’insérant dans les<br />
ouvertures du tableau de bord et ouvrez<br />
les languettes situées autour du boîtier<br />
avec un tournevis. Toutes les languettes<br />
ne seront pas capables d’entrer en<br />
contact, examinez donc celles qui seraient<br />
le plus efficaces. Ouvrez les languettes<br />
appropriées derrière le tableau de bord<br />
pour fixer le boîtier en place.
INSTALLATION<br />
Tournevis<br />
Languettes<br />
Tableau de bord<br />
Boîtier<br />
7. Reconnectez le harnais du câble et<br />
l’antenne, faites attention à ne pas pincer<br />
de fils ou de câbles.<br />
8. Faites glisser l’unité dans le boîtier jusqu’à<br />
ce qu’il se fixe en place.<br />
9. Pour mieux fixer l’unité, utilisez la courroie<br />
en métal fournie pour fixer le dos de<br />
l’unité. Utilisez le matériel fourni (Boulon<br />
de fixation (M5mm) et joint ressort) pour<br />
attacher l’une des extrémités de la<br />
courroie au boulon de montage au dos<br />
de l’unité. Si nécessaire, pliez la courroie<br />
en métal pour qu’elle convienne à la zone<br />
de montage du véhicule. Puis utilisez le<br />
matériel (Vis de connexion (5x25mm) et<br />
le joint simple) pour attacher l’autre<br />
extrémité sous le tableau de bord. Cette<br />
courroie vous permet également d’assurer<br />
la mise à la terre électrique de l’unité.<br />
Note:<br />
Pour installer le terminal de fil court du<br />
boulon de montage au dos de l’unité et le<br />
terminal de fil long au tableau de bord.<br />
Joint ressort<br />
Boulon de fixation<br />
Courroie en métal<br />
Boulon de montage<br />
Joint simple<br />
Vis de connexion<br />
10.Reconnectez le câble au terminal négatif<br />
(-) de la batterie du véhicule. Puis<br />
replacez l’anneau de finition extérieur et<br />
installer le panneau avant de l’unité. (voir<br />
les étapes dans “installer le panneau<br />
avant”)<br />
Retirer l’unité<br />
1. Assurez vous que le contact soit éteint,<br />
puis déconnectez le câble du terminal<br />
négatif (-) de la batterie du véhicule.<br />
3<br />
2. Retirez la courroie en métal attachée au<br />
dos de l’unité (si attaché).<br />
3. Appuyez sur le bouton de relâchement<br />
sur le panneau avant.<br />
4. Soulevez le dessus de l’anneau de finition<br />
extérieur puis retirez le.<br />
5. Insérez les deux clés fournies dans les<br />
fentes au milieu des côté gauche et droit<br />
de l’unité, puis tirez l’unité hors du tableau<br />
de bord.<br />
MONTAGE ARRIERE DIN (Méthode B)<br />
Si votre véhicule est une Nissan, Toyota,<br />
suivre les instructions de montage suivantes.<br />
Utilisez les trous de vis marqués T (Toyota),<br />
N (Nissan) situés sur les deux côtés de l’unité<br />
pour attacher l’unité aux crochets de<br />
montage de l’unité fournis avec votre<br />
véhicule.<br />
Factory Radio<br />
Mounting<br />
Bracket<br />
Screw<br />
Side view showing<br />
Screw Holes marked T, N<br />
Screw<br />
Dashboard or<br />
Console<br />
Pour attacher l’unité aux crochets usine de<br />
montage de radio.<br />
Alignez les trous de vis sur le crochet avec<br />
les trous de vis de l’unité, puis serrez les vis<br />
(5x5mm) de chaque côté.<br />
Note: l’anneau de finition extérieur, le boîtier<br />
et la courroie en métal ne sont pas utilisé<br />
dans la méthode d’installation B.
CONNEXION DES FILS<br />
CONNEXION ISO<br />
Rch arrière ROUGE<br />
Lch arrière BLANC<br />
Prise d’antenne<br />
Partie C<br />
Partie B<br />
Partie A<br />
GRIS<br />
4<br />
1 4 7 10 13 16 19<br />
3 6 9 12 15 18<br />
2 5 8 11 14 17 20<br />
1 3 5 7<br />
2 4 6 8<br />
1 3 5 7<br />
2 4 6 8<br />
Système de 4 haut-parleurs<br />
Système de 4 haut-parleurs<br />
( Vert / Noir )<br />
( Vert / Noir )<br />
( Vert )<br />
( Blanc / Noir )<br />
(Blanc)<br />
( Gris / Noir )<br />
( Gris )<br />
( Violet / Noir )<br />
(Violet)<br />
Haut-parleur<br />
arrière gauche<br />
Haut-parleur<br />
avant gauche<br />
Haut-parleur<br />
avant droit<br />
Haut-parleur<br />
arrière droit<br />
( Vert )<br />
( Blanc / Noir )<br />
(Blanc)<br />
( Gris / Noir )<br />
( Gris )<br />
( Violet / Noir )<br />
(Violet)<br />
Haut-parleur<br />
gauche<br />
Haut-parleur<br />
droit<br />
Fil de terre (Noir)<br />
Accessoire / Bouton (Rouge) +12V<br />
Antenne / Activer l’amplificateur (Bleu)<br />
Alimentation électrique constante (Jaune) +12V<br />
FUSIBLE (15A)
FONCTIONNEMENT<br />
EMPLACEMENT DES TOUCHES<br />
1 3 4 2 22 5 6 7 8 9 10 11 12 13 14<br />
24 23<br />
1. / (boutons d’augmentation/<br />
baisse du volume)<br />
2. SEL / MENU<br />
3. (Bouton de dégagement)<br />
4. (Raccrocher)/BND/LOU/ENT/<br />
CLR<br />
5. LCD<br />
6. DIR-<br />
7. SHF<br />
8. PAU<br />
9. SCN<br />
10. MODE / PAIRAGE<br />
11. PRT<br />
12. /MUTE<br />
13. DIR+<br />
14. Interface USB<br />
15. PTY<br />
21<br />
25<br />
20 19 18 17 16<br />
26 27<br />
29 28<br />
5<br />
15<br />
16. # SCAN/RE-CON<br />
17. T-MENU<br />
18. DISP<br />
19. */ + AS/ PS/ Navi-SCH<br />
20. AF<br />
21. TA / EQ<br />
22. Mic (microphone)<br />
23. / (boutons syntonisation/<br />
recherche/piste inférieure/<br />
supérieure)<br />
24. (Décrocher)<br />
25. Boutons de préréglage 1-6<br />
26. Fente du disque<br />
27. Bouton d’éjection<br />
28. lnterface SD/MMC<br />
29. Bouton de réinitialisation
FONCTIONNEMENT<br />
FONCTIONNEMENT DE BASE<br />
• METTRE EN MARCHE/ARRÊTER<br />
L’APPAREIL<br />
Appuyez sur le bouton (12) pour<br />
allumer l’appareil.<br />
Lorsque l’appareil est allumé, appuyez<br />
sur le bouton (12) et maintenez-le<br />
enfoncé pour éteindre l’appareil.<br />
• DÉGAGEMENT DE LA FACADE<br />
Appuyez sur le bouton (3) pour<br />
détacher la façade amovible.<br />
• RÉGLAGE DU SON<br />
Appuyez brièvement sur le bouton<br />
SEL/MENU pour accéder au mode de<br />
RÉGLAGE AUDIO, utilisez le bouton<br />
SEL/MENU (2) pour sélectionner le<br />
mode de réglage désiré. Le mode de<br />
réglage défilera dans l’ordre suivant :<br />
VOL BAS TRE BAL FAD<br />
(Volume) (Bass) (Treble) (Balance) (Fader)<br />
Appuyez légèrement sur / (1) pour<br />
régler la qualité sonore en l’augmentant<br />
ou en la baissant étape par étape;<br />
appuyez sur / (1) et maintenez la<br />
touche enfoncée pour modifier en<br />
continu la qualité sonore.<br />
• RÉGLAGE SYSTÈME<br />
Appuyez sur le bouton SEL/MENU (2)<br />
de la façade et maintenez-le enfoncé<br />
pour accéder au mode RÉGLAGE<br />
SYSTÈME. Ensuite, appuyez<br />
légèrement sur le bouton SEL/MENU<br />
(2) pour sélectionner l’élément que vous<br />
désirez changer et utilisez les boutons<br />
/ (1) pour modifier le réglage<br />
correspondant.<br />
1) BEEP ON/OFF<br />
Utilisez les touches de volume<br />
aug/dim pour régler le son bip sur on<br />
(actif) ou off (inactif).<br />
2) P-VOL<br />
Utilisez les touches de volume<br />
aug/dim pour sélectionner le niveau<br />
de volume lorsque l’appareil est<br />
allumé.<br />
3) AREA EUR/USA<br />
Utilisez les touches de volume<br />
aug/dim pour régler l’espace de<br />
fréquence des zones EUR ou US.<br />
6<br />
4) HEURE 24H/12H<br />
Utilisez les touches de volume<br />
aug/dim pour régler le format<br />
24Heures ou 12Heures.<br />
5) PCLK ON/OFF<br />
Utilisez les touches de volume<br />
aug/dim pour activer ou désactiver<br />
l’horloge lorsque l’appareil est éteint.<br />
Lorsque PCLK est activé (ON),<br />
l’horloge apparaît avec la lumière de<br />
fonds activée au moment d’éteindre<br />
l’appareil.<br />
• SON MUET<br />
Appuyez légèrement sur le bouton<br />
MUTE (12) pour mettre immédiatement<br />
le son muet, appuyez de nouveau sur<br />
ce bouton pour rétablir le son.<br />
• INTENSITÉ SONORE<br />
Appuyez sur le bouton LOU (4)pendant<br />
plusieurs secondes pour activer la<br />
fonction d’intensité sonore et “LOUD”<br />
apparaîtra à l’écran d’affichage LCD.<br />
Appuyez de nouveau pendant plusieurs<br />
secondes pour relâcher cette fonction<br />
et “LOUD” apparaîtra.<br />
• RÉGLER L’HORLOGE<br />
Appuyez brièvement sur le bouton DISP<br />
(18) jusqu’à ce que l’horloge s’affiche<br />
à l’écran d’affichage LCD.<br />
Maintenez ensuite le bouton DISP<br />
enfoncé jusqu’à ce que l’horloge<br />
clignote. Appuyez ensuite sur le bouton<br />
pour modifier les minutes ou appuyez<br />
sur le bouton pour changer les<br />
heures.<br />
• ÉGALISATION<br />
Appuyez brièvement sur le bouton<br />
EQ(21) pour activer la fonction<br />
d’égalisation et pour sélectionner le<br />
mode audio désiré. Plusieurs modes<br />
sont disponibles comme ci-dessous :<br />
CLASSIC POP ROCK DSP OFF<br />
• FONCTION RÉINITIALISATION<br />
Le bouton de réinitialisation (29) doit<br />
être activé soit avec une pointe de stylobille<br />
ou avec un objet fin en métal. Le<br />
bouton de réinitialisation doit être activé<br />
dans les cas suivants:
FONCTIONNEMENT<br />
- Première installation de l’appareil une<br />
fois le câblage terminé.<br />
- Aucun bouton de fonction n’est<br />
opérationnel.<br />
- Symbole d’erreur à l'écran.<br />
Remarque: Si, après avoir appuyé sur<br />
le bouton de réinitialisation (29) l’appareil<br />
ne fonctionne toujours pas<br />
correctement, veuillez utiliser un cotontige<br />
imbibé d’alcool d’isopropyle pour<br />
nettoyer la prise située sur la façade.<br />
• SÉLECTION DE MODE<br />
Appuyez brièvement sur le bouton<br />
MODE (10) pour sélectionner le mode<br />
désiré, le mode Radio, CD (MP3), USB,<br />
SD, AUX par exemple.<br />
Si aucun appareil USB ou aucune carte<br />
SD n’est connecté(e) à l’appareil, il ne<br />
sera pas possible de sélectionner le<br />
mode USB ou SD.<br />
Pour la fonction Bluetooth, une fois que<br />
le pairage est effectué avec succès,<br />
vous pouvez sélectionner le mode BT<br />
ou A2DP (Bluetooth audio) à l’aide du<br />
bouton MODE.<br />
• FONCTION ESP<br />
L’appareil peut résister aux chocs<br />
pendant trente secondes.<br />
FONCTIONNEMENT DE LA RADIO<br />
• SÉLECTIONNER LA BANDE DE<br />
FRÉQUENCE<br />
En mode radio, appuyez sur le bouton<br />
BND (4) pour sélectionner la bande<br />
désirée.<br />
La bande de réception défilera dans<br />
l’ordre suivant :<br />
FM1 FM2 FM3 MW<br />
• SÉLECTION DE STATION<br />
Appuyez sur les boutons / (23)<br />
pour activer la fonction recherche<br />
automatique. Appuyez pendant<br />
plusieurs secondes jusqu’à ce que<br />
“MANUAL” apparaisse à l’écran; le<br />
mode de syntonisation manuelle sera<br />
alors sélectionné. Si vous n’avez pas<br />
appuyé sur les deux boutons pendant<br />
quelques secondes, le mode de<br />
recherche automatique sera rétabli et<br />
“AUTO” apparaîtra à l’écran d’affichage<br />
LCD.<br />
7<br />
• MISE EN MÉMOIRE AUTOMATIQUE<br />
& BALAYAGE DE PROGRAMME<br />
Mise en mémoire automatique<br />
Appuyez sur le bouton AS/PS (19)<br />
pendant quelques secondes et<br />
“SEARCH” apparaîtra à l’écran<br />
d’affichage LCD. La radio effectuera<br />
une recherche à partir de la fréquence<br />
en cours et vérifiera la force de signal<br />
jusqu’à ce qu’un cycle de recherche<br />
soit effectué. Ensuite, les 6 stations les<br />
plus puissantes seront mises en<br />
mémoire sur les numéros de<br />
préréglages correspondants.<br />
- Balayage de programmes : appuyez<br />
brièvement sur le bouton AS/PS (19)<br />
pour effectuer un balayage de la station<br />
préréglée. Ensuite, le numéro de la<br />
station correspondante P1~P6<br />
clignotera à l’écran d’affichage LCD.<br />
• SCAN<br />
Appuyez sur le bouton SCAN(16) pour<br />
accéder au mode de balayage, l’appareil<br />
effectuera un balayage jusqu’à la station<br />
de fréquence la plus élevée et restera<br />
sur chaque station pendant plusieurs<br />
secondes (la fréquence correspondante<br />
clignotera à 3 reprises à l’écran<br />
d’affichage LCD).<br />
• ENREGISTREMENT DE STATION<br />
Appuyez sur les boutons de préréglages<br />
(25) (1 à 6) pour sélectionner une station<br />
qui a été mise en mémoire. Appuyez<br />
sur ce bouton pendant plusieurs<br />
secondes (jusqu’à ce que le 2è bip<br />
sonore soit émis), la station en cours<br />
sera alors enregistrée sur le bouton<br />
numérique.<br />
FONCTIONNEMENT RDS (SYSTÈME<br />
DE DONNÉES RADIO)<br />
- Réglage du mode RDS<br />
Appuyez sur le bouton AF (20) pour<br />
allumer ou éteindre le mode RDS.<br />
- UTILISER LE BOUTON PTY (15)<br />
Appuyez sur le bouton PTY (15) pour<br />
accéder au mode PTY SELECT, le nom<br />
de programme s’affichera sur le LCD,<br />
vous pouvez utiliser les boutons /<br />
(1) pour sélectionner les éléments et<br />
appuyez sur les boutons / (23)<br />
pour démarrer la recherche du<br />
programme correspondant.
FONCTIONNEMENT<br />
- Réglage RDS<br />
Appuyez longuement sur le bouton<br />
PTY (15) pour entrer dans le mode<br />
RDS SETTING. Puis appuyez brièvement<br />
sur le bouton PTY (15) pour<br />
sélectionner un élément à changer, et<br />
utiliser les boutons Volume augm/dim<br />
pour changer le réglage correspondant<br />
comme ci-dessous:<br />
TA RECHERCHE(TA ALARME)--> PI<br />
SON (PI MUET)-->RETUNE S<br />
(RETUNE L)-->MASQUER DPI<br />
(MASQUER TOUT)-->EONTA DX<br />
(EONTA LO)-->TAVOL 30-->REG OFF<br />
(REG ON).<br />
- Bouton Écoute de l’annonce de trafic<br />
TA (21) fonctionne comme suit :<br />
Lorsque vous appuyez et maintenez le<br />
bouton enfoncé pendant plus de 3<br />
secondes, cela active ou désactive la<br />
fonction sauf si vous appuyez de<br />
nouveau sur les touches / pour<br />
désactiver de nouveau.<br />
Lorsque le mode TA est activé et qu’une<br />
annonce de trafic est transmise:<br />
Si l’appareil est en mode CD (MP3) ou<br />
en mode AUX IN, il se mettra<br />
temporairement en mode radio.<br />
Se met temporairement sur une station<br />
EON lorsque EON détecte une annonce<br />
de trafic sur cet autre programme .<br />
Si le niveau du volume est sous le seuil,<br />
il sera alors élevé jusqu’à atteindre le<br />
niveau de ce seuil.<br />
Interruption de la fonction TA<br />
L’annonce de trafic en cours est annulée<br />
si vous appuyez sur cette touche. Mais<br />
le mode TA ne sera pas éteint.<br />
Les données RDS sont les données PI,<br />
PS, AF, TP, TA, EON et PTY.<br />
PI : Code d’identification de<br />
programmes. Code permettant<br />
l’identification de programmes<br />
PS: Nom de Service du Programme.<br />
Les données du nom de la station<br />
diffusée sont exprimées en<br />
caractères alphanumériques.<br />
AF: Fréquences alternatives. La liste<br />
des fréquences des stations de<br />
diffusion transmet le même<br />
programme.<br />
8<br />
TP: Identification du programme de<br />
trafic. Données d’identification<br />
des informations de trafic ; station<br />
de diffusion.<br />
TA: Identification annonce de trafic-<br />
Les données d’identification<br />
montrant les informations de trafic<br />
sont transmises ou pas.<br />
EON: Informations renforcées autres<br />
réseaux<br />
Informations de diffusion sur PI,<br />
AF, TP, TA, etc, concernant les<br />
réseaux autres que le réseau<br />
utilisé pour la réception actuelle.<br />
PTY: Code du type de programme<br />
Contenus des programmes<br />
comme les actualités, la musique<br />
douce, les sports, etc.<br />
FONCTIONNEMENT CD/MP3/WMA<br />
BASCULANT EN MODE CD<br />
Si aucun disque CD/MP3/WMA n’est<br />
inséré dans le lecteur:<br />
Insérez doucement un disque<br />
CD/MP3/WMA dans le compartiment du<br />
disque et en veillant à ce que la face<br />
imprimée soit sur le dessus, insérez<br />
jusqu’à ce que vous sentiez une<br />
résistance. Le disque sera<br />
automatiquement avalé par le lecteur. La<br />
lecture CD/MP3/WMA démarrera.<br />
Le disque sera automatiquement avalé<br />
par le lecteur.<br />
Si vous avez déjà inséré un disque<br />
CD/MP3/WMA dans le lecteur:<br />
Continuez à appuyer brièvement sur le<br />
bouton MODE (10).<br />
• SÉLECTION DE PISTES<br />
Appuyez sur / (23) pour effectuer<br />
un saut à la piste précédente/suivante.<br />
Le numéro de piste s’affichera à l’écran.<br />
Appuyez sur / (23) et maintenez la<br />
touche enfoncée pour faire un<br />
retour/une avance rapide. La lecture du<br />
disque démarre lorsque vous relâchez<br />
le bouton.<br />
• METTRE LA LECTURE EN PAUSE.<br />
Appuyez sur le bouton PAU (8) pour<br />
mettre le lecteur en pause. Appuyez de<br />
nouveau pour reprendre la lecture.
FONCTIONNEMENT<br />
• PRÉ-ÉCOUTER TOUTES LES PISTES<br />
Appuyez sur le bouton SCN (9) pour<br />
lire les premières secondes de chaque<br />
piste du disque en cours. Appuyez de<br />
nouveau pour arrêter le balayage de<br />
l’introduction et écouter la piste.<br />
• RÉPÉTER LA MÊME PISTE<br />
Appuyez sur le bouton RPT (11) pour<br />
répéter la même piste en continu.<br />
Appuyez de nouveau pour arrêter la<br />
fonction de répétition.<br />
• LIRE TOUTES LES PISTES DE<br />
MANIÈRE ALÉATOIRE<br />
Appuyez sur le bouton SHF (7) pour lire<br />
toutes les pistes du disque dans un<br />
ordre aléatoire. Appuyez de nouveau<br />
pour annuler la fonction<br />
• ÉJECTER UN DISQUE<br />
Appuyez sur le bouton (27) pour arrêter<br />
la lecture CD/MP3/WMA et éjecter le<br />
disque de la fente du disque (26).<br />
• FONCTIONS SPÉCIALES POUR LES<br />
DISQUES MP3/WMA<br />
1) SÉLECTION RÉPERTOIRE HAUT/BAS<br />
Appuyez sur le bouton DIR- (6) ou sur<br />
le bouton DIR+ (13) pour sélectionner<br />
un répertoire au niveau supérieur ou<br />
inférieur. Si le disque MP3/WMA ne<br />
contient aucune répertoire, la fonction<br />
des boutons DIR- (6) ou DIR+ (13) est<br />
désactivée.<br />
2) SÉLECTION DE PISTES PAR LE<br />
BOUTON AS/PS /Navi- SCH<br />
Le bouton AS/PS (Navi-SCH) (19) sert<br />
de bouton de sélection du mode Audio<br />
numérique en mode MP3.<br />
Lorsque vous appuyez sur ce bouton,<br />
il permet de sélectionner chaque mode<br />
audio numérique.<br />
“Recherche de piste” => “Recherche<br />
du répertoire ou du Nom de fichier”=><br />
“Navigation” depuis le menu racine à<br />
l’aide des boutons<br />
d’augmentation/baisse du volume.<br />
- Recherche directe d’une piste<br />
Appuyez une fois sur le bouton AS/PS<br />
(Navi-SCH) (19). Vous accéderez à<br />
‘Recherche de pistes’ en mode CD<br />
Audio Numérique.<br />
Vous pouvez utilisez les boutons<br />
haut/bas / (1) pour sélectionner le<br />
numéro de piste dans une séquence.<br />
9<br />
Le numéro de piste correspondant par<br />
exemple “TRACK 12” apparaîtra à<br />
l’écran.<br />
Appuyez sur le bouton BND/LOU/ENT<br />
(4) pour valider et démarrer la lecture.<br />
- Recherche de répertoire ou nom de<br />
fichier<br />
Appuyez deux fois sur le bouton AS/PS<br />
(Navi-SCH) (19). Vous accéderez à<br />
‘Recherche de répertoire ou nom de<br />
fichier’ en mode CD Audio Numérique.<br />
Vous pouvez utiliser les boutons<br />
haut/bas pour sélectionner les<br />
caractères A à Z, blanc, 0 à 9, _, -, +..<br />
- Appuyez sur le bouton SEL (2) pour<br />
valider l’insertion de chaque caractère.<br />
- Appuyez sur le bouton<br />
BND/LOU/ENT(4) pour valider la<br />
recherche de titre.<br />
Si le titre sélectionné est un nom de<br />
répertoire, l’affichage indiquera (‘ ‘),<br />
ensuite,<br />
- Utilisez les boutons<br />
d’augmentation/baisse du volume /<br />
(1) pour afficher la liste de toutes les<br />
chansons sous ce répertoire et<br />
sélectionnez le titre.<br />
- Appuyez sur le bouton BND/LOU/ENT<br />
(4) pour valider et démarrer la lecture.<br />
- Répétez les étapes ci-dessus si le<br />
nouveau titre sélectionné est de<br />
nouveau un répertoire.<br />
- Recherche depuis le répertoire racine<br />
Appuyez trois fois sur le bouton AS/PS<br />
(Navi-SCH) (19). L’appareil recherchera<br />
le fichier ou le répertoire depuis le<br />
répertoire racine à l’aide des boutons<br />
syntonisation/recherche/piste<br />
supérieure/inférieure / (23). L’icône<br />
D-DIR s’allume si le nom est le<br />
répertoire). La liste de tous les<br />
répertoires et de toutes les chansons<br />
disponibles s’affichera. Sélectionnez le<br />
répertoire/les chansons désiré(es) à<br />
l’aide des boutons d’augmentation/<br />
baisse du volume / (1) et appuyez<br />
sur le bouton BND/LOUD/ENT (24)<br />
pour valider.<br />
Si le titre sélectionné est une chanson,<br />
la lecture démarre.<br />
Si le titre sélectionné est un nom de<br />
répertoire, l’affichage indiquera (‘ ‘),<br />
utilisez ensuite les boutons<br />
d’augmentation/baisse du volume
FONCTIONNEMENT<br />
( / ) (1) pour afficher la liste<br />
de toutes les chansons sous ce<br />
répertoire et sélectionnez le titre.<br />
Appuyez sur le bouton<br />
BND/LOU/ENTpour valider et démarrer<br />
la lecture. Répétez les étapes ci-dessus<br />
si le nouveau titre sélectionné est de<br />
nouveau un répertoire.<br />
3) INFORMATION D’AFFICHAGE<br />
Appuyez sur le bouton DISP (18) pour<br />
afficher les informations suivantes:<br />
numéro de piste, horloge et autres<br />
informations.<br />
Pour les disques contenant la version<br />
de fonction MP3 ID3 uniquement: ID3<br />
TAG (si disponible : titre de la chanson,<br />
nom de répertoire, nom de l’artiste,<br />
autres contenus…) s’afficheront à<br />
l’écran sans que vous deviez appuyer<br />
sur le bouton DISP.<br />
FONCTIONNEMENT LECTURE USB<br />
Sur la façade de l’appareil, il y a une<br />
interface USB (14). Vous pouvez connecter<br />
un appareil USB grâce à cette interface<br />
(14).<br />
Lorsque vous connectez un appareil USB<br />
à cette interface, l’appareil effectue une<br />
recherche des fichiers MP3 ou des fichiers<br />
WMA sur le lecteur USB et commence<br />
automatiquement à lire ces fichiers MP3<br />
ou WMA.<br />
Si vous êtes sous un autre mode, vous<br />
pouvez aussi appuyer sur le bouton MODE<br />
(10) pour sélectionner le mode USB.<br />
Lorsque vous lisez des fichiers MP3 ou<br />
WMA sur l’appareil, l’opération est<br />
identique à celle des MP3/WMA décrite<br />
ci-dessus.<br />
Remarque<br />
• L’unité principale ne supporte que le<br />
disque de mémoire USB standard qui<br />
est approuvé par Microsoft.<br />
• Le lecteur USB MP3 n’est pas un<br />
standard ce qui signifie que différentes<br />
marques ou différents modèles ont leur<br />
propre standard. Nos produits ne<br />
peuvent donc pas supporter tous les<br />
lecteurs MP3.<br />
• Lorsque vous connectez le lecteur MP3<br />
et qu’il y a une batterie normale dans<br />
le lecteur (non pas une batterie<br />
rechargeable), vous devez retirer la<br />
batterie du lecteur MP3 puis la<br />
connecter à l’interface USB.<br />
10<br />
• Sinon, la batterie pourrait exploser en<br />
mode de lecture USB. Assurez-vous de<br />
ne pas retirer le lecteur USB de<br />
l’interface USB.<br />
ATTENTION<br />
Si le disque USB contient des fichiers<br />
importants, veuillez ne pas le lire sur<br />
l’unité principale. Veuillez ne pas lire le<br />
CD-R/RW qui contient des fichiers<br />
importants sur l’unité principale. En<br />
effet, toute mauvaise manipulation<br />
pourrait entraîner une perte de fichiers.<br />
Et notre société n’en n’assumerait pas<br />
la responsabilité.<br />
MODES DE DÉCODAGE MP3/WMA<br />
SUPPORTÉS<br />
L’unité principale supporte les modes de<br />
décodage MP3/WMA (Windows Media<br />
Audio) suivants.<br />
Standard Taux binaire<br />
(kbps)<br />
MPEG1 Audio<br />
Layer 3<br />
(44.1kHz)<br />
Windows<br />
Media Audio<br />
(44.1kHz)<br />
16~320Kbps<br />
& VBR<br />
16~320Kbps<br />
& VBR<br />
La solution USB peut supporter:<br />
1. Dossier: 256 Max.<br />
2. Fichier: 30000 Max.<br />
Mode<br />
supporté<br />
Stereo<br />
FONCTIONNEMENT SD/MMC (EN<br />
OPTION)<br />
Pour les besoins du client, l’appareil est<br />
aussi équipé d’une interface SD/MMC.<br />
Veuillez observer l’interface SD/MMC du<br />
boîtier de l’appareil ci-dessous.<br />
SD/MMC INTERFACE<br />
Stereo
FONCTIONNEMENT<br />
Lorsque vous insérez une carte SD/MMC<br />
dans l’interface SD/MMC (MP3),<br />
l’appareil effectue une recherche des<br />
fichiers MP3 et WMA de la carte et<br />
commence à lire automatiquement les<br />
fichiers MP3 ou WMA. L’opération est<br />
identique à celle des MP3 décrite cidessus.<br />
Si vous êtes sous un autre mode, vous<br />
pouvez aussi appuyer sur le bouton<br />
MODE (10) pour sélectionner le mode<br />
SD/MMC.<br />
Si la carte SD/MMC contient des fichiers<br />
importants, veuillez ne pas la lire sur<br />
l’unité principale.<br />
REMARQUES CONCERNANT LES<br />
DISQUES<br />
A.Remarques concernant les disques :<br />
1.Si vous tentez d’utiliser des disques de<br />
forme qui n’est pas standard (ex: carré,<br />
étoile, cœur), vous risquez<br />
d’endommager l’appareil. Veuillez vous<br />
assurer que la forme des disques CD<br />
que vous insérez dans l’appareil est<br />
ronde.<br />
2.Ne pas coller de papier ou de bande<br />
adhésive sur la face comportant le label<br />
ou sur la face d’enregistrement des<br />
disques car cela pourrait entraîner un<br />
dysfonctionnement.<br />
3.La saleté, la poussière, les rayures et<br />
les emballages de disques peuvent<br />
entraîner un dysfonctionnement.<br />
B. Remarques concernant les CD-R<br />
(CD enregistrables )/CD-RW (CD<br />
réinscriptibles):<br />
1.Pour cet appareil, veuillez vous assurer<br />
d’utiliser des disques comportant les<br />
indications suivantes uniquement:<br />
Recordable Rewritable<br />
2.L’appareil ne peut pas lire les CD-R et<br />
CD-RW non finalisés. (Veuillez vous<br />
référer au manuel de votre enregistreur<br />
CD-R/CD-RW ou de votre logiciel CD-<br />
R/CD-RW pour plus d’informations<br />
concernant la procédure de finalisation).<br />
3.En raison de l’état d’enregistrement,<br />
des conditions du disque et de<br />
l’équipement utilisé pour<br />
l’enregistrement, il se peut que certains<br />
disques CD-R/CD-RW ne puissent pas<br />
être lus par l’appareil. (voir *1)<br />
*1: Afin que la lecture soit plus fiable,<br />
veuillez suivre les recommandations<br />
suivantes:<br />
11<br />
a. Utilisez des CD-RW d’une vitesse allant<br />
de 1x à 4x et écrivez à une vitesse de<br />
1x à 2x.<br />
b.Utilisez des CD-R d’une vitesse allant<br />
de 1x à 8x et écrivez à une vitesse de<br />
1x à 2x.<br />
c. Ne pas lire un CD-RW sur lequel vous<br />
avez écrit plus de 5 fois.<br />
C. Remarques à propos des fichiers<br />
MP3 (version MP3 uniquement) :<br />
1.Le disque doit être conforme aux<br />
standards ISO9660 niveaux 1 ou 2 ou<br />
au format d’expansion Joliet ou Romeo.<br />
2.Lorsque vous nommez un fichier MP3,<br />
veuillez vous assurer que l’extension<br />
du nom de fichier est “.MP3”.<br />
3.Si les fichiers ne sont pas au format<br />
MP3 même si l’extension est “.MP3”,<br />
l’appareil ne peut reconnaître le fichier.<br />
FONCTIONNEMENT BLUETOOTH<br />
PRÉPARATION AVANT UTILISATION<br />
(1)Avant d’utiliser Bluetooth, veuillez vous<br />
assurer que votre téléphone supporte<br />
la fonction Bluetooth.<br />
(2)La puissance d’émission Bluetooth varie<br />
selon les différents types de téléphones<br />
mobiles. Afin d’obtenir la meilleure<br />
qualité de conversation possible, il est<br />
conseillé de conserver une distance de<br />
3m entre le téléphone mobile et<br />
l’appareil. Veuillez ne pas insérer d’objet<br />
métallique et veillez à ce qu’il n’y ait<br />
pas d’obstacle entre le téléphone et<br />
l’appareil non plus.<br />
PAIRAGE<br />
1) Appuyez longuement sur le bouton<br />
MODE jusqu’à ce que l’écran affiche<br />
"PAIRING" pour entrer en mode de<br />
pairage.<br />
Sur le téléphone mobile, sélectionnez<br />
le réglage Bluetooth. (Veuillez<br />
vous référer au manuel d’instructions<br />
de votre téléphone mobile pour la<br />
procédure de fonctionnement<br />
Bluetooth.)<br />
2) “HOTWELL_Vxx.xx.x” doit figurer sur<br />
la liste de votre téléphone mobile,<br />
veuillez sélectionner<br />
“HOTWELL_Vxx.xx.x” puis insérez le<br />
mot de passe “0000”.<br />
3) L’appareil a une fonction de pairage<br />
intégrée, elle permet de rechercher<br />
automatiquement un téléphone mobile<br />
Bluetooth.
FONCTIONNEMENT<br />
4) Lorsque le pairage est effectué avec<br />
succès, le logo Bluetooth s’affiche<br />
sur l’écran LCD.<br />
5) En cas d’échec du pairage,<br />
recommencez après quelques<br />
secondes. Vous pouvez vous référer<br />
aux instructions de fonctionnement de<br />
votre téléphone mobile pour supprimer<br />
de la liste l’appareil que vous n’arrivez<br />
pas à mettre en pairage et refaites le<br />
pairage.<br />
6) Remarque: Toutes les touches sont<br />
désactivées pendant le pairage à<br />
l’exception du bouton (dégagement)<br />
(3) et des boutons<br />
d’augmentation/baisse du volume /<br />
(1) et le bouton MUTE (12)<br />
Pendant le pairage, appuyer longuement<br />
sur le bouton MODE pour<br />
quitter, jusqu’à ce que l’écran indique<br />
“PAIR END”.<br />
• RECONNEXION<br />
Cet appareil est équipé d’une fonction<br />
de reconnexion automatique intégrée.<br />
Dans certaines conditions, l’appareil se<br />
reconnectera au téléphone mobile<br />
(remarque : le pairage du téléphone<br />
mobile avec l’appareil doit avoir été<br />
effectué au préalable).<br />
Avant de composer, vous devez vérifier<br />
si le logo Bluetooth est affiché à<br />
l’écran d’affichage LCD.<br />
Dans les dix secondes et dans les<br />
conditions suivantes :<br />
a. lorsque vous éteignez l’appareil et que<br />
vous le rallumez.<br />
b.Retirez le câble ACC et rebranchez-le.<br />
c. Appuyez sur le bouton de<br />
(détachement) (3) pour détacher la<br />
façade et réinstallez le panneau.<br />
Appuyez sur le bouton (24), ‘NOT<br />
PAIR’ s’affichera à l’écran d’affichage<br />
LCD.<br />
Vous pouvez attendre quelques<br />
secondes afin de permettre à l’appareil<br />
de se reconnecter automatiquement ou<br />
appuyez sur le bouton RE-CON (16)<br />
pendant quelques secondes et<br />
maintenez-le enfoncé afin de vous<br />
reconnecter.<br />
Pendant la reconnexion, l’écran<br />
indiquera "CONN TRY" plusieurs fois<br />
puis "CONN OK" lorsque la connexion<br />
est établie.<br />
12<br />
• T-MENU<br />
Lorsque le pairage s’est effectué avec<br />
succès, appuyez brièvement sur le<br />
bouton T-MENU (17) de la façade pour<br />
accéder au menu du téléphone, veuillez<br />
maintenir le bouton enfoncé ou<br />
appuyer sur > /
FONCTIONNEMENT<br />
2) Composer un numéro avec la fonction<br />
numérotation rapide<br />
Appuyez sur le bouton (24) puis<br />
appuyez sur les boutons de préréglages<br />
(M0~M9) et maintenez-les enfoncés<br />
pour appeler un numéro de téléphone<br />
qui est en mémoire.<br />
Ensuite, le numéro que vous aviez<br />
enregistré s’affichera à l’écran<br />
d’affichage LCD.<br />
3) Prévisualiser la liste des numéros en<br />
numérotation rapide<br />
Appuyez sur le bouton T-MENU (17) et<br />
sélectionnez l’élément PRE NUM.<br />
Si vous désirez appeler un des<br />
numéros figurant sur la liste, utilisez<br />
les boutons / (1) pour sélectionner<br />
le numéro en numérotation rapide et<br />
appuyez brièvement sur le bouton<br />
(24) pour valider la composition du<br />
numéro.<br />
4) Éditer la liste des numéros en<br />
numérotation rapide- sélectionnez le<br />
numéro que vous désirez éditer sur la<br />
liste des numéros en numérotation<br />
rapide puis appuyez brièvement sur le<br />
bouton SEL/MENU (2) pour accéder à<br />
l’interface d’édition.<br />
- RECEIVED: Affiche le dernier appel<br />
reçu. Vous pouvez utiliser les boutons<br />
/ (1) pour parcourir la liste des<br />
derniers appels reçus. Vous pouvez<br />
ensuite appuyer brièvement sur le<br />
bouton (24) pour valider la<br />
composition du numéro.<br />
- NUMÉROS COMPOSÉS :Affiche la<br />
liste des 10 derniers numéros<br />
composés.<br />
Vous pouvez utiliser les boutons /<br />
(1) pour parcourir les numéros. Vous<br />
pouvez ensuite appuyer brièvement sur<br />
le bouton (24) pour valider la<br />
composition du numéro.<br />
- MISSED: Affiche le dernier appel en<br />
absence.<br />
Vous pouvez utiliser les boutons /<br />
(1) pour parcourir les numéros. Vous<br />
pouvez ensuite appuyer brièvement sur<br />
le bouton (24) pour valider la<br />
composition du numéro.<br />
13<br />
- MANU ANS/AUTO ANS<br />
Sous ce mode, appuyez sur les boutons<br />
d’augmentation/baisse du volume /<br />
(1) pour sélectionner MANU ANS<br />
(répondre manuellement) ou AUTO ANS<br />
(répondre automatiquement).<br />
En mode AUTO ANS, lorsqu’un appel<br />
est entrant, l’appareil répond<br />
automatiquement à l’appel.<br />
En mode MANU ANS, lorsqu’un appel<br />
est entrant, vous pouvez appuyer sur<br />
le bouton (24) pour répondre à l’appel<br />
ou appuyez sur le bouton (4) pour<br />
rejeter l’appel entrant.<br />
- VOLUME DE LA<br />
CONVERSATION :Affiche le niveau du<br />
volume de la conversation en cours,<br />
vous pouvez utiliser les boutons /<br />
(augmentation/baisse du volume) (1)<br />
pour ajuster le niveau du volume de la<br />
conversation sur une certaine gamme.<br />
- RÉPONDRE/REJETER UN APPEL<br />
ENTRANT<br />
Veuillez vous référer au paragraphe<br />
MANU ANS/AUTO ANS de la section<br />
T-MENU.<br />
- ÉMETTRE UN APPEL<br />
1) Pour émettre un appel depuis PRE<br />
NUM, RECEIVED, DIALED, MISSED,<br />
veuillez vous référer à la section T-<br />
MENU.<br />
2) Émettre un appel en insérant le numéro<br />
de téléphone manuellement. Appuyez<br />
sur le bouton (24) de la façade. Utilisez<br />
les boutons 0~9, *, # pour entrer le<br />
numéro de téléphone que vous<br />
souhaitez composer. Appuyez ensuite<br />
de nouveau sur le bouton (24) pour<br />
appeler le numéro. Remarque: Si vous<br />
insérez un mauvais chiffre, appuyez<br />
brièvement sur le bouton CLR (4) pour<br />
le supprimer. Appuyez sur le bouton<br />
CLR (4) et maintenez-le enfoncé pour<br />
effacer la totalité du numéro.<br />
3) Pour numéroter le numéro du dernier<br />
appel, appuyez sur le bouton PHONE<br />
deux fois, l’écran d’affichage LCD<br />
indique “LAST NUM”, puis appuyez à<br />
nouveau sur le bouton PHONE pour<br />
appeler le dernier numéro d’appel.
FONCTIONNEMENT<br />
- TRANSFERT D’APPEL ENTRE<br />
LE TÉLÉPHONE MOBILE ET<br />
L’APPAREIL<br />
Pendant la conversation, vous pouvez<br />
appuyer sur le bouton T-MENU (17) et<br />
le maintenir enfoncé pour transférer<br />
l’appel entre le téléphone mobile et<br />
l’appareil.<br />
Remarque:<br />
Si vous transférez l’appel vers le<br />
téléphone mobile, le son muet du mode<br />
actuel sera alors rétabli.<br />
- AUDIO BLUETOOTH (FONCTION<br />
A2DP)<br />
L’appareil supporte la fonction audio<br />
Bluetooth. Si votre téléphone mobile<br />
peut lire des fichiers audio stéréo et<br />
que le pairage est correct, vous pouvez<br />
sélectionner un fichier audio et régler<br />
la fonction A2DP de votre téléphone<br />
mobile (cela dépend des téléphones<br />
mobiles, chaque téléphone mobile a<br />
une configuration différente).<br />
Lorsque vous êtes en mode A2DP, seuls<br />
les boutons / (23) et PAU sont<br />
opérationnels. Utilisez les boutons<br />
/ (23) de la façade de l’appareil<br />
pour choisir la piste<br />
précédente/suivante.<br />
Appuyez sur le bouton PAU(8) pour<br />
mettre la lecture en pause.<br />
Remarque: lorsque vous lisez de la<br />
musique, vous ne pouvez pas émettre<br />
d’appel. Lorsqu’un appel est entrant,<br />
vous pouvez choisir d’y répondre ou<br />
pas.<br />
14
SPECIFICATION<br />
GENERAL<br />
Conditions d’alimentation électrique : DC 12 Volts, Négatif<br />
Dimensions du châssis : 178 (W) X 160 (D) X 50 (H)<br />
Commandes des tons<br />
- Basse (à 100Hz) : +-10 dB<br />
- Aigu (à 10KHz) : +-10 dB<br />
Sortie électrique maximale : 4 x 40 Watts<br />
Courant d’évacuation : 15 Ampère (max.)<br />
LECTEUR CD<br />
Ration de signal au bruit : Plus de 55 dB<br />
Séparation de chaîne : Plus de 50 dB<br />
Fréquence de réponse : 40 Hz - 18K Hz<br />
RADIO<br />
FM<br />
Fréquences couvertes : 87.5 à 108 MHz<br />
IF : 10.7 MHz<br />
Sensibilité (S/B =30dB) : 4 Uv<br />
Séparation stéréo : > 25 dBu<br />
MW<br />
Fréquences couvertes : 522 to 1620 KHz<br />
IF : 450 KHz<br />
Sensibilité (S/B = 20 dB) : 36 dBu<br />
18
TROUBLE SHOOTING<br />
Avant de lire cette liste, vérifiez les connexions des câbles. Si le problème persiste<br />
une fois que vous avez vérifié la liste suivante, consulter un centre de service.<br />
Symptôme<br />
Ne s’allume pas<br />
Le disque ne charge<br />
pas ou est éjecté<br />
Pas de son<br />
Le son saute<br />
Les touches de<br />
commandes ne<br />
fonctionnent pas<br />
La radio ne<br />
fonctionne pas. La<br />
sélection<br />
automatique de<br />
station radio ne<br />
fonctionne pas.<br />
Cause<br />
Le contact de la voiture n’est<br />
pas démarré<br />
Le fusible est brûlé.<br />
Présence d’un CD dans le<br />
lecteur.<br />
Le disque inséré est inséré<br />
dans la mauvaise direction.<br />
Le CD est extrêmement sale<br />
ou est défectueux.<br />
Température dans la voiture<br />
trop haute.<br />
Condensation.<br />
Le volume est au minimum.<br />
Les câbles ne sont pas<br />
correctement connectés.<br />
L’angle d’installation est de<br />
plus de 30 degrés.<br />
Le CD est extrêmement sale<br />
ou est défectueux.<br />
Le micro ordinateur intégré<br />
ne fonctionne pas<br />
correctement dû au bruit.<br />
Le câble d’antenne n’est pas<br />
connecté.<br />
19<br />
Solution<br />
Si l’alimentation électrique est<br />
connectée aux circuits<br />
accessoires de la voiture, mais<br />
que le moteur ne bouge pas,<br />
placez la clé de contact sur<br />
“ACC”.<br />
Remplacez le fusible<br />
Retirez le disque du lecteur, puis<br />
placez en un nouveau.<br />
Insérez le CD avec la face<br />
étiquetée vers le haut.<br />
Nettoyez le disque ou essayez<br />
d’en lire un autre.<br />
Laissez refroidir jusqu’à ce que<br />
la température ambiante<br />
revienne à la normale.<br />
Eteignez le lecteur pendant une<br />
heure environ, puis réessayez<br />
Ajustez le volume au niveau<br />
souhaité.<br />
Vérifiez la connexion des câbles.<br />
Ajustez l’angle d’installation à<br />
moins de degrés.<br />
Nettoyez le disque ou essayez<br />
d’en lire un autre.<br />
Appuyez sur le bouton<br />
REINITIALISATION. Le panneau<br />
avant n’est pas correctement<br />
fixé en place.<br />
Insérez le câble d’antenne<br />
fermement.<br />
Les signaux sont trop faibles. Sélectionnez une station<br />
manuellement.<br />
8471001576
MCR-732<br />
GEBRUIKSHANDLEIDING<br />
Draagbaar Audiosysteem<br />
• PLL Synthesizer Stereoradio<br />
• Automatische Geheugenprogrammering<br />
• RDS (Radio Data Systeem) Bediening<br />
• CD/MP3/WMA Speler<br />
• Elektronische Schokbeveiliging (ESP) Functie<br />
• USB Interface<br />
• SD/MMC Kaartinterface (Optioneel)<br />
• Bluetooth Hands-free functie & A2DP (Geavanceerd Audio<br />
Distributieprofiel)<br />
• Stereo Audio Overdracht<br />
• Omklapbaar en Uitneembaar Paneel
INSTALLATIE<br />
Let op:<br />
• Kies voor het monteren een plaats waar<br />
het apparaat de bestuurder tijdens het<br />
rijden niet hindert.<br />
• Sluit, vóór u het apparaat installeert, eerst<br />
tijdelijk alle kabels aan en controleer dat<br />
het systeem naar behoren werkt.<br />
• Gebruik voor een juiste installatie alleen<br />
onderdelen die met het apparaat<br />
meegeleverd zijn. Het gebruik van nietgoedgekeurde<br />
onderdelen kan<br />
mankementen veroorzaken.<br />
• Raadpleeg uw dichtstbijzijnde leverancier<br />
als voor de installatie van het product<br />
gaatjes geboord moeten worden, of<br />
andere wijzigingen aan het voertuig<br />
uitgevoerd moeten worden.<br />
• Installeer het apparaat op een plek waar<br />
het de bestuurder niet in de weg kan zitten<br />
en geen letsel kan veroorzaken aan<br />
passagiers in het geval van plotseling<br />
remmen (bijv. in noodgevallen).<br />
• Als de installatiehoek groter dan 30° is,<br />
werkt het apparaat wellicht niet optimaal.<br />
30˚<br />
• Voorkom blootstelling van het apparaat<br />
aan hoge temperaturen, zoals van direct<br />
zonlicht of hete lucht die uit een<br />
verwarming komt, en voorkom<br />
blootstelling aan stof, vuil en sterke<br />
trillingen.<br />
DIN-MONTAGE AAN VOOR-/ACHTERZIJDE<br />
Het apparaat kan gemonteerd worden aan<br />
de Voorzijde (conventionele-DIN montage<br />
aan voorkant) of aan de Achterzijde (DINmontage<br />
aan achterzijde via de<br />
schroefgaatjes aan de zijkant van het<br />
chassis.<br />
Raadpleeg voor details de geïllustreerde<br />
installatiemethoden hieronder).<br />
HAAL VÓÓR INSTALLATIE DE SCHROEVEN<br />
ERUIT<br />
Verwijder, vóór het installeren van de radio,<br />
alstublieft de twee schroeven.<br />
Haal vóór installatie de schroeven eruit<br />
2<br />
DIN-MONTAGE AAN VOORZIJDE (Methode<br />
A)<br />
De voor de installatie benodigde opening<br />
Dit apparaat kan in elk dashboard, dat een<br />
opening als hieronder heeft, geïnstalleerd<br />
worden:<br />
Het apparaat installeren<br />
Controleer eerst alle aansluitingen en volg<br />
dan de stappen hieronder om het apparaat<br />
te installeren.<br />
1. Zorg ervoor dat het contactslot van de<br />
auto uitgeschakeld is. Maak de kabel los<br />
van de negatieve (-) pool van de accu.<br />
2. Maak het draadraam en de antenne los.<br />
3. Druk op de ontgrendelingsknop van het<br />
frontpaneel en verwijder het<br />
bedieningspaneel (zie de stappen voor<br />
“het frontpaneel losmaken”).<br />
4. Til de bovenkant van de sierrand omhoog,<br />
trek hem los en haal hem eraf.<br />
5. De twee meegeleverde sleutels maken<br />
lipjes in de huls van het apparaat los zodat<br />
u het eruit kunt halen. Steek de sleutels<br />
(met de inkepingen naar boven) zover<br />
mogelijk in de daarvoor bestemde<br />
openingen links en rechts op het apparaat.<br />
Schuif de huls van de achterkant van het<br />
apparaat af.<br />
Sierrand<br />
Frontpaneel<br />
182 mm<br />
Huls<br />
L sleutel<br />
R sleutel<br />
53 mm<br />
6. Zet de huls vast door hem in de opening<br />
in het dashboard te steken en de lipjes<br />
rondom de huls met een schroevendraaier<br />
naar buiten te buigen. Niet alle lipjes<br />
kunnen kontakt maken, dus gebruik<br />
degenen die het meest effectief zullen zijn.<br />
Buig ze achter het dashboard open om<br />
de huls stevig vast op zijn plaats te zetten.
INSTALLATIE<br />
Schroevendraaier<br />
Lipjes<br />
7. Zet het draadraam en de antenne weer<br />
vast en zorg ervoor dat geen draden<br />
bekneld raken.<br />
8. Schuif het apparaat in de huls tot hij in<br />
zijn plaats klikt.<br />
9. Gebruik voor het vastzetten van de<br />
achterkant van het apparaat de<br />
meegeleverde metalen beugel. Gebruik<br />
de meegeleverde 5mm zeskantmoer en<br />
veerring om één eind van de beugel vast<br />
te maken aan de montagebout achter op<br />
het apparaat. Verbuig indien nodig de<br />
metalen beugel zodat hij past in de<br />
montageruimte van uw auto. Gebruik nu<br />
de 5x25m plaatschroef en vlakke sluitring<br />
om het andere eind onder het dashboard<br />
aan een onderdeel van de auto vast te<br />
maken. Deze beugel zorgt ook voor<br />
aarding van het apparaat.<br />
Let op:<br />
Maak het korte gedeelte van de beugel vast<br />
aan de achterzijde van het apparaat en het<br />
lange gedeelte aan het dashboard.<br />
Veerring<br />
Metalen Beugel<br />
Montagebout<br />
Dashboard<br />
Huls<br />
Zeskantmoer<br />
Vlakke Sluitring<br />
Plaatschroef<br />
10. Sluit de kabel weer aan op de negatieve<br />
(-) pool van de accu. Plaats de sierring<br />
weer terug en installeer het frontpaneel<br />
(zie de stappen in “het frontpaneel<br />
installeren”).<br />
Het apparaat verwijderen<br />
1. Zorg ervoor dat het contactslot van de<br />
auto uitgeschakeld staat. Maak de kabel<br />
los van de negatieve (-) accupool.<br />
3<br />
2. Maak de metalen beugel (indien<br />
geïnstalleerd) los van de achterzijde van<br />
het apparaat.<br />
3. Druk op de ontgrendelingsknop om het<br />
frontpaneel eraf te halen.<br />
4. Hef de bovenkant van de sierrand op,<br />
trek hem los en haal hem eraf.<br />
5. Steek de beide meegeleverde sleutels in<br />
de openingen aan linker- en rechterzijde<br />
van het apparaat en trek het apparaat uit<br />
het dashboard.<br />
DIN-MONTAGE AAN ACHTERZIJDE<br />
(Methode B)<br />
Volg deze montage-instructies als uw auto<br />
een Toyota of Nissan is.<br />
Gebruik de schroefgaatjes, gemarkeerd met<br />
T (Toyota) of N (Nissan), aan beide zijden<br />
van het apparaat om het apparaat vast te<br />
maken aan de voorziene<br />
radiomontagebeugel van uw auto.<br />
Side view showing Screw Holes marked T, N<br />
Factory Radio<br />
Mounting<br />
Bracket<br />
Screw<br />
Screw<br />
Dashboard or<br />
Console<br />
Voor het vastmaken van het apparaat aan<br />
de radiomontagebeugels.<br />
Breng de schroefgaatjes in de beugel op<br />
gelijke hoogte met de schroefgaatjes in het<br />
apparaat en draai de 5x5mm schroeven<br />
aan beide zijden vast.<br />
Let op: de sierrand, huls en metalen beugel<br />
worden voor installatiemethode B niet<br />
gebruikt.
DRAADVERBINDINGEN<br />
ISO AANSLUITING<br />
Rechterachterkanaal ROOD<br />
Linkerachterkanaal WIT<br />
Antenne-ingang<br />
Deel C<br />
Deel B<br />
Deel A<br />
GRIJS<br />
Systeem met 4 Luidsprekers<br />
(Groen/Zwart)<br />
(Groen)<br />
Linkerachter<br />
(Wit/Zwart)<br />
luidspreker<br />
(Wit)<br />
(Grijs/Zwart)<br />
Linkervoor<br />
luidspreker<br />
(Grijs)<br />
(Paars/Zwart)<br />
Rechtervoor<br />
luidspreker<br />
(Paars)<br />
Rechterachter<br />
luidspreker<br />
Aardedraad (Zwart)<br />
+12V Accessoires/Geschakeld (Rood)<br />
Antenne/Versterker Aanzetten (Blauw)<br />
+12V Permanente Stroom (Geel)<br />
4<br />
1 4 7 10 13 16 19<br />
3 6 9 12 15 18<br />
2 5 8 11 14 17 20<br />
1 3 5 7<br />
2 4 6 8<br />
1 3 5 7<br />
2 4 6 8<br />
ZEKERING (15A)<br />
Systeem met 2 Luidsprekers<br />
(Groen/Zwart)<br />
(Groen)<br />
(Wit/Zwart)<br />
(Wit)<br />
(Grijs/Zwart)<br />
(Grijs)<br />
(Paars/Zwart)<br />
(Paars)<br />
Linker<br />
luidspreker<br />
Rechter<br />
luidspreker
BEDIENING<br />
LOCATIE VAN TOETSEN<br />
1 3 4 2 22 5 6 7 8 9 10 11 12 13 14<br />
24 23<br />
1. / (volume omhoog/omlaag<br />
toetsen)<br />
2. SEL / MENU<br />
3 (Afneemtoets)<br />
4. (Ophangen) /BND/LOU/ENT<br />
/CLR<br />
5. LCD<br />
6. DIR-<br />
7. SHF<br />
8. PAU<br />
9. SCN<br />
10. MODE/PAIR<br />
11. PRT<br />
12. / MUTE<br />
13. DIR+<br />
14. USB interface<br />
21<br />
25<br />
20 19 18 17 16<br />
26 27<br />
29 28<br />
5<br />
15<br />
15. PTY<br />
16. # SCAN/RE-CON<br />
17. T-MENU<br />
18. DISP<br />
19. */ + AS/ PS/ Navi-SCH<br />
20. AF<br />
21. TA/ EQ<br />
22. Mic (microfoon)<br />
23. / afstemmen/zoeken/track<br />
omlaag/omhoog toetsen)<br />
24. (Gesprek Aannemen)<br />
25. 1-6 voorinsteltoetsen<br />
26. Diskhouder<br />
27. Uitwerptoets<br />
28. SD/MMC interface<br />
29. Terugsteltoets
BEDIENING<br />
ALGEMENE BEDIENING<br />
• HET APPARAAT IN/UITSCHAKELEN<br />
Druk op (12) om het apparaat in te<br />
schakelen.<br />
Wanneer het apparaat is ingeschakeld,<br />
kunt u (12) ingedrukt houden om het<br />
weer uit te schakelen.<br />
• FRONTPLAAT AFNEMEN<br />
Druk op (3) om de afneembare<br />
frontplaat los te maken.<br />
• GELUIDSAFSTELLING<br />
Druk kort op SEL/MENU (2) om de<br />
modus AUDIO INSTELLING te openen,<br />
gebruik SEL/MENU (2) om de gewenste<br />
instelmodus te selecteren. De<br />
instelmodus wisselt in deze volgorder:<br />
VOL BAS TRE BAL FAD<br />
(Volume) (Lage Tonen) (Hoge Tonen) (Balans) (Fader)<br />
Druk kort op / (1) om de<br />
geluidskwaliteit stapsgewijs hoger of<br />
lager aan te passen, houd / (1)<br />
ingedrukt om de geluidskwaliteit snel<br />
bij te stellen.<br />
• SYSTEEMINSTELLING<br />
Houd de toets SEL/MENU (2) op het<br />
voorpaneel ingedrukt om de modus<br />
SYSTEEMINSTELLING te openen. Druk<br />
vervolgens kort op SEL/MENU (2) om<br />
het in te stellen onderwerp te selecteren<br />
en gebruik / (1) om de betreffende<br />
instelling te veranderen.<br />
1) ZOEMER AAN/UIT<br />
Gebruik de Volume Omhoog/Omlaag<br />
knop om de zoemer aan of uit te<br />
zetten.<br />
2) P-VOL<br />
Gebruik de Volume Omhoog/Omlaag<br />
knop om het volume bij inschakelen<br />
van het apparaat in te stellen.<br />
3) GEBIED EUR/USA<br />
Gebruik de Volume Omhoog/Omlaag<br />
knop om de Europese of VS frequentieverdeling<br />
in te stellen.<br />
4) UREN 24H/12H<br />
Gebruik de Volume Omhoog/Omlaag<br />
knop om 24-uurs of 12-uurs formaat te<br />
kiezen.<br />
6<br />
5) PCLK ON/OFF<br />
Gebruik de Volume Omhoog/Omlaag<br />
knop om in te stellen of de klok<br />
zichtbaar is als het apparaat is<br />
uitgeschakeld. De PCLK ON instelling<br />
zorgt ervoor dat de klok met achtergrondverlichting<br />
zichtbaar is.<br />
• DEMP<br />
Druk kort op de toets MUTE (12) om<br />
het geluid onmiddellijk te dempen,<br />
nogmaals indrukken om het geluid weer<br />
te herstellen.<br />
• LUIDHEID<br />
Druk voor enkele seconden op de toets<br />
LOU (4) om de luidheidfunctie in te<br />
schakelen, het woord “LOUD” zal op<br />
de LCD verschijnen.<br />
Nogmaals voor enkele seconden<br />
indrukken om deze functie uit te<br />
schakelen en “LOUD” zal verdwijnen.<br />
• KLOKINSTELLING<br />
Druk kort op de toets DISP (18) totdat<br />
de klok op de LCD display verschijnt.<br />
Houd vervolgens DISP (18) ingedrukt<br />
totdat de klok begint te knipperen.<br />
Gebruik dan de toets om de<br />
minuten in te stellen of de toets om<br />
de uren aan te passen.<br />
• EQUALIZER<br />
Druk kort op de toets EQ (21) om de<br />
equalizerfunctie in te schakelen en de<br />
gewenste audiomodus te selecteren.<br />
De verschillende beschikbare modi zijn:<br />
CLASSIC POP ROCK DSP OFF
BEDIENING<br />
• TERUGSTELFUNCTIE<br />
De terugsteltoets (29) kan alleen<br />
ingedrukt worden met een balpen of<br />
dun metalen voorwerp. must be<br />
activated with either a ballpoint pen or<br />
thin metal object. Gebruik de<br />
terugsteltoets in de volgende gevallen:<br />
- Aanvankelijke installatie van het<br />
apparaat na de volledige bedrading aan<br />
te leggen.<br />
- Geen van de funtietoetsen zijn<br />
werkzaam.<br />
- Storingssymbool op de display.<br />
Opmerking: mocht na indrukken van<br />
de terugsteltoets (29) het apparaat nog<br />
steeds niet werken, gebruik dan a.u.b.<br />
een wattenstaafje met wat isopropanol<br />
alcohol om de aansluiting op het<br />
voorpaneel te reinigen.<br />
• MODUSSELECTIE<br />
Druk kort op de toets MODE (10) om<br />
de gewenste modus te selecteren,<br />
waaronder Radio, CD (MP3), USB, SD,<br />
AUX.<br />
Wanneer geen USB of SD is<br />
aangesloten op het apparaat, zullen de<br />
corresponderende modus overgeslagen<br />
worden.<br />
Na met de Bluetooth functie succesvol<br />
te hebben gepaard, kunt u modus BT<br />
of A2DP (Bluetooth audio) selecteren<br />
met de toets MODE.<br />
• ESP FUNCTIE<br />
Dit apparaat is ca. dertig seconden lang<br />
bestand tegen vibraties.<br />
RADIOBEDIENING<br />
• DE FREQUENTIEBAND<br />
SELECTEREN<br />
Druk in radiomodus kort op de toets<br />
BND (4) om de gewenste band te<br />
selecteren.<br />
De ontvangstband zal als volgt wisselen:<br />
FM1 FM2 FM3 MW<br />
• STATIONS SELECTEREN<br />
Druk kort op de toetsen / (23) om<br />
de automatische zoekfunctie te<br />
activeren. Druk enkele seconden in<br />
totdat “MANUAL” op de display<br />
verschijnt om aan te geven dat de<br />
handmatige afstemmodus geselecteerd<br />
is. Als geen van beide toetsen voor<br />
enkele seconden niet ingedrukt worden,<br />
7<br />
zal het apparaat de automatische<br />
afstemmodus weer starten en wordt<br />
kort het woord “AUTO” op de display<br />
getoond.<br />
AUTOMATISCHE<br />
GEHEUGENPROGRAMMERING &<br />
PROGRAMMA’S SCANNEN<br />
- Automatische geheugenprogrammering<br />
Druk enkele seconden op de toets<br />
•<br />
AS/PS (19) en het woord “SEARCH”<br />
zal op de LCD verschijnen. De radio zal<br />
vanaf de huidige frequentie beginnen<br />
te zoeken en controleert de<br />
signaalsterkte nadat één zoekcyclus<br />
voltooid is. Vervolgens zullen de 6<br />
stations met het krachtigste signaal<br />
opgeslagen worden in de<br />
corresponderende cijfertoetsen van de<br />
voorinsteltoetsen.<br />
- Programma’s scannen. Druk kort op de<br />
toets AS/PS (19) om naar<br />
vooringestelde stations te scannen. Het<br />
corresponderende stationnummer<br />
P1~P6 zal op de LCD knipperen.<br />
• SCAN<br />
Druk op de toets SCAN (16) om de<br />
scanmodus te openen, het apparaat<br />
zal vervolgens zoeken naar stations met<br />
een hogere frequentie en bij elk<br />
gevonden station even wachten (de<br />
corresponderende frequentie zal<br />
driemaal op de LCD knipperen).<br />
• STATIONS OPSLAAN<br />
Druk op een van de voorinsteltoetsen<br />
(25) (1 tot 6) om een station te selecteren<br />
dat alreeds in het geheugen is<br />
opgeslagen. Druk enkele seconden op<br />
deze toets (totdat het 2e piepje klinkt)<br />
en het huidige station wordt onder die<br />
cijfertoets opgeslagen.<br />
RDS (RADIO DATA SYSTEEM)<br />
BEDIENING<br />
- De RDS modus instellen<br />
Druk op de AF (20) toets om de RDS<br />
modus in of uit te schakelen.<br />
- DE PTY TOETS (15) GEBRUIKEN<br />
Druk op de toets PTY (15) om modus<br />
PTY SELECTEREN te openen. De<br />
programmanaam zal op de LCD<br />
verschijnen en u kunt / (1)<br />
gebruiken om de onderwerpen te<br />
selecteren en met de toetsen /<br />
(23) beginnen met zoeken naar het<br />
corresponderende programma.
BEDIENING<br />
- RDS Instellingen<br />
Druk de PTY toets (15) in en houdt<br />
ingedrukt om de RDS Instellingen<br />
stand in te schakelen. Druk dan kort<br />
op de PTY toets (15) om het te<br />
wijzigen onderdeel te selecteren, en<br />
gebruik de Volume Omhoog/Omlaag<br />
toets om instellingen als volgt te<br />
wijzigen:<br />
TA SEEK(TA ALARM)--> PI<br />
SOUND(PI MUTE)--> RETUNE<br />
S(RETUNEL)--> MASK DPI(MASK<br />
ALL)--> EONTA DX(EONTA LO)--><br />
TAVOL 30--> REG OFF (REG ON)<br />
- Naar Verkeersinformatie luisteren<br />
gebruik toets TA (21) als volgt:<br />
Wanneer langer dan 3 seconden<br />
ingedrukt, wordt de functie geactiveerd,<br />
tenzij u nogmaals op / drukt om<br />
het te deactiveren.<br />
Wanneer de TA modus is ingeschakeld<br />
en er wordt verkeersinformatie<br />
uitgezonden:<br />
Wanneer het apparaat op CD (MP3)<br />
modus of AUX IN modus staat, zal het<br />
tijdelijk op radiomodus schakelen.<br />
Schakel tijdelijk over op een aan EON<br />
gekoppeld station wanneer EON<br />
verkeersinformatie waarneemt op dat<br />
andere programma.<br />
Indien het volumeniveau onder de<br />
drempelwaarde is ingesteld, zal het tot<br />
op die waarde verhoogt worden.<br />
TA annuleerfunctie<br />
De huidige verkeersinformatie kan met<br />
deze toets geannuleerd worden, maar<br />
de TA modus zal echter niet<br />
uitgeschakeld worden.<br />
De gebruikte RDS gegevens zijn de PI,<br />
PS, AF, TP, TA, EON en PTY gegevens.<br />
PI: Programma Identificatie Code.<br />
Code voor identificatie van<br />
programma’s.<br />
PS: Programma Service Naam.<br />
Naamgegevens van het<br />
uitzendende station, uitgedrukt in<br />
alfanumerieke karakters.<br />
AF: Alternatieve Frequenties.<br />
Frequentielijst van radiostations<br />
die hetzelfde programma<br />
uitzenden.<br />
VP: Verkeersprogramma Identificatie.<br />
Identificatiegegevens voor<br />
radiostations die<br />
verkeersinformatie uitzenden.<br />
8<br />
VI: Verkeersinformatie Identificatie.<br />
Identificatiegegevens die<br />
aangeven of verkeersinformatie<br />
wel of niet wordt uitgezonden.<br />
EON: Enhanced Other Networks /<br />
Versterkte Andere Netwerken<br />
Informatie. Uitzendinformatie op<br />
PI, AF, VP, VI, enz., m.b.t. andere<br />
netwerken dan het netwerk<br />
momenteel gebruikt voor<br />
ontvangst.<br />
PTY: Programma Type Code. Inhoud<br />
van programma’s, zoals nieuws,<br />
lichte muziek, sport enz.<br />
CD/MP3/WMA BEDIENING<br />
OP CD MODUS SCHAKELEN<br />
Als er geen CD/MP3/WMA disk in de<br />
driver zit:<br />
Steek voorzichtig een CD/MP3/WMA disk<br />
met de bedrukte zijde omhoog in de<br />
diskhouder totdat u wat weerstand voelt.<br />
De disk zal automatisch de driver in<br />
worden getrokken. Het afspelen van de<br />
CD/MP3/WMA disk begint.<br />
Wanneer het apparaat is ingeschakeld,<br />
kan de disk automatisch de driver<br />
ingetrokken worden.<br />
Als een CD/MP3/WMA disk alreeds in de<br />
driver geladen is:<br />
Druk verschillende keren kort op de toets<br />
MODE(10).<br />
• TRACKS SELECTEREN<br />
Gebruik / (23) om over te slaan<br />
naar de vorige/volgende track. Het<br />
tracknummer wordt op de LCD<br />
aangegeven. Houd / (23) ingedrukt<br />
om vooruit/terug te spoelen. Zodra u<br />
de toets loslaat, wordt het afspelen van<br />
de disk hervat.<br />
• AFSPELEN PAUZEREN<br />
Druk op de toets PAU (8) om de speler<br />
te pauzeren. Druk nogmaals in om het<br />
afspelen te hervatten.<br />
• ALLE TRACKS VOORBESCHOUWEN<br />
Door op de toets SCN (9) te drukken<br />
worden de eerste paar seconden van<br />
elke track op de huidige disk<br />
afgespeeld. Druk nogmaals in om de<br />
intro’s te stoppen en naar een track te<br />
luisteren.
BEDIENING<br />
• DEZELFDE TRACK HERHALEN<br />
Druk op de toets RPT (11) om dezelfde<br />
track herhaald af te spelen. Druk<br />
nogmaals in om de herhaling te<br />
annuleren.<br />
• ALLE TRACKS IN WILLEKEURIGE<br />
VOLGORDE AFSPELEN<br />
Druk op de toets SHF (7) om alle tracks<br />
van de disk in willekeurige volgorde af<br />
te spelen. Druk nogmaals in om deze<br />
functie te annuleren.<br />
• DISKS VERWIJDEREN<br />
Druk op de toets (27) om het afspelen<br />
van een CD/MP3/WMA te stoppen en<br />
de disk uit de houder (26) te halen.<br />
• SPECIALE FUNCTIES VOOR MP3/<br />
WMA DISKS<br />
1) FOLDER OMHOOG/OMLAAG<br />
SELECTEREN<br />
Druk op de toets DIR- (6) of DIR+ (13)<br />
om een folder omlaag of omhoog te<br />
selecteren. Als de MP3/WMA disk geen<br />
enkele folder bevat, zal indrukken van<br />
DIR- (6) of DIR+ (13) geen effect<br />
hebben.<br />
2) TRACKS SELECTEREN MET TOETS<br />
AS/PS /Navi- SCH<br />
De toets AS/PS (Navi-SCH) (19) dient<br />
als Digitale Audiomodus selectietoets<br />
tijdens afspelen van MP3 disks.<br />
Door de toets in te drukken, activeert<br />
u de selectie van elke aparte Digitale<br />
Audiomodus.<br />
“Tracks zoeken” => “Folder of<br />
bestandsnaam zoeken”=> “Navigatie”<br />
vanuit hoofdmenu met de toetsen<br />
volume omhoog/omlaag.<br />
- Direct naar Tracks zoeken<br />
Druk eenmaal op de toets AS/PS (Navi-<br />
SCH) (19) om modus “Tracks zoeken”<br />
te openen voor Digitale Audio CD’s.<br />
U kunt vervolgens de volume<br />
omhoog/omlaagtoetsen / (1)<br />
gebruiken om stapsgewijs de<br />
tracknummers te selecteren. Het<br />
corresponderende tracknummer, zoals<br />
“TRACK 12”, zal op het display<br />
verschijnen.<br />
Druk op de toets BND/LOU/ENT (4) ter<br />
bevestiging en om het afspelen te<br />
starten.<br />
- Naar Folders of Bestandsnamen<br />
zoeken<br />
9<br />
Druk tweemaal op de toets AS/PS<br />
(Navi-SCH) (19) om modus “Folder of<br />
Bestandsnaam zoeken” voor Digitale<br />
Audio CD’s.<br />
- Gebruik de volume<br />
omhoog/omlaagtoetsen om de<br />
karakters A tot Z te selecteren, blanco,<br />
0 tot 9, _, -, +.<br />
- Gebruik de toets SEL (2) om de invoer<br />
van elk karakters te bevestigen.<br />
- Druk op de toets BND/LOU/ENT (4)<br />
om het zoeken naar de titel te starten.<br />
Als de geselecteerde titel een<br />
foldernaam is, zal op de display (‘ ‘)<br />
verschijnen, vervolgens<br />
- Gebruik de volume<br />
omhoog/omlaagtoetsen / (1) om<br />
alle liedjes onder deze folder op te<br />
sommen en de titel te selecteren.<br />
- Druk op de toets BND/LOU/ENT (4) ter<br />
bevestiging en om het afspelen te<br />
starten.<br />
- Herhaal bovenstaande stappen als de<br />
onlangs geselecteerde titel wederom<br />
een folder is.<br />
- Zoeken vanaf de Hoofdfolder<br />
Druk driemaal op de toets AS/PS (Navi-<br />
SCH) (19). Het apparaat zoekt naar<br />
bestanden of folders vanaf de<br />
hoofdfolder via de toetsen<br />
afstemmen/zoeken/track<br />
omhoog/omlaag / (23). (Het icoontje<br />
D-DIR verschijnt als de naam een folder<br />
is). Op de display zullen eerste alle<br />
beschikbare folders en liedjes<br />
verschijnen. Selecteer de gewenste<br />
folder/liedjes met de volume<br />
omhoog/omlaagtoetsen / (1) en<br />
druk op BND/LOUD/ENT (24) ter<br />
bevestiging.<br />
Als de geselecteerde titel een liedje is,<br />
zal deze worden afgespeeld.<br />
Als de geselecteerde titel een<br />
foldernaam is, zal de display (‘ ‘) tonen,<br />
gebruik vervolgens de volume<br />
omhoog/omlaagtoetsen / (1) om<br />
alle liedjes onder deze folder weer te<br />
geven en selecteer de titel. Druk op<br />
toets BND/LOU/ENT ter bevestiging<br />
en om het afspelen te starten. Herhaal<br />
bovenstaande stappen als de onlangs<br />
geselecteerde titel wederom een folder<br />
is.<br />
3) INFORMATIE OPROEPEN<br />
Druk op de toets DISP (18) om<br />
informatie op te roepen,zoals het
BEDIENING<br />
tracknummer, de klok en andere<br />
informatie.<br />
Alleen voor diskversies met MP3 ID3<br />
functie: ID3 TAG (indien beschikbaar:<br />
songtitel, foldernaam, artiestnaam,<br />
overige inhoud…) zal op het scherm<br />
weergegeven worden zonder de toets<br />
DISP in te drukken.<br />
USB AFSPEELBEDIENING<br />
Het voorpaneel van het apparaat is<br />
voorzien van een USB interface (14). Via<br />
deze interface (14) kunt u een USB<br />
apparaat aansluiten.<br />
Zodra u een USB apparaat op deze<br />
interface aansluit, zal de speler zoeken<br />
naar de MP3 bestanden of WMA<br />
bestanden in de USB driver en<br />
automatische deze MP3 of WMA<br />
bestanden afspelen.<br />
Indien een andere modus actief is, kunt<br />
u op de toets MODE (10) drukken om de<br />
USB modus te selecteren. Tijdens het<br />
afspelen van de MP3 bestanden of WMA<br />
bestanden van het apparaat, zijn alle<br />
bedieningen hetzelfde als de hierboven<br />
beschreven bediening voor MP3/WMA.<br />
Opmerking<br />
• Het hoofdapparaat ondersteunt<br />
uitsluitend standaard USBgeheugendisks,<br />
goedgekeurd door<br />
Microsoft.<br />
• USB MP3 speler is niet een standaard,<br />
wat betekent dat verschillende<br />
merknamen of verschillende modellen<br />
een eigen standaard hebben. Daarom<br />
ondersteunt ons product niet elke MP3<br />
speler.<br />
• Als de te aan te sluiten MP3 speler een<br />
normale batterij bevat (niet-oplaadbare<br />
batterij), dient u de batterij uit de MP3<br />
speler te halen en deze daarna pas aan<br />
te sluiten op de USB interface.<br />
• Zoniet kan de batterij scheuren. Zorg<br />
ervoor in USB afspeelmodus nooit de<br />
USB driver uit de USB interface te<br />
verwijderen.<br />
OPGELET<br />
Sluit het USB apparaat niet aan op het<br />
hoofdapparaat om af te spelen als dit<br />
apparaat belangrijke bestanden bevat.<br />
Speel tevens geen CD-R/RW disks af die<br />
belangrijke bestanden bevatten. Verkeerd<br />
gebruik kan namelijk verlies van bestanden<br />
veroorzaken. Ons bedrijf draagt hiervoor<br />
geen verantwoordelijkheid.<br />
10<br />
ONDERSTEUNDE MP3/WMA<br />
DECODEERMODI<br />
Het hoofdapparaat ondersteunt de<br />
volgende MP3/WMA (Windows Media<br />
Audio) decodeermodi.<br />
Standaard Bitsnelheid<br />
(kbps)<br />
MPEG1 Audio<br />
Laag 3<br />
(44.1kHz)<br />
Windows<br />
Media Audio<br />
(44.1kHz)<br />
16-320Kbps<br />
& VBR<br />
16-320Kbps<br />
& VBR<br />
Ondersteunde<br />
Modus<br />
Stereo<br />
Stereo<br />
De USB oplossing ondersteunt:<br />
1. Folder: 256 max.<br />
2. Bestand: 30000 max.<br />
SD/MMC BEDIENING (OPTIONEEL)<br />
Naar wens van de klant kan het apparaat<br />
een SD/MMC interface toegevoegd<br />
krijgen. Zie hieronder, de SD/MMC<br />
interface zit op de behuizing van het<br />
apparaat.<br />
SD/MMC INTERFACE<br />
Zodra u een SD/MMC kaart in de<br />
SD/MMC interface steekt, zal het apparaat<br />
zoeken naar MP3 bestanden of WMA<br />
bestanden opgeslagen in die kaart en de<br />
MP3 of WMA bestanden automatisch<br />
afspelen. De bediening is hetzelfde als de<br />
hierboven beschreven MP3 bediening.<br />
Indien een andere modus actief is, kunt<br />
u op de toets MODE (10) drukken om de<br />
SD/MMC modus te selecteren.<br />
Sluit de SD/MMC kaart niet aan op het<br />
hoofdapparaat om af te spelen als de<br />
kaart belangrijke bestanden bevat.
BEDIENING<br />
OPMERKINGEN OVER DISKS<br />
A. Opmerkingen over disks:<br />
1.Het apparaat kan beschadigd raken als<br />
u probeert disks af te spelen met een<br />
niet-standaard vorm (bijv. rechthoek,<br />
ster, hart). Gebruik uitsluitend ronde<br />
CD’s voor dit apparaat.<br />
2.Plak geen stickers of tape en dergelijke<br />
op de bedrukte zijde van disks, omdat<br />
dit tot storingen kan leiden.<br />
3.Vuil, stof, krassen en vervormde disks<br />
zullen storingen veroorzaken.<br />
B. Opmerkingen over CD-R<br />
(opneembare CD’s)/CD-RW<br />
(herschrijfbare CD’s) disks:<br />
1.Speel met dit apparaat uitsluitend disks<br />
af met de volgende markeringen:<br />
Recordable Rewritable<br />
2.Het apparaat kan geen CD-R of CDRW<br />
disks afspelen die niet afgewerkt zijn.<br />
(Zie a.u.b. de handleiding van uw CD-<br />
R/CD-RW recorder of CD-R/CD-RW<br />
software voor meer informatie over<br />
afwerking van dergelijke disks).<br />
3.Het hangt af van de opnamestatus en<br />
condities van de disk en de apparatuur<br />
gebruikt voor de opname of bepaalde<br />
CD-R/CD-RW disks afgespeeld kunnen<br />
worden met dit apparaat. (zie *1)<br />
*1: Volg onderstaande aanbevelingen voor<br />
meer betrouwbare<br />
afspeelmogelijkheden:<br />
a. Gebruik CD-RW disks met snelheid 1x<br />
tot 4x en schrijfsnelheid 1x tot 2x.<br />
b.Gebruik CD-R disk met snelheid 1x tot<br />
8x en schrijfsnelheid 1x tot 2x.<br />
c. Speel geen CD-RW disks af die meer<br />
dan vijfmaal herschreven zijn.<br />
C. Opmerkingen over MP3 bestanden<br />
(Alleen MP3 Versie):<br />
1.Het diskformaat moet ISO9660 niveau<br />
1 of niveau 2 zijn, of Joliet of Romeo in<br />
het uitbreidingsformaat.<br />
2.Zorg ervoor extensie “.MP3” te<br />
gebruiken bij het toewijzen van een<br />
naam aan een MP3 bestand.<br />
3.Het apparaat kan een bestand niet<br />
herkennen als dit geen MP3 bestand<br />
is, zelfs als de bestandsnaam de<br />
extensie “.MP3” heeft.<br />
11<br />
BLUETOOTH BEDIENING<br />
• VOORBEREIDING VOOR GEBRUIK<br />
(1)Controleer a.u.b. of uw mobiele telefoon<br />
inderdaad de Bluetooth functie<br />
ondersteunt alvorens Bluetooth te<br />
gebruiken.<br />
(2)Bluetooth heeft voor elke verschillende<br />
telefoon een verschillende<br />
overdrachtssterkte. Voor de beste<br />
gesprekskwaliteit, raden wij een afstand<br />
aan tussen de mobiele telefoon en het<br />
apparaat van maximaal 3 meter.<br />
Verwijder tevens eventuele metalen<br />
voorwerpen of andere obstakels tussen<br />
de mobiele telefoon en het apparaat.<br />
• PAREN<br />
1) Houdt, om de paring mode in te<br />
schakelen, de MODE toets enige tijd<br />
ingedrukt totdat op het LCD scherm<br />
PAIRING getoond wordt.<br />
Selecteer de Bluetooth instellingen in<br />
uw mobiele telefoon (Zie a.u.b. de<br />
gebruiksaanwijzingen van uw mobiele<br />
telefoon m.b.t. Bluetooth bediening.)<br />
2) “HOTWELL_Vxx.xx.x” dient te staan<br />
aangegeven in de lijst op uw mobiele<br />
telefoon, selecteer a.u.b.<br />
“HOTWELL_Vxx.xx.x” en voer<br />
vervolgens het wachtwoord “0000” in.<br />
3) Het apparaat heeft een automatisch<br />
paarfunctie en zal automatisch zoeken<br />
naar de Bluetooth mobiele telefoon.<br />
4) Zodra het paren gelukt is, zal op de<br />
LCD het Bluetooth-icoontje<br />
verschijnen.<br />
5) Indien het paren mislukt, probeer het<br />
nogmaals binnen enkele seconden.<br />
Raadpleeg de handleiding van uw<br />
mobiele telefoon over het wissen van<br />
het foutief gepaarde apparaat en<br />
probeer nogmaals.<br />
6) Opmerking: Tijdens het paren zijn alleen<br />
de toetsen (afnemen) (3), volume<br />
omhoog/omlaag / (1) en MUTE<br />
(12) werkzaam, andere toetsen zijn in<br />
paarmodus gedeactiveerd.<br />
Als u wilt stoppen tijdens de pairing,<br />
houdt dan net zolang de MODE toets<br />
ingedrukt totdat "PAIR END" op het<br />
scherm verschijnt.
BEDIENING<br />
• OPNIEUW VERBINDEN<br />
Dit apparaat is voorzien van een<br />
automatisch functie voor nieuwe<br />
verbindingspogingen. In bepaalde<br />
gevallen zal het apparaat automatisch<br />
een nieuwe verbinding maken met de<br />
mobiele telefoon (opmerking: de<br />
mobiele telefoon moet hiervoor eerder<br />
gepaard zijn geweest met het apparaat.)<br />
Alvorens te bellen, dient u te controleren<br />
of het Bluetooth-icoontje op de LCD<br />
wordt weergegeven.<br />
Binnen tien seconden in de volgende<br />
gevallen:<br />
a. Wanneer u het apparaat uitschakelt en<br />
daarna weer inschakelt<br />
b.Schakel de ACC draad uit en schakel<br />
deze opnieuw in.<br />
c. Druk op de toets (afenemen) (3) om<br />
het voorpaneel los te maken en deze<br />
opnieuw te installeren.<br />
Druk op de toets (24), ‘NOT PAIR’<br />
kan op de LCD verschijnen. U kunt<br />
enkele seconden wachten om het<br />
apparaat opnieuw automatisch te laten<br />
verbinden of houd de toets RE-CON<br />
(16) enkele seconden ingedrukt om<br />
handmatig opnieuw een verbinding tot<br />
stand te brengen.<br />
Tijdens het opnieuw verbinden toont<br />
de LCD meerdere malen “COON<br />
TRY” en toont dan “CONN OK” als de<br />
verbinding succesvol tot stand is<br />
gebracht.<br />
• T-MENU<br />
Nadat het paren geslaagd is, kunt u<br />
kort op de toets T-MENU (17) op het<br />
voorpaneel drukken om het<br />
telefoonmenu te openen. Druk meerdere<br />
keren op deze toets of druk op de<br />
>/ ” aan.<br />
e. Gebruik 0~9, *, #, om het gewenste<br />
telefoonnummer in te voeren.<br />
Opmerking: Als u een verkeerd<br />
telefoonnumer invoert, kunt u de toets<br />
CLR (4) gebruiken om het te wissen.<br />
Houd de toets CLR (4) ingedrukt om<br />
alle nummers te wissen.<br />
f. Druk na het invoeren op de toets<br />
SEL/MENU (2) om het nummer in het<br />
voorinstelgeheugen op te slaan.<br />
De LCD toont “SAVE OK”.<br />
2) Een snelkeuzenummer bellen<br />
Druk op de toets (24) en houd<br />
vervolgens de voorinsteltoetsen<br />
(M0~M9) ingedrukt om het<br />
telefoonnummer te bellen dat op die<br />
geheugenplek is opgeslagen.<br />
Het nummer opgeslagen op deze<br />
geheugenplek zal op de LCD worden<br />
weergegeven.<br />
3) Snelkeuzelijst voorbeschouwen<br />
Druk op de toets T-MENU (17) om het<br />
menu PRE NUM te selecteren. Als u<br />
een nummer in deze lijst wilt bellen,<br />
kunt u / (1) gebruiken om een<br />
snelkeuzenummer te selecteren, druk<br />
vervolgens kort op de toets (24) om<br />
het bellen te bevestigen.<br />
4) De snelkeuzelijst bewerken. Selecteer<br />
het aan te passen nummer vanuit de<br />
snelkeuzelijst en druk vervolgens kort<br />
op de toets SEL/MENU (2) om de<br />
bewerkinterface te openen.<br />
- RECEIVED: Geeft het laatst ontvangen<br />
gesprek aan. U kunt / (1) gebruiken<br />
om te bladeren door alle ontvangen<br />
nummers. U kunt deze nummers bellen<br />
door kort op de toets (24) te drukken.
BEDIENING<br />
- DIALED: Geeft de 10 laatst gedraaide<br />
nummers aan.<br />
U kunt / (1) gebruiken om de<br />
nummers te scannen. U kunt deze<br />
nummers bellen door kort op de toets<br />
(24) te drukken.<br />
- MISSED: Geeft gemiste gesprekken<br />
weer.<br />
U kunt / (1) gebruiken om de<br />
nummers te scannen. U kunt deze<br />
nummers bellen door kort op de toets<br />
(24) te drukken.<br />
- MANU ANS/AUTO ANS<br />
Gebruik in deze modus de toetsen /<br />
(volume omhoog/omlaag) (1) om<br />
MANU ANS (handmatig beantwoorden)<br />
of AUTO ANS (automatisch<br />
beantwoorden) te selecteren.<br />
In AUTO ANS modus zal het apparaat<br />
een inkomende oproep automatisch<br />
beantwoorden.<br />
In MANU ANS modus kunt u op de<br />
toets (24) drukken om een oproep te<br />
beantwoorden of op de toets (4)<br />
drukken om een inkomende oproep te<br />
weigeren.<br />
- TALK VOLUME: Geeft het huidige<br />
gespreksvolume aan. U kunt de toetsen<br />
/ (volume omhoog/omlaag) (1)<br />
gebruiken om het gespreksvolume<br />
binnen een bepaald bereik aan te<br />
passen.<br />
• EEN INKOMEND GESPREK<br />
BEANTWOORDEN/WEIGEREN<br />
Zie a.u.b. paragraaf MANU ANS/AUTO<br />
ANS in de sectie T-MENU.<br />
• EEN UITGAAND GESPREK<br />
PLAATSEN<br />
1) Zie a.u.b. de sectie T-MENU om te<br />
bellen vanuit PRE NUM, RECEIVED,<br />
DIALED, MISSED.<br />
2) Een uitgaand gesprek plaatsen door<br />
het telefoonnummer handmatig in te<br />
voeren. Druk op de toets (24) op het<br />
voorpaneel. Gebruik de toetsen 0~9, *,<br />
# om het te bellen telefoonnumer in te<br />
voeren. Druk hierna nogmaals op de<br />
toets (24) om het nummer te draaien.<br />
Opmerking: indien u een verkeer<br />
nummer invoert, druk kort op de toets<br />
CLR (4) om het te wissen. Houd de<br />
toets CLR (4) ingedrukt om alle<br />
nummers te wissen.<br />
13<br />
3) Het laatst gebelde nummer markeren<br />
door tweemaal op de PHONE toets te<br />
drukken. De LCD toont "LAST NUM",<br />
druk opnieuw op de PHONE toets om<br />
het laatst gebelde nummer te bellen.<br />
• HET GESPREK OVERDRAGEN<br />
TUSSEN<br />
MOBIELE TELEFOON EN HET<br />
APPARAAT<br />
In gespreksmodus kunt u de toets T-<br />
MENU (17) ingedrukt houden om het<br />
gesprek te wisselen tussen de mobiele<br />
telefoon en het apparaat.<br />
Opmerking:<br />
Als u het gesprek doorstuurt naar de<br />
mobiele telefoon, zal het dempen van<br />
de huidige modus gelijkertijd<br />
geannuleerd worden.<br />
• BLUETOOTH AUDIO (A2DP FUNCTIE)<br />
Dit apparaat ondersteunt de Bluetooth<br />
audiofunctie. Als uw mobiele telefoon<br />
stereo audio kan afspelen en het paren<br />
geslaagd is, kunt u een audiobestand<br />
selecteren en deze op de A2DP functie<br />
op uw mobiele telefoon zetten. (Deze<br />
functie is afhankelijk van de<br />
mogelijkheden van uw telefoon.)<br />
In A2DP modus zijn alleen de toetsen<br />
/ (23) en de toets PAU werkzaam.<br />
Gebruik de toetsen / (23) op het<br />
voorpaneel van het apparaat om de<br />
vorige/volgende track te selecteren.<br />
Druk op de toets PAU (8) om het<br />
afspelen te pauzeren.<br />
Opmerking: tijdens het afspelen van<br />
muziek kunt u niet bellen. Wanneer een<br />
inkomende oproep binnenkomt, kunt u<br />
kiezen deze te beantwoorden of<br />
weigeren.
SPECIFICATIES<br />
ALGEMEEN<br />
Stroomvoorziening : DC 12 Volt, Negatieve Massa<br />
Afmetingen Chassis<br />
Toonregeling<br />
: 178(B) X 160(D) X 50(H)<br />
- Bas (bij 100Hz) : +-10dB<br />
- Hoge tonen (bij 10KHz) : +-10dB<br />
Max. Uitgangsvermogen : 4 x 40 Watt<br />
Stroomverbruik : 15 Ampère (max.)<br />
CD-SPELER<br />
Geluid/Ruisverhouding : Meer dan 55 dB<br />
Kanaalscheiding : Meer dan 50 dB<br />
Frequentierespons : 40 Hz - 18 KHz<br />
RADIO<br />
Frequentiebereik<br />
FM<br />
: 87,5 tot 108 MHz<br />
IF : 10,7 MHz<br />
Gevoeligheid (G/R = 30 dB) : 4Uv<br />
Stereoscheiding : > 25 dBu<br />
Frequentiebereik<br />
MG<br />
: 522 tot 1620 KHz<br />
IF : 450 KHz<br />
Gevoeligheid (G/R = 20 dB) : 36 dBu<br />
17
PROBLEEM OPLOSSEN<br />
Controleer eerst alle aansluitingen voordat u deze lijst raadpleegt. Neem contact op<br />
met de dichtstbijzijnde leverancier als u het probleem niet aan de hand van deze lijst<br />
kunt oplossen.<br />
Symptoom<br />
Geen Stroom.<br />
Kan geen disk laden<br />
of verwijderen.<br />
Geen geluid.<br />
Het geluid slaat<br />
over.<br />
De<br />
bedieningsknoppen<br />
werken niet.<br />
De radio werkt niet.<br />
De automatische<br />
selectie van<br />
radiozenders werkt<br />
niet.<br />
Oorzaak<br />
Het contact van de auto<br />
staat niet aan.<br />
De zekering is gesprongen.<br />
Er zit al een CD in de speler.<br />
De disk zit op zijn kop in de<br />
speler.<br />
De CD is erg vies of<br />
beschadigd.<br />
Het is te warm in de auto.<br />
Condensvorming.<br />
Het volume staat te laag.<br />
De aansluitingen kloppen<br />
niet.<br />
Het apparaat staat meer dan<br />
30 graden scheef.<br />
De disk is erg vies of<br />
beschadigd.<br />
De ingebouwde<br />
microcomputer werkt niet<br />
goed vanwege stoorsignalen<br />
De antennekabel is niet<br />
aangesloten<br />
18<br />
Oplossing<br />
Als de stroomvoorziening<br />
aangesloten is op het<br />
accessoirescircuit van de auto,<br />
maar de motor niet draait, draai<br />
dan de contactsleutel naar de<br />
“ACC”-stand.<br />
Vervang de zekering.<br />
Verwijder eerst de disk en plaats<br />
dan een nieuwe erin.<br />
Plaats de CD erin met het<br />
opschrift naar boven gericht.<br />
Maak de disk schoon of probeer<br />
een andere disk.<br />
Laat de temperatuur in de auto<br />
afkoelen tot een normaal niveau.<br />
Laat de speler ongeveer een uur<br />
uit staan, en probeer het dan<br />
opnieuw.<br />
Pas het volume aan.<br />
Controleer alle aansluitingen.<br />
Pas de installatiehoek aan tot<br />
minder dan 30 graden.<br />
Maak de CD schoon of probeer<br />
een andere disk.<br />
Druk op de RESET-knop.<br />
Controleer dat het frontpaneel<br />
goed op zijn plaats zit.<br />
Zorg ervoor dat de antennekabel<br />
stevig vast zit.<br />
De signalen zijn te zwak. Selecteer handmatig een zender.<br />
8471001576