SUNOPAK® 76 / 18 (Greca/ Trapeze) Installation Guide - Palram.de
SUNOPAK® 76 / 18 (Greca/ Trapeze) Installation Guide - Palram.de
SUNOPAK® 76 / 18 (Greca/ Trapeze) Installation Guide - Palram.de

Create successful ePaper yourself
Turn your PDF publications into a flip-book with our unique Google optimized e-Paper software.
SUNOPAK ® <strong>76</strong> / <strong>18</strong> (<strong>Greca</strong>/ <strong>Trapeze</strong>)<br />
<strong>Installation</strong> <strong>Gui<strong>de</strong></strong><br />
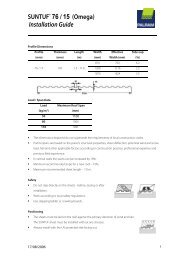
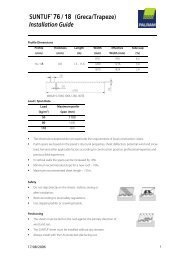
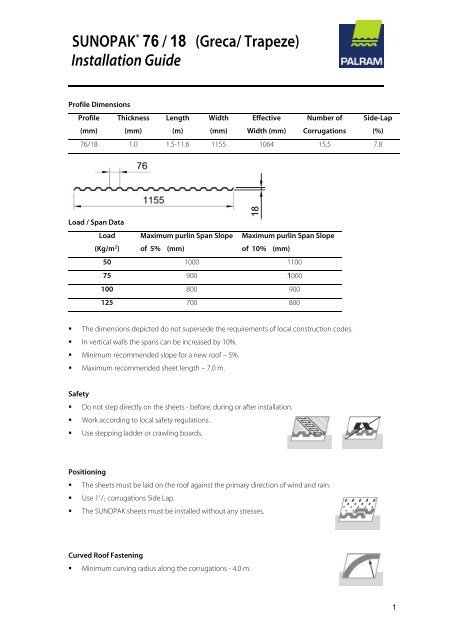
Profile Dimensions<br />
Profile<br />
(mm)<br />
Thickness<br />
(mm)<br />
Length<br />
(m)<br />
Width<br />
(mm)<br />
Effective<br />
Width (mm)<br />
Number of<br />
Corrugations<br />
Si<strong>de</strong>-Lap<br />
(%)<br />
<strong>76</strong>/<strong>18</strong> 1.0 1.5-11.6 1155 1064 15.5 7.8<br />
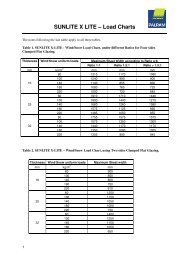
Load / Span Data<br />
Load Maximum purlin Span Slope Maximum purlin Span Slope<br />
(Kg/m 2 ) of 5% (mm)<br />
of 10% (mm)<br />
50 1000 1100<br />
75 900 1000<br />
100 800 900<br />
125 700 800<br />
• The dimensions <strong>de</strong>picted do not superse<strong>de</strong> the requirements of local construction co<strong>de</strong>s.<br />
• In vertical walls the spans can be increased by 10%.<br />
• Minimum recommen<strong>de</strong>d slope for a new roof – 5%.<br />
• Maximum recommen<strong>de</strong>d sheet length – 7.0 m.<br />
Safety<br />
• Do not step directly on the sheets - before, during or after installation.<br />
• Work according to local safety regulations.<br />
• Use stepping lad<strong>de</strong>r or crawling boards.<br />
Positioning<br />
• The sheets must be laid on the roof against the primary direction of wind and rain.<br />
• Use 1 1 / 2 corrugations Si<strong>de</strong> Lap.<br />
• The SUNOPAK sheets must be installed without any stresses.<br />
Curved Roof Fastening<br />
• Minimum curving radius along the corrugations - 4.0 m.<br />
1
SUNOPAK ® <strong>76</strong> / <strong>18</strong> (<strong>Greca</strong>/ <strong>Trapeze</strong>)<br />
<strong>Installation</strong> <strong>Gui<strong>de</strong></strong><br />
Roof and Wall Positioning and Fastening<br />
• Use plastic shaped spacing supports.<br />
• Start fastening the screws on the Si<strong>de</strong> Lap where the<br />
SUNTUF sheet over-laps the previous installed sheet.<br />
• Fasten on the corrugation crest at every purlin.<br />
• Fasten the screws on the lower edge purlin, each second<br />
corrugation crest, starting at the same si<strong>de</strong>.<br />
• Fasten at the internal purlins, at each third corrugation crest.<br />
• Fasten at the upper edge purlin, at each second corrugation crest, starting at the same si<strong>de</strong>.<br />
• Wall mounting (cladding) – The fasteners at the corrugations valley, except at the si<strong>de</strong>-laps.<br />
Internal Purlin Fasteners location<br />
External Purlin Fasteners location<br />
Si<strong>de</strong>-Lap<br />
• Use 1 1 / 2 corrugations Si<strong>de</strong> Lap.<br />
• Start from the si<strong>de</strong> where the SUNOPAK sheet over-laps the previous sheet.<br />
• Apply sealing tape along the crest centerline.<br />
End-Lap<br />
• Maximum overhang up to 100 mm from screw centerline.<br />
• Minimum overhangs 50 mm from screw centerline.<br />
• Apply sealing tape along screws centerline.<br />
• Roof edge – not more than 100 mm<br />
2
SUNOPAK ® <strong>76</strong> / <strong>18</strong> (<strong>Greca</strong>/ <strong>Trapeze</strong>)<br />
<strong>Installation</strong> <strong>Gui<strong>de</strong></strong><br />
Screws and Washers<br />
• Crest fixing – 5.5mm x 50mm wood or metal screw.<br />
• Valley fixing – 5.5mm x 38mm wood screw (wall covering).<br />
• Recommen<strong>de</strong>d washer/gasket: 19mm diameter- galvanized /<br />
aluminum / stainless metal washer attached to EPDM rubber gasket of 55 to 65 shore hardness and<br />
minimum 4mm thickness.<br />
• Never use PVC washers or any unapproved material.<br />
• PALRAM washers are highly recommen<strong>de</strong>d.<br />
• Pre-drill the screw holes in the SUNOPAK sheets, 3-4 mm bigger<br />
than the screw diameter (9-10mm).<br />
Fastening Tips<br />
• Use adjustable electric screwdriver.<br />
• The screw must be installed perpendicular<br />
to the SUNOPAK sheet.<br />
• Important - Do not over-tighten!<br />
Cutting / Sawing tools<br />
• Circular saw with small teeth.<br />
• Jigsaw.<br />
• When Sawing use high bla<strong>de</strong> speed and slow feed rate.<br />
• Support the sheet in the vicinity of the cut and clean dust and splinters away.<br />
Drilling<br />
• The hole diameter must be 3-4 mm larger than the diameter of the screw.<br />
• Support the sheet in the vicinity of the hole and clean dust and splinters away.<br />
Handling and Storage (Packed sheets)<br />
• Store in a sha<strong>de</strong>d place, protect from direct sunlight and rain.<br />
• Avoid covering the sheets with heat absorbing materials.<br />
• Avoid contact or environment of chemicals.<br />
• Avoid any tightening pressure on the sheets during packing and transporting.<br />
• Protect the sheets from any damage.<br />
3
SUNOPAK ® <strong>76</strong> / <strong>18</strong> (<strong>Greca</strong>/ <strong>Trapeze</strong>)<br />
<strong>Installation</strong> <strong>Gui<strong>de</strong></strong><br />
Accessories<br />
Use only PALRAM approved accessories<br />
• Compatible Silicone.<br />
• Butyl Rubber or Expanding Sealing tape.<br />
• Plastic crest supports.<br />
Important Notes<br />
• Avoid any stress source.<br />
• Pre drilled holes – Oversized holes should be 3-4mm wi<strong>de</strong>r than the screw diameter.<br />
• Do not over-tighten.<br />
• Use only approved accessories, including rubber washers, silicones, sealing strip, closure fixtures etc.<br />
Soft PVC washers looking exactly like EPDM washers are not compatible with Polycarbonate sheets.<br />
• Avoid contact with non-compatible chemicals and materials.<br />
For information about Accessories, please refer to the CATALOG OF FINISHING ACCESSORIES.<br />
Inasmuch as <strong>Palram</strong> Industries has no control over the use to which others may put the material, it does not guarantee that the same results as those <strong>de</strong>scribed<br />
herein will be obtained. Each user of the material should make his own tests to <strong>de</strong>termine the material's suitability for his own particular use. Statements<br />
concerning possible or suggested uses of the materials <strong>de</strong>scribed herein are not to be construed as constituting a license un<strong>de</strong>r any <strong>Palram</strong> Industries patent<br />
covering such use or as recommendations for use of such materials in the infringement of any patent. <strong>Palram</strong> Industries or its distributors cannot be held<br />
responsible for any losses incurred through incorrect installation of the material. In accordance with our Company policy of continual product <strong>de</strong>velopment you are<br />
advised to check with your local <strong>Palram</strong> Industries supplier to ensure that you have obtained the most up to date information.<br />
Europe<br />
UK<br />
Israel<br />
USA<br />
Australia<br />
Far East<br />
EUROPE<br />
PALRAM EUROPE LTD.<br />
Tel (44) 1302 380 777<br />
Fax (44) 1302 380 788<br />
sales.europe@palram.com<br />
PALRAM UK<br />
Tel (44) 1302 380 738<br />
Fax (44) 1302 380 739<br />
sales @palram.co.uk<br />
ISRAEL<br />
PALRAM ISRAEL LTD.<br />
Tel (972) 4 8459 900<br />
Fax (972) 4 8444 012<br />
palram@palram.com<br />
USA<br />
PALRAM Americas<br />
Tel 610 285 99<strong>18</strong><br />
Fax 610 285 9928<br />
palramamericas@palram.com<br />
4