SUNTUF® 76 / 18 (Greca/Trapeze) Installation Guide
SUNTUF® 76 / 18 (Greca/Trapeze) Installation Guide
SUNTUF® 76 / 18 (Greca/Trapeze) Installation Guide
- No tags were found...

You also want an ePaper? Increase the reach of your titles
YUMPU automatically turns print PDFs into web optimized ePapers that Google loves.
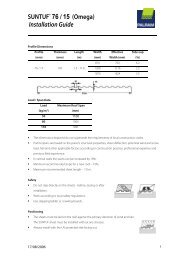
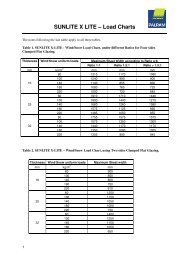
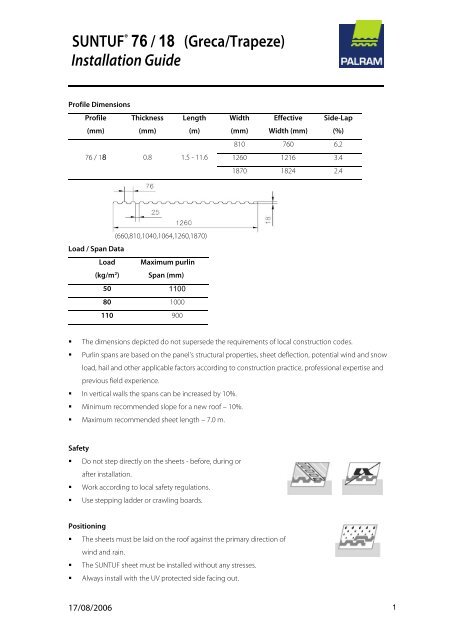
SUNTUF ® <strong>76</strong> / <strong>18</strong> (<strong>Greca</strong>/<strong>Trapeze</strong>)<strong>Installation</strong> <strong>Guide</strong>Profile DimensionsProfile(mm)Thickness(mm)Length(m)<strong>76</strong> / <strong>18</strong> 0.8 1.5 - 11.6Width(mm)EffectiveWidth (mm)Side-Lap(%)810 <strong>76</strong>0 6.21260 1216 3.4<strong>18</strong>70 <strong>18</strong>24 2.4(660,810,1040,1064,1260,<strong>18</strong>70)Load / Span DataLoad Maximum purlin(kg/m 2 ) Span (mm)50 110080 1000110 900• The dimensions depicted do not supersede the requirements of local construction codes.• Purlin spans are based on the panel’s structural properties, sheet deflection, potential wind and snowload, hail and other applicable factors according to construction practice, professional expertise andprevious field experience.• In vertical walls the spans can be increased by 10%.• Minimum recommended slope for a new roof – 10%.• Maximum recommended sheet length – 7.0 m.Safety• Do not step directly on the sheets - before, during orafter installation.• Work according to local safety regulations.• Use stepping ladder or crawling boards.Positioning• The sheets must be laid on the roof against the primary direction ofwind and rain.• The SUNTUF sheet must be installed without any stresses.• Always install with the UV protected side facing out.17/08/2006 1
SUNTUF ® <strong>76</strong> / <strong>18</strong> (<strong>Greca</strong>/<strong>Trapeze</strong>)<strong>Installation</strong> <strong>Guide</strong>Curved Roof Fastening• Minimum curving radius along the corrugations - 4.0 m.Roof and Wall Positioning and Fastening• Start fastening the screws on the Side Lap where the SUNTUF sheetover-laps the previously installed sheet.• Fasten on the corrugation crest at every purlin.• Fasten the screws on the lower edge purlin, each second corrugation valley, starting at the same side.• Fasten at the internal purlins, at each third corrugation valley.• Fasten at the upper edge purlin, at each second corrugation valley, starting at the same side.• Wall mounting (cladding) – The fasteners at the corrugations valley, except at the side-lap.Internal Purlin Fastener locationExternal Purlin Fastener locationSide-Lap• Use tow corrugations Side Lap where the slope smaller than 10%, longspans and large rain loads.• Start from the side where the SUNTUF sheet over-laps the other sheet.• Apply sealing tape along the crest centerline.• Use sheet to sheet (stitching) fasteners between the purlins, every 300-400 mm .End-Lap• Maximum overhang up to 100 mm from screw centerline.• Minimum overhangs 50 mm from screw centerline.• Apply sealing tape along screws centerline.• Roof edge – not more than 100 mmStitching screwsAre needed for improving side lap sealing in cases of slope smallerthan 10%, long spans and large rain loads.17/08/2006 2
SUNTUF ® <strong>76</strong> / <strong>18</strong> (<strong>Greca</strong>/<strong>Trapeze</strong>)<strong>Installation</strong> <strong>Guide</strong>Screws and Washers• Valley fixing - Self-drilling ¼”x 1” screw.• Crest fixing - Self-drilling ¼”x 1 1 / 2 ” screw.• Recommended washer/gasket: 19mm diameter- galvanized / aluminum /stainless metal washer attached to EPDM rubber gasket of 55 to 65 shore hardness.• Never use PVC washers or any unapproved material.• PALRAM washers are highly recommended.• When installing a curved roof it is recommended to use a compatible crest rider with EPDM attachedgasket.• It is recommended to pre-drill the screw holes in the SUNTUF sheets, 3-4 mm biggerdiameter than the screw.Fastening Tips• Use adjustable electric screwdriver.• The screw must be installed perpendicularto the SUNTUF sheet.• Important - Do not over-tighten!Cutting / Sawing tools• Circular saw with small teeth.• Jigsaw.• When Sawing use high blade speed and slow feed rate.• Support the sheet in the vicinity of the cut and clean dust and splinters away.Handling and Storage (Packed sheets)• Store in a shaded place, protect from direct sunlight and rain.• Avoid covering the sheets with heat absorbing materials.• Avoid contact or environment of chemicals.• Protect the sheets from any damage.AccessoriesUse only PALRAM approved accessories• Compatible Silicone.• Butyl Rubber or Expanding Sealing tape.• Closure Fixtures.17/08/2006 3
SUNTUF ® <strong>76</strong> / <strong>18</strong> (<strong>Greca</strong>/<strong>Trapeze</strong>)<strong>Installation</strong> <strong>Guide</strong>Drilling• The hole diameter must be 3-4 mm larger than the diameter of the screw.• Support the sheet in the vicinity of the hole and clean dust and splinters away.• The drill should be held perpendicular to the sheet surface.Applying the Sealing Strip• Clean the surface before applying the tape.• Apply the tape slowly, uniformly and with no stresses.• Apply one tape line along the screw holes locationor 2 tape lines on both sides of the screw holes line.Important Notes• Be sure to install the UV protected side facing the sun radiation.• Avoid any stress source.• Pre drilled holes – Oversized holes should be 3-4mm wider than the screw diameter.• Do not over-tighten.• Use only approved accessories, including rubber washers, silicones, sealing strip, closure fixtures etc.Soft PVC washers looking exactly like EPDM washers are not compatible with Polycarbonate sheets.• Avoid contact with non-compatible chemicals and materials.For information about Accessories, please refer to the CATALOG OF FINISHING ACCESSORIES.Inasmuch as PALRAM Industries has no control over the use to which others may put the material, it does not guarantee that the same results as those describedherein will be obtained. Each user of the material should make his own tests to determine the material's suitability for his own particular use. Statementsconcerning possible or suggested uses of the materials described herein are not to be construed as constituting a license under any Palram Industries patentcovering such use or as recommendations for use of such materials in the infringement of any patent. PALRAM Industries or its distributors cannot be heldresponsible for any losses incurred through incorrect installation of the material. In accordance with our Company policy of continual product development you areadvised to check with your local PALRAM Industries supplier to ensure that you have obtained the most up to date information.EuropeUKIsraelUSAAustraliaFar EastEUROPEPALRAM EUROPE LTD.Tel (44) 1302 380 777Fax (44) 1302 380 788sales.europe@palram.comPALRAM UKTel (44) 1302 380 738Fax (44) 1302 380 739sales @palram.co.ukISRAELPALRAM ISRAEL LTD.Tel (972) 4 8459 900Fax (972) 4 8459 980palram@palram.comUSAPALRAM AmericasTel 610 285 99<strong>18</strong>Fax 610 285 9928palramamericas@palram.com17/08/2006 4