suntuf plus install - Palram
suntuf plus install - Palram
suntuf plus install - Palram

You also want an ePaper? Increase the reach of your titles
YUMPU automatically turns print PDFs into web optimized ePapers that Google loves.
Plus®Corrugated Polycarbonate Sheets for GreenhousesInstallation InstructionsT a b l e o f C o n t e n t s :A - Profile Dimensions 2B - Distance Between Purlins 2C - Handling and Storage 3D - Cutting 3E - Drilling 3F - Chemical Resistance 3G - Sealing and Bonding 4H - Use of Shading Compounds 4I - Positioning of Sheets 5J - Overlap 5K - Arching Radius 5L - Roof and Wall Fastener Location 6M - Screws, Washers and Gaskets 6N - Sheet-to-Sheet Stitching Fasteners 7O - Additional Accessories 7P - Standard SUNTUF Plus Accessories 8
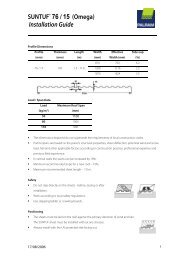
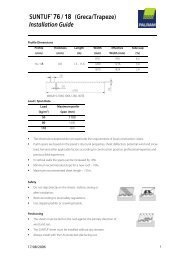
SUNTUF PlusINSTALLATION INSTRUCTIONSA Profile Dimensions:Distance betweenCorrugations (mm)76Width(mm)EffectiveWidth (mm)Number ofCorrugationsWaveOverlapPercentOverlap1260 1216 17 1* 3.576 1870 1824 25 1* 2.5Table 151Greca Profile16512676126016Figure 1a26761870Figure 1b3015Omega Profile3015761260Figure 2aB761870Figure 2bTwo corrugations length overlap is recommended for slopes below 15%, or in case of* extreme weather conditions (excessive rain and/or wind.)Distance between Purlins:ProfileGrecaOmegaSheetThicknessmm0.80.8TheoreticalWeightkg/m 21.201.15Loadkg/m 290120150Table 2Distance betweenRoof Purlinsmm120011001000Distance betweenWall Purlinsmm12001. The dimensions depicted above do not supersede the requirements of local construction codes.The distances depicted above were calculated based on the structural properties with the followingfactors being taken into consideration: sheet deflection, potential wind load, potential snow load,hail and application load according to usual construction practice.2. When designing a new roof, it is strongly recommended that the slope be above 10% (5.7°). (Consultyour local PALRAM representative when recovering an existing greenhouse whose slope is shallowerthan this value).3. The recommended maximum panel length is 7.0 m. The recommended maximum distance betweenthe edge and first purlin is 900 mm or the value dictated by the design engineer. (See drawing onpage 5- Figure 8b).Calculate the number of sheets as follows:61326 8.041 - Divide the length of the roof (the length of the gutter) by the effective width of the sheet.2 - Calculate the required length of the sheet (to be no greater than 7.0 m) according to purlin to purlindistance <strong>plus</strong> the required extension beyond first and last purlin and overlap distance, if exists.2
SUNTUF PlusINSTALLATION INSTRUCTIONSCHandling and Storage:1. PALRAM corrugated sheets must be transported and stored horizontally on aflat, sturdy pallet whose dimensions are equal to or larger thanthe sheets themselves. The sheets should be secured and fastenedto the pallet. It is possible to store sheets of smaller dimensionson top of larger sheets of the same type. (Never store sheetsof larger dimensions on top of smaller sheets!) SUNTUF Plus must bestored in a cool and shaded location.2. Important: Never cover the pallet with, or place on the pallet, materials thatare good conductors of heat (e.g. metal, pipes, clear or dark objects).3. In cases where it is necessary to store the pallet outdoors, cover it with awhite opaque polyethylene sheet, card board, or any other material thatdoes not absorb or conduct heat. The total pallet must be covered.Figure 3DCutting:It is possible to cut SUNTUF Plus corrugated sheets using a circularsaw with small teeth, rotating at a high speed, taking care toadvance the saw slowly. It is also possible to use a portable electricsaw(Jig Saw) or sheet metal shears. In any case, it is importantto support the sheet in the vicinity of the cut and clean awaythe dust and debris generated by cutting.Figure 4EDrilling:1. Drilling should be carried out with a drill bit intended for metal. The holediameter must be 2 mm greater than the diameter of the screw to be used.It is important to support the sheet in the vicinity where the sheet is beingdrilled. The dust generated by drilling must be cleared away before theinsertion of the screw.2. Special attention should be given to drill all the required holes perpendicularto the face of the material.Figure 590 oFChemical Resistance (compatible sealants and adhesive materials):1. SUNTUF Plus sheets are resistant to a variety of chemicals and exhibit limitted resistance to a second group ofchemicals. A third group of chemicals will attack and cause damage to the sheet. The degree of damage will dependon the severity of attack and time of exposure.2. Choose only sealants and adhesives which are compatiable with SUNTUF Plus (see paragraph G).3. Beware of <strong>install</strong>ing the sheets on wet paint, or other uncompatible materials, which may damage the polycarbonatsheets.4. Use of sealants or adhesives not included in the recommended list must receive the Manufacturer's explicit approval.This can be obtained through your distributor. Use of materials not on the list, or which have not received theManufacturer's explicit approval, may harm the sheet and will void all warranties and any responsibility of themanufacturer for the performance of SUNTUF Plus!!5. Your local distributor can provide additional information and forward materials for evaluation of their compatabilitywith SUNTUF Plus.61326 8.043
SUNTUF PlusINSTALLATION INSTRUCTIONSG Sealing and bonding:1. Compatible siliconesealants recommendedfor use with PALRAMsheets:Product Name / Type ManufacturerNovasil S-64Otto ChemiePlastisil BSR 50-20 Simson BVSilicone Sealant 3793Silicone Sealant 795Dow-CorningSilicone Sealant 791-PQ3-7098/7099GE/BayerMultisil TransparentSiliconesTable 3For other materials please consult your PALRAM distributorGrecaOmegaSEALANT2. Corrugated sealing strip closure should be used to preventthe entry of water, wind, insects or other small animalsbetween <strong>install</strong>ed sheets. A seal between the sheet andthe edge purlin of the roof can be created using a sealingstrip in the form of the profile. It is held in place by thesame screw used to fasten the sheet to the purlin. Thesealing strip should be manufactured from cross-linkedpolyethylene foam (XPE)3. Sealing strips between overlapping sheets should be usedwhere the pitch of the roof is less than 15%. Only butylrubber strips should be used. The strip should be placedbetween overlapping sheets along the length and widthof the overlap at both edges. In cases where penetrationof wind or fumes must be prevented, a sealing strip shouldbe used irrespective to roof slope. Wherever a sealing stripis inserted, a fastening sheet to sheet tightening screwshould be used.Shaped foam polyethylenetop and bottom (PE) sealing strips.Figure 6aButyl Rubber Sealing StripFigure 6cSilicone sealant.Figure 6bWARNING - Do not use materials which are not recommended by <strong>Palram</strong>.Specifically, polyurethane foam should not be used as <strong>install</strong>ion foamwith SUNTUF Plus. Contact with this material will render the sheetsfragile. When in doubt, consult your <strong>Palram</strong> distributor.HUse of Shading Compounds:1. It is possible to apply shading compounds on SUNTUF Plus sheets.2. Use only recognized commercial brands, confirmed to be compatible with polycarbonate. Do not apply dubious mixturesthat may contain incompatible components, which will attack and damage the sheets.3. In case of doubt, consult your SUNTUF Plus distributor, who can advise you on the proper use of shading compounds.4. You can ask for recommendations on compatible formulations that were tested and confirmed for use by PALRAMIndustries. Note that all the recommended formulations are water-soluble and will eventually be washed away by rains.5. Shading compounds should be easily removed using a strong water jet in conjunction with vigorous brushing with asoft bristle brush, or wiping with soft cotton rags.61326 8.044
SUNTUF PlusINSTALLATION INSTRUCTIONSIPositioning of Sheets:1. Only one side of a SUNTUF Plus sheet is UV protected*. Thisside must always face out toward the sun. The UV protectedside is indicated by a sticker or polyethylene strip along thelength of the sheet.The sticker or polyethylene strip must beremoved immediately after the sheet is <strong>install</strong>ed.2. The sheets should be laid down on the roof or set upon thewall against the primary direction of wind and rain.3. Do not step on the panels between purlins.4. Stepping ladders and other devices required for safe workshould be used.5. Never leave panels unattended until all the required screwshave been tightened.6. SUNTUF Plus sheets are lightweight. The sheet can be rolledin a direction perpendicular to the length of the corrugationsfor the purpose of lifting them to the roof.* Except for SUNTUF Plus UV2 which is manufactured with co-extruded UVprotection on both sided when a special order has been placed.Figure 7aFigure 7cDirection of Wind and RainLay Sheets against Wind DirectionFigure 7bFigure 7dJOverlap:1. Width overlap (sheet edge):Minimum overlap: 120 mmMinimum distance of 60 mmof each sheet’s edge fromcenterline of supporting purlins(line of screws).Maximum overlap: 200 mm120-200 mmFigure 8aLength Overlap2. Length overlap:One corrugation**3. Roof Edge: Sheets at the roof’sedge should extend beyondover the edge support by notmore than 100 mm.Minimum Slope 10%Width OverlapFigure 8b100 mmEdge Purlin toPurlin DistanceInternal Purlin toPurlin DistanceKArching Radius:When covering curved structures, it is possible to set the sheetson an arched framework so that they will arch within the range ofelasticity of the sheets without inducing stress. The minimum radiusof the arch created is 3.00 m for Omega and 6.00 m for Greca.** See comment on Par. A./ Pg. 2.Minimum RadiusFigure 961326 8.045
SUNTUF PlusINSTALLATION INSTRUCTIONSLRoof and Wall Fastener Location:1. A fastening screw should be inserted into atleast every third corrugation valley at eachinternal purlin.2. Along the edge purlin, the screws are to beinserted into alternate corrugation valleys.3. Along the length overlap, the screws are tobe inserted into the overlapping corrugationcrest on top of each purlin.4. A hole must be pre-drilled into each screwlocation. The diameter of the hole must be2 mm larger than that of the screw.Positions for fastening roof or wall screws at internal purlin.Figure 10aPositions for fastening roof or wall screws at edge purlin.Figure 10b19 mm washer19 mm washer5. The screws should be tightened with an electricscrewdriver with an adjustable clutch, takingcare not to over-tighten. Excessive tighteningmay harm the sheet and cause prematurefailure.6. Sheet-to-sheet stitching fasteners arerecommended along the length of overlappingcorrugations between the purlins, at least 2units at every span. (Par. M. Sheet-to-sheetstitching fasteners, p. 6)19 mm washerGreca ProfileFigure 10cOmega ProfileFigure 10d25 mm washerM Screws, Washers and Gaskets:1. General Recommendations: For optimal long-term maintenancefree service, PALRAM strongly recommends the use of heavydutycorrosion resistant screws, and special metal washerswith profiled 4 mm (at least) thick EPDM rubber gaskets*,19 mm (crest) or 25 mm (valley) diameter (in Greca profilboth crest and valley with 19 mm), to fasten the sheets tothe supporting structure and seal the fastener’s hole. (fig.11a, b).2. Use of self-tapping screws with pre-drilled holes or self-drillingscrews is recommended. For wooden purlins, a special woodscrewshould be used. (See Figures 11c, d, e on side.)19mm washer/gasketFigure 11a25mm washer/gasketFigure 11b3. The screw placed into corrugation crest should be 6.3 x 38mm (1/4 x 11/2 in.) or a #12 or 14 gage screw. Screwsplaced in a corrugation valley should be 6.3 x 25 mm (1/4x 1 in.). Each screw should be fitted with a conical corrosionresistant metal washer at least 1 mm (0.04 in.) thick and aspecial EPDM gasket (fig. 11a,b). The screw should be tightenedmoderately without deforming the washer and rubber gasketor distorting the corrugation.4. Special attention should be given to the insertion of the screwsperpendicular to the material face. Oblique insertion coulddamage the sheet and/or result in leaks. (fig. 12a, b, c)Self-tapping screwFigure 11cSelf-drilling screwFigure 11dWood screwFigure 11e61326 8.04* PALRAM offers to supply, upon demand, the recommendedfastener combinations mentioned above, along with the SUNTUFPlus sheets.INCORRECT -Non-perpendicular drillingand insertion.Figure 12aCORRECT INCORRECT -Excess overtighteningFigure 12bFigure 12c6
SUNTUF PlusINSTALLATION INSTRUCTIONSNSheet-to-Sheet Stitching Fasteners:1. Stitching fasteners are used to create acomplete tightening between overlappingsheets, between purlins. When the slopeof the roof is less than 15%, it is necessaryto insert such a fastener every 40 cm.Where the slope is greater than 15%,the spacing is every 50 cm. It isrecommended to use 1 /4” x 3 /4” self-tappingscrews, without the need for prior drillingof a hole.2. Top & bottom length overlap strengtheningprofiles (Fig. 14) are also serving as sheetto-sheetstitching elements, with additionalmid-span screws.Sheet-to-sheet fastening screwbetween overlapping corrugations(detail), for Omega profil.Figure 13aSheet-to-sheet fastening screwbetween overlapping corrugations(detail), for Greca profile.Figure 13bFigure 14OAdditional Accessories:1. Purlins for Condensation Collectiona) It is possible to build the greenhouse (consult yourgreenhouse supplier) utilizing special purlins of omegadesign that aid in condensation collection and preventcondensation drip from the purlins. Care must be takento construct the greenhouse with a devise that will carryoff the collected condensation at the edge of the purlins.b) An aluminum collecting profile will be <strong>install</strong>ed ontop of every supporting truss or beam in the greenhouse.Its purpose is collecting and draining the condensedwater gathered in the Omega purlins’ channels, leadingthem into the side gutters. (Fig. 16b)Figure 16aSuntuf PlusFor complete sealing its recommendedto use a butil rubber strip (par. G/Pg. 4)Alum. collecting profileTrussprofileFigure 16bOmega purlin2. Corner Side Ridge Closurea) To close the structure where the roof meets thegable, or a vertical closure between two walls meetingat the corners, two adjoining galvanized sheet-metalprofiles are used. (Fig. 17)b) The internal L shaped 100 x 100 x 1.5 mm profileis used to attach both edges of the cladding sheets tothe structure- at the corner of roof and gable or twowall edges at a corner.c) The external L shaped, 150 x 150 x 0.55 mm flashingis fastened to the internal L profile at the roof edge andtop end of the gable, or at the greenhouse corners. Itcloses the gap between the cladding sheets at thecorners, with or without additional XPE shaped closurestrips (Fig. 7a).Internal Metal Covering100 X 100 X 1.5 mmCorner Side Ridge CoveringFigure 17External Metal Covering150 X 150 X 0.55mm61326 8.047
SUNTUF PlusINSTALLATION INSTRUCTIONSOPStandard SUNTUF Plus Accessories:Greca Profile Universal Ridge Cap(Omega Profile Universal Ridge Cap, not shown,also available)Dimensions: 2280 x 150 x 150 mm2800 x 270 x 270 mmNumber of Corrugations: 30Net Length: 2204 mmFigure 18aSUNTUF PlusFigure 18bSUNTUF PlusFlat Ridge Cap 150°Dimensions:2500 x 210 x 210 mmNet Length: 2400 mmCorrugated Sealing StripFigure 19aFlat Side Ridge - 90°Dimensions:2500 x 160 x 160 mmNet Length: 2400 mmFigure 19bSUNTUF PlusFigure 20aSUNTUF PlusFigure 20b* - All the above materials may be purchased from PALRAM Industries and its distributors.Inasmuch as PALRAM Industries has no control over the use to which others may put the material, it does not guarantee that the same results as those described herein will be obtained. Each user of thematerial should make his own tests to determine the material's suitability for his own particular use. Statements concerning possible or suggested uses of the materials described herein are not to be construedas constituting a license under any PALRAM Industries patent covering such use or as recommendations for use of such materials in the infringement of any patent. PALRAM Industries or its distributorscannot be held responsible for any losses incurred through incorrect <strong>install</strong>ation of the material. In accordance with our Company policy of continual product development you are advised to check with yourlocal PALRAM Industries supplier to ensure that you have obtained the most up to date information.61326 8.04EuropeUKIsraelUSAAustraliaFar EastEUROPEPALRAM EUROPE LTD.Tel (44) 1302 380 777Fax (44) 1302 380 788sales.europe@palram.comPALRAM UKTel (44) 1302 380 738Fax (44) 1302 380 739sales.uk@palram.com8ISRAELPALRAM ISRAEL LTD.Tel (972) 4 8459 900Fax (972) 4 8459 980palram@palram.comUSAPALRAM AMERICASTel 610 285 9918Fax 610 285 9928<strong>suntuf</strong>@<strong>suntuf</strong>.comwww.palram.com