INSTALLATION GUIDE ⢠OWNER'S GUIDE - Bulldog Security
INSTALLATION GUIDE ⢠OWNER'S GUIDE - Bulldog Security
INSTALLATION GUIDE ⢠OWNER'S GUIDE - Bulldog Security

Create successful ePaper yourself
Turn your PDF publications into a flip-book with our unique Google optimized e-Paper software.
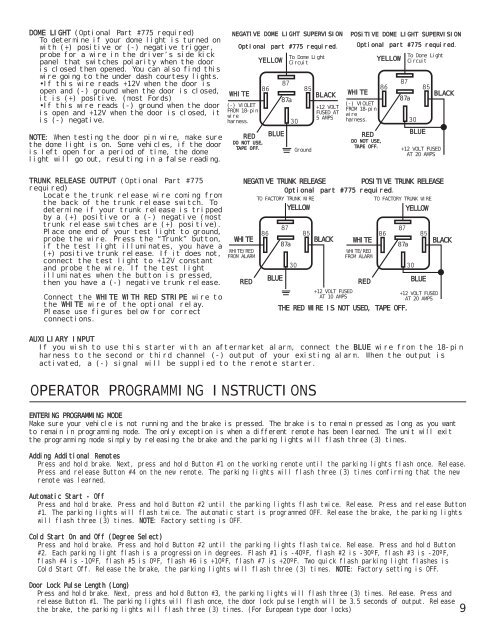
DOME LIGHT (Optional Part #775 required)<br />
To determine if your dome light is turned on<br />
with (+) positive or (-) negative trigger,<br />
probe for a wire in the driver’s side kick<br />
panel that switches polarity when the door<br />
is closed then opened. You can also find this<br />
wire going to the under dash courtesy lights.<br />
•If this wire reads +12V when the door is<br />
open and (-) ground when the door is closed,<br />
it is (+) positive. (most Fords)<br />
•If this wire reads (-) ground when the door<br />
is open and +12V when the door is closed, it<br />
is (-) negative.<br />
NOTE: When testing the door pin wire, make sure<br />
the dome light is on. Some vehicles, if the door<br />
is left open for a period of time, the dome<br />
light will go out, resulting in a false reading.<br />
NEGATIVE DOME LIGHT SUPERVISION<br />
Optional part #775 required.<br />
WHITE<br />
(-) VIOLET<br />
FROM 18-pin<br />
wire<br />
harness.<br />
RED<br />
DO NOT USE,<br />
TAPE OFF.<br />
YELLOW<br />
BLUE<br />
87a<br />
To Dome Light<br />
Circuit<br />
Ground<br />
BLACK<br />
+12 VOLT<br />
FUSED AT<br />
5 AMPS<br />
POSiTIVE DOME LIGHT SUPERVISION<br />
Optional part #775 required.<br />
WHITE<br />
(-) VIOLET<br />
FROM 18-pin<br />
wire<br />
harness.<br />
RED<br />
DO NOT USE,<br />
TAPE OFF.<br />
YELLOW<br />
87a<br />
To Dome Light<br />
Circuit<br />
BLUE<br />
+12 VOLT FUSED<br />
AT 20 AMPS<br />
BLACK<br />
TRUNK RELEASE OUTPUT (Optional Part #775<br />
required)<br />
Locate the trunk release wire coming from<br />
the back of the trunk release switch. To<br />
determine if your trunk release is tripped<br />
by a (+) positive or a (-) negative (most<br />
trunk release switches are (+) positive).<br />
Place one end of your test light to ground,<br />
probe the wire. Press the “Trunk” button,<br />
if the test light illuminates, you have a<br />
(+) positive trunk release. If it does not,<br />
connect the test light to +12V constant<br />
and probe the wire. If the test light<br />
illuminates when the button is pressed,<br />
then you have a (-) negative trunk release.<br />
Connect the WHITE WITH RED STRIPE wire to<br />
the WHITE wire of the optional relay.<br />
Please use figures below for correct<br />
connections.<br />
NEGATIVE TRUNK RELEASE POSITIVE TRUNK RELEASE<br />
Optional part #775 required.<br />
WHITE<br />
WHITE/RED<br />
FROM ALARM<br />
TO FACTORY TRUNK WIRE<br />
+12 VOLT FUSED<br />
AT 10 AMPS<br />
AUXILIARY INPUT<br />
If you wish to use this starter with an aftermarket alarm, connect the BLUE wire from the 18-pin<br />
harness to the second or third channel (-) output of your existing alarm. When the output is<br />
activated, a (-) signal will be supplied to the remote starter.<br />
BLUE<br />
87a<br />
YELLOW<br />
OPERATOR PROGRAMMING INSTRUCTIONS<br />
RED<br />
BLACK<br />
WHITE<br />
WHITE/RED<br />
FROM ALARM<br />
RED<br />
TO FACTORY TRUNK WIRE<br />
87a<br />
THE RED WIRE IS NOT USED, TAPE OFF.<br />
YELLOW<br />
BLUE<br />
+12 VOLT FUSED<br />
AT 20 AMPS<br />
ENTERING PROGRAMMING MODE<br />
Make sure your vehicle is not running and the brake is pressed. The brake is to remain pressed as long as you want<br />
to remain in programming mode. The only exception is when a different remote has been learned. The unit will exit<br />
the programming mode simply by releasing the brake and the parking lights will flash three (3) times.<br />
Adding Additional Remotes<br />
Press and hold brake. Next, press and hold Button #1 on the working remote until the parking lights flash once. Release.<br />
Press and release Button #4 on the new remote. The parking lights will flash three (3) times confirming that the new<br />
remote was learned.<br />
Automatic Start - Off<br />
Press and hold brake. Press and hold Button #2 until the parking lights flash twice. Release. Press and release Button<br />
#1. The parking lights will flash twice. The automatic start is programmed OFF. Release the brake, the parking lights<br />
will flash three (3) times. NOTE: Factory setting is OFF.<br />
Cold Start On and Off (Degree Select)<br />
Press and hold brake. Press and hold Button #2 until the parking lights flash twice. Release. Press and hold Button<br />
#2. Each parking light flash is a progression in degrees. Flash #1 is -40ºF, flash #2 is -30ºF, flash #3 is -20ºF,<br />
flash #4 is -10ºF, flash #5 is 0ºF, flash #6 is +10ºF, flash #7 is +20ºF. Two quick flash parking light flashes is<br />
Cold Start Off. Release the brake, the parking lights will flash three (3) times. NOTE: Factory setting is OFF.<br />
Door Lock Pulse Length (Long)<br />
Press and hold brake. Next, press and hold Button #3, the parking lights will flash three (3) times. Release. Press and<br />
release Button #1. The parking lights will flash once, the door lock pulse length will be 3.5 seconds of output. Release<br />
the brake, the parking lights will flash three (3) times. (For European type door locks) 9<br />
BLACK