Lead-Free Repairing System INSTRUCTION ... - The Allendale Stores
Lead-Free Repairing System INSTRUCTION ... - The Allendale Stores
Lead-Free Repairing System INSTRUCTION ... - The Allendale Stores

You also want an ePaper? Increase the reach of your titles
YUMPU automatically turns print PDFs into web optimized ePapers that Google loves.
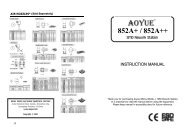
AIR NOZZLES<br />
Sold Separately<br />
Manufacturer:<br />
AOYUE TONGYI INTERNATIONAL LIMITED<br />
Jishui Industrial Zone, Nantou, Zhongshan City,<br />
Guangdong Province, P.R.China<br />
http://www.aoyue.com<br />
12<br />
<strong>Lead</strong>-<strong>Free</strong> <strong>Repairing</strong> <strong>System</strong><br />
<strong>INSTRUCTION</strong> MANUAL<br />
Thank you for purchasing model Int2738 <strong>Lead</strong>free <strong>Repairing</strong> <strong>System</strong>.<br />
Please read manual before using the unit.<br />
Keep manual in an accessible place for future reference.
TABLE OF CONTENTS<br />
Package Inclusion ………………………………..…..… 3<br />
Spare Parts List .…..……………………..…….………… 3<br />
Specifications ……………………………..……………. 4<br />
Features …..………………………………….………….. 5<br />
Safety Precaution ……….……………………….……... 5<br />
Assembly and Preparation …………………………….. 6<br />
Operation Guidelines<br />
Panel Guide ………………………………………. 7<br />
Hot Air Gun …………….………………...……….. 8<br />
Soldering Iron ………………………………..……. 9<br />
Smoke Absorber . ………………………….….….. 9<br />
Maintenance ……………….………………………..…. 10<br />
Replacement Tips ………...………………………….… 11<br />
Air Nozzles ………………...………………………..….… 12<br />
2<br />
REPLACEMENT TIPS<br />
Sold Separately<br />
11
MAINTENANCE<br />
A. Replacing the Hot Air Gun heating element<br />
1. Remove the screws which secure the handle and slide the cord tube.<br />
2. Open the handle. Disconnect the ground wire and remove the pipe.<br />
3. Remove the heating element by disconnecting the terminal.<br />
4. Insert a new heating element and reconnect the terminal. Handle the<br />
heating element with care. Never rub its wire. Reconnect the ground wire<br />
after replacing the element.<br />
5. Assemble the handle in the reverse order of disassembly.<br />
B. Replacing the Soldering Iron tip<br />
1. Always turn the power OFF when removing or inserting a tip.<br />
2. When the tip is hot, hold it with the heat resistant pad and pull it out.<br />
3. Insert the new tip fully into the handle. If the tip is not fully inserted, the<br />
display will show a sensor error when power is turned on.<br />
C. Care for the Soldering Iron tip<br />
Always keep the solderplated section of the tip/nozzle coated with a small<br />
amount of solder. If the tip of the nozzle is coated with oxide, the tip/nozzle’s<br />
heat conductivity will be lowered. Coating the tip with a small amount of<br />
fresh solder ensures maximum heat conductivity.<br />
D. Checking the soldering iron connection cord for damages<br />
1. Remove the soldering tip and the nipple.<br />
2. Push the socket out from inside the handle assembly.<br />
3. Measure the resistance values between the connector and the lead wires at<br />
the socket as follows:<br />
Pin 1 Red ( + )<br />
Pin 3 Blue (ground)<br />
Pin 5 Black ( )<br />
If any value exceeds 0Ω or is ∞, replace the<br />
handle assembly.<br />
10<br />
PACKAGE INCLUSION<br />
2738 Main Station<br />
2630B Soldering Iron Holder<br />
with Solder Wire Stand<br />
Power Cord<br />
SPARE PARTS LIST<br />
939 Vacuum<br />
Suction Pen<br />
Soldering Iron with<br />
Smoke Absorber<br />
Hot Air Gun and<br />
Hot Air Gun Holder<br />
30181X Filter Pads<br />
(6 pcs.)<br />
Part No. Description<br />
10094 Hot air gun heating element<br />
30106S Plastic handle of hot air gun<br />
S009 Hot air gun complete handle<br />
20962 Hot air gun metal pipe<br />
P002 Diaphragm pump<br />
30127S Soldering Iron plastic handle<br />
30150J<br />
Heat Resistant Pad<br />
B011 Soldering Iron complete handle<br />
Air Nozzles<br />
(1124, 1130, 1197,1010,<br />
1313, 1919)<br />
LF2B Tip<br />
G001 IC Popper<br />
3
SPECIFICATIONS<br />
MAIN STATION<br />
Power Input : available in 110V / 220V<br />
Station Dimensions: 188(w) x 126(h) x 250(d) mm<br />
Weight: 5.6Kg<br />
Set the airflow level. You can adjust to your desired airflow by using the<br />
SOLDERING IRON<br />
Power Consumption: 70W<br />
Temperature Range: 250°C 480°C<br />
Heating Element: Ceramic Heater<br />
Output Voltage: 24V<br />
HOT AIR GUN<br />
Power Consumption: 500W<br />
Temperature Range: 100°C 480°C<br />
Heating Element Metal Heating Core<br />
Pump/Motor Type: Diaphragm Pump<br />
Air Capacity: 23 l /min (max)<br />
SMOKE ABSORBER<br />
Vacuum Pressure: 600mm Hg<br />
4<br />
OPERATING PROCEDURE<br />
II. SOLDERING IRON<br />
1. Check if the Soldering Iron is attached properly to the 5pin receptacle and<br />
the vacuum tube is securely connected.<br />
2. Be sure that all function buttons are not pressed.<br />
3. Turn on the Power Switch.<br />
4. Press the SOLDER IRON function switch to turn on the soldering iron<br />
function.<br />
5. When a signal beep is heard, press the Reset button.<br />
6. Solder iron is set to automatically increase temperature to 350°C upon<br />
turning on. Unit will display 350°C for 3 seconds then automatically switch<br />
to display real temperature of the solder iron.<br />
7. Set the temperature. Adjust to your desired temperature, using the<br />
button.<br />
8. Start using when real temperature reaches the set temperature.<br />
Note: Automate soldering time — This is an optional setting. You can<br />
set soldering time to 30 minutes then it automatically turns off.<br />
To activate this function:<br />
1. Press the temperature adjust button of the solder iron in a<br />
simultaneous manner together with the Reset button.<br />
2. <strong>The</strong> display will show indicating that the 30 minute automate<br />
time is turned on.<br />
3. After 30 minutes the buzzer beeps and the temperature decreases to room<br />
temperature. When heating element power has been shutoff, the display<br />
will show<br />
4. To start soldering again, press the Reset button once.<br />
** Automate function is automatically deactivated when temperature is<br />
readjusted or when reset button is pressed.<br />
III. SMOKE ABSORBER<br />
1. Wait until the soldering iron reaches the set temperature and stabilizes.<br />
2. Set Vacuum Control to smoke absorber.<br />
3. Press the SMOKE ABSORBER<br />
function switch.<br />
4. Fumes absorbed will pass through a filter and be blown out thru the hot air<br />
gun. So the smoke that is blown out from the hot air gun during soldering<br />
is already filtered.<br />
IMPORTANT: Filters should be cleaned and replaced regularly so that it<br />
would not clog up the air path and will effectively clean the toxic fumes<br />
produced during soldering process.<br />
9
OPERATING PROCEDURE<br />
I. HOT AIR GUN<br />
1. Be sure that all function buttons are not pressed.<br />
2. Turn on the Power Switch.<br />
3. Set Vacuum Control to SMD rework.<br />
4. Press the HOT AIR GUN function switch to turn on hot air reworking<br />
function.<br />
5. Set the airflow level. You can adjust to your desired airflow by using the<br />
buttons. Airflow range is from 15 – 99.<br />
6. Set the temperature. Adjust to your desired working temperature, using<br />
the button.<br />
7. When airflow and temperature has been set, wait until the real temperature<br />
reaches the set temperature before using the Hot Air Gun.<br />
8. After using the Hot Air Gun, do not immediately turn off the power switch,<br />
instead turn off the hot air gun function switch to activate the autocool off<br />
function of the unit. This is for safety and proper maintenance of the unit.<br />
IMPORTANT: Remember to set airflow level first before setting the<br />
temperature so that it would not damage the heating element, causing<br />
it to be burnt out prematurely.<br />
IMPORTANT: Airflow level should be set accordingly, working with low<br />
airflow and high temperature often causes heating element to get<br />
easily burnt.<br />
Note: Auto-cool off function — after turning off the hot air gun function<br />
switch, unit starts to blow cool air to decease temperature of the hot air<br />
gun, hot air gun function will automatically be turned off when the hot<br />
air gun temperature reached a safe level of 90°C. (Auto-cool off will not<br />
function when main power switch is turned off)<br />
Note: Auto-sleep mode — unit is also programmed to have an auto-<br />
sleep mode, this is activated when hot air gun is turned on but is<br />
placed on the hot air gun holder and not put to use for fifteen minutes,<br />
temperature automatically decreases and eventually turns to sleep<br />
mode. When the handle is held again the unit will go back to its<br />
previous setting.<br />
8<br />
FEATURES<br />
◆ <strong>Lead</strong>free, smokefree, 3 in 1 multifunctional repairing system. Combines the<br />
function of a Hot Air Gun, a Soldering Iron and a Smoke Absorber.<br />
◆ Microprocessor controlled ESD safe unit. All digital display of hot air<br />
temperature, soldering iron temperature and air pressure with touch type<br />
panel controls.<br />
◆ Unique 15minute standby auto sleep mode. Returns to previous setting<br />
when the handle is held up again. Programmable auto reworking time from<br />
20 to 9999 seconds.<br />
◆ Designed with an autocool off process. Upon turning the unit off, it starts to<br />
blow cold air until it reaches a safe temperature of 85 degrees, this is to<br />
ensure safety and to prolong usage life of the heating element.<br />
◆ Compound tip designed for efficiency. Replacement of tips with easy slip in/<br />
out method.<br />
◆ Creative builtin smoke extractor that absorbs the fumes created at the<br />
source. Eliminates the space hindering smoke absorbing units yet allowing a<br />
healthy environment.<br />
◆ Compatible with various type of air nozzles. Please see page #12 for list of<br />
available air nozzles.<br />
◆ Compatible with different kind of tips. Please see p#11 for list of replacement<br />
tips.<br />
SAFETY PRECAUTION<br />
CAUTION: Misuse may cause extensive damage to the unit.<br />
For your own safety, be sure to comply with the following precautions.<br />
◆ Check every component after opening the package whether everything is in<br />
good working condition. If there are any damages suspected , don’t use the<br />
item and contact your dealer.<br />
◆ When moving the unit to another location, be sure to turn off the power<br />
switch and remove the plug.<br />
◆ Do not strike or subject to physical shock the main unit, hot air gun, soldering<br />
iron or any parts of the system. Use carefully and lightly so as not to<br />
damage any parts.<br />
◆ Be sure the unit is grounded. Always connect power to a grounded<br />
receptacle.<br />
5
ASSEMBLY AND PREPARATION<br />
A. Soldering Iron<br />
1. Install solder wire to the solder iron holder. (Figure 1)<br />
2. Attach the soldering iron cord assembly to the 5pin output at the<br />
lower center area of the main unit.<br />
3. Place soldering iron to the soldering iron stand as shown in<br />
Figure 1.<br />
B. Smoke Absorber<br />
Attach the smoke absorbing tube to the vacuum cap. Make sure that<br />
the cord connections are free from any tangles.<br />
C. Hot Air Gun<br />
<strong>The</strong> Hot Air gun holder was installed on the station upside down for<br />
packaging purpose. To set up the Hot Air Gun holder, loosen the<br />
screw that holds it on the left side of the station. After loosening both<br />
screws, turn the holder ride side up, then tighten the screws back.<br />
Place the hot air gun in the sensor controlled holder to prepare for<br />
usage.<br />
Figure 1. Soldering Iron stand with solder wire holder<br />
6<br />
1<br />
3<br />
4<br />
5<br />
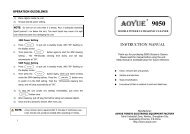
PANEL GUIDE<br />
2<br />
6 7 8<br />
1 — Airflow gauge<br />
2 — Hot air gun temperature adjustment button<br />
3 — Hot air gun airflow adjustment button<br />
4 — Soldering iron temperature adjustment button<br />
5 — Hot air gun connecting outlet<br />
6 — Vacuum Cap<br />
7 — Soldering iron receptacle<br />
8 — Main power switch<br />
9 — Digital display of hot air gun temperature (actual and set)<br />
actual temperature<br />
temperature being set<br />
cooling down<br />
sleep (standby) and off mode<br />
10 — Hot air gun function switch<br />
11 — Digital display of airflow<br />
actual airflow<br />
airflow being set<br />
12 — Reset button for all settings<br />
13 — Soldering iron temperature (actual and set)<br />
14 — Soldering iron function switch<br />
15 — Vacuum control<br />
Smoke Absorber when using smoke absorbing function of solder iron<br />
SMD rework when using the hot air gun<br />
10<br />
12<br />
14<br />
15<br />
9<br />
11<br />
13<br />
7