Bedside Light Alarm FL5 - Sarabec
Bedside Light Alarm FL5 - Sarabec
Bedside Light Alarm FL5 - Sarabec

You also want an ePaper? Increase the reach of your titles
YUMPU automatically turns print PDFs into web optimized ePapers that Google loves.
<strong>Bedside</strong> <strong>Light</strong> <strong>Alarm</strong> FL6<br />
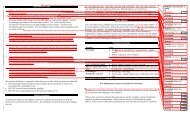
SAFETY PRECAUTIONS<br />
The manufacturer cannot be held responsible for damage which is caused by not using this<br />
unit in compliance with the safety precautions.<br />
• Unplug the light unit from the mains supply before changing or fitting a light bulb or lamp shade.<br />
• Do not open the casing of the unit at any time, NO user serviceable parts can be found inside.<br />
• Do not expose the unit or leads to rain or any other source of moisture.<br />
United Kingdom connection to mains supply<br />
• This apparatus must be protected by a 3 amp fuse if a 13 amp (BS1363) plug is used. Be sure to<br />
replace the fuse only with an identical approved type, as originally fitted, and to replace the fuse<br />
cover.<br />
• IMPORTANT: The wires in this mains lead are coloured in accordance with the following code<br />
• Blue: Neutral Brown: Live.<br />
• If you need to change the mains plug supplied the colours of the wires in the mains lead of this<br />
apparatus may not correspond with the coloured markings identifying the terminals in your plug,<br />
so proceed as follows:<br />
• The wire which is coloured BLUE must be connected to the terminal marked with the letter N or<br />
coloured BLACK. The wire coloured BROWN must be connected to the terminal which is<br />
marked with the letter L or coloured RED. DO NOT make any connection to the terminal which<br />
is marked with the letter E or coloured GREEN.<br />
IF IN DOUBT - SEEK EXPERT ADVICE<br />
Warning :<br />
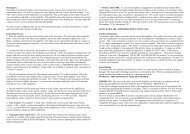
Instructions for use<br />
Unplug the light unit from the mains supply before changing or fitting a light<br />
bulb or lamp shade<br />
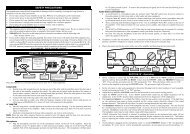
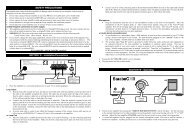
Plug one end of the connecting lead into the socket marked , on the rear of the<br />
light unit. Plug the other end into the socket on the rear of the alarm clock. Put the light<br />
bulb into the bulb holder on the light unit.<br />
Plug the two-pin socket of the mains connecting lead into the socket on the rear of the light<br />
unit. Plug the mains plug into a mains socket and switch it on. The red light marked<br />
will show on the front of the light unit. If the mains plug is the wrong type and<br />
you need to change it, please follow the wiring instructions below.<br />
A vibrating pad may also be used with the bedside light alarm. This may be placed under a<br />
sheet beneath your pillow. The vibrating pad is plugged into the socket marked<br />
. The vibrating pad will vibrate whenever the light flashes. If you would like<br />
one of these vibrating pads please order as .<br />
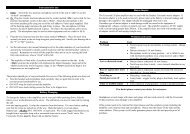
Problems and Cures<br />
Problem<br />
Cure<br />
System not working & red • Mains connecting lead not plugged in firmly or not switched<br />
light not lit.<br />
on at socket.<br />
<strong>Light</strong> not working. • Faulty light bulb.<br />
Clock not working, • Clock connecting lead not plugged in at either the light unit<br />
second-hand not moving. or the clock.<br />
• Faulty clock.<br />
Clock seems to lose time • Check that alarm is not unplugged to use mains socket for a<br />
occasionally.<br />
Hoover, hair dryer, etc.<br />
If in doubt please contact your dealer for assistance.<br />
If the system needs to be returned for repair, the alarm clock, light unit, clock connecting<br />
lead and mains lead connecting lead should all be returned.<br />
Please also state the nature of the fault and the return address. If the system is still under<br />
guarantee please state this and provide proof of purchase.<br />
Accessories and Spares<br />
A full list of accessories and spares with prices is shown in our current product guide,<br />
available on request. Please check the current price and quote both the description and part<br />
number when ordering.<br />
Part No. Description<br />
102-904 <strong>Light</strong> alarm vibrator for use with <strong>Bedside</strong> <strong>Light</strong> <strong>Alarm</strong> FL6<br />
202-102 <strong>Alarm</strong> Clock<br />
353-038 <strong>Alarm</strong> Clock connecting lead<br />
352-320 Mains lead<br />
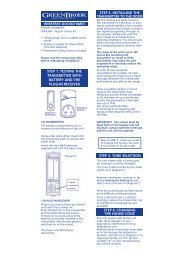
To use the bedside light alarm to wake you up, set the alarm (see clock instructions). Set the<br />
light switch marked on the light unit to the position. When the alarm<br />
goes off, the light will flash on and off until the alarm is switched off at the clock.<br />
The bedside light alarm can also be used as a reading light by moving the light switch<br />
marked to the position. If the alarm has been set and goes off, the light<br />
will flash off and on until the alarm is switched off at the clock.
®<br />
<strong>Bedside</strong> <strong>Light</strong> <strong>Alarm</strong><br />
Model FL6<br />
Owner’s Manual<br />
Introduction<br />
The <strong>Bedside</strong> <strong>Light</strong> <strong>Alarm</strong> enables you to wake up easily. A traditional alarm clock is<br />
connected to a light unit, which flashes when the alarm time is reached. The system can also<br />
be used as a bedside light. An optional vibrating pad is available to wake even the heaviest<br />
sleeper.<br />
The <strong>Bedside</strong> <strong>Light</strong> <strong>Alarm</strong> is supplied ready for use with a quartz alarm clock, a light unit<br />
which uses a standard light bulb (maximum 60 watts), a clock connecting lead, a light bulb<br />
(60 Watt) and a mains connecting lead. A lampshade is not supplied, but the light unit is<br />
designed to take normal shades.<br />
The system is completely mains powered. The clock connecting lead and mains connecting<br />
lead must be left plugged in at ALL times with the mains switched on. It is NOT possible to<br />
operate the clock by using a battery. Please read the operating instructions packed with the<br />
clock before use.<br />
Specification<br />
Power Supply<br />
• 230 V ~ 50Hz 15VA max. (excluding bulb)<br />
• Bulb rating 60W max.<br />
Product conforms to the provisions of the following European Union Directives :<br />
• 73/23 Low Voltage Directive<br />
• 89/336 & 92/31 Electro Magnetic Compatibility Directives<br />
• 93/68 CE Marking Directive<br />
is a mark of <strong>Sarabec</strong> Ltd.<br />
© <strong>Sarabec</strong> Ltd 103-xxx.002 1098 FL6 0198.doc<br />
<strong>Sarabec</strong> Limited 15 High Force Road Middlesbrough TS2 1RH<br />
Telephone (01642) 247789 Fax (01642) 230827 Text (01642) 251310