to download the instruction manual - Sarabec
to download the instruction manual - Sarabec
to download the instruction manual - Sarabec

Create successful ePaper yourself
Turn your PDF publications into a flip-book with our unique Google optimized e-Paper software.
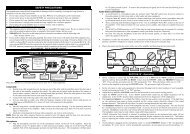
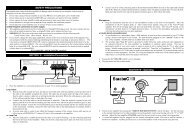
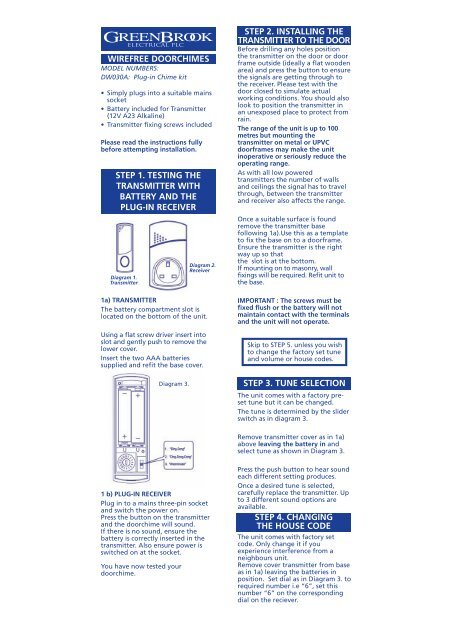
WIREFREE DOORCHIMESMODEL NUMBERS:DW030A: Plug-in Chime kit• Simply plugs in<strong>to</strong> a suitable mainssocket• Battery included for Transmitter(12V A23 Alkaline)• Transmitter fixing screws includedPlease read <strong>the</strong> <strong>instruction</strong>s fullybefore attempting installation.STEP 1. TESTING THETRANSMITTER WITHBATTERY AND THEPLUG-IN RECEIVERDiagram 1.TransmitterDiagram 3.Diagram 2.Receiver1a) TRANSMITTERThe battery compartment slot islocated on <strong>the</strong> bot<strong>to</strong>m of <strong>the</strong> unit.Using a flat screw driver insert in<strong>to</strong>slot and gently push <strong>to</strong> remove <strong>the</strong>lower cover.Insert <strong>the</strong> two AAA batteriessupplied and refit <strong>the</strong> base cover.STEP 2. INSTALLING THETRANSMITTER TO THE DOORBefore drilling any holes position<strong>the</strong> transmitter on <strong>the</strong> door or doorframe outside (ideally a flat woodenarea) and press <strong>the</strong> but<strong>to</strong>n <strong>to</strong> ensure<strong>the</strong> signals are getting through <strong>to</strong><strong>the</strong> receiver. Please test with <strong>the</strong>door closed <strong>to</strong> simulate actualworking conditions. You should alsolook <strong>to</strong> position <strong>the</strong> transmitter inan unexposed place <strong>to</strong> protect fromrain.The range of <strong>the</strong> unit is up <strong>to</strong> 100metres but mounting <strong>the</strong>transmitter on metal or UPVCdoorframes may make <strong>the</strong> unitinoperative or seriously reduce <strong>the</strong>operating range.As with all low poweredtransmitters <strong>the</strong> number of wallsand ceilings <strong>the</strong> signal has <strong>to</strong> travelthrough, between <strong>the</strong> transmitterand receiver also affects <strong>the</strong> range.Once a suitable surface is foundremove <strong>the</strong> transmitter basefollowing 1a).Use this as a template<strong>to</strong> fix <strong>the</strong> base on <strong>to</strong> a doorframe.Ensure <strong>the</strong> transmitter is <strong>the</strong> rightway up so that<strong>the</strong> slot is at <strong>the</strong> bot<strong>to</strong>m.If mounting on <strong>to</strong> masonry, wallfixings will be required. Refit unit <strong>to</strong><strong>the</strong> base.IMPORTANT : The screws must befixed flush or <strong>the</strong> battery will notmaintain contact with <strong>the</strong> terminalsand <strong>the</strong> unit will not operate.Skip <strong>to</strong> STEP 5. unless you wish<strong>to</strong> change <strong>the</strong> fac<strong>to</strong>ry set tuneand volume or house codes.STEP 3. TUNE SELECTIONThe unit comes with a fac<strong>to</strong>ry presettune but it can be changed.The tune is determined by <strong>the</strong> sliderswitch as in diagram 3.Remove transmitter cover as in 1a)above leaving <strong>the</strong> battery in andselect tune as shown in Diagram 3.1 b) PLUG-IN RECEIVERPlug in <strong>to</strong> a mains three-pin socketand switch <strong>the</strong> power on.Press <strong>the</strong> but<strong>to</strong>n on <strong>the</strong> transmitterand <strong>the</strong> doorchime will sound.If <strong>the</strong>re is no sound, ensure <strong>the</strong>battery is correctly inserted in <strong>the</strong>transmitter. Also ensure power isswitched on at <strong>the</strong> socket.You have now tested yourdoorchime.Press <strong>the</strong> push but<strong>to</strong>n <strong>to</strong> hear soundeach different setting produces.Once a desired tune is selected,carefully replace <strong>the</strong> transmitter. Up<strong>to</strong> 3 different sound options areavailable.STEP 4. CHANGINGTHE HOUSE CODEThe unit comes with fac<strong>to</strong>ry setcode. Only change it if youexperience interference from aneighbours unit.Remove cover transmitter from baseas in 1a) leaving <strong>the</strong> batteries inposition. Set dial as in Diagram 3. <strong>to</strong>required number i.e “6”, set thisnumber “6” on <strong>the</strong> correspondingdial on <strong>the</strong> reciever.
Press push but<strong>to</strong>n on <strong>the</strong> transmitter<strong>to</strong> check that <strong>the</strong> chime works andcarefully replace transmitter asabove.STEP 5. TESTINGTest your doorchime by plugging <strong>the</strong>receiver in different rooms andvarying distances from <strong>the</strong>transmitter <strong>to</strong> ascertain <strong>the</strong>coverage available in your home,this way you are unlikely <strong>to</strong> missany visi<strong>to</strong>rs.6. TROUBLE SHOOTINGFault : Chime does not soundCause :• Check batteries are not exhaustedand <strong>the</strong>y have been inserted <strong>the</strong>correct way round. Do not mixdifferent types of batteries.• Re-check <strong>the</strong> dials and switches in<strong>the</strong> transmitter and receiver if <strong>the</strong>house codes have been changed.• Move <strong>the</strong> receiver nearer <strong>the</strong>transmitter.If after going through <strong>the</strong> troubleshooting section, you still experiencedifficulty please ring us on -GreenBrook‘s Help Line01279 772 750during office hours quoting<strong>the</strong> model numberGUARANTEEYour doorchime is guaranteed for 12months from date of purchase.Please retain till receipt as proof ofpurchase. This is in addition <strong>to</strong> yourstatu<strong>to</strong>ry rights.REMARKSFor indoor use only.No naked flame sources, such aslighted candles being placed near<strong>the</strong> unit.The unit should not be exposed<strong>to</strong> dripping or splashing and noobjects filledwith liquids, such as beingplaced near vases.Please dispose of old,defectivebatteries in an environmentallyfriendly manner in accordancewith <strong>the</strong> relevant legislation.This Symbol indicates seperatecollection of electronic/electricalequipment.PLEASE KEEP THESEINSTRUCTIONS SAFEFOR FUTURE REFERENCEWest Road,Harlow,EssexCM20 2BGTel 01279 772 750Fax 01279 635 285Email: sales@greenbrook.co.ukWeb: www.greenbrook.co.ukIssue No: 701325